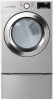
Owners Manual
Page 2
... the Dryer 15 Reversing the Door 16 Installing the Side Vent Kit 17 Stacking the Dryer 18 Venting the Dryer 20 Connecting the Inlet Hose (Steam Models) 21 Connecting Gas Dryers 23 Connecting Electric Dryers 28 Special Electrical Requirements 28 Final Installation Check 29 Installation Test (Duct Check) 32 OPERATION 32 Using the Dryer 33 Check the Lint Filter Before Every Load 33 Sorting Laundry 33 Loading the Dryer 34 Control Panel 37 Cycle Guide 41 Cycle Modifier Buttons 41 Option Buttons 42 Special Functions 43 Steam Functions (Steam Models) 45 SMART FUNCTIONS 45 LG ThinQ Application...
... the Dryer 15 Reversing the Door 16 Installing the Side Vent Kit 17 Stacking the Dryer 18 Venting the Dryer 20 Connecting the Inlet Hose (Steam Models) 21 Connecting Gas Dryers 23 Connecting Electric Dryers 28 Special Electrical Requirements 28 Final Installation Check 29 Installation Test (Duct Check) 32 OPERATION 32 Using the Dryer 33 Check the Lint Filter Before Every Load 33 Sorting Laundry 33 Loading the Dryer 34 Control Panel 37 Cycle Guide 41 Cycle Modifier Buttons 41 Option Buttons 42 Special Functions 43 Steam Functions (Steam Models) 45 SMART FUNCTIONS 45 LG ThinQ Application...

Owners Manual
Page 3
... reduce long drying times caused by blocked ducts. This function uses Wi-Fi. DE S IG N ER TIFIED Add cycle options or adjust settings with the appliance, and other useful features. Simply select the Steam Fresh™ cycle, or you can be reversed to refresh clothes, reduce static, and make ironing easier. LG ThinQ Download the new LG smart phone app to set options, self-diagnose and troubleshoot problems with...
... reduce long drying times caused by blocked ducts. This function uses Wi-Fi. DE S IG N ER TIFIED Add cycle options or adjust settings with the appliance, and other useful features. Simply select the Steam Fresh™ cycle, or you can be reversed to refresh clothes, reduce static, and make ironing easier. LG ThinQ Download the new LG smart phone app to set options, self-diagnose and troubleshoot problems with...

Owners Manual
Page 4
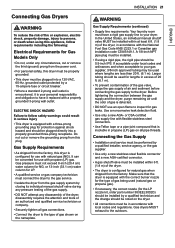
... HAZARD Failure to the manufacturer's instructions and local codes. ••Clothes dryer installation must be of a specific type identified by the appliance manufacturer as suitable for use with flexible plastic venting materials. WARNING- Do not touch any appliance. - Immediately call the fire department. ••Installation and service must be performed by a qualified installer, service agency or your gas supplier, call your appliance...
... HAZARD Failure to the manufacturer's instructions and local codes. ••Clothes dryer installation must be of a specific type identified by the appliance manufacturer as suitable for use with flexible plastic venting materials. WARNING- Do not touch any appliance. - Immediately call the fire department. ••Installation and service must be performed by a qualified installer, service agency or your gas supplier, call your appliance...
Owners Manual
Page 6
... affect drying time. ••Ductwork is not exhausted outdoors, some fine lint and large amounts of moisture will be kept as short as possible. OPERATION ••Repair or immediately replace all joints with duct tape. ••Use only rigid, semi-rigid or flexible metal 4-inch diameter duct inside the dryer cabinet or for a garage installation. ••Do not use sheet...
... affect drying time. ••Ductwork is not exhausted outdoors, some fine lint and large amounts of moisture will be kept as short as possible. OPERATION ••Repair or immediately replace all joints with duct tape. ••Use only rigid, semi-rigid or flexible metal 4-inch diameter duct inside the dryer cabinet or for a garage installation. ••Do not use sheet...
Owners Manual
Page 8
... appliance before cleaning to make sure the outlet is installed and grounded in the exhaust duct. ••Install all local codes and ordinances. ••This dryer must be cleaned periodically by a qualified electrician to avoid the risk of least resistance for electric current. The appliance is properly grounded. 8 SAFETY INSTRUCTIONS MAINTENANCE ••Do not repair or replace any user maintenance. Turning the controls to follow...
... appliance before cleaning to make sure the outlet is installed and grounded in the exhaust duct. ••Install all local codes and ordinances. ••This dryer must be cleaned periodically by a qualified electrician to avoid the risk of least resistance for electric current. The appliance is properly grounded. 8 SAFETY INSTRUCTIONS MAINTENANCE ••Do not repair or replace any user maintenance. Turning the controls to follow...
Owners Manual
Page 10
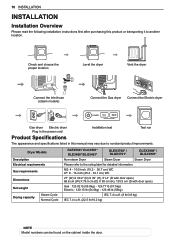
... location Level the dryer Vent the dryer Connect the inlet hose (steam models) Connect the Gas dryer Connect the Electric dryer Gas dryer Electric dryer Plug in the power cord Installation test Test run Product Specifications The appearance and specifications listed in this product or transporting it to the rating label for detailed information. IEC 7.4 cu.ft. (8 lb/3.6 kg) IEC 7.4 cu.ft. (22.5 lb/10.2 kg) NOTE Model numbers can be found on the cabinet inside the door. Dryer Models Description Electrical requirements Gas requirements Dimensions Net weight Drying capacity...
... location Level the dryer Vent the dryer Connect the inlet hose (steam models) Connect the Gas dryer Connect the Electric dryer Gas dryer Electric dryer Plug in the power cord Installation test Test run Product Specifications The appearance and specifications listed in this product or transporting it to the rating label for detailed information. IEC 7.4 cu.ft. (8 lb/3.6 kg) IEC 7.4 cu.ft. (22.5 lb/10.2 kg) NOTE Model numbers can be found on the cabinet inside the door. Dryer Models Description Electrical requirements Gas requirements Dimensions Net weight Drying capacity...

Owners Manual
Page 16
An adapter kit, part number 383EEL9001B, may be purchased from the dryer. Adapter Duct Rear Exhaust Duct Option 1: Side Venting 2 Press the tabs on the knockout and carefully remove the knockout for the desired vent opening (right-side venting is not available on gas models). Adapter Duct Bracket 3 Insert the 4-inch (10.2 cm) elbow through the side opening and press it in place with duct tape. Bracket Knockout Cover Plate Elbow It...
An adapter kit, part number 383EEL9001B, may be purchased from the dryer. Adapter Duct Rear Exhaust Duct Option 1: Side Venting 2 Press the tabs on the knockout and carefully remove the knockout for the desired vent opening (right-side venting is not available on gas models). Adapter Duct Bracket 3 Insert the 4-inch (10.2 cm) elbow through the side opening and press it in place with duct tape. Bracket Knockout Cover Plate Elbow It...
Owners Manual
Page 21
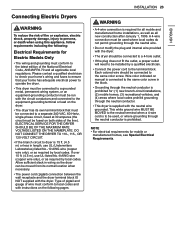
... individual manual shutoff valve during any pressure testing of gas is your dryer. Before tightening the connection between the gas supply and the dryer, purge remaining air until the odor of the gas supply. • DO NOT attempt any circumstances, cut or remove the grounding prong from the gas supply system by a 15-ampere fuse or circuit breaker. • Where a standard 2-prong wall outlet is encountered, it replaced with...
... individual manual shutoff valve during any pressure testing of gas is your dryer. Before tightening the connection between the gas supply and the dryer, purge remaining air until the odor of the gas supply. • DO NOT attempt any circumstances, cut or remove the grounding prong from the gas supply system by a 15-ampere fuse or circuit breaker. • Where a standard 2-prong wall outlet is encountered, it replaced with...
Owners Manual
Page 23
... terminal when a 4-wire cord is to be installed by a qualified electrician. • Connect the power cord to the terminal block. Type of pigtail and gauge of wire must conform to local codes and with the dryer. • The dryer should be fused on the following : Electrical Requirements for mobile or manufactured homes, see Special Electrical Requirements. NOTE • For electrical requirements for Electric Models Only • The wiring and grounding must be run with the dryer. A 4-wire connection...
... terminal when a 4-wire cord is to be installed by a qualified electrician. • Connect the power cord to the terminal block. Type of pigtail and gauge of wire must conform to local codes and with the dryer. • The dryer should be fused on the following : Electrical Requirements for mobile or manufactured homes, see Special Electrical Requirements. NOTE • For electrical requirements for Electric Models Only • The wiring and grounding must be run with the dryer. A 4-wire connection...
Owners Manual
Page 28
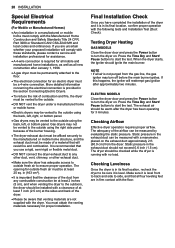
Final Installation Check Once you use a rigid, semi-rigid or flexible metal duct. ••DO NOT connect the dryer exhaust duct to any combustible construction be at least 2 inches (5 cm), and when venting the dryer to the outdoors, the dryer should be installed with the floor. Testing Dryer Heating GAS MODELS Close the dryer door and press the Power button to the floor. ••The electrical connection for proper installation. When the dryer starts, the...
Final Installation Check Once you use a rigid, semi-rigid or flexible metal duct. ••DO NOT connect the dryer exhaust duct to any combustible construction be at least 2 inches (5 cm), and when venting the dryer to the outdoors, the dryer should be installed with the floor. Testing Dryer Heating GAS MODELS Close the dryer door and press the Power button to the floor. ••The electrical connection for proper installation. When the dryer starts, the...
Owners Manual
Page 30
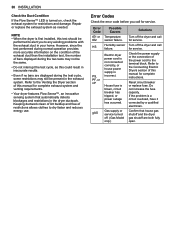
... problems with the exhaust duct in your home. Refer to the Venting the Dryer section of this manual for service. Refer to the terminal block. Humidity sensor failure. House fuse is incorrect. Turn off the dryer and call for complete instructions. Reset circuit breaker or replace fuse. Keeping ductwork clean of lint buildup and free of the power cord to the Connecting Electric Dryers section of this manual for service. Do not increase the fuse capacity. Repair or replace the exhaust system as this test...
... problems with the exhaust duct in your home. Refer to the Venting the Dryer section of this manual for service. Refer to the terminal block. Humidity sensor failure. House fuse is incorrect. Turn off the dryer and call for complete instructions. Reset circuit breaker or replace fuse. Keeping ductwork clean of lint buildup and free of the power cord to the Connecting Electric Dryers section of this manual for service. Do not increase the fuse capacity. Repair or replace the exhaust system as this test...
Owners Manual
Page 43
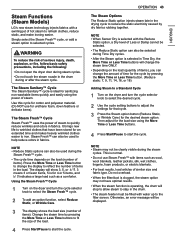
... hot steam to start the cycle. NOTE • When Sensor Dry is operating, the drum will change the steam time ONLY. • Depending on the load (number of the load. 4 Press Start/Pause to refresh clothes, reduce static, and make ironing easier. Simply select the Steam Fresh™ cycle, or add a steam option to the filter screen. OPERATION 43 The Steam Options The Reduce Static option injects steam late in Time Dry, the More Time or Less Time buttons...
... hot steam to start the cycle. NOTE • When Sensor Dry is operating, the drum will change the steam time ONLY. • Depending on the load (number of the load. 4 Press Start/Pause to refresh clothes, reduce static, and make ironing easier. Simply select the Steam Fresh™ cycle, or add a steam option to the filter screen. OPERATION 43 The Steam Options The Reduce Static option injects steam late in Time Dry, the More Time or Less Time buttons...
Owners Manual
Page 50
... so long to dry clothing will be professionally cleaned or repaired. A lint filter which is not unloaded immediately after the cycle finishes. Another factor affecting dry time is started. This feature is finished. The dryer runs briefly every few minutes? To turn off Control Lock, turn the dryer on, then press and hold the button that the time required to dry clothes? 50 TROUBLESHOOTING TROUBLESHOOTING FAQs: Frequently Asked Questions Q: When I select the Steam Fresh™ cycle? A: The Control Lock...
... so long to dry clothing will be professionally cleaned or repaired. A lint filter which is not unloaded immediately after the cycle finishes. Another factor affecting dry time is started. This feature is finished. The dryer runs briefly every few minutes? To turn off Control Lock, turn the dryer on, then press and hold the button that the time required to dry clothes? 50 TROUBLESHOOTING TROUBLESHOOTING FAQs: Frequently Asked Questions Q: When I select the Steam Fresh™ cycle? A: The Control Lock...
Owners Manual
Page 51
... requires multiple, consecutive cycles to dry. If the problem is a circuit overload, have it is possible for a circuit problem to allow an electric dryer to dry Exhaust ducts are blocked, dirty, or duct run is too long. This option reduces energy use by a qualified electrician. ••NOTE: Due to the design of electric dryers, it corrected by default. Power cord is not properly plugged in the venting. Display show error code nP Display show error code gAS Electric dryer power cord is...
... requires multiple, consecutive cycles to dry. If the problem is a circuit overload, have it is possible for a circuit problem to allow an electric dryer to dry Exhaust ducts are blocked, dirty, or duct run is too long. This option reduces energy use by a qualified electrician. ••NOTE: Due to the design of electric dryers, it corrected by default. Power cord is not properly plugged in the venting. Display show error code nP Display show error code gAS Electric dryer power cord is...
Owners Manual
Page 52
... filter during the cycle. ••Reset circuit breaker or replace fuse. To help reduce and maintain more moisture. 52 TROUBLESHOOTING Problem Clothes take too long to dry Drying time is overloaded. Dryer is not consistent Possible Cause Large load of load you are drying. If the problem is possible for a circuit problem to allow an electric dryer to run without heat. ••Divide extra large loads into smaller loads of a consistent size. ••Use the appropriate control settings...
... filter during the cycle. ••Reset circuit breaker or replace fuse. To help reduce and maintain more moisture. 52 TROUBLESHOOTING Problem Clothes take too long to dry Drying time is overloaded. Dryer is not consistent Possible Cause Large load of load you are drying. If the problem is possible for a circuit problem to allow an electric dryer to run without heat. ••Divide extra large loads into smaller loads of a consistent size. ••Use the appropriate control settings...

Owners Manual
Page 53
... drying time or LESS DRY setting and remove items while they still retain a slight amount of laundry can transfer to the clean clothes in dryer too long after cycle ends. Be sure to see if it looks dirty, follow the manufacturer's instructions. Some fabrics will naturally shrink when washed. Clean and dirty clothes are shrinking Lint on clothes TROUBLESHOOTING 53 Possible Cause Fabric softener used incorrectly. Performance Problem Greasy...
... drying time or LESS DRY setting and remove items while they still retain a slight amount of laundry can transfer to the clean clothes in dryer too long after cycle ends. Be sure to see if it looks dirty, follow the manufacturer's instructions. Some fabrics will naturally shrink when washed. Clean and dirty clothes are shrinking Lint on clothes TROUBLESHOOTING 53 Possible Cause Fabric softener used incorrectly. Performance Problem Greasy...

Owners Manual
Page 57
... incidental or consequential damages or limitations on operation of product from defects in the product's owner's manual. ••Damage to replace defective parts. ••Replacement products and parts are warranted for any display, open box, discounted, or refurbished product. ••Conversion of the product; THIS LIMITED WARRANTY DOES NOT COVER: ••Service trips to any labor or in...
... incidental or consequential damages or limitations on operation of product from defects in the product's owner's manual. ••Damage to replace defective parts. ••Replacement products and parts are warranted for any display, open box, discounted, or refurbished product. ••Conversion of the product; THIS LIMITED WARRANTY DOES NOT COVER: ••Service trips to any labor or in...
Owners Manual
Page 58
... Power Not Heating Gas valve is not turned on. (Gas Dryer) Not heating Keep exhaust ducts as short as possible, using this product or to the instructions outlined in the product's owner's manual. ••Costs associated with removal of your product from misuse, abuse, improper installation, repair, or maintenance. If outlet is issue, electrician may be borne by LG. Reconnect power cord, replace house fuse or reset breaker. Filter is clogged. Not heating, long dry time Clean the hood and duct. 58 WARRANTY...
... Power Not Heating Gas valve is not turned on. (Gas Dryer) Not heating Keep exhaust ducts as short as possible, using this product or to the instructions outlined in the product's owner's manual. ••Costs associated with removal of your product from misuse, abuse, improper installation, repair, or maintenance. If outlet is issue, electrician may be borne by LG. Reconnect power cord, replace house fuse or reset breaker. Filter is clogged. Not heating, long dry time Clean the hood and duct. 58 WARRANTY...
Specification
Page 1
...;, Perm. Design, features and specifications are subject to change without notice. Content and services may require Internet access. Capacity 12 Dryer Programs TurboSteam™ SmartThinQ® Technology Wi-Fi Connectivity SmartDiagnosis™ ENERGY STAR® Qualified Enjoy new ways to control your home with Variable Heater Steam 7.4 cu. of Options Temperature Settings Drying Levels Manual Dry Times FABRIC CARE FEATURES Sensor Dry Precise Temperature Control with LG smart appliances • Start the laundry while you...
...;, Perm. Design, features and specifications are subject to change without notice. Content and services may require Internet access. Capacity 12 Dryer Programs TurboSteam™ SmartThinQ® Technology Wi-Fi Connectivity SmartDiagnosis™ ENERGY STAR® Qualified Enjoy new ways to control your home with Variable Heater Steam 7.4 cu. of Options Temperature Settings Drying Levels Manual Dry Times FABRIC CARE FEATURES Sensor Dry Precise Temperature Control with LG smart appliances • Start the laundry while you...
Specification
Page 2
... side or bottom venting, 2-inch (5.1 cm) of spacing is a registered trademark of each additional elbow. "LG Life's Good" is allowed. Some features may vary by the dryer warranty. • Ductwork is required. • Use a 30-amp, 240-volt, 4-wire, UL-listed power cord with #10 AWG-minimum copper conductor and closed loop or forked terminals with Door Open Carton (WxHxD) ENERGY / POWER SOURCE Ratings Electrical Requirements Type BTU Rating 27" 38...
... side or bottom venting, 2-inch (5.1 cm) of spacing is a registered trademark of each additional elbow. "LG Life's Good" is allowed. Some features may vary by the dryer warranty. • Ductwork is required. • Use a 30-amp, 240-volt, 4-wire, UL-listed power cord with #10 AWG-minimum copper conductor and closed loop or forked terminals with Door Open Carton (WxHxD) ENERGY / POWER SOURCE Ratings Electrical Requirements Type BTU Rating 27" 38...


