Owner's Manual
Page 1
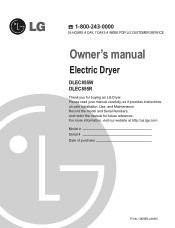
For more information, visit our website at http://us.lge.com Model # Serial # Date of purchase P/ No.: 3828EL4003R Record the model and Serial Numbers, and retain the manual for buying an LG Dryer. Please read your manual carefully, as it provides instructions on safe installation, Use, and Maintenance. 1-800-243-0000 24 HOURS A DAY, 7 DAYS A WEEK FOR LG CUSTOMER SERVICE Owner's manual Electric Dryer DLEC855W DLEC855R Thank you for future reference.
For more information, visit our website at http://us.lge.com Model # Serial # Date of purchase P/ No.: 3828EL4003R Record the model and Serial Numbers, and retain the manual for buying an LG Dryer. Please read your manual carefully, as it provides instructions on safe installation, Use, and Maintenance. 1-800-243-0000 24 HOURS A DAY, 7 DAYS A WEEK FOR LG CUSTOMER SERVICE Owner's manual Electric Dryer DLEC855W DLEC855R Thank you for future reference.

Owner's Manual
Page 2
... Dry? These large increases or decreases in the time needed to ensure complete drying. F eatures F Ultra Big Capacity Drum The LG Dryer has a large capacity. Reduced drying time Drying time is reduced by the use of Use The electronic control has a large, ...LED display. C ontents F Safety Instructions 3 Installation Instructions 6 Electrical Requirement 10 Appearance And Design 13 Operating Your Dryer 14 Additional Functions 17 Caring For Your Dryer 19 Additional Tips For Smart Use 22 Troubleshooting Guide 24 Technical Data 28 Warranty 29 2 Manual Dry Manual Dry ...
... Dry? These large increases or decreases in the time needed to ensure complete drying. F eatures F Ultra Big Capacity Drum The LG Dryer has a large capacity. Reduced drying time Drying time is reduced by the use of Use The electronic control has a large, ...LED display. C ontents F Safety Instructions 3 Installation Instructions 6 Electrical Requirement 10 Appearance And Design 13 Operating Your Dryer 14 Additional Functions 17 Caring For Your Dryer 19 Additional Tips For Smart Use 22 Troubleshooting Guide 24 Technical Data 28 Warranty 29 2 Manual Dry Manual Dry ...
Owner's Manual
Page 3
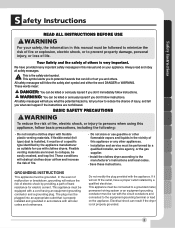
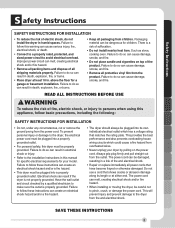
...injury, and tell you and others is installed, it will follow basic precautions, including the following: • Do not install a clothes dryer with flexible plastic venting materials. This is not properly grounded. 3 These words mean: DANGER: You can be killed or seriously injured if...you don't immediately follow instructions. If flexible metal (foil type) duct is very important. Do not modify the plug provided with clothes dryers. If it must be of a specific type identified by providing a path of life. Flexible venting materials are not followed. GROUNDING ...
...injury, and tell you and others is installed, it will follow basic precautions, including the following: • Do not install a clothes dryer with flexible plastic venting materials. This is not properly grounded. 3 These words mean: DANGER: You can be killed or seriously injured if...you don't immediately follow instructions. If flexible metal (foil type) duct is very important. Do not modify the plug provided with clothes dryers. If it must be of a specific type identified by providing a path of life. Flexible venting materials are not followed. GROUNDING ...
Owner's Manual
Page 4
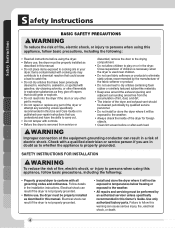
...or after each load. SAFETY INSTRUCTIONS FOR INSTALLATION WARNING To reduce the risk of the equipment-grounding conductor can result if the dryer is properly grounded. WARNING Improper connection of fire, electric shock, or injury to persons when using this appliance, follow basic ...precautions, including the following: • Properly ground dryer to conform with all instructions before using this appliance, follow this manual. • Do not place items exposed to follow basic precautions...
...or after each load. SAFETY INSTRUCTIONS FOR INSTALLATION WARNING To reduce the risk of the equipment-grounding conductor can result if the dryer is properly grounded. WARNING Improper connection of fire, electric shock, or injury to persons when using this appliance, follow basic ...precautions, including the following: • Properly ground dryer to conform with all instructions before using this appliance, follow this manual. • Do not place items exposed to follow basic precautions...
Owner's Manual
Page 5
...to pinch, crush, or damage the power cord. Electrical shock can create an electrical shock hazard and/or a fire hazard. • This dryer must be damaged, resulting in humid spaces. There is a risk of fire and electrical shock. • Repair or replace immediately all shipping...on top of the product. The power cord can melt, creating electrical shock and/or fire hazard. • When installing or moving the dryer, be dangerous for a garage or basement installation. Safety Instructions S afety Instructions F SAFETY INSTRUCTIONS FOR INSTALLATION • To reduce the risk of...
...to pinch, crush, or damage the power cord. Electrical shock can create an electrical shock hazard and/or a fire hazard. • This dryer must be damaged, resulting in humid spaces. There is a risk of fire and electrical shock. • Repair or replace immediately all shipping...on top of the product. The power cord can melt, creating electrical shock and/or fire hazard. • When installing or moving the dryer, be dangerous for a garage or basement installation. Safety Instructions S afety Instructions F SAFETY INSTRUCTIONS FOR INSTALLATION • To reduce the risk of...
Owner's Manual
Page 6
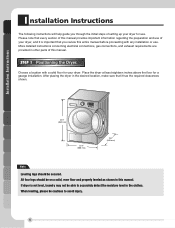
...exhaust requirements are provided in the clothes. When leveling, please be cautious to accurately detect the moisture level in other parts of your dryer, and it has the required clearances shown. I nstallation Instructions F The following instructions will help guide you review this manual. All ...four legs should be able to avoid injury. 6 Choose a location with any installation or use. Positioning the Dryer. Installation Instructions 33.5" (850 mm) 23.6" (600 mm) 25.2" (640 mm) Note Leveling legs should be on a solid, even floor...
...exhaust requirements are provided in the clothes. When leveling, please be cautious to accurately detect the moisture level in other parts of your dryer, and it has the required clearances shown. I nstallation Instructions F The following instructions will help guide you review this manual. All ...four legs should be able to avoid injury. 6 Choose a location with any installation or use. Positioning the Dryer. Installation Instructions 33.5" (850 mm) 23.6" (600 mm) 25.2" (640 mm) Note Leveling legs should be on a solid, even floor...

Owner's Manual
Page 7
... or Mobile Home The following parts on a heat setting, as suitable for use this manual, before making the electrical connection for Electric Dryer 7 Prior to the first use of this appliance, use all-purpose cleaning products or a solution of detergent and water, with a ...Use a UL approved strain relief. • Disconnect power before taking any dust or dirt that section, and the remainder of the dryer. More detailed information concerning the electrical connection is required for proper installation of this manual for all mobile and manufactured home installations, as...
... or Mobile Home The following parts on a heat setting, as suitable for use this manual, before making the electrical connection for Electric Dryer 7 Prior to the first use of this appliance, use all-purpose cleaning products or a solution of detergent and water, with a ...Use a UL approved strain relief. • Disconnect power before taking any dust or dirt that section, and the remainder of the dryer. More detailed information concerning the electrical connection is required for proper installation of this manual for all mobile and manufactured home installations, as...
Owner's Manual
Page 8
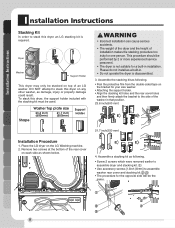
...be stacked on top of installation makes the stacking procedure too risky for a built-in . • Do not operate the dryer is required. Place the LG dryer on any other washer, as damage, injury or property damage could result. Remove two screws at the bottom of the washer in... the protective film from the double-sided tape on each side as following . Assemble the stacking kit as a built-in installation. To stack this dryer an LG stacking kit is disassembled. 3. Assemble a stacking kit as shown below. 4. Please do not install as following . • Screw 2 screws which...
...be stacked on top of installation makes the stacking procedure too risky for a built-in . • Do not operate the dryer is required. Place the LG dryer on any other washer, as damage, injury or property damage could result. Remove two screws at the bottom of the washer in... the protective film from the double-sided tape on each side as following . Assemble the stacking kit as a built-in installation. To stack this dryer an LG stacking kit is disassembled. 3. Assemble a stacking kit as shown below. 4. Please do not install as following . • Screw 2 screws which...
Owner's Manual
Page 9
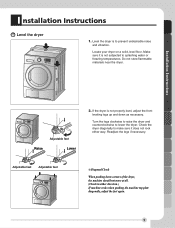
... it is not properly level, adjust the front leveling legs up and down corners of the dryer, the machine should not move at all. (Check in either way. Level the dryer is to lower the dryer. Check the dryer diagonally to splashing water or freezing temperatures. Adjustable feet Adjustable feet ❊ Diagonal Check When...
... it is not properly level, adjust the front leveling legs up and down corners of the dryer, the machine should not move at all. (Check in either way. Level the dryer is to lower the dryer. Check the dryer diagonally to splashing water or freezing temperatures. Adjustable feet Adjustable feet ❊ Diagonal Check When...
Owner's Manual
Page 10
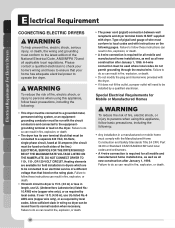
... shock, or injury to persons when using this appliance, follow basic precautions, including the following pages. Allow sufficient slack in dryers which are available for all mobile and manufactured home installations, as well as all new construction after January 1, 1996. Failure to...use UL-listed No.-8 AWG wire (copper wire only), or as required by local codes. Electrical Requirement For Electric Dryers E lectrical Requirement COONECTING ELECTRIC DRYERS WARNING To help prevent fire, electric shock, serious injury, or death, the wiring and grounding must be used where...
... shock, or injury to persons when using this appliance, follow basic precautions, including the following pages. Allow sufficient slack in dryers which are available for all mobile and manufactured home installations, as well as all new construction after January 1, 1996. Failure to...use UL-listed No.-8 AWG wire (copper wire only), or as required by local codes. Electrical Requirement For Electric Dryers E lectrical Requirement COONECTING ELECTRIC DRYERS WARNING To help prevent fire, electric shock, serious injury, or death, the wiring and grounding must be used where...
Owner's Manual
Page 11
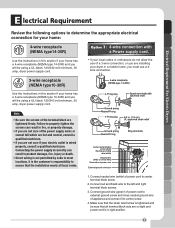
... appropriate electrical F connection for your home: 4-wire receptacle (NEMA type14-30R) Use the instructions in right position. 11 Electrical Requirement For Electric Dryers E lectrical Requirement Review the following options to center screw. 4. Make sure that the strain relief screw is tightened and be using a UL ...listed, 120/240 volt minimum, 30 amp, dryer power supply cord. : 4-wire connection with a Power supply cord. • lf your home has a 4-wire receptacle (NEMA type 14-30R) ...
... appropriate electrical F connection for your home: 4-wire receptacle (NEMA type14-30R) Use the instructions in right position. 11 Electrical Requirement For Electric Dryers E lectrical Requirement Review the following options to center screw. 4. Make sure that the strain relief screw is tightened and be using a UL ...listed, 120/240 volt minimum, 30 amp, dryer power supply cord. : 4-wire connection with a Power supply cord. • lf your home has a 4-wire receptacle (NEMA type 14-30R) ...
Owner's Manual
Page 12
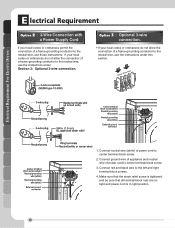
.... 12 lf your local codes or ordinances do not allow the connection of a frame-grounding conductor to center terminal block screw. 3. Electrical Requirement For Electric Dryers 1. Connect red and black wire to center terminal block screw. 2. Connect neutral wire (white) of power cord to the neutral wire, use the instructions under...
.... 12 lf your local codes or ordinances do not allow the connection of a frame-grounding conductor to center terminal block screw. 3. Electrical Requirement For Electric Dryers 1. Connect red and black wire to center terminal block screw. 2. Connect neutral wire (white) of power cord to the neutral wire, use the instructions under...
Owner's Manual
Page 14
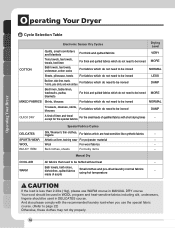
... fabrics which do not need to be ironed NORMAL Trousers, dresses, skirts, blouses For fabrics which are heat-sensitive like synthetic fabrics - Operating Your Dryer O perating Your Dryer F Cycle Selection Table COTTON Electronic Sensor Dry Cycles Quilts, small comforters and blankets For thick and quilted fabrics Terry towels, tea towels, towels, bed...
... fabrics which do not need to be ironed NORMAL Trousers, dresses, skirts, blouses For fabrics which are heat-sensitive like synthetic fabrics - Operating Your Dryer O perating Your Dryer F Cycle Selection Table COTTON Electronic Sensor Dry Cycles Quilts, small comforters and blankets For thick and quilted fabrics Terry towels, tea towels, towels, bed...
Owner's Manual
Page 15
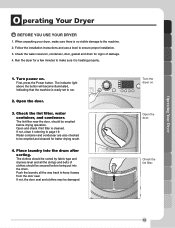
...away from the door seal. Push the laundry all the strings and belts of damage. 4. Check the lint filter. 15 Operating Your Dryer O perating Your Dryer BEFORE YOU USE YOUR DRYER 1. Check the water reservoir, condenser, door, gasket and drum for a few minutes to run. 2. The indicator light above the .... If not, the door seal and clothes may be emptied before being put into the drum after sorting. F Turn the dryer on . Turn power on . Run the dryer for signs of clothes should be emptied and cleaned for better drying result. 4. Follow the installation instructions and use a level ...
...away from the door seal. Push the laundry all the strings and belts of damage. 4. Check the lint filter. 15 Operating Your Dryer O perating Your Dryer BEFORE YOU USE YOUR DRYER 1. Check the water reservoir, condenser, door, gasket and drum for a few minutes to run. 2. The indicator light above the .... If not, the door seal and clothes may be emptied before being put into the drum after sorting. F Turn the dryer on . Turn power on . Run the dryer for signs of clothes should be emptied and cleaned for better drying result. 4. Follow the installation instructions and use a level ...
Owner's Manual
Page 16
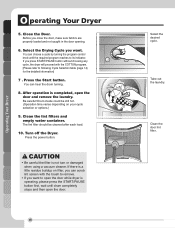
... cycle. Press the Start button. You can choose a cycle by turning the program control knob until drum completely stops and then open the door while dryer is a little residue buildup on your cycle selection or options.) 9. CAUTION • Be careful the filter is completed, open the door and remove the ...scrub lint screen with the COTTON program. [Please refer to its indicator. After operation is not turn or damaged when using a vacuum cleaner. Operating Your Dryer O perating Your Dryer 5. Be careful! Turn off the Dryer. Take out the laundry. Clean the door lint filter.
... cycle. Press the Start button. You can choose a cycle by turning the program control knob until drum completely stops and then open the door while dryer is a little residue buildup on your cycle selection or options.) 9. CAUTION • Be careful the filter is completed, open the door and remove the ...scrub lint screen with the COTTON program. [Please refer to its indicator. After operation is not turn or damaged when using a vacuum cleaner. Operating Your Dryer O perating Your Dryer 5. Be careful! Turn off the Dryer. Take out the laundry. Clean the door lint filter.
Owner's Manual
Page 17
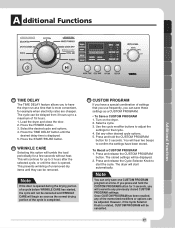
Load the dryer and close the door. 2. Press the TIME DELAY button until the desired delay time is rotated, CUSTOM PROGRAM will be removed. Press the START/PAUSE .... Note If the door is completed. CUSTOM PROGRAM If you press and hold the CUSTOM PROGRAM button for a few seconds without heat. Turn on the dryer. 2. Set any previously stored CUSTOM PROGRAM settings. To Recall a CUSTOM PROGRAM 1. Press and release the CUSTOM PROGRAM button. The...
Load the dryer and close the door. 2. Press the TIME DELAY button until the desired delay time is rotated, CUSTOM PROGRAM will be removed. Press the START/PAUSE .... Note If the door is completed. CUSTOM PROGRAM If you press and hold the CUSTOM PROGRAM button for a few seconds without heat. Turn on the dryer. 2. Set any previously stored CUSTOM PROGRAM settings. To Recall a CUSTOM PROGRAM 1. Press and release the CUSTOM PROGRAM button. The...
Owner's Manual
Page 18
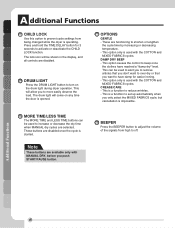
... Press the BEEPER button to activate or deactivate the CHILD LOCK function. Additional Functions 18 The drum light will come on the drum light during dryer operation. These are disabled. This option causes the control to beep once the clothes have damp for 3 seconds to adjust the volume of the signals... from being changed while the dryer is used to alert you to remove articles that you don't want to over dry or that you to have reached a "damp dry" level. These...
... Press the BEEPER button to activate or deactivate the CHILD LOCK function. Additional Functions 18 The drum light will come on the drum light during dryer operation. These are disabled. This option causes the control to beep once the clothes have damp for 3 seconds to adjust the volume of the signals... from being changed while the dryer is used to alert you to remove articles that you don't want to over dry or that you to have reached a "damp dry" level. These...
Owner's Manual
Page 19
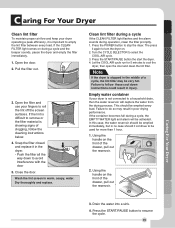
... and alarm will capture the water from the drying process. Press the POWER button to resume the cycle. 19 The press it in the dryer. - Note If the dryer is showing signs of a cycle, the lint filter may result in injury. 3. Dry thoroughly and replace. Empty water container If your fingers to... roll the lint off the screen surfaces. This should be very hot. Press the START/PAUSE button to stop the dryer. Press the START/PAUSE button the start the dryer. 4. Let the COOL AIR cycle run for more than 1 hour. 1. If the lint is difficult to remove or the filter material...
... and alarm will capture the water from the drying process. Press the POWER button to resume the cycle. 19 The press it in the dryer. - Note If the dryer is showing signs of a cycle, the lint filter may result in injury. 3. Dry thoroughly and replace. Empty water container If your fingers to... roll the lint off the screen surfaces. This should be very hot. Press the START/PAUSE button to stop the dryer. Press the START/PAUSE button the start the dryer. 4. Let the COOL AIR cycle run for more than 1 hour. 1. If the lint is difficult to remove or the filter material...
Owner's Manual
Page 20
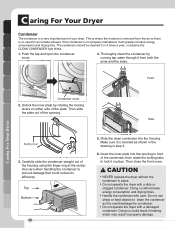
...ring at the center. Slide the clean condenser into the opening . Then close the front cover. Side Sealing cover 3. CAUTION • NEVER operate the dryer without the condenser in place. The condenser should be cleaned 3 or 4 times a year, or anytime the CLEAN CONDENSER light blinks. 1. Front Caring For Your... cover 2. Top Bottom 20 5. If the condenser is no need for an outside exhaust. Carefully slide the condenser straight out of your dryer. Doing so could reduce its efficiency. This is where the moisture is removed form the air so there is not properly maintained, it in ...
...ring at the center. Slide the clean condenser into the opening . Then close the front cover. Side Sealing cover 3. CAUTION • NEVER operate the dryer without the condenser in place. The condenser should be cleaned 3 or 4 times a year, or anytime the CLEAN CONDENSER light blinks. 1. Front Caring For Your... cover 2. Top Bottom 20 5. If the condenser is no need for an outside exhaust. Carefully slide the condenser straight out of your dryer. Doing so could reduce its efficiency. This is where the moisture is removed form the air so there is not properly maintained, it in ...
Owner's Manual
Page 21
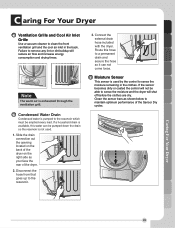
...by the control to sense the moisture remaining in the back. Disconnect the hose from that goes up to maintain optimum performance of the dryer. 2. If the sensor becomes dirty or coated the control will reduce air flow and increase energy consumption and drying times. 3. Connect the... external drain hose included with the dryer. Route this water can not come loose. Note The warm air is used . 1. If a household drain is available, this hose to a...
...by the control to sense the moisture remaining in the back. Disconnect the hose from that goes up to maintain optimum performance of the dryer. 2. If the sensor becomes dirty or coated the control will reduce air flow and increase energy consumption and drying times. 3. Connect the... external drain hose included with the dryer. Route this water can not come loose. Note The warm air is used . 1. If a household drain is available, this hose to a...


