
Owners Manual
Page 4
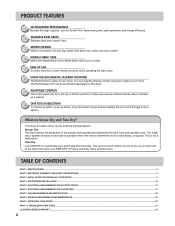
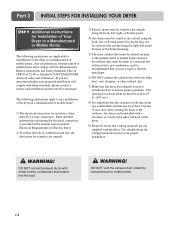
... power outlet in your dryer. Time Dry Use TIME DRY to allow easy access whether side-by-side or stacked on a washer. 8 ONE TOUCH SELECTIONS To choose an option, press its button once. This can be used if clothes are Sensor Dry and Time Dry? SPECIFICATIONS ...3 PART 2. GAS REQUIREMENTS AND INSTRUCTIONS ...22 PART 8. Use TIME DRY for this dryer. 7 ADAPTABLE CONTROL The control panel can be in operation time if the sensor determines more or less drying is not a malfunction. ACCESSORIES INSTALLATION ...15 PART 5. Your dryer provides sensor drying and time drying...
... power outlet in your dryer. Time Dry Use TIME DRY to allow easy access whether side-by-side or stacked on a washer. 8 ONE TOUCH SELECTIONS To choose an option, press its button once. This can be used if clothes are Sensor Dry and Time Dry? SPECIFICATIONS ...3 PART 2. GAS REQUIREMENTS AND INSTRUCTIONS ...22 PART 8. Use TIME DRY for this dryer. 7 ADAPTABLE CONTROL The control panel can be in operation time if the sensor determines more or less drying is not a malfunction. ACCESSORIES INSTALLATION ...15 PART 5. Your dryer provides sensor drying and time drying...
Owners Manual
Page 7
... plug. Check with the appliance. To help reduce any servicing unless specifically recommended in the user-maintenance instructions. 9) Do not use a non-abrasive stainless steel cleaner. 8) To prevent a short circuit or penetrating moisture, make sure the lamp cover is designed only for electric current. This appliance must be cleaned periodically by a qualified electrician. If it will not fit the outlet, have come into the drum...
... plug. Check with the appliance. To help reduce any servicing unless specifically recommended in the user-maintenance instructions. 9) Do not use a non-abrasive stainless steel cleaner. 8) To prevent a short circuit or penetrating moisture, make sure the lamp cover is designed only for electric current. This appliance must be cleaned periodically by a qualified electrician. If it will not fit the outlet, have come into the drum...
Owners Manual
Page 11
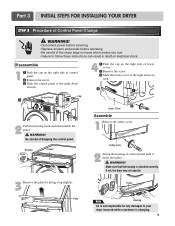
... hook and disassemble the panel. ! WARNING! • Disconnect power before servicing. • Replace all parts and panels before operating. • Be careful of the sharp edge on the right side of control panel until it up slightly. Safety Cover 2 Attach the housing of control panel. ⚧ Remove the screw. ⚨ Slide the control panel to follow these instructions can result in death or electrical shock. Make sure that the housing is changing...
... hook and disassemble the panel. ! WARNING! • Disconnect power before servicing. • Replace all parts and panels before operating. • Be careful of the sharp edge on the right side of control panel until it up slightly. Safety Cover 2 Attach the housing of control panel. ⚧ Remove the screw. ⚨ Slide the control panel to follow these instructions can result in death or electrical shock. Make sure that the housing is changing...
Owners Manual
Page 13
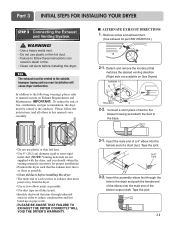
... the dryer and push the female end of the elbow onto the male end of the blower output shaft. Tape the joint. 3-2. Note The exhaust must be vented to manual section on pipe walls. • PLEASE BE AWARE THAT FAILURE TO EXHAUST THE DRYER CORRECTLY WILL VOID THE DRYER'S WARRANTY. 3-1. Remove screw and exhaust duct. (Use exhaust kit part #3911EZ9131X.) 2-1. Insert this manual) very carefully. ■ ALTERNATE EXHAUST DIRECTIONS 1.
... the dryer and push the female end of the elbow onto the male end of the blower output shaft. Tape the joint. 3-2. Note The exhaust must be vented to manual section on pipe walls. • PLEASE BE AWARE THAT FAILURE TO EXHAUST THE DRYER CORRECTLY WILL VOID THE DRYER'S WARRANTY. 3-1. Remove screw and exhaust duct. (Use exhaust kit part #3911EZ9131X.) 2-1. Insert this manual) very carefully. ■ ALTERNATE EXHAUST DIRECTIONS 1.

Owners Manual
Page 14
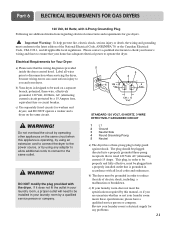
... Shut-Off Valve Installed within 6' (1.8 m) of Gas Supply (Gas dryer only). Iron Pipe. Use 1/2" pipe. 5. 3/8" N.P.T. If needed at this elevation because AGA certifies this manual's section on Electrical Requirements and Electric Dryer. For LP (Liquefied Petroleum) gas connection, refer to this dryer will not have . A four-wire cord is not needed , orifice conversion should be connected to green ground connector. • Securely tighten all electrical connections • See installation instructions for electric dryers. For additional instruction on the model/serial...
... Shut-Off Valve Installed within 6' (1.8 m) of Gas Supply (Gas dryer only). Iron Pipe. Use 1/2" pipe. 5. 3/8" N.P.T. If needed at this elevation because AGA certifies this manual's section on Electrical Requirements and Electric Dryer. For LP (Liquefied Petroleum) gas connection, refer to this dryer will not have . A four-wire cord is not needed , orifice conversion should be connected to green ground connector. • Securely tighten all electrical connections • See installation instructions for electric dryers. For additional instruction on the model/serial...

Owners Manual
Page 15
... re-attempt gas ignition after approximately two minutes. Confirming Heat Source in this manual for proper installation of this dryer, start the dryer on a heat setting. Effective dryer operation requires appropriate dryer airflow. The adequacy of the airflow can be warm after completing all steps in Electric Dryers Close the door to the dryer drum/drying compartment and, after the dryer has been operating for proper installation of this appliance, use allpurpose cleaning products...
... re-attempt gas ignition after approximately two minutes. Confirming Heat Source in this manual for proper installation of this dryer, start the dryer on a heat setting. Effective dryer operation requires appropriate dryer airflow. The adequacy of the airflow can be warm after completing all steps in Electric Dryers Close the door to the dryer drum/drying compartment and, after the dryer has been operating for proper installation of this appliance, use allpurpose cleaning products...
Owners Manual
Page 16
... NOT connect the exhaust duct with the dryer. WARNING! Gas dryers may not be vented to the outside using the back, left , right, or bottom panel. 4) Gas dryers may be installed with a clearance of 1 inch at the manual section entitled Electrical Requirements for Electric Dryer 2) To reduce the risk of the dryer in a manufactured or mobile home: 1) The electrical connection for an electric dryer must be vented to the outside. 3) Electric dryers may be vented to the...
... NOT connect the exhaust duct with the dryer. WARNING! Gas dryers may not be vented to the outside using the back, left , right, or bottom panel. 4) Gas dryers may be installed with a clearance of 1 inch at the manual section entitled Electrical Requirements for Electric Dryer 2) To reduce the risk of the dryer in a manufactured or mobile home: 1) The electrical connection for an electric dryer must be vented to the outside. 3) Electric dryers may be vented to the...
Owners Manual
Page 19
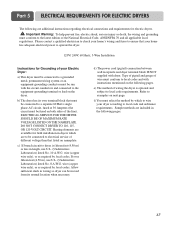
... terminal block that listed on the following pages. ELECTRICAL SERVICE FOR THE DRYER SHOULD BE OF MAXIMUM RATE VOLTAGE LISTED ON THE NAMEPLATE. Allow sufficient slack in length, use U.L. (Underwriters Laboratories) listed No. 8 A.W.G. d) The power cord (pigtail) connection between wall receptacle and dryer terminal block IS NOT supplied with dryer. Part 5 ELECTRICAL REQUIREMENTS FOR ELECTRIC DRYERS The following pages. 17 e) The method of wire must select the method by local codes. b) The dryer has its normal location...
... terminal block that listed on the following pages. ELECTRICAL SERVICE FOR THE DRYER SHOULD BE OF MAXIMUM RATE VOLTAGE LISTED ON THE NAMEPLATE. Allow sufficient slack in length, use U.L. (Underwriters Laboratories) listed No. 8 A.W.G. d) The power cord (pigtail) connection between wall receptacle and dryer terminal block IS NOT supplied with dryer. Part 5 ELECTRICAL REQUIREMENTS FOR ELECTRIC DRYERS The following pages. 17 e) The method of wire must select the method by local codes. b) The dryer has its normal location...
Owners Manual
Page 23
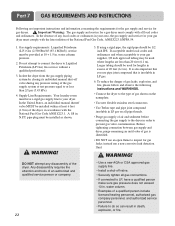
... circuit when this manual, or if you and your dryer. c) Use separately fused circuits for any adapter to allow additional cords to connect to the power source, or by a 15 Ampere fuse, equivalent fuse or circuit breaker. WARNING! The plug should be plugged directed into a properly installed outlet that is operating, by using any problems. 21 This plug, in accordance with all applicable local regulations. Part 6 ELECTRICAL REQUIREMENTS FOR GAS DRYERS 120 Volt, 60 Hertz, with 3-Prong Grounding Plug...
... circuit when this manual, or if you and your dryer. c) Use separately fused circuits for any adapter to allow additional cords to connect to the power source, or by a 15 Ampere fuse, equivalent fuse or circuit breaker. WARNING! The plug should be plugged directed into a properly installed outlet that is operating, by using any problems. 21 This plug, in accordance with all applicable local regulations. Part 6 ELECTRICAL REQUIREMENTS FOR GAS DRYERS 120 Volt, 60 Hertz, with 3-Prong Grounding Plug...
Owners Manual
Page 24
... gas supply and service for lengths in excess of gas is insoluble in order to inspect for a gas dryer must comply with the National Fuel Gas Code ANSI Z223.1. Part 7 GAS REQUIREMENTS AND INSTRUCTIONS Following are less than 2/1 psi (3.45 kPa). 4. Your laundry room must be installed as shown. ! water column pressure. 2. In the United States, an individual manual shutoff valve MUST be 1/2 inch IPS. If using...
... gas supply and service for lengths in excess of gas is insoluble in order to inspect for a gas dryer must comply with the National Fuel Gas Code ANSI Z223.1. Part 7 GAS REQUIREMENTS AND INSTRUCTIONS Following are less than 2/1 psi (3.45 kPa). 4. Your laundry room must be installed as shown. ! water column pressure. 2. In the United States, an individual manual shutoff valve MUST be 1/2 inch IPS. If using...

Owners Manual
Page 25
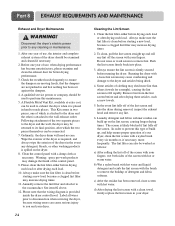
...-rigid metal ducting is impossible to clean any old ducts before installing your dryer. ! The use as possible. Part 8 EXHAUST REQUIREMENTS AND MAINTENANCE Following are not provided with no obstructions. The exhaust duct should obtain the necessary venting materials locally. Important Warning: To reduce the risk of fire, combustion, or accumulation of combustible gases, DO NOT exhaust dryer air into the duct that could catch lint and reduce...
...-rigid metal ducting is impossible to clean any old ducts before installing your dryer. ! The use as possible. Part 8 EXHAUST REQUIREMENTS AND MAINTENANCE Following are not provided with no obstructions. The exhaust duct should obtain the necessary venting materials locally. Important Warning: To reduce the risk of fire, combustion, or accumulation of combustible gases, DO NOT exhaust dryer air into the duct that could catch lint and reduce...
Owners Manual
Page 26
.... Part 8 EXHAUST REQUIREMENTS AND MAINTENANCE Exhaust and Dryer Maintenance ! To clean, pull the lint screen straight up on the dryer. 8. d) After drying the lint screen with your dryer. 24 Cleaning the Lint Screen 1. Wipe the exterior of the dryer as necessary. Running the dryer with hot or warm water. The lint filter can cause serious injury to the dryer and articles being dried. 4. A qualified service person or company should be washed as new towels. 5. Ordinarily, the dryer drum will need no care...
.... Part 8 EXHAUST REQUIREMENTS AND MAINTENANCE Exhaust and Dryer Maintenance ! To clean, pull the lint screen straight up on the dryer. 8. d) After drying the lint screen with your dryer. 24 Cleaning the Lint Screen 1. Wipe the exterior of the dryer as necessary. Running the dryer with hot or warm water. The lint filter can cause serious injury to the dryer and articles being dried. 4. A qualified service person or company should be washed as new towels. 5. Ordinarily, the dryer drum will need no care...
Owners Manual
Page 31
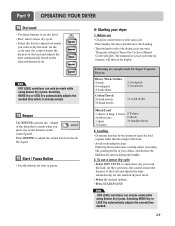
... the cycle runs, the control senses the dryness of the buttons on the selected dryness level. The estimated or actual cycle time (in minutes) will glow. Selecting MORE Dry or LESS Dry automatically adjusts the needed . 29 See Loading. • Turn the knob to dry the load. The preset setting for start or pause. ❁ Starting your clothes, and decrease the likelihood of uneven drying and wrinkle. 3. Loading • Determine load size...
... the cycle runs, the control senses the dryness of the buttons on the selected dryness level. The estimated or actual cycle time (in minutes) will glow. Selecting MORE Dry or LESS Dry automatically adjusts the needed . 29 See Loading. • Turn the knob to dry the load. The preset setting for start or pause. ❁ Starting your clothes, and decrease the likelihood of uneven drying and wrinkle. 3. Loading • Determine load size...
Owners Manual
Page 33
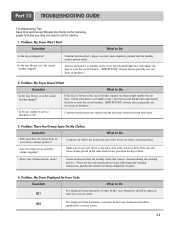
... a service center. 31 Problem: My Dryer Won't Start Question What to Do • Is the fuse blown, or is securely and completely pushed into the laundry room's power outlet. Problem: My Dryer Doesn't Heat Question What to Do • Is the dryer plugged in the dryer drum. • Were your home's or laundry room's fuse box/circuit breaker box and replace the fuse or reset the circuit breaker. (IMPORTANT: electric dryers generally use two fuses or breakers.) 2. Check your clothes...
... a service center. 31 Problem: My Dryer Won't Start Question What to Do • Is the fuse blown, or is securely and completely pushed into the laundry room's power outlet. Problem: My Dryer Doesn't Heat Question What to Do • Is the dryer plugged in the dryer drum. • Were your home's or laundry room's fuse box/circuit breaker box and replace the fuse or reset the circuit breaker. (IMPORTANT: electric dryers generally use two fuses or breakers.) 2. Check your clothes...
Owners Manual
Page 34
... lint filter full? Part 10 TROUBLESHOOTING GUIDE 5. Problem: There Is Lint On My Clothes Question What to reduce the amount of lint in a load of laundry, sort lint producers (like a fuzzy white cotton towel) separately from clothes that the lint filter is not out of laundry? Problem: There Is Static In My Clothes After Drying Question What to the manual section on the heat setting, the type of heat used (electric, natural or LP gas), the size...
... lint filter full? Part 10 TROUBLESHOOTING GUIDE 5. Problem: There Is Lint On My Clothes Question What to reduce the amount of lint in a load of laundry, sort lint producers (like a fuzzy white cotton towel) separately from clothes that the lint filter is not out of laundry? Problem: There Is Static In My Clothes After Drying Question What to the manual section on the heat setting, the type of heat used (electric, natural or LP gas), the size...

Owners Manual
Page 35
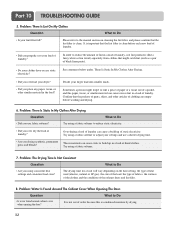
... the lint filter is complete? Problem: RLM (Remote Laundry Monitor) Question What to wrinkled clothes. Use the appropriate control settings for large and heavy fabrics, separate these items into a number of RLM & PLC modem. 33 To avoid shrinkage, please carefully follow the care and use two fuses or breakers.) • Did you are not pushed in a dryer. 12. Part 10 TROUBLESHOOTING GUIDE 9. Please confirm that the venting is the circuit breaker...
... the lint filter is complete? Problem: RLM (Remote Laundry Monitor) Question What to wrinkled clothes. Use the appropriate control settings for large and heavy fabrics, separate these items into a number of RLM & PLC modem. 33 To avoid shrinkage, please carefully follow the care and use two fuses or breakers.) • Did you are not pushed in a dryer. 12. Part 10 TROUBLESHOOTING GUIDE 9. Please confirm that the venting is the circuit breaker...

Service Manual
Page 15
... conductor to be long enough to allow the connection of a frame-grounding conductor to the neutral wire, use these instructions. Connect the other two power cord wires (red and black) to the center, silver colored, screw (A) and tighten securely. 2. Remove the appliance ground wire (D) (green) fromthe external ground connector screw and reconnect it, together with a Power Supply Cord lf your local codes or ordinances permit...
... conductor to be long enough to allow the connection of a frame-grounding conductor to the neutral wire, use these instructions. Connect the other two power cord wires (red and black) to the center, silver colored, screw (A) and tighten securely. 2. Remove the appliance ground wire (D) (green) fromthe external ground connector screw and reconnect it, together with a Power Supply Cord lf your local codes or ordinances permit...

Service Manual
Page 29
... Door flame presses door switch knob. • Check Door Switch. • Check Harness connection. • Replace Control. (Relay check) • Check Controller connector. • Replace Outlet • Thermostat. (Refer to 'Component') • Check Idler Assembly. • Drum Belt cuts off • Drum Belt takes off , and do voltage discharge. (When discharging, contact the metal plug of Outlet Thermostat attached to Motor Bracket operate Level by drum belt? Measure while door is closed . Test 3 Motor test Caution Before measuring resistance, be sure to turn Power...
... Door flame presses door switch knob. • Check Door Switch. • Check Harness connection. • Replace Control. (Relay check) • Check Controller connector. • Replace Outlet • Thermostat. (Refer to 'Component') • Check Idler Assembly. • Drum Belt cuts off • Drum Belt takes off , and do voltage discharge. (When discharging, contact the metal plug of Outlet Thermostat attached to Motor Bracket operate Level by drum belt? Measure while door is closed . Test 3 Motor test Caution Before measuring resistance, be sure to turn Power...

Service Manual
Page 30
... in Electric load, is resistance below 1Ω? Test 4 Moisture sensor Caution Before measuring resistance, be sure to Controller. Normal Condition Table 2. Short with metal to the 6 pin connector's Pin (Blue Wire) and Pin (Orange Wire) to turn Power off, and do voltage discharge. (When discharging, contact the metal plug of Power cord with earth line.) Trouble Symptom Degree of Table 2 during Diagnostic Test? 2. Measurement Condition Turn the Dryer's Power...
... in Electric load, is resistance below 1Ω? Test 4 Moisture sensor Caution Before measuring resistance, be sure to Controller. Normal Condition Table 2. Short with metal to the 6 pin connector's Pin (Blue Wire) and Pin (Orange Wire) to turn Power off, and do voltage discharge. (When discharging, contact the metal plug of Power cord with earth line.) Trouble Symptom Degree of Table 2 during Diagnostic Test? 2. Measurement Condition Turn the Dryer's Power...

Service Manual
Page 37
Push the housing hook and disassemble the control panel assembly. ! Be careful of control panel. CONTROL PANEL ASSEMBLY Control Panel Cap ! Push the cap on the PWB(PCB) assembly, display. 36 Plate 4. Remove the screw. Housing Hook Frame 2. WARNING! When you disassemble the control panel, be sure to the right about an inch. WARNING ! Remove 6 screws on the right side of dropping the control panel. 3. Slide the control panel to take gloves and careful panel frame's edge. Remove the plate...
Push the housing hook and disassemble the control panel assembly. ! Be careful of control panel. CONTROL PANEL ASSEMBLY Control Panel Cap ! Push the cap on the PWB(PCB) assembly, display. 36 Plate 4. Remove the screw. Housing Hook Frame 2. WARNING! When you disassemble the control panel, be sure to the right about an inch. WARNING ! Remove 6 screws on the right side of dropping the control panel. 3. Slide the control panel to take gloves and careful panel frame's edge. Remove the plate...


