
Owners Manual
Page 3
For more information, visit our website at http://us.lge.com P/No.: 3828EL3003M Please read your manual carefully, as it provides instructions on safe Installation, use and maintenance. Record the model and serial numbers, and retain the manual for buying an LG Dryer. ☎ 1-800-243-0000 24 HOURS A DAY, 7 DAYS A WEEK FOR LG CUSTOMER SERVICE DLE9577WM / DLG9588WM DLE9577SM / DLG9588SM Thank you for future reference.
For more information, visit our website at http://us.lge.com P/No.: 3828EL3003M Please read your manual carefully, as it provides instructions on safe Installation, use and maintenance. Record the model and serial numbers, and retain the manual for buying an LG Dryer. ☎ 1-800-243-0000 24 HOURS A DAY, 7 DAYS A WEEK FOR LG CUSTOMER SERVICE DLE9577WM / DLG9588WM DLE9577SM / DLG9588SM Thank you for future reference.
Owners Manual
Page 4
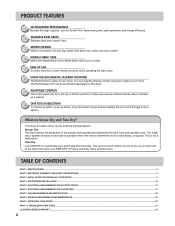
...USE An entire selection of user-friendly functions make operating the dryer easy. 6 USING THE RLM (REMOTE LAUNDRY MONITOR) The RLM monitors status of options. IMPORTANT WARRANTY AND SAFETY INSTRUCTIONS ...4 PART 3. ACCESSORIES INSTALLATION ...15 PART 5. EXHAUST REQUIREMENTS ...AND MAINTENANCE ...23 PART 9. INITIAL STEPS FOR INSTALLING YOUR DRYER ...7 PART 4. ELECTRICAL REQUIREMENTS FOR ELECTRIC DRYER...17 PART 6. GAS REQUIREMENTS AND INSTRUCTIONS ...22 PART 8. TROUBLESHOOTING GUIDE...31 LG DRYER LIMITED WARRANTY...34 2 The RLM Display Unit can be purchased separately...
...USE An entire selection of user-friendly functions make operating the dryer easy. 6 USING THE RLM (REMOTE LAUNDRY MONITOR) The RLM monitors status of options. IMPORTANT WARRANTY AND SAFETY INSTRUCTIONS ...4 PART 3. ACCESSORIES INSTALLATION ...15 PART 5. EXHAUST REQUIREMENTS ...AND MAINTENANCE ...23 PART 9. INITIAL STEPS FOR INSTALLING YOUR DRYER ...7 PART 4. ELECTRICAL REQUIREMENTS FOR ELECTRIC DRYER...17 PART 6. GAS REQUIREMENTS AND INSTRUCTIONS ...22 PART 8. TROUBLESHOOTING GUIDE...31 LG DRYER LIMITED WARRANTY...34 2 The RLM Display Unit can be purchased separately...
Owners Manual
Page 5
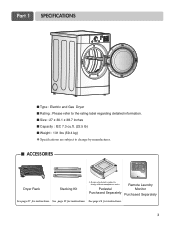
See page 15 for instructions. 3 Part 1 SPECIFICATIONS ■ Type : Electric and Gas Dryer ■ Rating : Please refer to the rating label regarding detailed information. ■ Size : 27 x 30.1 x 38.7 inches ■ Capacity : IEC 7.3 cu....) ■ Weight : 131 Ibs (59.4 kg) ❋ Specifications are subject to change by manufacturer. ■ ACCESSORIES Dryer Rack Stacking Kit ❊ Design of pedestals is subject to change without manafaturers notice. See page 16 for instructions. Pedestal Purchased Separately Remote Laundry Monitor Purchased Separately See page 27 for...
See page 15 for instructions. 3 Part 1 SPECIFICATIONS ■ Type : Electric and Gas Dryer ■ Rating : Please refer to the rating label regarding detailed information. ■ Size : 27 x 30.1 x 38.7 inches ■ Capacity : IEC 7.3 cu....) ■ Weight : 131 Ibs (59.4 kg) ❋ Specifications are subject to change by manufacturer. ■ ACCESSORIES Dryer Rack Stacking Kit ❊ Design of pedestals is subject to change without manafaturers notice. See page 16 for instructions. Pedestal Purchased Separately Remote Laundry Monitor Purchased Separately See page 27 for...
Owners Manual
Page 6
Warranty Service is effective for only 90 days. Warranty Restriction: If the dryer is subjected to the instructions in this manual, LG will need the complete model and serial number when requesting warranty service. For your safety, the recommendations in ... than single family use, all warranty coverage is available by contacting your nearest LG Service Center. Date of your new LG dryer. Part 2 IMPORTANT WARRANTY AND SAFETY INSTRUCTIONS SEEKING WARRANTY SERVICE The warranty for your dryer is required. WARNING! Use the space below to prevent property damage, personal ...
Warranty Service is effective for only 90 days. Warranty Restriction: If the dryer is subjected to the instructions in this manual, LG will need the complete model and serial number when requesting warranty service. For your safety, the recommendations in ... than single family use, all warranty coverage is available by contacting your nearest LG Service Center. Date of your new LG dryer. Part 2 IMPORTANT WARRANTY AND SAFETY INSTRUCTIONS SEEKING WARRANTY SERVICE The warranty for your dryer is required. WARNING! Use the space below to prevent property damage, personal ...
Owners Manual
Page 7
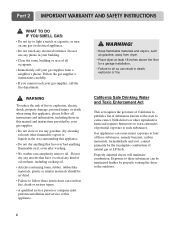
..., or sneakers that is properly installed and grounded in a risk of the fabric softner or product. 15) This dryer is closed . To help reduce any servicing unless specifically recommended in the user-maintenance instructions. 9) Do not use a non-abrasive stainless steel cleaner. 8) To prevent a short circuit or penetrating moisture, make sure the...
..., or sneakers that is properly installed and grounded in a risk of the fabric softner or product. 15) This dryer is closed . To help reduce any servicing unless specifically recommended in the user-maintenance instructions. 9) Do not use a non-abrasive stainless steel cleaner. 8) To prevent a short circuit or penetrating moisture, make sure the...
Owners Manual
Page 8
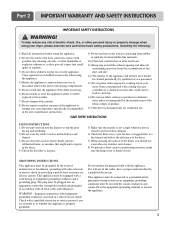
... person or company must perform installation and service of natural gas or LP fuels. Properly adjusted dryers will minimize combustion. Exposure to these substances can cause minor exposure to such substances. Part 2 IMPORTANT WARRANTY AND SAFETY INSTRUCTIONS ! WARNING To reduce the risk of fire or explosion, electric shock, property damage, personal injury...
... person or company must perform installation and service of natural gas or LP fuels. Properly adjusted dryers will minimize combustion. Exposure to these substances can cause minor exposure to such substances. Part 2 IMPORTANT WARRANTY AND SAFETY INSTRUCTIONS ! WARNING To reduce the risk of fire or explosion, electric shock, property damage, personal injury...
Owners Manual
Page 9
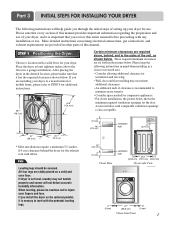
... connections, and exhaust requirements are provided in other parts of setting up your dryer for use . When leveling, please be secured. Part 3 INITIAL STEPS FOR INSTALLING YOUR DRYER The following instructions in mind when installing in a closet or recessed area: • Consider ...8226; For closet installations, the picture below . Place the dryer at least eighteen inches above , behind the dryer for additional instructions. 38.7" (98.3 cm) 49.8" (126.4 cm) Certain minimum clearances are installing your dryer. Those required minimum clearances are stably placed on the optional...
... connections, and exhaust requirements are provided in other parts of setting up your dryer for use . When leveling, please be secured. Part 3 INITIAL STEPS FOR INSTALLING YOUR DRYER The following instructions in mind when installing in a closet or recessed area: • Consider ...8226; For closet installations, the picture below . Place the dryer at least eighteen inches above , behind the dryer for additional instructions. 38.7" (98.3 cm) 49.8" (126.4 cm) Certain minimum clearances are installing your dryer. Those required minimum clearances are stably placed on the optional...
Owners Manual
Page 10
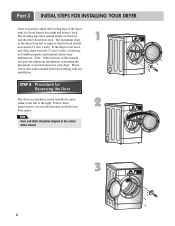
...before proceeding with any installation. The leveling legs must remain firmly on your dryer. Part 3 INITIAL STEPS FOR INSTALLING YOUR DRYER Once in which your door opens: Note Door and latch should not rock. Follow these instructions to reverse the direction in position, adjust the leveling legs of the... dryer until it is not level, and if the slope exceeds 2.5 cm (1 inch), a load may not tumble properly and internal ...
...before proceeding with any installation. The leveling legs must remain firmly on your dryer. Part 3 INITIAL STEPS FOR INSTALLING YOUR DRYER Once in which your door opens: Note Door and latch should not rock. Follow these instructions to reverse the direction in position, adjust the leveling legs of the... dryer until it is not level, and if the slope exceeds 2.5 cm (1 inch), a load may not tumble properly and internal ...
Owners Manual
Page 11
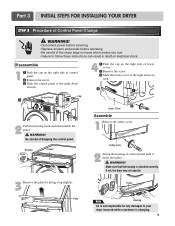
...hook and disassemble the panel. ! Be careful of control panel until it up slightly. WARNING! Plate Frame Note Housing LG is not responsible for any damages to your dryer incurred while a customer is attached correctly. WARNING! • Disconnect power before servicing. • Replace all parts and...Change ! If not, the dryer may not operate. 3 Remove the plate by lifting it clicks into place. ! Part 3 INITIAL STEPS FOR INSTALLING YOUR DRYER STEP 3 Procedure of the sharp edge on frame which makes you hurt. • Failure to follow these instructions can result in death or...
...hook and disassemble the panel. ! Be careful of control panel until it up slightly. WARNING! Plate Frame Note Housing LG is not responsible for any damages to your dryer incurred while a customer is attached correctly. WARNING! • Disconnect power before servicing. • Replace all parts and...Change ! If not, the dryer may not operate. 3 Remove the plate by lifting it clicks into place. ! Part 3 INITIAL STEPS FOR INSTALLING YOUR DRYER STEP 3 Procedure of the sharp edge on frame which makes you hurt. • Failure to follow these instructions can result in death or...
Owners Manual
Page 13
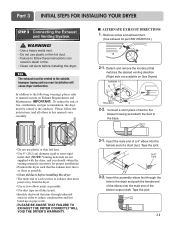
... on all others in the dryer and push the female end of the elbow onto the male end of the blower output shaft. Tape the joint. 3-2. Improper taping and incorrect installation will cause dryer malfunction. Please follow these instructions can result in order to ...manual section on pipe walls. • PLEASE BE AWARE THAT FAILURE TO EXHAUST THE DRYER CORRECTLY WILL VOID THE DRYER'S WARRANTY. 3-1. Tape the joint. 11 WARNING! •...
... on all others in the dryer and push the female end of the elbow onto the male end of the blower output shaft. Tape the joint. 3-2. Improper taping and incorrect installation will cause dryer malfunction. Please follow these instructions can result in order to ...manual section on pipe walls. • PLEASE BE AWARE THAT FAILURE TO EXHAUST THE DRYER CORRECTLY WILL VOID THE DRYER'S WARRANTY. 3-1. Tape the joint. 11 WARNING! •...

Owners Manual
Page 14
... is appropriate for manufactured (mobile) home installations and where local codes do so can result in a clothes dryer. 2. If your house is located at the back of dryer. 4. Use this manual's section on Gas Requirements and Instructions. 1 2 5 3 4 1. Or using LNG with a non-corrosive leak detection fluid. If changing the orifice, also adjust the...
... is appropriate for manufactured (mobile) home installations and where local codes do so can result in a clothes dryer. 2. If your house is located at the back of dryer. 4. Use this manual's section on Gas Requirements and Instructions. 1 2 5 3 4 1. Or using LNG with a non-corrosive leak detection fluid. If changing the orifice, also adjust the...
Owners Manual
Page 16
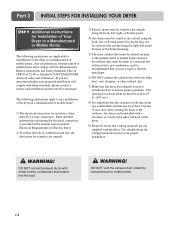
...with these standards, please contact a service and installation professional for assistance. The following instructions apply to any other duct, vent, chimney, or other exhaust duct. 7) Make sure the dryer has adequate access to outside fresh air must be at least 25 in2 (163...proper installation. ! Part 3 INITIAL STEPS FOR INSTALLING YOUR DRYER STEP 9 Additional Instructions for Installation of Your Dryer in a manufactured or mobile home: 1) The electrical connection for an electric dryer must be vented to the outside. 3) Electric dryers may not be made of a material that extend into ...
...with these standards, please contact a service and installation professional for assistance. The following instructions apply to any other duct, vent, chimney, or other exhaust duct. 7) Make sure the dryer has adequate access to outside fresh air must be at least 25 in2 (163...proper installation. ! Part 3 INITIAL STEPS FOR INSTALLING YOUR DRYER STEP 9 Additional Instructions for Installation of Your Dryer in a manufactured or mobile home: 1) The electrical connection for an electric dryer must be vented to the outside. 3) Electric dryers may not be made of a material that extend into ...
Owners Manual
Page 17
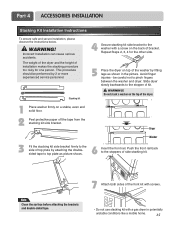
...not use stacking kit with a screw on the top of kit. ! Part 4 ACCESSORIES INSTALLATION Stacking Kit Installation Instructions To ensure safe and secure installation, please observe the instructions below. ! Stacking kit 4 Secure stacking kit side bracket to the side of the washer by fitting legs as... picture shows. 6 Insert the front rail. Repeat Steps 2, 3, 4 for one person. WARNING! Dryer Washer 3 Fit the stacking kit ...
...not use stacking kit with a screw on the top of kit. ! Part 4 ACCESSORIES INSTALLATION Stacking Kit Installation Instructions To ensure safe and secure installation, please observe the instructions below. ! Stacking kit 4 Secure stacking kit side bracket to the side of the washer by fitting legs as... picture shows. 6 Insert the front rail. Repeat Steps 2, 3, 4 for one person. WARNING! Dryer Washer 3 Fit the stacking kit ...

Owners Manual
Page 18
Part 4 ACCESSORIES INSTALLATION Pedestal Installation Instructions 1 4 2 1) Shut off gas. 2) Unplug power cord. 3) Disconnect gas line from dryer. 4) Pull away and loosen vent clamp. 5) Disconnect venting. for washer/ combo for dryer 5 6 3 for dryer for washer/ combo 7 16
Part 4 ACCESSORIES INSTALLATION Pedestal Installation Instructions 1 4 2 1) Shut off gas. 2) Unplug power cord. 3) Disconnect gas line from dryer. 4) Pull away and loosen vent clamp. 5) Disconnect venting. for washer/ combo for dryer 5 6 3 for dryer for washer/ combo 7 16
Owners Manual
Page 19
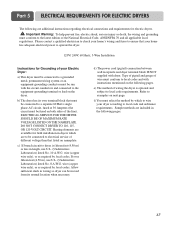
... examples on the following pages. Part 5 ELECTRICAL REQUIREMENTS FOR ELECTRIC DRYERS The following are additional instructions regarding electrical connections and requirements for field installation in dryers which to wire your Electric Dryer: a) This dryer must be connected to a grounded metal, permanent wiring system or ... and fuses to ensure that your home has adequate electrical power to operate the dryer. 120V/ 240V, 60 Hertz, 3-Wire Installation Instructions for Grounding of your dryer according to the equipment-grounding terminal or lead on nameplate. Type of pigtail and...
... examples on the following pages. Part 5 ELECTRICAL REQUIREMENTS FOR ELECTRIC DRYERS The following are additional instructions regarding electrical connections and requirements for field installation in dryers which to wire your Electric Dryer: a) This dryer must be connected to a grounded metal, permanent wiring system or ... and fuses to ensure that your home has adequate electrical power to operate the dryer. 120V/ 240V, 60 Hertz, 3-Wire Installation Instructions for Grounding of your dryer according to the equipment-grounding terminal or lead on nameplate. Type of pigtail and...
Owners Manual
Page 20
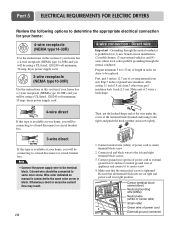
... to a fused disconnect or circuit breaker box. Part 5 ELECTRICAL REQUIREMENTS FOR ELECTRIC DRYERS Review the following options to determine the appropriate electrical connection for your home: 4-wire receptacle (NEMA type14-30R) Use the instructions in this section if your home has a 4-wire receptacle (NEMA type 14-30R...) and you will be using a UL listed, 120/240 volt minimum, 30 amp, dryer power supply cord. 3-wire receptacle (NEMA type10-30R) Use the instructions in this section if your home has a 3-wire receptacle (NEMA type 10-30R) and you will be using a ...
... to a fused disconnect or circuit breaker box. Part 5 ELECTRICAL REQUIREMENTS FOR ELECTRIC DRYERS Review the following options to determine the appropriate electrical connection for your home: 4-wire receptacle (NEMA type14-30R) Use the instructions in this section if your home has a 4-wire receptacle (NEMA type 14-30R...) and you will be using a UL listed, 120/240 volt minimum, 30 amp, dryer power supply cord. 3-wire receptacle (NEMA type10-30R) Use the instructions in this section if your home has a 3-wire receptacle (NEMA type 10-30R) and you will be using a ...
Owners Manual
Page 22
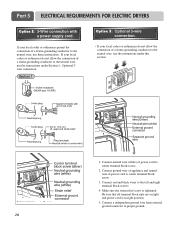
... are on tight and power cord is tightened. Connect a independent ground wire from external ground connector to the neutral wire, use the instructions under this section. 1. lf your local codes or ordinances do not allow the connection of a frame-grounding conductor to proper ground.... 20 Part 5 ELECTRICAL REQUIREMENTS FOR ELECTRIC DRYERS Option 2: 3-Wire connection with a power supply cord. Make sure the strain relief screw is in right position. 5. If your local codes...
... are on tight and power cord is tightened. Connect a independent ground wire from external ground connector to the neutral wire, use the instructions under this section. 1. lf your local codes or ordinances do not allow the connection of a frame-grounding conductor to proper ground.... 20 Part 5 ELECTRICAL REQUIREMENTS FOR ELECTRIC DRYERS Option 2: 3-Wire connection with a power supply cord. Make sure the strain relief screw is in right position. 5. If your local codes...
Owners Manual
Page 23
... person or company. Please contact a qualified electrician to check your home's wiring and fuses to you are additional instructions regarding electrical connections and requirements for washers and dryers, and DO NOT operate a washer and a dryer on the same circuit. ! DO NOT modify the plug provided with all wires prior to disconnection when servicing...
... person or company. Please contact a qualified electrician to check your home's wiring and fuses to you are additional instructions regarding electrical connections and requirements for washers and dryers, and DO NOT operate a washer and a dryer on the same circuit. ! DO NOT modify the plug provided with all wires prior to disconnection when servicing...
Owners Manual
Page 24
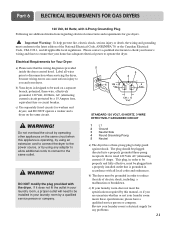
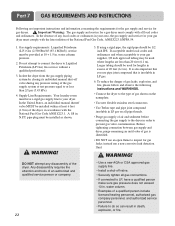
... Warning: The gas supply and service for gas leaks; Do not attempt to connect the dryer to your gas supplier, 3/8 inch approved tubing may be used where lengths are important instructions and information concerning the requirements for the gas supply and service for lengths in excess of 20...of gas leaks, explosion, and fire, please follow and observe the following instructions and WARNINGS. • Connect the dryer to the type of air and sediment before connecting the gas supply to inspect for a gas dryer must comply with all local codes and ordinances. water column. • ...
... Warning: The gas supply and service for gas leaks; Do not attempt to connect the dryer to your gas supplier, 3/8 inch approved tubing may be used where lengths are important instructions and information concerning the requirements for the gas supply and service for lengths in excess of 20...of gas leaks, explosion, and fire, please follow and observe the following instructions and WARNINGS. • Connect the dryer to the type of air and sediment before connecting the gas supply to inspect for a gas dryer must comply with all local codes and ordinances. water column. • ...

Owners Manual
Page 25
... with no obstructions. Rigid or semi-rigid metal ducting is not recommended to clean any old ducts before installing your dryer. ! DO NOT use . 2. Exhaust Requirements and Instructions: 1. Venting materials are important instructions and information concerning the exhaust requirements for each additional elbow. For example, the outer end of a building. Important Warning: To...
... with no obstructions. Rigid or semi-rigid metal ducting is not recommended to clean any old ducts before installing your dryer. ! DO NOT use . 2. Exhaust Requirements and Instructions: 1. Venting materials are important instructions and information concerning the exhaust requirements for each additional elbow. For example, the outer end of a building. Important Warning: To...


