
Service Manual
Page 3
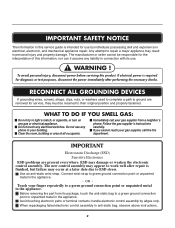
... or test purposes, disconnect the power immediately after performing the necessary checks. Use an anti-static wrist strap. Before removing the part from a neighbor's phone. WARNING ! Do not touch any phone in your gas supplier from its use by edges only. ... skill and experience in electrical, electronic, and mechanical appliance repair. Follow the gas supplier's instructions carefully. Avoid touching electronic parts or terminal contacts; To avoid personal injury, disconnect power before servicing this product. IMPORTANT SAFETY NOTICE The information in this service...
... or test purposes, disconnect the power immediately after performing the necessary checks. Use an anti-static wrist strap. Before removing the part from a neighbor's phone. WARNING ! Do not touch any phone in your gas supplier from its use by edges only. ... skill and experience in electrical, electronic, and mechanical appliance repair. Follow the gas supplier's instructions carefully. Avoid touching electronic parts or terminal contacts; To avoid personal injury, disconnect power before servicing this product. IMPORTANT SAFETY NOTICE The information in this service...
Service Manual
Page 4
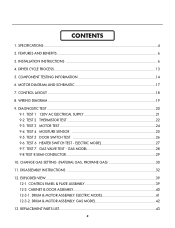
... 6. TEST 3 MOTOR TEST 24 9-4. TEST 6 HEATER SWITCH TEST - DRUM & MOTOR ASSEMBLY: ELECTRIC MODEL 41 12-3-2. TEST 5 DOOR SWITCH TEST 26 9-6. TEST 7 GAS VALVE TEST - REPLACEMENT PARTS LIST 43 3 DRYER CYCLE PROCESS ...13 5. CONTROL LAYOUT ...18 8. CONTROL PANEL & PLATE ASSEMBLY 39 12-2. TEST 2 THERMISTOR TEST 22 9-3. DRUM & MOTOR ASSEMBLY: GAS MODEL 42...
... 6. TEST 3 MOTOR TEST 24 9-4. TEST 6 HEATER SWITCH TEST - DRUM & MOTOR ASSEMBLY: ELECTRIC MODEL 41 12-3-2. TEST 5 DOOR SWITCH TEST 26 9-6. TEST 7 GAS VALVE TEST - REPLACEMENT PARTS LIST 43 3 DRYER CYCLE PROCESS ...13 5. CONTROL LAYOUT ...18 8. CONTROL PANEL & PLATE ASSEMBLY 39 12-2. TEST 2 THERMISTOR TEST 22 9-3. DRUM & MOTOR ASSEMBLY: GAS MODEL 42...
Service Manual
Page 9
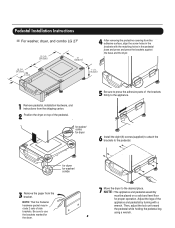
Pedestal Installation Instructions For washer, dryer, and combo LG 27" 4 AAtftaecr hretmheovdinogubthle-pfarocteedcttivaepecoovfetrhinegbfroamcktehteto the dardyheersaivsesshuorfwacnes, oaltighne tbhenstcpreawrtshoolfetshien bthreackets ablriagcnkwetisthwtihthetheedgmeaatcnhdincgahnoblees aintttahcehpeeddteostahle pbeadseesatnadl wpritehssscarnedwpsr.ess the brackets...placed on top of the pedestal. , for washer/ combo for dryer 5 Be sure to press the adhesive parts of the appliance and pedestal by turning with a wrench. NOTE: That the Pedestal hardware packet may include 2 sets of side brackets...
Pedestal Installation Instructions For washer, dryer, and combo LG 27" 4 AAtftaecr hretmheovdinogubthle-pfarocteedcttivaepecoovfetrhinegbfroamcktehteto the dardyheersaivsesshuorfwacnes, oaltighne tbhenstcpreawrtshoolfetshien bthreackets ablriagcnkwetisthwtihthetheedgmeaatcnhdincgahnoblees aintttahcehpeeddteostahle pbeadseesatnadl wpritehssscarnedwpsr.ess the brackets...placed on top of the pedestal. , for washer/ combo for dryer 5 Be sure to press the adhesive parts of the appliance and pedestal by turning with a wrench. NOTE: That the Pedestal hardware packet may include 2 sets of side brackets...
Service Manual
Page 32
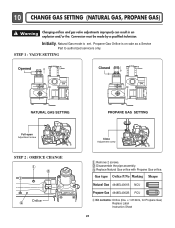
... made by a qualified technician. Disassemble the pipe assembly. Replace Natural Gas orifice with Propane Gas orifice. Initially, Natural Gas mode is on sale as a Service Part to authorized servicers only. 10 CHANGE GAS SETTING (NATURAL GAS, PROPANE GAS) ! STEP 1 : VALVE SETTING Opened Closed Full open Adjustment screw STEP 2 : ORIFICE CHANGE Orifice...
... made by a qualified technician. Disassemble the pipe assembly. Replace Natural Gas orifice with Propane Gas orifice. Initially, Natural Gas mode is on sale as a Service Part to authorized servicers only. 10 CHANGE GAS SETTING (NATURAL GAS, PROPANE GAS) ! STEP 1 : VALVE SETTING Opened Closed Full open Adjustment screw STEP 2 : ORIFICE CHANGE Orifice...
Service Manual
Page 38
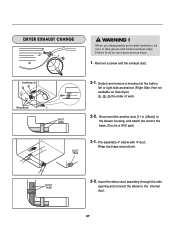
... take gloves and careful exhaust edge. Pre-assemble 4" elbow with 4" duct. When you disassemble and install ventilation, be sure to the base. (Duct is a SVC part) DUCT TAPE 3-1. Remove a screw and the exhaust duct. 2-1. Detach and remove a knockout at the botton, left or right side as desired. (Right Side Vent not...
... take gloves and careful exhaust edge. Pre-assemble 4" elbow with 4" duct. When you disassemble and install ventilation, be sure to the base. (Duct is a SVC part) DUCT TAPE 3-1. Remove a screw and the exhaust duct. 2-1. Detach and remove a knockout at the botton, left or right side as desired. (Right Side Vent not...
Service Manual
Page 45
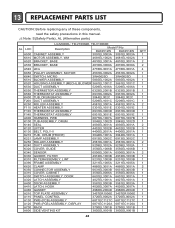
... A800 SIDE VENTING KIT 6871EC1120A 6871EC1120A 3750EL1001B 3750EL1001B 383EEL9001B 383EEL9001B 44 QTY 1 1 2 2 4 1 1 1 1 1 1 1 1 1 2 1 1 1 1 1 2 3 1 1 1 2 1 1 2 1 1 1 2 1 1 1 1 1 1 1 1 1 1 1 1 1 13 REPLACEMENT PARTS LIST CAUTION: Before replacing any of these components, read the safety precautions in this manual. ¡Æ Note: S(Safety Parts), AL (Alternative parts) LG MODEL: TD-V10062E, TD-V10060E AL LOC Description Model P/No DLE2512W DLE2514W A500 CABINET ASSEMBLY...
... A800 SIDE VENTING KIT 6871EC1120A 6871EC1120A 3750EL1001B 3750EL1001B 383EEL9001B 383EEL9001B 44 QTY 1 1 2 2 4 1 1 1 1 1 1 1 1 1 2 1 1 1 1 1 2 3 1 1 1 2 1 1 2 1 1 1 2 1 1 1 1 1 1 1 1 1 1 1 1 1 13 REPLACEMENT PARTS LIST CAUTION: Before replacing any of these components, read the safety precautions in this manual. ¡Æ Note: S(Safety Parts), AL (Alternative parts) LG MODEL: TD-V10062E, TD-V10060E AL LOC Description Model P/No DLE2512W DLE2514W A500 CABINET ASSEMBLY...
Service Manual
Page 46
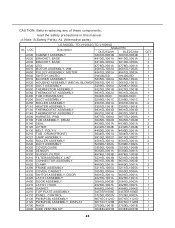
CAUTION: Before replacing any of these components, read the safety precautions in this manual. ¡Æ Note: S(Safety Parts), AL (Alternative parts) LG MODEL: TD-V10062G,TD-V10060G AL LOC Description Model P/N DLE2522W DLE2524W A500 CABINET ASSEMBLY 3091EL0003B 3091EL0003B A520 BRACKET, BASE 4810EL3001A 4810EL3001A A530 BRACKET, BASE 4810EL3009A ...
CAUTION: Before replacing any of these components, read the safety precautions in this manual. ¡Æ Note: S(Safety Parts), AL (Alternative parts) LG MODEL: TD-V10062G,TD-V10060G AL LOC Description Model P/N DLE2522W DLE2524W A500 CABINET ASSEMBLY 3091EL0003B 3091EL0003B A520 BRACKET, BASE 4810EL3001A 4810EL3001A A530 BRACKET, BASE 4810EL3009A ...


