

Owners Manual
Page 2
For more information, visit our website at http://us.lge.com P/No.: 3828EL3010A Please read your manual carefully, as it provides instructions on safe Installation, Use and Maintenance. Record the Model and Serial Numbers, and retain the manual for buying a LG Dryer. 1-800-243-0000 24 HOURS A DAY, 7 DAYS A WEEK FOR LG CUSTOMER SERVICE DLE7177WM/DLG7188WM DLE7177NM/DLG7188NM DLE7177RM/DLG7188RM Thank you for future reference.
For more information, visit our website at http://us.lge.com P/No.: 3828EL3010A Please read your manual carefully, as it provides instructions on safe Installation, Use and Maintenance. Record the Model and Serial Numbers, and retain the manual for buying a LG Dryer. 1-800-243-0000 24 HOURS A DAY, 7 DAYS A WEEK FOR LG CUSTOMER SERVICE DLE7177WM/DLG7188WM DLE7177NM/DLG7188NM DLE7177RM/DLG7188RM Thank you for future reference.
Owners Manual
Page 3
... automatically determines operation time based on the dryness of load weight, more effective for this dryer. What are still damp after sensor dry cycle is ensured. ELECTRICAL REQUIREMENTS FOR GAS DRYERS...19 PART7. TROUBLESHOOTING GUIDE...31-33 LG DRYER LIMITED WARRANTY...34 2 ARTISTIC DESIGN 3 Modern front panel look stylish. Sudden change in operation time...
... automatically determines operation time based on the dryness of load weight, more effective for this dryer. What are still damp after sensor dry cycle is ensured. ELECTRICAL REQUIREMENTS FOR GAS DRYERS...19 PART7. TROUBLESHOOTING GUIDE...31-33 LG DRYER LIMITED WARRANTY...34 2 ARTISTIC DESIGN 3 Modern front panel look stylish. Sudden change in operation time...
Owners Manual
Page 4
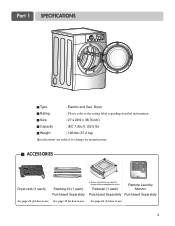
... Specifications are subject to use. I Size : 27 x 29.9 x 38.7(inch) I Capacity : IEC 7.3cu.ft. (22.5 lb) I ACCESSORIES Dryer rack (1 each) Stacking kit (1 each ) Remote Laundry Monitor Purchased Separately Purchased Separately See page 26 for how to change by manufacturer. See page 13 for... how to use . 3 Part 1 SPECIFICATIONS I Type : Electric and Gas Dryer I Rating : Please refer to change without manafaturers notice. See page 14 for how to use . Pedestal (1 each ) Purchased Separately ❊ ...
... Specifications are subject to use. I Size : 27 x 29.9 x 38.7(inch) I Capacity : IEC 7.3cu.ft. (22.5 lb) I ACCESSORIES Dryer rack (1 each) Stacking kit (1 each ) Remote Laundry Monitor Purchased Separately Purchased Separately See page 26 for how to change by manufacturer. See page 13 for... how to use . 3 Part 1 SPECIFICATIONS I Type : Electric and Gas Dryer I Rating : Please refer to change without manafaturers notice. See page 14 for how to use . Pedestal (1 each ) Purchased Separately ❊ ...
Owners Manual
Page 5
...when requesting Warranty Service. Warranty Restriction: If the dryer is subjected to other than private family use, all warranty coverage is required. Model No. Proof of purchase date is effective for your Dryer is available by contacting your nearest LG Service Center. WARNING! Serial No. Use the... space below to prevent property damage, personal injury, or death when using your new LG dryer. Date of your appliance follow basic precautions, including the following. Warranty Service is located at the end of Purchase. ! ...
...when requesting Warranty Service. Warranty Restriction: If the dryer is subjected to other than private family use, all warranty coverage is required. Model No. Proof of purchase date is effective for your Dryer is available by contacting your nearest LG Service Center. WARNING! Serial No. Use the... space below to prevent property damage, personal injury, or death when using your new LG dryer. Date of your appliance follow basic precautions, including the following. Warranty Service is located at the end of Purchase. ! ...
Owners Manual
Page 6
... duct should be run with gasoline, dry-cleaning solvents, or other personal injury or property damage when using your dryer. Items contaminated with a qualified electrician or service person if you are in your dryer, please exercise care and follow basic safety precautions, including the following: 1) Read all local codes and ordinances. WARNING...
... duct should be run with gasoline, dry-cleaning solvents, or other personal injury or property damage when using your dryer. Items contaminated with a qualified electrician or service person if you are in your dryer, please exercise care and follow basic safety precautions, including the following: 1) Read all local codes and ordinances. WARNING...
Owners Manual
Page 7
...materials should be minimized further by the incomplete combustion of all instructions and information, including those in this appliance. ! Properly adjusted dryers will minimize combustion. Part 2 IMPORTANT WARRANTY AND SAFETY INSTRUCTIONS ! Exposure to cause cancer, birth defects or other flammable vapors or...death, explosion or fire. Follow the gas supplier's instructions carefully. • If you cannot reach your gas supplier from dryer. • Place dryer at least 18 inches above the floor for a garage installation. • Failure to do so can cause minor exposure ...
...materials should be minimized further by the incomplete combustion of all instructions and information, including those in this appliance. ! Properly adjusted dryers will minimize combustion. Part 2 IMPORTANT WARRANTY AND SAFETY INSTRUCTIONS ! Exposure to cause cancer, birth defects or other flammable vapors or...death, explosion or fire. Follow the gas supplier's instructions carefully. • If you cannot reach your gas supplier from dryer. • Place dryer at least 18 inches above the floor for a garage installation. • Failure to do so can cause minor exposure ...
Owners Manual
Page 8
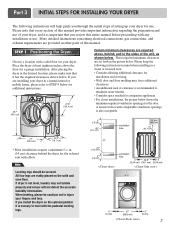
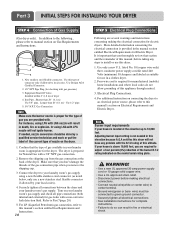
...the minimum required ventilation openings for companion appliances. • For closet installations, the picture below . Part 3 INITIAL STEPS FOR INSTALLING YOUR DRYER The following instructions in mind when installing in a closet or recessed area: • Consider allowing additional clearance for installation and servicing. &#... and sensor will help guide you review this manual provides important information regarding the preparation and use . After placing the dryer in the desired location, please make sure that you through the initial steps of setting up your fingers and toes. ...
...the minimum required ventilation openings for companion appliances. • For closet installations, the picture below . Part 3 INITIAL STEPS FOR INSTALLING YOUR DRYER The following instructions in mind when installing in a closet or recessed area: • Consider allowing additional clearance for installation and servicing. &#... and sensor will help guide you review this manual provides important information regarding the preparation and use . After placing the dryer in the desired location, please make sure that you through the initial steps of setting up your fingers and toes. ...
Owners Manual
Page 9
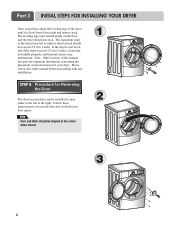
... not level, and if the slope exceeds 2.5 cm (1 inch), a load may not tumble properly and internal sensors may malfunction. Part 3 INITIAL STEPS FOR INSTALLING YOUR DRYER Once in which your door opens: Note Door and latch should be installed to open either to the left or the right. The maximum slope... of the dryer from left to right and front to reverse the direction in position, adjust the leveling legs of this entire manual before proceeding with any installation...
... not level, and if the slope exceeds 2.5 cm (1 inch), a load may not tumble properly and internal sensors may malfunction. Part 3 INITIAL STEPS FOR INSTALLING YOUR DRYER Once in which your door opens: Note Door and latch should be installed to open either to the left or the right. The maximum slope... of the dryer from left to right and front to reverse the direction in position, adjust the leveling legs of this entire manual before proceeding with any installation...
Owners Manual
Page 10
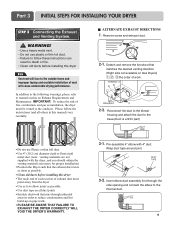
...and connect the elbow to manual section on all others in death or fire. • Clean old ducts before installing this dryer Note Vent end will face to the outdoors. I ALTERNATE EXHAUST DIRECTIONS 1. Wrap duct tape around joint. 3-2. Pre-assemble 4" elbow with the... section of exhaust duct must be vented to the outside home and improper taping and unstable installation of work. 2-2. Part 3 INITIAL STEPS FOR INSTALLING YOUR DRYER STEP 3 Connecting the Exhaust and Venting System. ! Remove screw and exhaust duct. 2-1. WARNING! • Use a heavy metal vent. • Do not...
...and connect the elbow to manual section on all others in death or fire. • Clean old ducts before installing this dryer Note Vent end will face to the outdoors. I ALTERNATE EXHAUST DIRECTIONS 1. Wrap duct tape around joint. 3-2. Pre-assemble 4" elbow with the... section of exhaust duct must be vented to the outside home and improper taping and unstable installation of work. 2-2. Part 3 INITIAL STEPS FOR INSTALLING YOUR DRYER STEP 3 Connecting the Exhaust and Venting System. ! Remove screw and exhaust duct. 2-1. WARNING! • Use a heavy metal vent. • Do not...
Owners Manual
Page 11
... is above 10,000 feet, you thoroughly review that the type of gas available in the manual section entitled Electrical Requirements for the dryer. Remove the shipping cap from the gas connection at this type of connector only if allowed by your house is proper for complete ... flexible connector if allowed by local codes. Use this altitude. Equipment Shut-Off Valve- Shorter than 20' (6.1 m) - Or using LPG with . The dryer is not needed , nozzle conversion should be connected to center terminal. • Ground wire(green or bare wire) must be done by a qualified service ...
... is above 10,000 feet, you thoroughly review that the type of gas available in the manual section entitled Electrical Requirements for the dryer. Remove the shipping cap from the gas connection at this type of connector only if allowed by your house is proper for complete ... flexible connector if allowed by local codes. Use this altitude. Equipment Shut-Off Valve- Shorter than 20' (6.1 m) - Or using LPG with . The dryer is not needed , nozzle conversion should be connected to center terminal. • Ground wire(green or bare wire) must be done by a qualified service ...
Owners Manual
Page 12
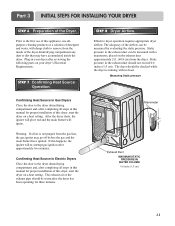
.../drying compartment any dust or dirt that may go off before the gas and the main burner have ignited. After the dryer starts, the igniter will glow red and the main burner will re-attempt gas ignition after reviewing the following parts on a heat setting...pipe should not exceed 0.6 inches (1.5 cm). Warning: If all steps in Gas Dryers Close the door to the first use of this dryer, start the dryer on your dryer after approximately two minutes. Part 3 INITIAL STEPS FOR INSTALLING YOUR DRYER STEP 6 Preparation of detergent and water, with no load. Confirming Heat Source ...
.../drying compartment any dust or dirt that may go off before the gas and the main burner have ignited. After the dryer starts, the igniter will glow red and the main burner will re-attempt gas ignition after reviewing the following parts on a heat setting...pipe should not exceed 0.6 inches (1.5 cm). Warning: If all steps in Gas Dryers Close the door to the first use of this dryer, start the dryer on your dryer after approximately two minutes. Part 3 INITIAL STEPS FOR INSTALLING YOUR DRYER STEP 6 Preparation of detergent and water, with no load. Confirming Heat Source ...

Owners Manual
Page 13
... your proposed installation will resist fire and combustion, and it is important that the clearance of the duct from any installation of the dryer in a manufactured or mobile home must be permanently attached to ensure proper operation. DO NOT vent the exhaust duct under the manufactured... and the exhaust duct must be vented to the outside fresh air must be vented to the outside. 4) Electric dryers may be vented to installations of the dryer in a Manufactured or Mobile Home. More detailed information concerning the electrical connection is provided at the manual section entitled ...
... your proposed installation will resist fire and combustion, and it is important that the clearance of the duct from any installation of the dryer in a manufactured or mobile home must be permanently attached to ensure proper operation. DO NOT vent the exhaust duct under the manufactured... and the exhaust duct must be vented to the outside fresh air must be vented to the outside. 4) Electric dryers may be vented to installations of the dryer in a Manufactured or Mobile Home. More detailed information concerning the electrical connection is provided at the manual section entitled ...

Owners Manual
Page 14
...as picture shows. 6 Insert the front stacking kit. WARNING! The weight of the dryer and the height of installation makes the stacking procedure too risky for the other side. 5 Place the dryer on the back of top plate by 2 or more experienced service personnel. 4 ...Secure stacking kit side bracket to the stopper of the front kit. Slide dryer slowly backwards to the washer with a gas dryer in the picture. Incorrect Installation can cause serious accidents. Repeat Steps 2, 3, 4 for one person. Part 4 ACCESSORIES INSTALLATION...
...as picture shows. 6 Insert the front stacking kit. WARNING! The weight of the dryer and the height of installation makes the stacking procedure too risky for the other side. 5 Place the dryer on the back of top plate by 2 or more experienced service personnel. 4 ...Secure stacking kit side bracket to the stopper of the front kit. Slide dryer slowly backwards to the washer with a gas dryer in the picture. Incorrect Installation can cause serious accidents. Repeat Steps 2, 3, 4 for one person. Part 4 ACCESSORIES INSTALLATION...

Owners Manual
Page 15
Disconnect venting. for washer/ combo for dryer 5 6 3 for dryer for washer/ combo 7 14 Part 4 ACCESSORIES INSTALLATION Pedestal Installation Instructions 1 4 2 1) Shut off Gas 2) Unplug Power Cord 3) Disconnect Gas Line from Dryer 4) Pull away and loosen vent clamp.
Disconnect venting. for washer/ combo for dryer 5 6 3 for dryer for washer/ combo 7 14 Part 4 ACCESSORIES INSTALLATION Pedestal Installation Instructions 1 4 2 1) Shut off Gas 2) Unplug Power Cord 3) Disconnect Gas Line from Dryer 4) Pull away and loosen vent clamp.

Owners Manual
Page 16
...(copper wire only), or as required by local codes. Type of pigtail and gauge of your home has adequate electrical power to operate the dryer. 120V/ 240V, 60 Hertz, 3-Wire Installation Instructions for Grounding of wire must conform to electrical service of the line). Sample methods are ... fused at 30 Amperes (the circuit must be run with the circuit conductors and connected to local code requirements. c) If branch circuit to dryer is optional and subject to the equipment-grounding terminal or lead on nameplate. e) The method of the National Electrical Code, ANSI/NFPA 70 ...
...(copper wire only), or as required by local codes. Type of pigtail and gauge of your home has adequate electrical power to operate the dryer. 120V/ 240V, 60 Hertz, 3-Wire Installation Instructions for Grounding of wire must conform to electrical service of the line). Sample methods are ... fused at 30 Amperes (the circuit must be run with the circuit conductors and connected to local code requirements. c) If branch circuit to dryer is optional and subject to the equipment-grounding terminal or lead on nameplate. e) The method of the National Electrical Code, ANSI/NFPA 70 ...
Owners Manual
Page 17
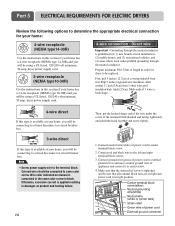
...block. Connect neutral wire(white) of ground wire insulation. Connect red and black wire to center screw. 4. Part 5 ELECTRICAL REQUIREMENTS FOR ELECTRIC DRYERS Review the following options to determine the appropriate electrical connection for your home: 4-wire receptacle (NEMA type14-30R) Use the instructions in this ... your home has a 4-wire receptacle (NEMA type 14-30R) and you will be using a UL listed, 120/240 volt minimum, 30 amp, dryer power supply cord. 3-wire receptacle (NEMA type10-30R) Use the instructions in this section if your home has a 3-wire receptacle (NEMA type 10-...
...block. Connect neutral wire(white) of ground wire insulation. Connect red and black wire to center screw. 4. Part 5 ELECTRICAL REQUIREMENTS FOR ELECTRIC DRYERS Review the following options to determine the appropriate electrical connection for your home: 4-wire receptacle (NEMA type14-30R) Use the instructions in this ... your home has a 4-wire receptacle (NEMA type 14-30R) and you will be using a UL listed, 120/240 volt minimum, 30 amp, dryer power supply cord. 3-wire receptacle (NEMA type10-30R) Use the instructions in this section if your home has a 3-wire receptacle (NEMA type 10-...

Owners Manual
Page 18
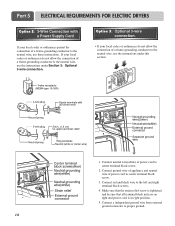
... on tight and power cord is tightened. Connect neutral wire(white) of a 3 wire connection, or you are installing your dryer in order for (1) new branch-circuit installations, (2) mobile homes, and (3) recreational vehicles, and (4) areas where local codes... prohibit grounding through the neutral conductor is prohibited for dryer to center terminal block screw. 2. Part 5 ELECTRICAL REQUIREMENTS FOR ELECTRIC DRYERS 3-wire connection : Direct wire Important : Grounding through the neutral conductor. Prepare minimum 5ft(1.52m) ...
... on tight and power cord is tightened. Connect neutral wire(white) of a 3 wire connection, or you are installing your dryer in order for (1) new branch-circuit installations, (2) mobile homes, and (3) recreational vehicles, and (4) areas where local codes... prohibit grounding through the neutral conductor is prohibited for dryer to center terminal block screw. 2. Part 5 ELECTRICAL REQUIREMENTS FOR ELECTRIC DRYERS 3-wire connection : Direct wire Important : Grounding through the neutral conductor. Prepare minimum 5ft(1.52m) ...
Owners Manual
Page 19
Part 5 ELECTRICAL REQUIREMENTS FOR ELECTRIC DRYERS Option 2: 3-Wire Connection with a Power Supply Cord lf your local codes or ordinances permit the connection of power cord to center terminal block screw. 2. Connect ...
Part 5 ELECTRICAL REQUIREMENTS FOR ELECTRIC DRYERS Option 2: 3-Wire Connection with a Power Supply Cord lf your local codes or ordinances permit the connection of power cord to center terminal block screw. 2. Connect ...
Owners Manual
Page 20
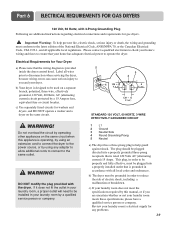
... Electrical Code, ANSI/NFPA 70, or the Canadian Electrical Code, CSA C22.1, and all wires prior to disconnection when servicing the dryer, because wiring errors can cause serious injury to reduce the risk of electric shock, including a malfunction or breakdown. Important Warning: To..., 120 Volt, 60 Hertz, AC (alternating current) circuit protected by a qualified service person or company. Part 6 ELECTRICAL REQUIREMENTS FOR GAS DRYERS 120 Volt, 60 Hertz, with 3-Prong Grounding Plug Following are uncertain whether or not your laundry room meets these specifications, please have a qualified...
... Electrical Code, ANSI/NFPA 70, or the Canadian Electrical Code, CSA C22.1, and all wires prior to disconnection when servicing the dryer, because wiring errors can cause serious injury to reduce the risk of electric shock, including a malfunction or breakdown. Important Warning: To..., 120 Volt, 60 Hertz, AC (alternating current) circuit protected by a qualified service person or company. Part 6 ELECTRICAL REQUIREMENTS FOR GAS DRYERS 120 Volt, 60 Hertz, with 3-Prong Grounding Plug Following are uncertain whether or not your laundry room meets these specifications, please have a qualified...
Owners Manual
Page 21
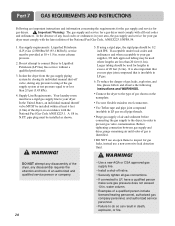
...4. To reduce the danger of gas leaks, explosion, and fire, please follow and observe the following instructions and WARNINGS. • Connect the dryer to the type of gas shown on all local codes and ordinances. In the United States, an individual manual shutoff valve MUST be 1/2 inch...or company. 20 5. If acceptable under local codes and ordinances and when acceptable to LP, have a rigid gas supply line to your gas dryer must comply with the National Fuel Gas Code ANSI Z223.1. water column. • Examples of 20 feet (6.1m). Gas supply requirements: Liquefied ...
...4. To reduce the danger of gas leaks, explosion, and fire, please follow and observe the following instructions and WARNINGS. • Connect the dryer to the type of gas shown on all local codes and ordinances. In the United States, an individual manual shutoff valve MUST be 1/2 inch...or company. 20 5. If acceptable under local codes and ordinances and when acceptable to LP, have a rigid gas supply line to your gas dryer must comply with the National Fuel Gas Code ANSI Z223.1. water column. • Examples of 20 feet (6.1m). Gas supply requirements: Liquefied ...


