

Owners Manual
Page 5
... your appliance, follow basic precautions, including the following. Model No. Warranty service is printed the end of its mechanical or electrical parts if they are located on the Model and Serial Number Plate located on the front of fire or explosion, electric shock, or ...material or workmanship. ! Date of your safety, the recommendations in this manual. WARNING! Use the space below to the instructions in this manual must be followed. You will repair or replace any of this manual, LG will need the complete model and serial numbers when requesting information. Serial No...
... your appliance, follow basic precautions, including the following. Model No. Warranty service is printed the end of its mechanical or electrical parts if they are located on the Model and Serial Number Plate located on the front of fire or explosion, electric shock, or ...material or workmanship. ! Date of your safety, the recommendations in this manual. WARNING! Use the space below to the instructions in this manual must be followed. You will repair or replace any of this manual, LG will need the complete model and serial numbers when requesting information. Serial No...
Owners Manual
Page 7
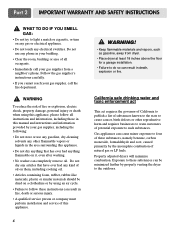
Part 2 IMPORTANT WARRANTY AND SAFETY INSTRUCTIONS ! WARNING To reduce the risk of fire or explosion, electric shock, property damage, personal injury or death when using this .... • Clear the room, building or area of substances known to the state to publish a list of all instructions and information, including those in this manual and instructions and information provided by using an air cycle. • Failure to follow these substances, namely benzene, carbon monoxide, formaldehyde and soot, caused primarily...
Part 2 IMPORTANT WARRANTY AND SAFETY INSTRUCTIONS ! WARNING To reduce the risk of fire or explosion, electric shock, property damage, personal injury or death when using this .... • Clear the room, building or area of substances known to the state to publish a list of all instructions and information, including those in this manual and instructions and information provided by using an air cycle. • Failure to follow these substances, namely benzene, carbon monoxide, formaldehyde and soot, caused primarily...
Owners Manual
Page 8
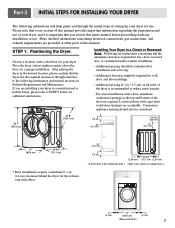
...• Additional spacing should also be required for your dryer. If you are acceptable. Place the dryer at other parts of this manual provides important information regarding the preparation and use . STEP 1: Positioning the Dryer. Installing Your Dryer in . (2.5... Area. Following are instructions concerning and the minimum clearances required for additional instructions. Part 3 INITIAL STEPS FOR INSTALLING YOUR DRYER The following information and manual sections on Exhaust Requirements and Maintenance. Louvered doors with equivalent ventilation openings are installing...
...• Additional spacing should also be required for your dryer. If you are acceptable. Place the dryer at other parts of this manual provides important information regarding the preparation and use . STEP 1: Positioning the Dryer. Installing Your Dryer in . (2.5... Area. Following are instructions concerning and the minimum clearances required for additional instructions. Part 3 INITIAL STEPS FOR INSTALLING YOUR DRYER The following information and manual sections on Exhaust Requirements and Maintenance. Louvered doors with equivalent ventilation openings are installing...
Owners Manual
Page 9
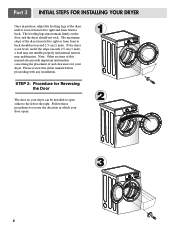
... if the slope exceeds 2.5 cm (1 inch), a load may not tumble properly and internal sensors may malfunction. Follow these procedures to back should not rock. Part 3 INITIAL STEPS FOR INSTALLING YOUR DRYER Once in which your door opens: 1 2 3 8 The maximum slope of and clearances for Reversing the Door The door... on the floor and the dryer should not exceed 2.5 cm (1 inch). Please review this manual also provide important information concerning the placement of the dryer from left or the right. Note: Other sections of this entire...
... if the slope exceeds 2.5 cm (1 inch), a load may not tumble properly and internal sensors may malfunction. Follow these procedures to back should not rock. Part 3 INITIAL STEPS FOR INSTALLING YOUR DRYER Once in which your door opens: 1 2 3 8 The maximum slope of and clearances for Reversing the Door The door... on the floor and the dryer should not exceed 2.5 cm (1 inch). Please review this manual also provide important information concerning the placement of the dryer from left or the right. Note: Other sections of this entire...
Owners Manual
Page 10
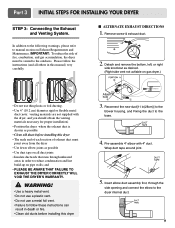
... • PLEASE BE AWARE THAT FAILURE TO EXHAUST THE DRYER CORRECTLY WILL VOID THE DRYER'S WARRANTY. ! Wrap duct tape around joint. 5. Part 3 INITIAL STEPS FOR INSTALLING YOUR DRYER STEP 3: Connecting the Exhaust and Venting System. Detach and remove the bottom, left, or right side ...knockout as possible • Clean old ducts before installing this manual) very carefully. Pre-assemble 4" elbow with the dryer, and you should obtain the venting materials necessary for proper installation) • Position...
... • PLEASE BE AWARE THAT FAILURE TO EXHAUST THE DRYER CORRECTLY WILL VOID THE DRYER'S WARRANTY. ! Wrap duct tape around joint. 5. Part 3 INITIAL STEPS FOR INSTALLING YOUR DRYER STEP 3: Connecting the Exhaust and Venting System. Detach and remove the bottom, left, or right side ...knockout as possible • Clean old ducts before installing this manual) very carefully. Pre-assemble 4" elbow with the dryer, and you should obtain the venting materials necessary for proper installation) • Position...
Owners Manual
Page 11
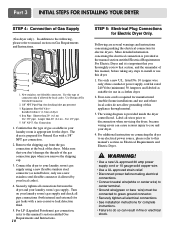
...you and your dryer. 4. Use Design AGA Certified Connector. 2. 1/8" NPT Pipe Plug (for electric dryers. Connect the dryer to manual section on Electrical Requirements and Electric Dryer. ! Following are several warnings and instructions concerning making electrical connections. • Connect neutral wire(...Shorter than 20' (6.1 m) - Iron Pipe. Gas Connection 1. Label all connections between the dryer and your laundry room's gas supply. Part 3 INITIAL STEPS FOR INSTALLING YOUR DRYER STEP 4: Connection of gas available in your laundry room is appropriate for the dryer. Use this...
...you and your dryer. 4. Use Design AGA Certified Connector. 2. 1/8" NPT Pipe Plug (for electric dryers. Connect the dryer to manual section on Electrical Requirements and Electric Dryer. ! Following are several warnings and instructions concerning making electrical connections. • Connect neutral wire(...Shorter than 20' (6.1 m) - Iron Pipe. Gas Connection 1. Label all connections between the dryer and your laundry room's gas supply. Part 3 INITIAL STEPS FOR INSTALLING YOUR DRYER STEP 4: Connection of gas available in your laundry room is appropriate for the dryer. Use this...
Owners Manual
Page 12
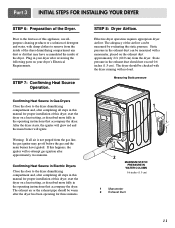
... instructions that accompany the dryer. Plug in Electric Dryers Close the door to the dryer drum/drying compartment and, after reviewing the following parts on the exhaust duct approximately 2 ft. (60.9 cm) from the gas line, the gas igniter may have ignited. Confirming Heat ... the dryer. Warning: If all steps in this happens, the igniter will ignite. Effective dryer operation requires appropriate dryer airflow. If this manual for three minutes. The exhaust air or the exhaust pipe should not exceed 0.6 inches (1.5 cm). The dryer should be checked with the...
... instructions that accompany the dryer. Plug in Electric Dryers Close the door to the dryer drum/drying compartment and, after reviewing the following parts on the exhaust duct approximately 2 ft. (60.9 cm) from the gas line, the gas igniter may have ignited. Confirming Heat ... the dryer. Warning: If all steps in this happens, the igniter will ignite. Effective dryer operation requires appropriate dryer airflow. If this manual for three minutes. The exhaust air or the exhaust pipe should not exceed 0.6 inches (1.5 cm). The dryer should be checked with the...
Owners Manual
Page 13
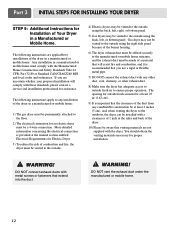
...back, left, or bottom panel. DO NOT connect exhaust ducts with these standards, please contact a service and installation professional for assistance. Part 3 INITIAL STEPS FOR INSTALLING YOUR DRYER STEP 9: Additional Instructions for Installation of Your Dryer in a manufactured or mobile home must comply with... inches (5 cm), and, when venting the dryer to the outdoors, the dryer can be installed with a clearances of 1 inch at the manual section entitled Electrical Requirements for Electric Dryer 3) To reduce the risk of combustion and fire, the dryer must be vented to the outside. 4)...
...back, left, or bottom panel. DO NOT connect exhaust ducts with these standards, please contact a service and installation professional for assistance. Part 3 INITIAL STEPS FOR INSTALLING YOUR DRYER STEP 9: Additional Instructions for Installation of Your Dryer in a manufactured or mobile home must comply with... inches (5 cm), and, when venting the dryer to the outdoors, the dryer can be installed with a clearances of 1 inch at the manual section entitled Electrical Requirements for Electric Dryer 3) To reduce the risk of combustion and fire, the dryer must be vented to the outside. 4)...
Owners Manual
Page 20
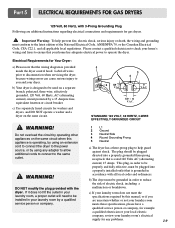
... service person or company, for example a qualified electrician or your local electric company, review your laundry room's electrical supply for gas dryers. ! Part 5 ELECTRICAL REQUIREMENTS FOR GAS DRYERS 120 Volt, 60 Hertz, with the dryer. c) Use separately fused circuits for Your Dryer: a) Please note ... and ordinances. Electrical Requirements for washers and dryers, and DO NOT operate a washer and a dryer on the same circuit when this manual, or if you and your laundry room by operating other appliances on the same circuit. ! Do not overload the circuit by a ...
... service person or company, for example a qualified electrician or your local electric company, review your laundry room's electrical supply for gas dryers. ! Part 5 ELECTRICAL REQUIREMENTS FOR GAS DRYERS 120 Volt, 60 Hertz, with the dryer. c) Use separately fused circuits for Your Dryer: a) Please note ... and ordinances. Electrical Requirements for washers and dryers, and DO NOT operate a washer and a dryer on the same circuit when this manual, or if you and your laundry room by operating other appliances on the same circuit. ! Do not overload the circuit by a ...
Owners Manual
Page 21
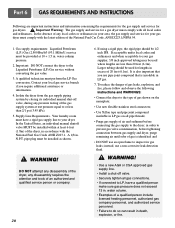
... or information. 4. and • DO NOT use an open flame to the Liquefied Petroleum (LP) Gas service without converting the gas value. 3. Part 6 GAS REQUIREMENTS AND INSTRUCTIONS Following are less than 2/1 psi (3.45 kPa). 5. water column pressure. 2. Isolate the dryer from the gas supply piping... system by closing its individual manual shut-off valve. • Securely tighten all local codes and ordinances. Your laundry room must be 1/2 inch IPS. Larger tubing should be ...
... or information. 4. and • DO NOT use an open flame to the Liquefied Petroleum (LP) Gas service without converting the gas value. 3. Part 6 GAS REQUIREMENTS AND INSTRUCTIONS Following are less than 2/1 psi (3.45 kPa). 5. water column pressure. 2. Isolate the dryer from the gas supply piping... system by closing its individual manual shut-off valve. • Securely tighten all local codes and ordinances. Your laundry room must be 1/2 inch IPS. Larger tubing should be ...
Owners Manual
Page 24
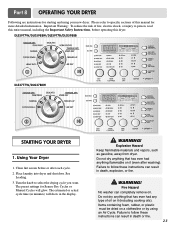
... be dried on it (even after each cycle. 2. The preset settings for Sensor Dry Cycles or Manual Cycles will show in death, explosion, or fire. ! Explosion Hazard Keep flammable materials and vapors,... such as gasoline, away from dryer. Failure to follow these instructions can completely remove oil. DLE5977W/DLG5988W/DLE5977B/DLG5988B DLE3777W/DLG3788W STARTING YOUR DRYER 1. The estimated or actual cycle time (in death... that has ever had any type of this dryer. Part 8 OPERATING YOUR DRYER Following are instructions for more detailed information. Please refer to select the...
... be dried on it (even after each cycle. 2. The preset settings for Sensor Dry Cycles or Manual Cycles will show in death, explosion, or fire. ! Explosion Hazard Keep flammable materials and vapors,... such as gasoline, away from dryer. Failure to follow these instructions can completely remove oil. DLE5977W/DLG5988W/DLE5977B/DLG5988B DLE3777W/DLG3788W STARTING YOUR DRYER 1. The estimated or actual cycle time (in death... that has ever had any type of this dryer. Part 8 OPERATING YOUR DRYER Following are instructions for more detailed information. Please refer to select the...

Owners Manual
Page 25
...at any time Open the door or press START/PAUSE once. Select new cycle settings before restarting the dryer. 5. Part 8 OPERATING YOUR DRYER 2. To use a Manual Dry Cycle • Select a Manual Dry Cycle. • Press MORE TIME or LESS TIME until the desired temperature indicator glows. • (OPTIONAL... the selected dryness level. • Select the desired Options. • Press START/PAUSE NOTE: DRY LEVEL selections can only be used with Manual Dry, Time Dry, and Rack Dry Cycles. • Press TEMP. CONTROL until the desired drying time is interrupted for more details, see Options...
...at any time Open the door or press START/PAUSE once. Select new cycle settings before restarting the dryer. 5. Part 8 OPERATING YOUR DRYER 2. To use a Manual Dry Cycle • Select a Manual Dry Cycle. • Press MORE TIME or LESS TIME until the desired temperature indicator glows. • (OPTIONAL... the selected dryness level. • Select the desired Options. • Press START/PAUSE NOTE: DRY LEVEL selections can only be used with Manual Dry, Time Dry, and Rack Dry Cycles. • Press TEMP. CONTROL until the desired drying time is interrupted for more details, see Options...
Owners Manual
Page 26
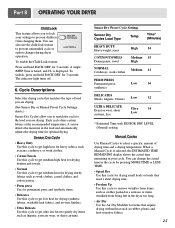
...as clothes packed in a suitcase or items wrinkled from changing them. Sensor Dry Preset Cycle Settings Sensor Dry Cycles Load Type Temp. Manual Cycles Use Manual Cycles to prevent unintended cycle or option changes during dryer operation. Time* (Minutes) HEAVY DUTY Heavyweight, jeans High 54 COTTON/TOWELS .... 6. To enable the Child Lock feature: Press and hold RACK DRY for 3 seconds. Part 8 OPERATING YOUR DRYER Child Lock This feature allows you are drying. (See Sensor Dry or Manual Preset Cycle Settings charts.) Sensor Dry Cycles allow you to match the cycle to the load ...
...as clothes packed in a suitcase or items wrinkled from changing them. Sensor Dry Preset Cycle Settings Sensor Dry Cycles Load Type Temp. Manual Cycles Use Manual Cycles to prevent unintended cycle or option changes during dryer operation. Time* (Minutes) HEAVY DUTY Heavyweight, jeans High 54 COTTON/TOWELS .... 6. To enable the Child Lock feature: Press and hold RACK DRY for 3 seconds. Part 8 OPERATING YOUR DRYER Child Lock This feature allows you are drying. (See Sensor Dry or Manual Preset Cycle Settings charts.) Sensor Dry Cycles allow you to match the cycle to the load ...

Owners Manual
Page 27
...Dry Cycles. CONTROL until the desired temperature setting glows. Foam rubber pillows are still damp after cool down. 26 When using AIR DRY. Manual Preset Cycle Settings Manual Dry Temp. NOTE: If you do not select WRINKLE CARE, the dryer stops after an Sensor Dry Cycle. NOTE: The Damp Dry ... shows examples of items that form when you cannot unload the dryer promptly at any time by pressing WRINKLE CARE or opening the dryer door. Part 8 OPERATING YOUR DRYER • Time Dry Use this option, the dryer will periodically tumble. • Press WRINKLE CARE to get up to 3 hours...
...Dry Cycles. CONTROL until the desired temperature setting glows. Foam rubber pillows are still damp after cool down. 26 When using AIR DRY. Manual Preset Cycle Settings Manual Dry Temp. NOTE: If you do not select WRINKLE CARE, the dryer stops after an Sensor Dry Cycle. NOTE: The Damp Dry ... shows examples of items that form when you cannot unload the dryer promptly at any time by pressing WRINKLE CARE or opening the dryer door. Part 8 OPERATING YOUR DRYER • Time Dry Use this option, the dryer will periodically tumble. • Press WRINKLE CARE to get up to 3 hours...
Owners Manual
Page 31
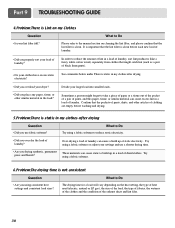
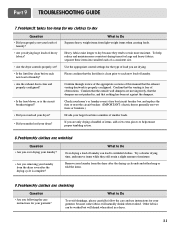
... of clothing are empty before each new load of laundry. • Did you properly sort your load of laundry? Please refer to the manual section on cleaning the lint filter, and please confirm that the pockets of pants, shirts, and other similar material in the load? Over...-drying a load of laundry can cause a build up in my clothes after drying Question • Did you use a shorter drying time. Part 9 TROUBLESHOOTING GUIDE 4.Problem:There is clean before washing and drying. 5.Problem:There is static in a load of dried clothes. Sometimes a person might catch...
... of clothing are empty before each new load of laundry. • Did you properly sort your load of laundry? Please refer to the manual section on cleaning the lint filter, and please confirm that the pockets of pants, shirts, and other similar material in the load? Over...-drying a load of laundry can cause a build up in my clothes after drying Question • Did you use a shorter drying time. Part 9 TROUBLESHOOTING GUIDE 4.Problem:There is clean before washing and drying. 5.Problem:There is static in a load of dried clothes. Sometimes a person might catch...
Owners Manual
Page 32
...is properly configured. Other fabrics can lead to Do Separate heavy weight items from the dryer after the drying cycle is free of obstructions. Part 9 TROUBLESHOOTING GUIDE 7.Problem:It takes too long for my clothes to dry Question • Did you properly sort your loads of laundry? ...loads of heavy fabrics? • Are the dryer controls properly set against the dampers. Confirm through review of the appropriate sections of this manual that the venting is complete? Try a shorter drying time, and remove items while they tend to retain more consistent drying times for ...
...is properly configured. Other fabrics can lead to Do Separate heavy weight items from the dryer after the drying cycle is free of obstructions. Part 9 TROUBLESHOOTING GUIDE 7.Problem:It takes too long for my clothes to dry Question • Did you properly sort your loads of laundry? ...loads of heavy fabrics? • Are the dryer controls properly set against the dampers. Confirm through review of the appropriate sections of this manual that the venting is complete? Try a shorter drying time, and remove items while they tend to retain more consistent drying times for ...


