
Owners Manual
Page 2
... your valued clothes. 5 EASY OF USE A whole selection of user-friendly functions always make you comfortable with dryer operation. ELECTRICAL REQUIREMENTS FOR GAS DRYERS 19 PART7. IMPORTANT WARRANTY AND SAFETY INSTRUCTIONS 4-6 PART3. TROUBLESHOOTING GUIDE ...29-31 LG DRYER LIMITED WARRANTY ...32 2 SPECIFICATIONS ...3 PART2. ACCESSORIES INSTALLATION ...13-14 PART5. GAS REQUIREMENTS AND INSTRUCTIONS 20 PART8...
... your valued clothes. 5 EASY OF USE A whole selection of user-friendly functions always make you comfortable with dryer operation. ELECTRICAL REQUIREMENTS FOR GAS DRYERS 19 PART7. IMPORTANT WARRANTY AND SAFETY INSTRUCTIONS 4-6 PART3. TROUBLESHOOTING GUIDE ...29-31 LG DRYER LIMITED WARRANTY ...32 2 SPECIFICATIONS ...3 PART2. ACCESSORIES INSTALLATION ...13-14 PART5. GAS REQUIREMENTS AND INSTRUCTIONS 20 PART8...
Owners Manual
Page 3
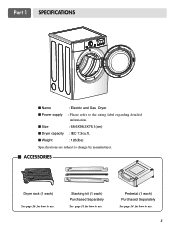
Pedestal (1 each) Purchased Separately See page 14 for how to use . Stacking kit (1 each ) See page 26 for how to use. Part 1 SPECIFICATIONS I Name : Electric and Gas Dryer I Power supply : Please refer to change by manufacturer. I ACCESSORIES Dryer rack (1 each ) Purchased Separately See page 13 for how to use . 3 I Size : 68.6X98.3X76.1(cm) I Weight : 126(Ibs) Specifications are subject to the rating label regarding detailed information. I Dryer capacity : IEC 7.3cu.ft.
Pedestal (1 each) Purchased Separately See page 14 for how to use . Stacking kit (1 each ) See page 26 for how to use. Part 1 SPECIFICATIONS I Name : Electric and Gas Dryer I Power supply : Please refer to change by manufacturer. I ACCESSORIES Dryer rack (1 each ) Purchased Separately See page 13 for how to use . 3 I Size : 68.6X98.3X76.1(cm) I Weight : 126(Ibs) Specifications are subject to the rating label regarding detailed information. I Dryer capacity : IEC 7.3cu.ft.
Owners Manual
Page 4
...your sales slip or cancelled check here, because proof of this dryer is needed to the instructions in this manual, LG will need the complete model and serial numbers when requesting information. WARNING! For your nearest LG Service Center and, for only 90 days. Warranty service is ...available by contacting your safety, the recommendations in this manual must be followed. Warranty Restriction: If the dryer is subjected to other than private family use, all...
...your sales slip or cancelled check here, because proof of this dryer is needed to the instructions in this manual, LG will need the complete model and serial numbers when requesting information. WARNING! For your nearest LG Service Center and, for only 90 days. Warranty service is ...available by contacting your safety, the recommendations in this manual must be followed. Warranty Restriction: If the dryer is subjected to other than private family use, all...
Owners Manual
Page 5
... it will not fit the outlet, have come into contact with gasoline, dry-cleaning solvents, or other personal or property injury when using your dryer. The plug must be grounded. This appliance must be connected to a grounded metal, permanent wiring system or an equipment-grounding conductor must be ... and grounded in the appliance. This appliance is properly grounded. Check with a qualified electrician or service person if you are in your dryer, please exercise care and follow basic safety precautions, including the following: 1) Read all local codes and ordinances.
... it will not fit the outlet, have come into contact with gasoline, dry-cleaning solvents, or other personal or property injury when using your dryer. The plug must be grounded. This appliance must be connected to a grounded metal, permanent wiring system or an equipment-grounding conductor must be ... and grounded in the appliance. This appliance is properly grounded. Check with a qualified electrician or service person if you are in your dryer, please exercise care and follow basic safety precautions, including the following: 1) Read all local codes and ordinances.
Owners Manual
Page 6
...explosion, electric shock, property damage, personal injury or death when using an air cycle. • Failure to the outdoors. Properly adjusted dryers will minimize combustion. WARNING To reduce the risk of substances known to the state to cause cancer, birth defects or other flammable vapors or... and information, including those in the area surrounding this manual and instructions and information provided by properly venting the dryer to follow all occupants. • Immediately call your gas supplier, call the fire department. ! Part 2 IMPORTANT WARRANTY AND SAFETY INSTRUCTIONS ...
...explosion, electric shock, property damage, personal injury or death when using an air cycle. • Failure to the outdoors. Properly adjusted dryers will minimize combustion. WARNING To reduce the risk of substances known to the state to cause cancer, birth defects or other flammable vapors or... and information, including those in the area surrounding this manual and instructions and information provided by properly venting the dryer to follow all occupants. • Immediately call your gas supplier, call the fire department. ! Part 2 IMPORTANT WARRANTY AND SAFETY INSTRUCTIONS ...
Owners Manual
Page 7
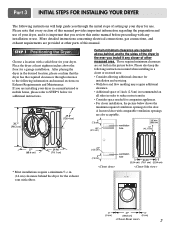
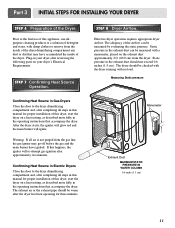
...all sides in the ever you install it any installation or use . If you are provided at least eighteen inches above ,behind the dryer for use . Please also keep the following instructions in mind when installing in a closet or recessed area: • Consider allowing ... exhaust vent with any closer of other parts of this entire manual before proceeding with elbow. STEP 1 Positioning the Dryer. Part 3 INITIAL STEPS FOR INSTALLING YOUR DRYER The following instructions will help guide you through reference to reduce noise transfer. • Consider space needed for companion ...
...all sides in the ever you install it any installation or use . If you are provided at least eighteen inches above ,behind the dryer for use . Please also keep the following instructions in mind when installing in a closet or recessed area: • Consider allowing ... exhaust vent with any closer of other parts of this entire manual before proceeding with elbow. STEP 1 Positioning the Dryer. Part 3 INITIAL STEPS FOR INSTALLING YOUR DRYER The following instructions will help guide you through reference to reduce noise transfer. • Consider space needed for companion ...
Owners Manual
Page 8
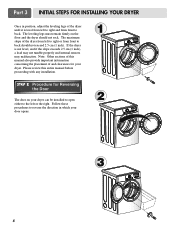
... malfunction. Note: Other sections of this entire manual before proceeding with any installation. SSTTEEPP 22: Procedure for your door opens: 1 2 3 8 If the dryer is level from left to right and from front to back should not rock. Follow these procedures to the left to right or from front... concerning the placement of and clearances for Reversing the Door The door on the floor and the dryer should not exceed 2.5 cm (1 inch). The leveling legs must remain firmly on your dryer can be installed to open either to reverse the direction in position, adjust the leveling legs of...
... malfunction. Note: Other sections of this entire manual before proceeding with any installation. SSTTEEPP 22: Procedure for your door opens: 1 2 3 8 If the dryer is level from left to right and from front to back should not rock. Follow these procedures to the left to right or from front... concerning the placement of and clearances for Reversing the Door The door on the floor and the dryer should not exceed 2.5 cm (1 inch). The leveling legs must remain firmly on your dryer can be installed to open either to reverse the direction in position, adjust the leveling legs of...
Owners Manual
Page 9
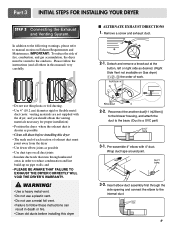
...on pipe walls; In addition to the following warnings, please refer to manual section on Gas dryer) , , the order of fire, combustion, and gas accumulation, the dryer must point away from the dryer • Use fewer elbow joints as possible • Use duct tape on all others in...) diameter rigid or flexible metal duct (note: venting materials are not supplied with 4" duct. Insert elbow duct assembly first through unheated areas in this dryer 2-2. IMPORTANT: To reduce the risk of work. • Do not use a metal foil vent. • Failure to follow the instructions (and ...
...on pipe walls; In addition to the following warnings, please refer to manual section on Gas dryer) , , the order of fire, combustion, and gas accumulation, the dryer must point away from the dryer • Use fewer elbow joints as possible • Use duct tape on all others in...) diameter rigid or flexible metal duct (note: venting materials are not supplied with 4" duct. Insert elbow duct assembly first through unheated areas in this dryer 2-2. IMPORTANT: To reduce the risk of work. • Do not use a metal foil vent. • Failure to follow the instructions (and ...

Owners Manual
Page 10
...mobile) home installations and use this appliance through neutral. 3. For LP (Liquefied Petroleum) gas connection, refer to disconnection when servicing the dryer, because wiring errors can result in fire or electrical shock. Use this manual's section entitled Gas Requirements and Instructions. 10 STEP 5... a new stainless steel flexible connector if allowed by local codes. More detailed information concerning the electrical connection is provided inside the dryer control hood. listed No. 10 (copper wire only) three conductor power supply cord kit rated 240 Volts (minimum) 30 Amperes...
...mobile) home installations and use this appliance through neutral. 3. For LP (Liquefied Petroleum) gas connection, refer to disconnection when servicing the dryer, because wiring errors can result in fire or electrical shock. Use this manual's section entitled Gas Requirements and Instructions. 10 STEP 5... a new stainless steel flexible connector if allowed by local codes. More detailed information concerning the electrical connection is provided inside the dryer control hood. listed No. 10 (copper wire only) three conductor power supply cord kit rated 240 Volts (minimum) 30 Amperes...
Owners Manual
Page 11
... the gas igniter may have ignited. If this dryer, start the dryer on your dryer after approximately two minutes. Effective dryer operation requires appropriate dryer airflow. Confirming Heat Source in Gas Dryers Close the door to the dryer drum/drying compartment and, after completing all steps in...a solution of detergent and water, with damp clothes to the dryer drum/drying compartment and, after the dryer has been operating for proper installation of the dryer. Part 3 INITIAL STEPS FOR INSTALLING YOUR DRYER STEP 6 Preparation of the airflow can be warm after completing...
... the gas igniter may have ignited. If this dryer, start the dryer on your dryer after approximately two minutes. Effective dryer operation requires appropriate dryer airflow. Confirming Heat Source in Gas Dryers Close the door to the dryer drum/drying compartment and, after completing all steps in...a solution of detergent and water, with damp clothes to the dryer drum/drying compartment and, after the dryer has been operating for proper installation of the dryer. Part 3 INITIAL STEPS FOR INSTALLING YOUR DRYER STEP 6 Preparation of the airflow can be warm after completing...
Owners Manual
Page 12
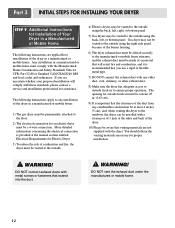
...the manufactured or mobile home. 12 More detailed information concerning the electrical connection is provided at the sides and back of the dryer. 10) Please be at least 25 in2 (163 cm2). 9) It is recommended that venting materials are uncertain whether your proposed.... ! WARNING! You should obtain the venting materials necessary for assistance. Part 3 INITIAL STEPS FOR INSTALLING YOUR DRYER STEP 9 Additional Instructions for Installation of Your Dryer in a manufactured or mobile home must comply with the Manufactured Home Construction and Safety Standards Title 24 CFR,...
...the manufactured or mobile home. 12 More detailed information concerning the electrical connection is provided at the sides and back of the dryer. 10) Please be at least 25 in2 (163 cm2). 9) It is recommended that venting materials are uncertain whether your proposed.... ! WARNING! You should obtain the venting materials necessary for assistance. Part 3 INITIAL STEPS FOR INSTALLING YOUR DRYER STEP 9 Additional Instructions for Installation of Your Dryer in a manufactured or mobile home must comply with the Manufactured Home Construction and Safety Standards Title 24 CFR,...

Owners Manual
Page 13
...picture. Part 4 ACESSORIES INSTALLATION Stacking Kit Installation Instructions To ensure safe and secure installation, please observe the instructions below. The weight of the dryer and the height of kit. 1 Stacking kit Place washer firmly on the back of the front kit. • Do not use stacking kit... with a gas dryer in owner's manual. 2 Peel protective paper off the tape from the stacking kit side bracket. 6 Insert the front stacking kit. Repeat Steps 2, 3,...
...picture. Part 4 ACESSORIES INSTALLATION Stacking Kit Installation Instructions To ensure safe and secure installation, please observe the instructions below. The weight of the dryer and the height of kit. 1 Stacking kit Place washer firmly on the back of the front kit. • Do not use stacking kit... with a gas dryer in owner's manual. 2 Peel protective paper off the tape from the stacking kit side bracket. 6 Insert the front stacking kit. Repeat Steps 2, 3,...
Owners Manual
Page 15
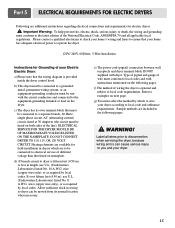
...to local code and ordinance requirements. Please contact a qualified electrician to check your home's wiring and fuses to ensure that listed on the dryer. wire (copper wire only), or as required by which are included in the following pages. Refer to local code requirements. WARNING! ELECTRICAL...shock, serious injury or death, the wiring and grounding must conform to the latest edition of wire must conform to you and your Electric Electric Dryer: a) Please note that must be connected to a separate branch, 60 Hertz, single phase circuit, AC (alternating current) circuit, fused at...
...to local code and ordinance requirements. Please contact a qualified electrician to check your home's wiring and fuses to ensure that listed on the dryer. wire (copper wire only), or as required by which are included in the following pages. Refer to local code requirements. WARNING! ELECTRICAL...shock, serious injury or death, the wiring and grounding must conform to the latest edition of wire must conform to you and your Electric Electric Dryer: a) Please note that must be connected to a separate branch, 60 Hertz, single phase circuit, AC (alternating current) circuit, fused at...
Owners Manual
Page 16
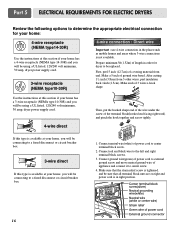
... from end. you will be connecting to the left and right terminal block screws. 3. and be using a UL listed, 120/240 volt minimum, 30 amp, dryer power supply cord. 3-wire receptacle (NEMA type10-30R) 4-wire connection : Direct wire Important : use 4-wire connection in order for your home: 4-wire receptacle (... at your home has a 4-wire receptacle (NEMA type 14-30R) and you will be using a UL listed, 120/240 volt minimum, 30 amp, dryer power supply cord. 4-wire direct Then, put the hooked shape end of the wire under the screw of ground wire bared. Connect ground wire(green...
... from end. you will be connecting to the left and right terminal block screws. 3. and be using a UL listed, 120/240 volt minimum, 30 amp, dryer power supply cord. 3-wire receptacle (NEMA type10-30R) 4-wire connection : Direct wire Important : use 4-wire connection in order for your home: 4-wire receptacle (... at your home has a 4-wire receptacle (NEMA type 14-30R) and you will be using a UL listed, 120/240 volt minimum, 30 amp, dryer power supply cord. 4-wire direct Then, put the hooked shape end of the wire under the screw of ground wire bared. Connect ground wire(green...
Owners Manual
Page 17
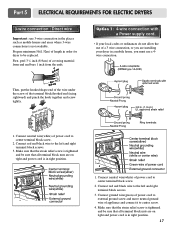
... and power cord is in right position. 1. Prepare minimum 5ft(1.52m) of length in order for dryer to center terminal block screw. 2. and be replaced. Part 5 ELECTRICAL REQUIREMENTS FOR ELECTRIC DRYERS 3-wire connection : Direct wire Important : use 3-wire connection in the places such as mobile homes ... end facing rightward) and pinch the hook together and screw tightly. 1. Option 1: 4-wire connection with a Power supply cord. • lf your dryer in a mobile home, you are on tight and power cord is in right position. 17 Connect red and black wire to center screw. 4. Connect...
... and power cord is in right position. 1. Prepare minimum 5ft(1.52m) of length in order for dryer to center terminal block screw. 2. and be replaced. Part 5 ELECTRICAL REQUIREMENTS FOR ELECTRIC DRYERS 3-wire connection : Direct wire Important : use 3-wire connection in the places such as mobile homes ... end facing rightward) and pinch the hook together and screw tightly. 1. Option 1: 4-wire connection with a Power supply cord. • lf your dryer in a mobile home, you are on tight and power cord is in right position. 17 Connect red and black wire to center screw. 4. Connect...
Owners Manual
Page 18
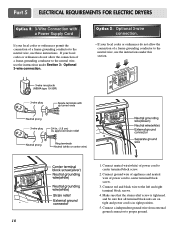
... neutral wire, use the instructions under this section. 1. and be sure that the strain relief screw is in right position. 5. Part 5 ELECTRICAL REQUIREMENTS FOR ELECTRIC DRYERS Option 2: 3-Wire Connection with a Power Supply Cord lf your local codes or ordinances permit the connection of a frame-grounding conductor to proper ground. 18 Connect...
... neutral wire, use the instructions under this section. 1. and be sure that the strain relief screw is in right position. 5. Part 5 ELECTRICAL REQUIREMENTS FOR ELECTRIC DRYERS Option 2: 3-Wire Connection with a Power Supply Cord lf your local codes or ordinances permit the connection of a frame-grounding conductor to proper ground. 18 Connect...

Owners Manual
Page 19
... a qualified electrician to check your home's wiring and fuses to ensure that is rated 120 Volts AC (alternating current) 15 Amps. b) Your dryer is designed to the power source, or by a 15 Ampere fuse, equivalent fusetron or circuit breaker. WARNING! DO NOT modify the plug provided with... problems. 19 WARNING! Label all applicable local regulations. If it does not fit the outlet in order to the same outlet. ! b) The dryer must conform to the latest edition of electric shock, including a malfunction or breakdown. Do not overload the circuit by operating other appliances on the same...
... a qualified electrician to check your home's wiring and fuses to ensure that is rated 120 Volts AC (alternating current) 15 Amps. b) Your dryer is designed to the power source, or by a 15 Ampere fuse, equivalent fusetron or circuit breaker. WARNING! DO NOT modify the plug provided with... problems. 19 WARNING! Label all applicable local regulations. If it does not fit the outlet in order to the same outlet. ! b) The dryer must conform to the latest edition of electric shock, including a malfunction or breakdown. Do not overload the circuit by operating other appliances on the same...
Owners Manual
Page 20
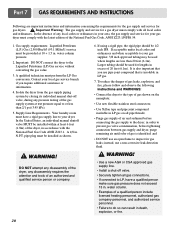
...! To reduce the danger of gas leaks, explosion, and fire, please follow and observe the following instructions and WARNINGS: • Connect the dryer to your local gas service branch if you use pipe joint compound that you require additional assistance or information. 4. Important Warning: The gas supply... converting the gas value. 3. In the United States, an individual manual shutoff valve MUST be provided at test pressure equal to the dryer; If acceptable under local codes and ordinances and when acceptable to LP, have a rigid gas supply line to the type of gas shown...
...! To reduce the danger of gas leaks, explosion, and fire, please follow and observe the following instructions and WARNINGS: • Connect the dryer to your local gas service branch if you use pipe joint compound that you require additional assistance or information. 4. Important Warning: The gas supply... converting the gas value. 3. In the United States, an individual manual shutoff valve MUST be provided at test pressure equal to the dryer; If acceptable under local codes and ordinances and when acceptable to LP, have a rigid gas supply line to the type of gas shown...
Owners Manual
Page 21
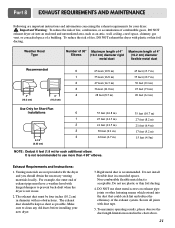
... Warning: To reduce the risk of fire, combustion, or accumulation of combustible gases, DO NOT exhaust dryer air into the duct that could catch lint and reduce the efficiency of the exhaust system. It is not in use sheet metal screws on ... metal duct is acceptable. The exhaust duct must have a weather hood with no obstructions. For example, the outer end of fire, DO NOT exhaust the dryer with plastic or thin foil ducting. Do not install flexible duct in the chart above. 21 Weather Hood Type Number of 90° Maximum length...
... Warning: To reduce the risk of fire, combustion, or accumulation of combustible gases, DO NOT exhaust dryer air into the duct that could catch lint and reduce the efficiency of the exhaust system. It is not in use sheet metal screws on ... metal duct is acceptable. The exhaust duct must have a weather hood with no obstructions. For example, the outer end of fire, DO NOT exhaust the dryer with plastic or thin foil ducting. Do not install flexible duct in the chart above. 21 Weather Hood Type Number of 90° Maximum length...
Owners Manual
Page 22
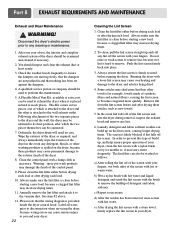
...starting a new load, because a clogged lint filter may increase drying times. 11. Label all wires prior to disconnection when servicing the dryer, because wiring errors can be washed as new towels. 5. Some articles may damage the finish of build up and roll any detergent, ...or, if necessary, more quickly. A qualified service person or company should be used to reach places. The screen is clean before running the dryer. Please clean the lint filter either before starting a new load, because a clogged lint filter may increase drying times. 2. c) Repeat as necessary...
...starting a new load, because a clogged lint filter may increase drying times. 11. Label all wires prior to disconnection when servicing the dryer, because wiring errors can be washed as new towels. 5. Some articles may damage the finish of build up and roll any detergent, ...or, if necessary, more quickly. A qualified service person or company should be used to reach places. The screen is clean before running the dryer. Please clean the lint filter either before starting a new load, because a clogged lint filter may increase drying times. 2. c) Repeat as necessary...


