
Owners Manual
Page 2
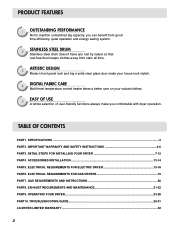
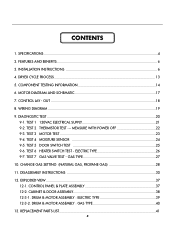
... control heater takes a better care on your valued clothes. 5 EASY OF USE A whole selection of user-friendly functions always make you comfortable with dryer operation. IMPORTANT WARRANTY AND SAFETY INSTRUCTIONS 4-6 PART3. ACCESSORIES INSTALLATION ...13-14 PART5. ELECTRICAL REQUIREMENTS FOR GAS DRYERS 19 PART7. TABLE OF CONTENTS PART1. EXHAUST REQUIREMENTS AND MAINTENANCE 21-22 PART9. INITIAL STEPS FOR INSTALLING YOUR DRYER 7-12 PART4. SPECIFICATIONS ...3 PART2. GAS REQUIREMENTS AND INSTRUCTIONS 20 PART8. OPERATING YOUR DRYER...23-28 PART10. TROUBLESHOOTING GUIDE...
... control heater takes a better care on your valued clothes. 5 EASY OF USE A whole selection of user-friendly functions always make you comfortable with dryer operation. IMPORTANT WARRANTY AND SAFETY INSTRUCTIONS 4-6 PART3. ACCESSORIES INSTALLATION ...13-14 PART5. ELECTRICAL REQUIREMENTS FOR GAS DRYERS 19 PART7. TABLE OF CONTENTS PART1. EXHAUST REQUIREMENTS AND MAINTENANCE 21-22 PART9. INITIAL STEPS FOR INSTALLING YOUR DRYER 7-12 PART4. SPECIFICATIONS ...3 PART2. GAS REQUIREMENTS AND INSTRUCTIONS 20 PART8. OPERATING YOUR DRYER...23-28 PART10. TROUBLESHOOTING GUIDE...
Owners Manual
Page 4
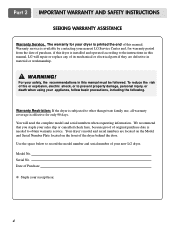
... use, all warranty coverage is printed the end of fire or explosion, electric shock, or to record the model number and serial number of Purchase ❈ Staple your new LG dryer. Warranty service is needed to the instructions in this manual, LG will need the complete model and serial numbers when requesting information. Serial No. For your sales slip or cancelled check here, because proof of the dryer behind the door. Your dryer's model and serial numbers...
... use, all warranty coverage is printed the end of fire or explosion, electric shock, or to record the model number and serial number of Purchase ❈ Staple your new LG dryer. Warranty service is needed to the instructions in this manual, LG will need the complete model and serial numbers when requesting information. Serial No. For your sales slip or cancelled check here, because proof of the dryer behind the door. Your dryer's model and serial numbers...
Owners Manual
Page 5
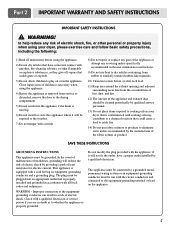
... drum is properly grounded. Check with controls. 8) Do not repair or replace any part of the appliance or attempt any risk of least resistance for electric current. Part 2 IMPORTANT WARRANTY AND SAFETY INSTRUCTIONS IMPORTANT SAFETY INSTRUCTIONS ! In the event of malfunction or breakdown, grounding will reduce the risk of electric shock. WARNING! to help reduce any servicing unless specifically recommended in the user-maintenance instructions. 9) Do not use...
... drum is properly grounded. Check with controls. 8) Do not repair or replace any part of the appliance or attempt any risk of least resistance for electric current. Part 2 IMPORTANT WARRANTY AND SAFETY INSTRUCTIONS IMPORTANT SAFETY INSTRUCTIONS ! In the event of malfunction or breakdown, grounding will reduce the risk of electric shock. WARNING! to help reduce any servicing unless specifically recommended in the user-maintenance instructions. 9) Do not use...
Owners Manual
Page 9
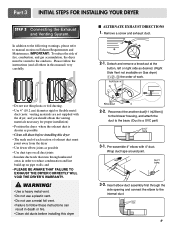
... DRYER'S WARRANTY. ! Please follow these instructions can result in death or fire. • Clean old ducts before installing this manual) very carefully. Remove a screw and exhaust duct. 2-1. IMPORTANT: To reduce the risk of fire, combustion, and gas accumulation, the dryer must point away from the dryer • Use fewer elbow joints as possible • Use duct tape on all duct joints • Insulate ductwork that runs through the side opening...
... DRYER'S WARRANTY. ! Please follow these instructions can result in death or fire. • Clean old ducts before installing this manual) very carefully. Remove a screw and exhaust duct. 2-1. IMPORTANT: To reduce the risk of fire, combustion, and gas accumulation, the dryer must point away from the dryer • Use fewer elbow joints as possible • Use duct tape on all duct joints • Insulate ductwork that runs through the side opening...

Owners Manual
Page 10
... connector if allowed by local codes. The dryer is required for electric dryers. The wiring diagram is important that the type of the dryer. Use this type of this manual's section entitled Gas Requirements and Instructions. 10 STEP 5 Electrical Plug Connections for checking inlet gas pressure) 3. Equipment Shut-Off Valve- For LP (Liquefied Petroleum) gas connection, refer to you and your laundry room's gas supply using a new flexible stainless steel connector (as suitable for gas leaks with a 3/8" NPT gas connection. 2. Four-wire cord...
... connector if allowed by local codes. The dryer is required for electric dryers. The wiring diagram is important that the type of the dryer. Use this type of this manual's section entitled Gas Requirements and Instructions. 10 STEP 5 Electrical Plug Connections for checking inlet gas pressure) 3. Equipment Shut-Off Valve- For LP (Liquefied Petroleum) gas connection, refer to you and your laundry room's gas supply using a new flexible stainless steel connector (as suitable for gas leaks with a 3/8" NPT gas connection. 2. Four-wire cord...
Owners Manual
Page 11
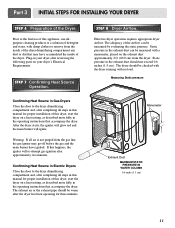
... the dryer. STEP 7 Confirming Heat Source Operation. Effective dryer operation requires appropriate dryer airflow. After the dryer starts, the igniter will glow red and the main burner will re-attempt gas ignition after reviewing the following parts on a heat setting, as described more fully in your dryer after approximately two minutes. Static pressure in the exhaust duct can be checked with the dryer running with damp clothes to the first use allpurpose cleaning...
... the dryer. STEP 7 Confirming Heat Source Operation. Effective dryer operation requires appropriate dryer airflow. After the dryer starts, the igniter will glow red and the main burner will re-attempt gas ignition after reviewing the following parts on a heat setting, as described more fully in your dryer after approximately two minutes. Static pressure in the exhaust duct can be checked with the dryer running with damp clothes to the first use allpurpose cleaning...
Owners Manual
Page 12
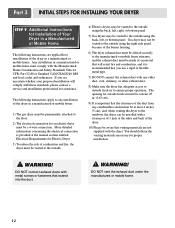
More detailed information concerning the electrical connection is provided at the manual section entitled Electrical Requirements for outside using the back, left , or bottom panel. Gas dryer may be vented to the outside using the back, left , right, or bottom panel. 5) Gas dryers may not be vented to the outside using the right side panel because of the burner housing. 6) The dryer exhaust duct must be affixed securely to the manufactured or mobile...
More detailed information concerning the electrical connection is provided at the manual section entitled Electrical Requirements for outside using the back, left , or bottom panel. Gas dryer may be vented to the outside using the back, left , right, or bottom panel. 5) Gas dryers may not be vented to the outside using the right side panel because of the burner housing. 6) The dryer exhaust duct must be affixed securely to the manufactured or mobile...
Owners Manual
Page 15
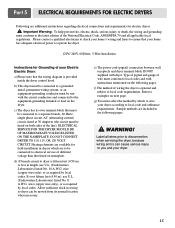
... to check your home's wiring and fuses to ensure that your Electric Electric Dryer: a) Please note that must be run with the circuit conductors and connected to local codes and with dryer. If over fifteen feet (4.50 m), use U.L. (Underwriters Laboratories) listed No. 10 A.W.G. or an equipment-grounding conductor must be connected to operate the dryer. 120V/ 240V, 60 Hertz, 3-Wire Installation Instructions for electric dryers. ! Part 5 ELECTRICAL REQUIREMENTS FOR ELECTRIC DRYERS Following are additional instructions regarding electrical connections and requirements...
... to check your home's wiring and fuses to ensure that your Electric Electric Dryer: a) Please note that must be run with the circuit conductors and connected to local codes and with dryer. If over fifteen feet (4.50 m), use U.L. (Underwriters Laboratories) listed No. 10 A.W.G. or an equipment-grounding conductor must be connected to operate the dryer. 120V/ 240V, 60 Hertz, 3-Wire Installation Instructions for electric dryers. ! Part 5 ELECTRICAL REQUIREMENTS FOR ELECTRIC DRYERS Following are additional instructions regarding electrical connections and requirements...

Owners Manual
Page 19
...-prong receptacle that the wiring diagram is rated 120 Volts AC (alternating current) 15 Amps. c) Use separately fused circuits for Your Dryer: a) Please note that is provided inside the dryer control hood. This plug, in order to you are additional instructions regarding electrical connections and requirements for any adapter to allow additional cords to connect to be plugged directed into a properly installed outlet that your dryer. Do not overload the circuit by a qualified service...
...-prong receptacle that the wiring diagram is rated 120 Volts AC (alternating current) 15 Amps. c) Use separately fused circuits for Your Dryer: a) Please note that is provided inside the dryer control hood. This plug, in order to you are additional instructions regarding electrical connections and requirements for any adapter to allow additional cords to connect to be plugged directed into a properly installed outlet that your dryer. Do not overload the circuit by a qualified service...
Owners Manual
Page 20
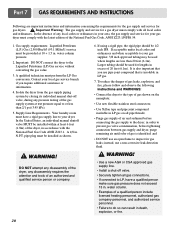
.... ! Supply Line Requirements. pipe plug must perform the LP Gas conversion. instead, use pipe joint compound that you require additional assistance or information. 4. WARNING! • Use a new AGA or CSA approved gas supply line. • Install a shut-off valve, during any pressure testing of the dryer, in LP gas on all pipe threads; • Purge gas supply of an authorized and qualified service person or company. 6. water column pressure...
.... ! Supply Line Requirements. pipe plug must perform the LP Gas conversion. instead, use pipe joint compound that you require additional assistance or information. 4. WARNING! • Use a new AGA or CSA approved gas supply line. • Install a shut-off valve, during any pressure testing of the dryer, in LP gas on all pipe threads; • Purge gas supply of an authorized and qualified service person or company. 6. water column pressure...
Owners Manual
Page 21
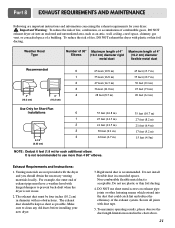
... clean any old ducts before installing your dryer. ! DO NOT use more than 4 90° elbows. 45 feet (13.7 m) 35 feet (10.7 m) 30 feet (9.1 m) 25 feet (7.6 m) 20 feet (6.1 m) 35 feet (10.7 m) 27 feet (8.2 m) 21 feet (6.4 m) 17 feet (5.2 m) 15 feet (4.5m) Exhaust Requirements and Instructions: 1. Venting materials are important instructions and information concerning the exhaust requirements for each additional elbow. Make sure to use sheet...
... clean any old ducts before installing your dryer. ! DO NOT use more than 4 90° elbows. 45 feet (13.7 m) 35 feet (10.7 m) 30 feet (9.1 m) 25 feet (7.6 m) 20 feet (6.1 m) 35 feet (10.7 m) 27 feet (8.2 m) 21 feet (6.4 m) 17 feet (5.2 m) 15 feet (4.5m) Exhaust Requirements and Instructions: 1. Venting materials are important instructions and information concerning the exhaust requirements for each additional elbow. Make sure to use sheet...
Owners Manual
Page 22
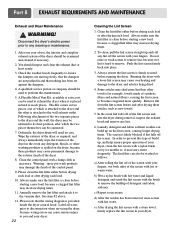
... lint screen with hot water. A Flexible Metal Vent Kit, available at least yearly. 3. Ordinarily, the dryer drum will need no care. d) After the residue has been removed, rinse screen with the brush to its final position, after drying each load. Part 8 EXHAUST REQUIREMENTS AND MAINTENANCE Exhaust and Dryer Maintenance ! WARNING! Always ensure the lint screen is placed in the event any lint off the screen. The screen is likely blocked if lint falls off the screen with your dryer. The lint filter...
... lint screen with hot water. A Flexible Metal Vent Kit, available at least yearly. 3. Ordinarily, the dryer drum will need no care. d) After the residue has been removed, rinse screen with the brush to its final position, after drying each load. Part 8 EXHAUST REQUIREMENTS AND MAINTENANCE Exhaust and Dryer Maintenance ! WARNING! Always ensure the lint screen is placed in the event any lint off the screen. The screen is likely blocked if lint falls off the screen with your dryer. The lint filter...
Owners Manual
Page 24
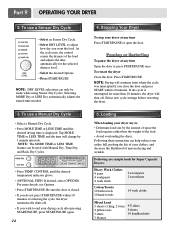
... loading your dryer at any time Press START/PAUSE or open the door. Selecting MORE Dry or LESS Dry automatically adjusts the sensed time needed. 3. Part 9 OPERATING YOUR DRYER 2. To use a Manual Dry Cycle • Select a Manual Dry Cycle. • Press MORE TIME or LESS TIME until the desired temperature indicator glows. • (OPTIONAL STEP) If desired, select OPTIONS. As the cycle runs, the control senses the dryness of the load. • Avoid overloading the dryer. Following these instruction...
... loading your dryer at any time Press START/PAUSE or open the door. Selecting MORE Dry or LESS Dry automatically adjusts the sensed time needed. 3. Part 9 OPERATING YOUR DRYER 2. To use a Manual Dry Cycle • Select a Manual Dry Cycle. • Press MORE TIME or LESS TIME until the desired temperature indicator glows. • (OPTIONAL STEP) If desired, select OPTIONS. As the cycle runs, the control senses the dryness of the load. • Avoid overloading the dryer. Following these instruction...
Owners Manual
Page 27
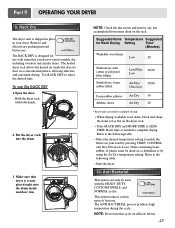
... can only be dried on delicate fabrics. 27 Put the dryer rack into the drum 3. Reset time as needed to flow in your load by using the Air Dry temperature setting. Use RACK DRY to lay flat on the rack. NOTE: Do not use the RACK DRY 1.Open the door. The ANTI BACTERIAL process produces high temperature during the cycle. Part 9 OPERATING YOUR DRYER 9. Remove and discard any lint accumulated from items dried on the dryer rack. • Select RACK DRY and MORE TIME or LESS...
... can only be dried on delicate fabrics. 27 Put the dryer rack into the drum 3. Reset time as needed to flow in your load by using the Air Dry temperature setting. Use RACK DRY to lay flat on the rack. NOTE: Do not use the RACK DRY 1.Open the door. The ANTI BACTERIAL process produces high temperature during the cycle. Part 9 OPERATING YOUR DRYER 9. Remove and discard any lint accumulated from items dried on the dryer rack. • Select RACK DRY and MORE TIME or LESS...
Owners Manual
Page 29
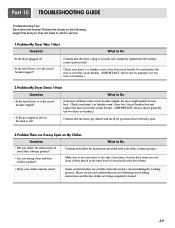
... may not need to call for service. 1.Problem:My Dryer Won 't Start Question What to Do • Is the dryer plugged in the dryer drum. • Were your fabric softener product? Stains on your clothes entirely clean? Check your home's or laundry room's fuse box/circuit breaker box and replace the fuse or reset the circuit breaker. (IMPORTANT: electric dryers generally use two fuses or breakers.) • Is the gas supply or service blocked or off? Please review and confirm...
... may not need to call for service. 1.Problem:My Dryer Won 't Start Question What to Do • Is the dryer plugged in the dryer drum. • Were your fabric softener product? Stains on your clothes entirely clean? Check your home's or laundry room's fuse box/circuit breaker box and replace the fuse or reset the circuit breaker. (IMPORTANT: electric dryers generally use two fuses or breakers.) • Is the gas supply or service blocked or off? Please review and confirm...
Owners Manual
Page 30
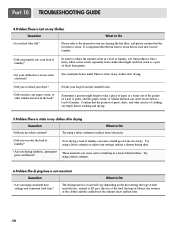
... larger load into smaller loads. The drying time for a load will vary depending on the heat setting, the type of heat used (electric, natural or LP gas), the size of the load, the type of fabrics, the wetness of the clothes and the condition of laundry. • Did you drying synthetic, permanent press and blends? It is important that the lint filter is clean. Try using consistent heat settings and consistent load sizes? Part 10 TROUBLESHOOTING GUIDE 4.Problem:There is Lint...
... larger load into smaller loads. The drying time for a load will vary depending on the heat setting, the type of heat used (electric, natural or LP gas), the size of the load, the type of fabrics, the wetness of the clothes and the condition of laundry. • Did you drying synthetic, permanent press and blends? It is important that the lint filter is clean. Try using consistent heat settings and consistent load sizes? Part 10 TROUBLESHOOTING GUIDE 4.Problem:There is Lint...
Owners Manual
Page 31
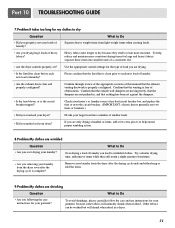
... fabrics will shrink when dried in , and that the exhaust venting ductwork is the circuit breaker tripped? Part 10 TROUBLESHOOTING GUIDE 7.Problem:It takes too long for my clothes to dry Question What to Do • Did you properly sort your laundry? Confirm that the lint filter is complete? Check your home's or laundry room's fuse box/circuit breaker box and replace the fuse or reset the circuit breaker. (IMPORTANT: electric dryers generally use instructions for your garment?
... fabrics will shrink when dried in , and that the exhaust venting ductwork is the circuit breaker tripped? Part 10 TROUBLESHOOTING GUIDE 7.Problem:It takes too long for my clothes to dry Question What to Do • Did you properly sort your laundry? Confirm that the lint filter is complete? Check your home's or laundry room's fuse box/circuit breaker box and replace the fuse or reset the circuit breaker. (IMPORTANT: electric dryers generally use instructions for your garment?
Service Manual
Page 3
...TEST 2 THERMISTOR TEST --- TEST 6 HEATER SWITCH TEST - GAS TYPE 27 10. EXPLODED VIEW ...37 12-1. REPLACEMENT PARTS LIST 41 3 OUT ...18 8. TEST 1 120VAC ELECTRICAL SUPPLY 21 9-2. TEST 4 MOISTURE SENSOR 24 9-5. TEST 7 GAS VALVE TEST - CONTROL PANEL & PLATE ASSEMBLY 37 12-2. COMPONENT TESTING INFORMATION 14 6. TEST 3 MOTOR TEST 23 9-4. DRUM & MOTOR ASSEMBLY : GAS TYPE 40 13. FEATURES AND BENEFITS ...6 3. INSTALLATION INSTRUCTIONS 6 4. WIRING DIAGRAM ...19 9. CHANGE GAS SETTING (NATURAL GAS, PROPANE GAS 28 11. MOTOR DIAGRAM AND SCHEMATIC 17 7. DRYER...
...TEST 2 THERMISTOR TEST --- TEST 6 HEATER SWITCH TEST - GAS TYPE 27 10. EXPLODED VIEW ...37 12-1. REPLACEMENT PARTS LIST 41 3 OUT ...18 8. TEST 1 120VAC ELECTRICAL SUPPLY 21 9-2. TEST 4 MOISTURE SENSOR 24 9-5. TEST 7 GAS VALVE TEST - CONTROL PANEL & PLATE ASSEMBLY 37 12-2. COMPONENT TESTING INFORMATION 14 6. TEST 3 MOTOR TEST 23 9-4. DRUM & MOTOR ASSEMBLY : GAS TYPE 40 13. FEATURES AND BENEFITS ...6 3. INSTALLATION INSTRUCTIONS 6 4. WIRING DIAGRAM ...19 9. CHANGE GAS SETTING (NATURAL GAS, PROPANE GAS 28 11. MOTOR DIAGRAM AND SCHEMATIC 17 7. DRYER...

Service Manual
Page 23
" (Brown wire)? " (White wire) and "BL2- YES • Replace Control. (Relay check) • Check Controller connector. • Check if Door flame presses door switch knob. • Check Door Switch. • Check Harness connection. NO YES Does Idle Switch attached to Motor Bracket operate Level by drum belt? YES Measure while door is closed . YES NO Is resistance below 1Ω between Connector "WH3- NO Is resistance below 3Ω between terminals of Power cord with earth line.) Trouble Symptom Drum will function; NO...
" (Brown wire)? " (White wire) and "BL2- YES • Replace Control. (Relay check) • Check Controller connector. • Check if Door flame presses door switch knob. • Check Door Switch. • Check Harness connection. NO YES Does Idle Switch attached to Motor Bracket operate Level by drum belt? YES Measure while door is closed . YES NO Is resistance below 1Ω between Connector "WH3- NO Is resistance below 3Ω between terminals of Power cord with earth line.) Trouble Symptom Drum will function; NO...

Service Manual
Page 24
... Controller. Test 4 Moisture sensor Caution Before measuring resistance, be sure to turn Power off, and do voltage discharge. (When discharging, contact the metal plug of Power cord with earth line.) Trouble Symptom Degree of dryness does not match with metal to 6pin connector's Pin (BLUE wire) and Pin (ORANGE wire) to Electro load: 1. Measurement Condition Turn the Dryer's Power Off, then measure resistance. Damping cloth When contacting cloth to Controller...
... Controller. Test 4 Moisture sensor Caution Before measuring resistance, be sure to turn Power off, and do voltage discharge. (When discharging, contact the metal plug of Power cord with earth line.) Trouble Symptom Degree of dryness does not match with metal to 6pin connector's Pin (BLUE wire) and Pin (ORANGE wire) to Electro load: 1. Measurement Condition Turn the Dryer's Power Off, then measure resistance. Damping cloth When contacting cloth to Controller...


