

Owner's Manual (English)
Page 1
Record the model and serial numbers, and retain the manual for buying an LG Dryer. For more information, visit our website at http://us.lge.com P/No.: 3828EL3004J 1-800-243-0000 24 HOURS A DAY, 7 DAYS A WEEK FOR LG CUSTOMER SERVICE DLE3733W / DLG3744W DLE3733S / DLG3744S DLE3733D / DLG3744D DLE3733U / DLG3744U Thank you for future reference. Please read your manual carefully, as it provides instructions on safe Installation, use and maintenance.
Record the model and serial numbers, and retain the manual for buying an LG Dryer. For more information, visit our website at http://us.lge.com P/No.: 3828EL3004J 1-800-243-0000 24 HOURS A DAY, 7 DAYS A WEEK FOR LG CUSTOMER SERVICE DLE3733W / DLG3744W DLE3733S / DLG3744S DLE3733D / DLG3744D DLE3733U / DLG3744U Thank you for future reference. Please read your manual carefully, as it provides instructions on safe Installation, use and maintenance.

Owner's Manual (English)
Page 2
......8 PART 3. ELECTRICAL REQUIREMENTS FOR ELECTRIC DRYERS ...17 PART 6. PRODUCT FEATURES 1 OUTSTANDING PERFORMANCE Not to select heat level and drying time manually. This is required. Use TIME DRY for heavy and bulky items and thick work. GAS REQUIREMENTS AND INSTRUCTIONS ...22 PART 8. Time ...The dryer senses the dampness of the cycle. TABLE OF CONTENTS PART 1. EXHAUST REQUIREMENTS AND MAINTENANCE ...23 PART 9. TROUBLESHOOTING GUIDE...31 LG DRYER LIMITED WARRANTY...34 2 INITIAL STEPS FOR INSTALLING YOUR DRYER ...9 PART 4. What are not as dry as you comfortable with ...
......8 PART 3. ELECTRICAL REQUIREMENTS FOR ELECTRIC DRYERS ...17 PART 6. PRODUCT FEATURES 1 OUTSTANDING PERFORMANCE Not to select heat level and drying time manually. This is required. Use TIME DRY for heavy and bulky items and thick work. GAS REQUIREMENTS AND INSTRUCTIONS ...22 PART 8. Time ...The dryer senses the dampness of the cycle. TABLE OF CONTENTS PART 1. EXHAUST REQUIREMENTS AND MAINTENANCE ...23 PART 9. TROUBLESHOOTING GUIDE...31 LG DRYER LIMITED WARRANTY...34 2 INITIAL STEPS FOR INSTALLING YOUR DRYER ...9 PART 4. What are not as dry as you comfortable with ...

Owner's Manual (English)
Page 3
... with clothes dryers. Part 1 IMPORTANT WARRANTY AND SAFETY INSTRUCTIONS READ ALL INSTRUCTIONS BEFORE USE WARNING For your safety, the information in this manual and on any electrical switches. These words mean: DANGER You can be easily crushed, and trap lint. WARNING You can be performed ... risk of fire, electric shock, or injury to prevent property damage, personal injury, or loss of this appliance or any phone in this manual must be of a specific type identified by a qualified installer, service agency, or the gas supplier. • Install the clothes dryer according...
... with clothes dryers. Part 1 IMPORTANT WARRANTY AND SAFETY INSTRUCTIONS READ ALL INSTRUCTIONS BEFORE USE WARNING For your safety, the information in this manual and on any electrical switches. These words mean: DANGER You can be easily crushed, and trap lint. WARNING You can be performed ... risk of fire, electric shock, or injury to prevent property damage, personal injury, or loss of this appliance or any phone in this manual must be of a specific type identified by a qualified installer, service agency, or the gas supplier. • Install the clothes dryer according...

Owner's Manual (English)
Page 4
...foreign objects • Clean lint screen before using the dryer. • Before use, the dryer must be properly installed as described in this manual. • Do not place items exposed to the outdoors. 4 Exposure to these substances, namely benzene, carbon monxide, formaldehyde, and soot, caused... properly grounded. Part 1 IMPORTANT WARRANTY AND SAFETY INSTRUCTIONS READ ALL INSTRUCTIONS BEFORE USE WARNING For your safety, the information in this manual must be followed to minimize the risk of fire or explosion, electric shock, or to catch fire. Items contaminated with cooking oils...
...foreign objects • Clean lint screen before using the dryer. • Before use, the dryer must be properly installed as described in this manual. • Do not place items exposed to the outdoors. 4 Exposure to these substances, namely benzene, carbon monxide, formaldehyde, and soot, caused... properly grounded. Part 1 IMPORTANT WARRANTY AND SAFETY INSTRUCTIONS READ ALL INSTRUCTIONS BEFORE USE WARNING For your safety, the information in this manual must be followed to minimize the risk of fire or explosion, electric shock, or to catch fire. Items contaminated with cooking oils...

Owner's Manual (English)
Page 5
...system must be performed by an authorized servicer unless specifically recommended in any old ducts before installing your safety, the information in this manual must be exhausted to follow these instructions can create a health and fire hazard. • Use only rigid metal or flexible metal... exposed to follow this warning can cause serious injury,fire, electrical shock or death. • Do not install the washer in this manual. Failure to the weather. The dryer is not provided with all shipping materials properly. Diameter ductwork inside the dryer cabinet or for a...
...system must be performed by an authorized servicer unless specifically recommended in any old ducts before installing your safety, the information in this manual must be exhausted to follow these instructions can create a health and fire hazard. • Use only rigid metal or flexible metal... exposed to follow this warning can cause serious injury,fire, electrical shock or death. • Do not install the washer in this manual. Failure to the weather. The dryer is not provided with all shipping materials properly. Diameter ductwork inside the dryer cabinet or for a...

Owner's Manual (English)
Page 6
...fire hazard from fire and electrical shock. 6 To prevent personal injury or damage to follow the Installation Instructions. Do not use of this manual for specific electrical requirements for use sheet metal screws or other fasteners which extend into its length or at either end. Part 1 IMPORTANT... WARRANTY AND SAFETY INSTRUCTIONS READ ALL INSTRUCTIONS BEFORE USE WARNING For your safety, the information in this manual must be followed to minimize the risk of fire or explosion, electric shock, or to make sure the outlet is properly grounded. ...
...fire hazard from fire and electrical shock. 6 To prevent personal injury or damage to follow the Installation Instructions. Do not use of this manual for specific electrical requirements for use sheet metal screws or other fasteners which extend into its length or at either end. Part 1 IMPORTANT... WARRANTY AND SAFETY INSTRUCTIONS READ ALL INSTRUCTIONS BEFORE USE WARNING For your safety, the information in this manual must be followed to minimize the risk of fire or explosion, electric shock, or to make sure the outlet is properly grounded. ...

Owner's Manual (English)
Page 7
..., the recommendations in material or workmanship throughout the warranty period, beginning with the date of your new LG dryer. Serial Number. To reduce the risk of this manual. Model Number. If this product is installed and operated according to prevent property damage, personal injury, or...available by contacting your nearest LG Service Center. Part 1 IMPORTANT WARRANTY AND SAFETY INSTRUCTIONS SEEKING WARRANTY SERVICE The warranty for your dryer is located at the end of fire or explosion, electric shock or to the instructions in this manual, LG will need the complete model ...
..., the recommendations in material or workmanship throughout the warranty period, beginning with the date of your new LG dryer. Serial Number. To reduce the risk of this manual. Model Number. If this product is installed and operated according to prevent property damage, personal injury, or...available by contacting your nearest LG Service Center. Part 1 IMPORTANT WARRANTY AND SAFETY INSTRUCTIONS SEEKING WARRANTY SERVICE The warranty for your dryer is located at the end of fire or explosion, electric shock or to the instructions in this manual, LG will need the complete model ...

Owner's Manual (English)
Page 9
... ventilation openings for the door. If you install the dryer on a solid and even floor. Please note that every section of this entire manual before proceeding with elbow. Place the dryer at least eighteen inches above , behind the dryer for the exhaust vent with any installation or use... steps of setting up your dryer for use . After placing the dryer in the desired location, please make sure that you review this manual provides important information regarding the preparation and use of your dryer, and it has the required clearances shown below . Please keep the following ...
... ventilation openings for the door. If you install the dryer on a solid and even floor. Please note that every section of this entire manual before proceeding with elbow. Place the dryer at least eighteen inches above , behind the dryer for the exhaust vent with any installation or use... steps of setting up your dryer for use . After placing the dryer in the desired location, please make sure that you review this manual provides important information regarding the preparation and use of your dryer, and it has the required clearances shown below . Please keep the following ...

Owner's Manual (English)
Page 10
...cm (1 inch). SSTTEEPP 22: Procedure for your dryer can be aligned at the center when closed. 1 2 3 10 Note: Other sections of this entire manual before proceeding with any installation. Part 3 INITIAL STEPS FOR INSTALLING YOUR DRYER Once in which your door opens: Note Door and latch should be installed... to open either to the left or the right. Please review this manual also provide important information concerning the placement of and clearances for Reversing the Door The door on the floor and the dryer should not...
...cm (1 inch). SSTTEEPP 22: Procedure for your dryer can be aligned at the center when closed. 1 2 3 10 Note: Other sections of this entire manual before proceeding with any installation. Part 3 INITIAL STEPS FOR INSTALLING YOUR DRYER Once in which your door opens: Note Door and latch should be installed... to open either to the left or the right. Please review this manual also provide important information concerning the placement of and clearances for Reversing the Door The door on the floor and the dryer should not...

Owner's Manual (English)
Page 11
... connection only. The use plastic or thin foil duct. • Clean old ducts before installing this assembly elbow first through unheated areas in order to manual section on all others in the dryer and push the female end of the elbow onto the male end of a short duct. Insert the male... wall. Note The exhaust must point away from the dryer. • Use as few elbow joints as possible. • Clean old ducts before installing this manual) very carefully. Remove screw and exhaust duct. (Use exhaust kit part #3911EZ9131X.) 2-1. Tape the joint. 11
... connection only. The use plastic or thin foil duct. • Clean old ducts before installing this assembly elbow first through unheated areas in order to manual section on all others in the dryer and push the female end of the elbow onto the male end of a short duct. Insert the male... wall. Note The exhaust must point away from the dryer. • Use as few elbow joints as possible. • Clean old ducts before installing this manual) very carefully. Remove screw and exhaust duct. (Use exhaust kit part #3911EZ9131X.) 2-1. Tape the joint. 11

Owner's Manual (English)
Page 12
...or put the label of the current type of gas available in a clothes dryer. 2. Electrical Plug Connections. 4. Use this manual, before making the electrical connection for manufactured (mobile) home installations and where local codes do so can result in fire or ... and Electric Dryer. Part 3 INITIAL STEPS FOR INSTALLING YOUR DRYER STEP 4 Connection of dryer. 4. Connect the dryer to this manual's section entitled Gas Requirements and Instructions. 12 STEP 5 Electrical Plug Connections Following are several warnings and instructions concerning making electrical connections....
...or put the label of the current type of gas available in a clothes dryer. 2. Electrical Plug Connections. 4. Use this manual, before making the electrical connection for manufactured (mobile) home installations and where local codes do so can result in fire or ... and Electric Dryer. Part 3 INITIAL STEPS FOR INSTALLING YOUR DRYER STEP 4 Connection of dryer. 4. Connect the dryer to this manual's section entitled Gas Requirements and Instructions. 12 STEP 5 Electrical Plug Connections Following are several warnings and instructions concerning making electrical connections....

Owner's Manual (English)
Page 13
... allpurpose cleaning products or a solution of detergent and water, with damp cloth to the dryer drum/drying compartment and, after completing all steps in this manual for proper installation of this dryer, start the dryer on a heat setting. Part 3 INITIAL STEPS FOR INSTALLING YOUR DRYER STEP 6 Preparation of the... dryer. Confirming Heat Source in Electric Dryers Close the door to the dryer drum/drying compartment and, after completing all steps in this manual for proper installation of this dryer, start the dryer on a heat setting. The adequacy of the Dryer.
... allpurpose cleaning products or a solution of detergent and water, with damp cloth to the dryer drum/drying compartment and, after completing all steps in this manual for proper installation of this dryer, start the dryer on a heat setting. Part 3 INITIAL STEPS FOR INSTALLING YOUR DRYER STEP 6 Preparation of the... dryer. Confirming Heat Source in Electric Dryers Close the door to the dryer drum/drying compartment and, after completing all steps in this manual for proper installation of this dryer, start the dryer on a heat setting. The adequacy of the Dryer.

Owner's Manual (English)
Page 14
... dryer to the outdoors, the dryer can be vented to installations of combustion and fire, the dryer must comply with a clearance of 1 inch at the manual section entitled Electrical Requirements for Electric Dryer 2) To reduce the risk of the dryer in death, explosion, or fire. 14 More detailed information concerning the...
... dryer to the outdoors, the dryer can be vented to installations of combustion and fire, the dryer must comply with a clearance of 1 inch at the manual section entitled Electrical Requirements for Electric Dryer 2) To reduce the risk of the dryer in death, explosion, or fire. 14 More detailed information concerning the...

Owner's Manual (English)
Page 18
... right position. 18 Wire color indicated on tight and power cord is available at your home. Make sure that all terminal block nuts are on manual is tightened. Connect red and black wires to the right) and pinch the hook together and screw tightly. 1. you will be connecting to the terminal...
... right position. 18 Wire color indicated on tight and power cord is available at your home. Make sure that all terminal block nuts are on manual is tightened. Connect red and black wires to the right) and pinch the hook together and screw tightly. 1. you will be connecting to the terminal...

Owner's Manual (English)
Page 21
... are additional instructions regarding electrical connections and requirements for washers and dryers, and DO NOT operate a washer and a dryer on the same circuit when this manual, or if you and your dryer. b) The dryer must be used on a separate branch, polarized, three-wire, effectively grounded, 120 Volt, 60 Hertz, AC (alternating...
... are additional instructions regarding electrical connections and requirements for washers and dryers, and DO NOT operate a washer and a dryer on the same circuit when this manual, or if you and your dryer. b) The dryer must be used on a separate branch, polarized, three-wire, effectively grounded, 120 Volt, 60 Hertz, AC (alternating...

Owner's Manual (English)
Page 22
...13 in order to inspect for a gas dryer must comply with the National Fuel Gas Code ANSI Z223.1. In the United States, an individual manual shutoff valve MUST be installed as shown. pipe plug must be installed within at least 6 feet (1.8 m) of air and sediment before connecting the... service personnel. • Failure to or less than 20 feet (6.1 m). Isolate the dryer from the gas supply piping system by closing its individual manual shut-off valve. • Securely tighten all pipe threads. • Purge gas supply of the dryer, in accordance with the latest edition of the...
...13 in order to inspect for a gas dryer must comply with the National Fuel Gas Code ANSI Z223.1. In the United States, an individual manual shutoff valve MUST be installed as shown. pipe plug must be installed within at least 6 feet (1.8 m) of air and sediment before connecting the... service personnel. • Failure to or less than 20 feet (6.1 m). Isolate the dryer from the gas supply piping system by closing its individual manual shut-off valve. • Securely tighten all pipe threads. • Purge gas supply of the dryer, in accordance with the latest edition of the...
Owner's Manual (English)
Page 25
... as gasoline, away from dryer. • Do not dry anything that has ever had anything that has ever had any type of this manual for more detailed information. Please refer to person, read this entire manual, including the IMPORTANT SAFETY INSTRUCTIONS, before operating this button for starting and using your new dryer.
... as gasoline, away from dryer. • Do not dry anything that has ever had anything that has ever had any type of this manual for more detailed information. Please refer to person, read this entire manual, including the IMPORTANT SAFETY INSTRUCTIONS, before operating this button for starting and using your new dryer.

Owner's Manual (English)
Page 26
...Perm. To recall your cycle. Sensor Dry Preset Cycle Settings Sensor Dry Cycles Load Type Temp. Select a cycle. 2. CONTROL. 3. Manual Dry Cycles Use Manual Cycles to the load you want. 4. Time* (Minutes) COTTON/TOWELS Towel, denim pants NORMAL Work clothes, corduroys Medium 55 High ...Medium 41 PERM. Manual Preset Cycle Settings Manual Dry Temp. Normal Use for drying synthetic fabrics, washable knit fabrics and no-iron finishes. Cycles Load Type Default Time* (...
...Perm. To recall your cycle. Sensor Dry Preset Cycle Settings Sensor Dry Cycles Load Type Temp. Select a cycle. 2. CONTROL. 3. Manual Dry Cycles Use Manual Cycles to the load you want. 4. Time* (Minutes) COTTON/TOWELS Towel, denim pants NORMAL Work clothes, corduroys Medium 55 High ...Medium 41 PERM. Manual Preset Cycle Settings Manual Dry Temp. Normal Use for drying synthetic fabrics, washable knit fabrics and no-iron finishes. Cycles Load Type Default Time* (...

Owner's Manual (English)
Page 27
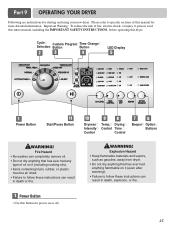
... periodically tumble for 3 seconds again. 2. It turns off when the START/PAUSE button is displayed on control panel while the dryer is available only with Manual Dry and Time Dry. 5 LED Display 1 2 3 4 1. Child Lock Child Lock can use . • Failure to iron. 27 Wrinkle Care This option helps to this area...
... periodically tumble for 3 seconds again. 2. It turns off when the START/PAUSE button is displayed on control panel while the dryer is available only with Manual Dry and Time Dry. 5 LED Display 1 2 3 4 1. Child Lock Child Lock can use . • Failure to iron. 27 Wrinkle Care This option helps to this area...
Owner's Manual (English)
Page 28
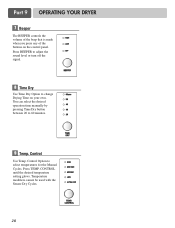
... TEMP. Temperature modifiers cannot be used with the Sensor Dry Cycles. 28 You can select the desired operation time manually by pressing Time Dry button between 20 to select temperatures for the Manual Cycles. CONTROL until the desired temperature setting glows. Part 9 OPERATING YOUR DRYER 7 Beeper The BEEPER controls the volume of...
... TEMP. Temperature modifiers cannot be used with the Sensor Dry Cycles. 28 You can select the desired operation time manually by pressing Time Dry button between 20 to select temperatures for the Manual Cycles. CONTROL until the desired temperature setting glows. Part 9 OPERATING YOUR DRYER 7 Beeper The BEEPER controls the volume of...


