

Owner's Manual (English)
Page 2
... 4. OPERATING YOUR DRYER ...25 PART 10. TROUBLESHOOTING GUIDE...31 LG DRYER LIMITED WARRANTY...34 2 PRODUCT FEATURES 1 OUTSTANDING PERFORMANCE Not to select heat level and drying time manually. This is required. Use TIME DRY for heavy and bulky items and thick work. SPECIFICATIONS ...8 PART 3. ACCESSORIES INSTALLATION ...15 PART 5. ELECTRICAL REQUIREMENTS FOR GAS DRYERS...
... 4. OPERATING YOUR DRYER ...25 PART 10. TROUBLESHOOTING GUIDE...31 LG DRYER LIMITED WARRANTY...34 2 PRODUCT FEATURES 1 OUTSTANDING PERFORMANCE Not to select heat level and drying time manually. This is required. Use TIME DRY for heavy and bulky items and thick work. SPECIFICATIONS ...8 PART 3. ACCESSORIES INSTALLATION ...15 PART 5. ELECTRICAL REQUIREMENTS FOR GAS DRYERS...
Owner's Manual (English)
Page 8
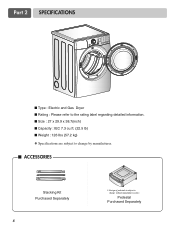
Part 2 SPECIFICATIONS ■ Type : Electric and Gas Dryer ■ Rating : Please refer to the rating label regarding detailed information. ■ Size : 27 x 29.9 x 38.7(inch) ■ Capacity : IEC 7.3 cu.ft. (22.5 lb) ■ Weight : 126 Ibs (57.2 kg) ❋ Specifications are subject to change by manufacturer. ■ ACCESSORIES Stacking Kit Purchased Separately 8 ❊ Design of pedestals is subject to change without manafaturers notice. Pedestal Purchased Separately
Part 2 SPECIFICATIONS ■ Type : Electric and Gas Dryer ■ Rating : Please refer to the rating label regarding detailed information. ■ Size : 27 x 29.9 x 38.7(inch) ■ Capacity : IEC 7.3 cu.ft. (22.5 lb) ■ Weight : 126 Ibs (57.2 kg) ❋ Specifications are subject to change by manufacturer. ■ ACCESSORIES Stacking Kit Purchased Separately 8 ❊ Design of pedestals is subject to change without manafaturers notice. Pedestal Purchased Separately
Owner's Manual (English)
Page 15
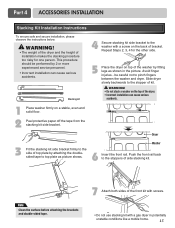
... stacking kit side bracket. Slide dryer slowly backwards to pinch fingers between the washer and dryer. be performed by fitting legs as picture shows. Part 4 ACCESSORIES INSTALLATION Stacking Kit Installation Instructions To ensure safe and secure installation, please observe the instructions below. This procedure should be careful not to the stopper...
... stacking kit side bracket. Slide dryer slowly backwards to pinch fingers between the washer and dryer. be performed by fitting legs as picture shows. Part 4 ACCESSORIES INSTALLATION Stacking Kit Installation Instructions To ensure safe and secure installation, please observe the instructions below. This procedure should be careful not to the stopper...

Owner's Manual (English)
Page 16
... each corner to securely attach the appliance to lower until you can turn them with the holes in the correct positions. Part 4 ACCESSORIES INSTALLATION Pedestal Installation Instructions The pedestal accessory includes: • Drawer divider (1) • Wrench (1) • Screws (18) † • Retainers (4) †† † Dryer installation only uses 8 screws ††...
... each corner to securely attach the appliance to lower until you can turn them with the holes in the correct positions. Part 4 ACCESSORIES INSTALLATION Pedestal Installation Instructions The pedestal accessory includes: • Drawer divider (1) • Wrench (1) • Screws (18) † • Retainers (4) †† † Dryer installation only uses 8 screws ††...