
Owners Manual
Page 2
... the Dryer 15 Reversing the Door 16 Installing the Side Vent Kit 17 Stacking the Dryer 18 Venting the Dryer 20 Connecting the Inlet Hose (Steam Models) 21 Connecting Gas Dryers 23 Connecting Electric Dryers 28 Special Electrical Requirements 28 Final Installation Check 29 Installation Test (Duct Check) 32 OPERATION 32 Using the Dryer 33 Check the Lint Filter Before Every Load 33 Sorting Laundry 33 Loading the Dryer 34 Control Panel 37 Cycle Guide 41 Cycle Modifier Buttons 41 Option Buttons 42 Special Functions 43 Steam Functions (Steam Models) 45 SMART FUNCTIONS 45 LG SmartThinQ Application...
... the Dryer 15 Reversing the Door 16 Installing the Side Vent Kit 17 Stacking the Dryer 18 Venting the Dryer 20 Connecting the Inlet Hose (Steam Models) 21 Connecting Gas Dryers 23 Connecting Electric Dryers 28 Special Electrical Requirements 28 Final Installation Check 29 Installation Test (Duct Check) 32 OPERATION 32 Using the Dryer 33 Check the Lint Filter Before Every Load 33 Sorting Laundry 33 Loading the Dryer 34 Control Panel 37 Cycle Guide 41 Cycle Modifier Buttons 41 Option Buttons 42 Special Functions 43 Steam Functions (Steam Models) 45 SMART FUNCTIONS 45 LG SmartThinQ Application...

Owners Manual
Page 3
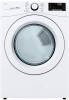
... hot steam to help increase efficiency and reduce long drying times caused by blocked ducts. Easy-Access Reversible Door The wide-opening door provides easy access for installation location. PRODUCT FEATURES PRODUCT FEATURES 3 ENGLISH C Easy-to-Use Control Panel Rotate the cycle selector knob to remove the restrictions. This function uses Wi-Fi. Add cycle options or adjust settings with a swirling jet of Residential Clothes dryer Smart Diagnosis™ Should you see the alert: Clean or repair...
... hot steam to help increase efficiency and reduce long drying times caused by blocked ducts. Easy-Access Reversible Door The wide-opening door provides easy access for installation location. PRODUCT FEATURES PRODUCT FEATURES 3 ENGLISH C Easy-to-Use Control Panel Rotate the cycle selector knob to remove the restrictions. This function uses Wi-Fi. Add cycle options or adjust settings with a swirling jet of Residential Clothes dryer Smart Diagnosis™ Should you see the alert: Clean or repair...
Owners Manual
Page 4
...not store or use with flexible plastic venting materials. Risk of Fire Install the clothes dryer according to the manufacturer's instructions and local codes. ••Clothes dryer installation must be ...light any electrical switch; If you what may be of a specific type identified by a qualified installer, service agency or your building. - 4 SAFETY INSTRUCTIONS SAFETY INSTRUCTIONS READ ALL INSTRUCTIONS BEFORE USE Your safety and the safety of others . We have provided many important safety messages in this or any phone in the vicinity of this manual and on your gas...
...not store or use with flexible plastic venting materials. Risk of Fire Install the clothes dryer according to the manufacturer's instructions and local codes. ••Clothes dryer installation must be ...light any electrical switch; If you what may be of a specific type identified by a qualified installer, service agency or your building. - 4 SAFETY INSTRUCTIONS SAFETY INSTRUCTIONS READ ALL INSTRUCTIONS BEFORE USE Your safety and the safety of others . We have provided many important safety messages in this or any phone in the vicinity of this manual and on your gas...

Owners Manual
Page 5
... obstruct clothes dryer airflow and increase the risk of fire. If flexible metal (foil type) duct is installed, it must be of a specific type identified by qualified service personnel in accordance with local codes. ••Disconnect the power cord, house fuse or circuit breaker before installing or servicing the appliance. ••When moving the appliance, be easily crushed, and trap lint. ENGLISH SAFETY INSTRUCTIONS 5 IMPORTANT SAFETY INSTRUCTIONS WARNING...
... obstruct clothes dryer airflow and increase the risk of fire. If flexible metal (foil type) duct is installed, it must be of a specific type identified by qualified service personnel in accordance with local codes. ••Disconnect the power cord, house fuse or circuit breaker before installing or servicing the appliance. ••When moving the appliance, be easily crushed, and trap lint. ENGLISH SAFETY INSTRUCTIONS 5 IMPORTANT SAFETY INSTRUCTIONS WARNING...

Owners Manual
Page 6
...) in use. ••Gas dryers MUST be exhausted to the outside. ••The dryer exhaust system must be supplied through an external switching device, such as a timer, or connected to a circuit that could affect drying time. ••Ductwork is not exhausted outdoors, some fine lint and large amounts of the exhaust system. If the dryer is not provided with duct tape. ••Use only...
...) in use. ••Gas dryers MUST be exhausted to the outside. ••The dryer exhaust system must be supplied through an external switching device, such as a timer, or connected to a circuit that could affect drying time. ••Ductwork is not exhausted outdoors, some fine lint and large amounts of the exhaust system. If the dryer is not provided with duct tape. ••Use only...

Owners Manual
Page 8
... are in the exhaust duct. ••Install all local codes and ordinances. ••This dryer must be grounded. Electrical shock may create an electric shock hazard and/or a fire hazard. Check with the installation instructions of the manufacturer of electric shock. ••Clean the lint filter before cleaning and attempting any dust or foreign matter from the power plug pins. ••Disconnect this Owner's Manual.
... are in the exhaust duct. ••Install all local codes and ordinances. ••This dryer must be grounded. Electrical shock may create an electric shock hazard and/or a fire hazard. Check with the installation instructions of the manufacturer of electric shock. ••Clean the lint filter before cleaning and attempting any dust or foreign matter from the power plug pins. ••Disconnect this Owner's Manual.

Owners Manual
Page 10
... door open) Gas : 123.02 lb (55.8kg) - 126.77 lb (57.5kg) Electric : 120.15 lb (54.5kg) - 123.46 lb (56kg) - Check and choose the proper location Level the dryer Vent the dryer Connect the inlet hose (steam models) Connect the Gas dryer Connect the Electric dryer Gas dryer Electric dryer Plug in the power cord Installation test Test run Product Specifications The appearance and specifications listed in this product or transporting it to another location. 10 INSTALLATION INSTALLATION Installation Overview Please read the following installation instructions...
... door open) Gas : 123.02 lb (55.8kg) - 126.77 lb (57.5kg) Electric : 120.15 lb (54.5kg) - 123.46 lb (56kg) - Check and choose the proper location Level the dryer Vent the dryer Connect the inlet hose (steam models) Connect the Gas dryer Connect the Electric dryer Gas dryer Electric dryer Plug in the power cord Installation test Test run Product Specifications The appearance and specifications listed in this product or transporting it to another location. 10 INSTALLATION INSTALLATION Installation Overview Please read the following installation instructions...

Owners Manual
Page 11
Detailed instructions concerning electrical connections, gas connections, and exhaust requirements are provided on the following pages. See Connecting Electric Dryers. ••A sturdy floor to place the dryer at temperatures below 45 °F (7 °C). Clothes may not tumble properly, and automatic sensor cycles may not operate correctly if the dryer is not level. • For garage installation, you review this entire manual before installing and operating your dryer! The standard pedestal height is important that...
Detailed instructions concerning electrical connections, gas connections, and exhaust requirements are provided on the following pages. See Connecting Electric Dryers. ••A sturdy floor to place the dryer at temperatures below 45 °F (7 °C). Clothes may not tumble properly, and automatic sensor cycles may not operate correctly if the dryer is not level. • For garage installation, you review this entire manual before installing and operating your dryer! The standard pedestal height is important that...

Owners Manual
Page 16
... 1½" (38 mm) Option 2: Bottom Venting 2 Press the adapter duct onto the blower housing and secure it onto the adapter duct. Insert the elbow/duct assembly through the side opening (right-side venting is not available on gas models). Press the adapter duct onto the blower housing and secure to change the dryer vent location. 1 Remove the rear exhaust duct retaining screw. An adapter kit, part number 383EEL9001B, may be purchased from...
... 1½" (38 mm) Option 2: Bottom Venting 2 Press the adapter duct onto the blower housing and secure it onto the adapter duct. Insert the elbow/duct assembly through the side opening (right-side venting is not available on gas models). Press the adapter duct onto the blower housing and secure to change the dryer vent location. 1 Remove the rear exhaust duct retaining screw. An adapter kit, part number 383EEL9001B, may be purchased from...

Owners Manual
Page 21
... manual shutoff valve during any pressure testing of the gas supply. • DO NOT attempt any circumstances, cut or remove the grounding prong from the factory, this dryer is configured for use with a three-prong grounding plug for protection against shock hazard and should be installed by a 15-ampere fuse or circuit breaker. • Where a standard 2-prong wall outlet is encountered, it replaced with flexible stainless steel connectors...
... manual shutoff valve during any pressure testing of the gas supply. • DO NOT attempt any circumstances, cut or remove the grounding prong from the factory, this dryer is configured for use with a three-prong grounding plug for protection against shock hazard and should be installed by a 15-ampere fuse or circuit breaker. • Where a standard 2-prong wall outlet is encountered, it replaced with flexible stainless steel connectors...

Owners Manual
Page 23
... gauge of wire must be fused on manual is connected to the same color screw in length, use UL-listed No.-8 AWG wire (copper wire only), or as required by local codes. Allow sufficient slack in wiring so the dryer can be moved from its own terminal block that your home has adequate electrical power to operate the dryer. • This dryer must be connected to a grounded metal, permanent wiring system, or...
... gauge of wire must be fused on manual is connected to the same color screw in length, use UL-listed No.-8 AWG wire (copper wire only), or as required by local codes. Allow sufficient slack in wiring so the dryer can be moved from its own terminal block that your home has adequate electrical power to operate the dryer. • This dryer must be connected to a grounded metal, permanent wiring system, or...

Owners Manual
Page 28
Testing Dryer Heating GAS MODELS Close the dryer door and press the Power button to ensure proper operation. The exhaust air should be warm after January 1, 1996. ••A gas dryer must be a 4-wire connection. It is level. You must comply with the Manufactured Home Construction and Safety Standards Title 24 CFR, Part 3280 or Standard CAN/ CSA Z240 MH and local codes and ordinances. Press the Time Dry and Start/ Pause...
Testing Dryer Heating GAS MODELS Close the dryer door and press the Power button to ensure proper operation. The exhaust air should be warm after January 1, 1996. ••A gas dryer must be a 4-wire connection. It is level. You must comply with the Manufactured Home Construction and Safety Standards Title 24 CFR, Part 3280 or Standard CAN/ CSA Z240 MH and local codes and ordinances. Press the Time Dry and Start/ Pause...

Owners Manual
Page 30
... problem is blown, circuit breaker has tripped, or power outage has occurred. Error Code tE1 or tE2 HS PS, PF, or nP gAS Possible Causes Temperature sensor failure. House fuse is a circuit overload, have it corrected by a qualified electrician. Turn off the dryer and call for complete instructions. Error Codes Check the error code before you to dry faster and reduces energy use. Refer to the Connecting Electric Dryers section of this manual for service. Humidity sensor failure. Electric dryer power cord...
... problem is blown, circuit breaker has tripped, or power outage has occurred. Error Code tE1 or tE2 HS PS, PF, or nP gAS Possible Causes Temperature sensor failure. House fuse is a circuit overload, have it corrected by a qualified electrician. Turn off the dryer and call for complete instructions. Error Codes Check the error code before you to dry faster and reduces energy use. Refer to the Connecting Electric Dryers section of this manual for service. Humidity sensor failure. Electric dryer power cord...

Owners Manual
Page 43
... filter/duct is clogged, the steam option may not be used to help reduce odors in the drum during Time Dry cycles. • After the Steam option is selected in the drying cycle to reduce the static electricity caused by pressing the More Time or Less Time buttons to fit the size of the load. 4 Press Start/Pause to refresh clothes, reduce static, and make ironing easier. Otherwise, an error...
... filter/duct is clogged, the steam option may not be used to help reduce odors in the drum during Time Dry cycles. • After the Steam option is selected in the drying cycle to reduce the static electricity caused by pressing the More Time or Less Time buttons to fit the size of the load. 4 Press Start/Pause to refresh clothes, reduce static, and make ironing easier. Otherwise, an error...
Owners Manual
Page 50
... efficient operation of clothes dryers. Use the More Time or Less Time buttons to dry clothing will be professionally cleaned or repaired. An exhaust system which is not unloaded immediately after the cycle finishes. A: This is your home exhaust system. A: When the Steam Fresh™ cycle is selected, the dryer displays the recommended number of garments for the number of lint or clogged with lint, or is excessively long, needs to quickly access the 2 Type Dryer...
... efficient operation of clothes dryers. Use the More Time or Less Time buttons to dry clothing will be professionally cleaned or repaired. An exhaust system which is not unloaded immediately after the cycle finishes. A: This is your home exhaust system. A: When the Steam Fresh™ cycle is selected, the dryer displays the recommended number of garments for the number of lint or clogged with lint, or is excessively long, needs to quickly access the 2 Type Dryer...
Owners Manual
Page 51
... Flow Sense™ indicator is reset. The Energy Saver option is selected by adding an air dry section to the beginning of the cycle. This option reduces energy use by default. Operation Problem The Flow Sense™ indicator remains active after the restriction has been cleared, call for service. Display show error code nP Display show error code gAS Electric dryer power cord is not connected correctly, or house power supply is blown, circuit breaker...
... Flow Sense™ indicator is reset. The Energy Saver option is selected by adding an air dry section to the beginning of the cycle. This option reduces energy use by default. Operation Problem The Flow Sense™ indicator remains active after the restriction has been cleared, call for service. Display show error code nP Display show error code gAS Electric dryer power cord is not connected correctly, or house power supply is blown, circuit breaker...

Owners Manual
Page 52
.... Lint filter needs to be necessary to pause the cycle and clean the filter during the cycle. ••Reset circuit breaker or replace fuse. ENERGY SAVER option selected (on the type of heat used (electric, natural gas, or LP gas), the size of the load, the type of fabrics, the wetness of the clothes, and the condition of a consistent size. ••Use the appropriate control settings for a load will take longer to dry. If the load is possible for a circuit problem...
.... Lint filter needs to be necessary to pause the cycle and clean the filter during the cycle. ••Reset circuit breaker or replace fuse. ENERGY SAVER option selected (on the type of heat used (electric, natural gas, or LP gas), the size of the load, the type of fabrics, the wetness of the clothes, and the condition of a consistent size. ••Use the appropriate control settings for a load will take longer to dry. If the load is possible for a circuit problem...

Owners Manual
Page 53
... no heat setting. ••Remove the lint from the filter before being dried together. Adjust settings and use a shorter drying time, or use SENSOR DRY cycles. ••Divide extra large loads into smaller loads for your clothes, always consult and follow the manufacturer's instructions. If it is overloaded. With the lint removed, hold the filter up to 3 hours to the clean clothes in a dryer. Clothes were not properly cleaned or rinsed before every load. Performance Problem...
... no heat setting. ••Remove the lint from the filter before being dried together. Adjust settings and use a shorter drying time, or use SENSOR DRY cycles. ••Divide extra large loads into smaller loads for your clothes, always consult and follow the manufacturer's instructions. If it is overloaded. With the lint removed, hold the filter up to 3 hours to the clean clothes in a dryer. Clothes were not properly cleaned or rinsed before every load. Performance Problem...

Owners Manual
Page 57
... perform during the warranty period set forth below, LG will provide parts and labor to deliver, pick up, or install or repair the product; instruction to the customer on how long an implied warranty lasts, so the above exclusion or limitation may also have other rights that are warranted for other damage to the finish of your LG Dryer ("Product") fail due...
... perform during the warranty period set forth below, LG will provide parts and labor to deliver, pick up, or install or repair the product; instruction to the customer on how long an implied warranty lasts, so the above exclusion or limitation may also have other rights that are warranted for other damage to the finish of your LG Dryer ("Product") fail due...

Owners Manual
Page 58
... maintenance. Not heating, long dry time Clean the lint filter. Reconnect power cord, replace house fuse or reset breaker. commercial use of repair or replacement under these excluded circumstances shall be required. Duct is clogged. No Power Not Heating Gas valve is not turned on. (Gas Dryer) Not heating Keep exhaust ducts as short as possible, using this product or to the instructions outlined in the owner's manual. Open the gas valve. Filter is clogged. The cost of parts not approved or specified by the consumer. TO OBTAIN WARRANTY SERVICE...
... maintenance. Not heating, long dry time Clean the lint filter. Reconnect power cord, replace house fuse or reset breaker. commercial use of repair or replacement under these excluded circumstances shall be required. Duct is clogged. No Power Not Heating Gas valve is not turned on. (Gas Dryer) Not heating Keep exhaust ducts as short as possible, using this product or to the instructions outlined in the owner's manual. Open the gas valve. Filter is clogged. The cost of parts not approved or specified by the consumer. TO OBTAIN WARRANTY SERVICE...


