
Specification
Page 1
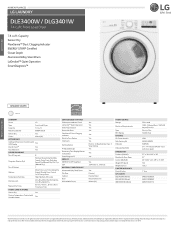
...white SUMMARY Series LG Type Front Load Dryer Capacity 7.4 cu. of Options 7 Options More Time, Less Time, Damp Dry Signal, Wrinkle Care, Control Lock, Energy Saver Temperature Settings High, Medium, Ultra Low Drying Levels Very Dry, More Dry, Normal Dry, Less Dry, Damp Dry Manual Dry Times 60 min., 40 min., 20 min., More Time/Less Time FABRIC CARE FEATURES Sensor Dry Yes Precise Temperature Control with Variable Heater Yes CONVENIENCE FEATURES 3 Minute Installation Check LoDecibel™ Quiet Operation End of their respective owners. HOME APPLIANCES LG LAUNDRY DLE3400W...
...white SUMMARY Series LG Type Front Load Dryer Capacity 7.4 cu. of Options 7 Options More Time, Less Time, Damp Dry Signal, Wrinkle Care, Control Lock, Energy Saver Temperature Settings High, Medium, Ultra Low Drying Levels Very Dry, More Dry, Normal Dry, Less Dry, Damp Dry Manual Dry Times 60 min., 40 min., 20 min., More Time/Less Time FABRIC CARE FEATURES Sensor Dry Yes Precise Temperature Control with Variable Heater Yes CONVENIENCE FEATURES 3 Minute Installation Check LoDecibel™ Quiet Operation End of their respective owners. HOME APPLIANCES LG LAUNDRY DLE3400W...
Owners Manual
Page 2
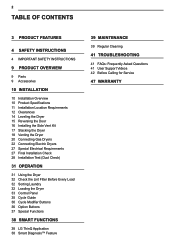
... Reversing the Door 16 Installing the Side Vent Kit 17 Stacking the Dryer 18 Venting the Dryer 20 Connecting Gas Dryers 22 Connecting Electric Dryers 27 Special Electrical Requirements 27 Final Installation Check 28 Installation Test (Duct Check) 31 OPERATION 31 Using the Dryer 32 Check the Lint Filter Before Every Load 32 Sorting Laundry 32 Loading the Dryer 33 Control Panel 35 Cycle Guide 36 Cycle Modifier Buttons 36 Option Buttons 37 Special Functions 38 SMART FUNCTIONS 38 LG ThinQ Application 38 Smart Diagnosis™ Feature 39 MAINTENANCE 39 Regular Cleaning...
... Reversing the Door 16 Installing the Side Vent Kit 17 Stacking the Dryer 18 Venting the Dryer 20 Connecting Gas Dryers 22 Connecting Electric Dryers 27 Special Electrical Requirements 27 Final Installation Check 28 Installation Test (Duct Check) 31 OPERATION 31 Using the Dryer 32 Check the Lint Filter Before Every Load 32 Sorting Laundry 32 Loading the Dryer 33 Control Panel 35 Cycle Guide 36 Cycle Modifier Buttons 36 Option Buttons 37 Special Functions 38 SMART FUNCTIONS 38 LG ThinQ Application 38 Smart Diagnosis™ Feature 39 MAINTENANCE 39 Regular Cleaning...

Owners Manual
Page 5
... or remove the third (ground) prong from the power cord. •• When installing or moving or installing the product in a different location, call qualified service personnel for installation and service. •• Keep packing materials out of the reach of long sleeved gloves and safety glasses. •• Never attempt to operate this manual. •• Connect to a properly rated, protected, and sized power circuit to all installation instructions...
... or remove the third (ground) prong from the power cord. •• When installing or moving or installing the product in a different location, call qualified service personnel for installation and service. •• Keep packing materials out of the reach of long sleeved gloves and safety glasses. •• Never attempt to operate this manual. •• Connect to a properly rated, protected, and sized power circuit to all installation instructions...
Owners Manual
Page 6
... several minutes. OPERATION •• Repair or immediately replace all instructions before using the appliance and save these instructions. •• Use this time. 6 SAFETY INSTRUCTIONS •• Gas dryers MUST be exhausted to the outside of the dwelling. An accumulation of lint in any other appliance. •• Keep the area underneath and around the exhaust opening and adjacent surrounding areas free from each for...
... several minutes. OPERATION •• Repair or immediately replace all instructions before using the appliance and save these instructions. •• Use this time. 6 SAFETY INSTRUCTIONS •• Gas dryers MUST be exhausted to the outside of the dwelling. An accumulation of lint in any other appliance. •• Keep the area underneath and around the exhaust opening and adjacent surrounding areas free from each for...

Owners Manual
Page 7
... the power supply. •• Remove the door before the appliance is removed from service or discarded to avoid the danger of children or small animals getting trapped inside. •• Unplug the appliance before cleaning to avoid the risk of electric shock. •• Clean the lint filter before or after each load. •• The interior of the appliance and exhaust duct...
... the power supply. •• Remove the door before the appliance is removed from service or discarded to avoid the danger of children or small animals getting trapped inside. •• Unplug the appliance before cleaning to avoid the risk of electric shock. •• Clean the lint filter before or after each load. •• The interior of the appliance and exhaust duct...
Owners Manual
Page 8
... for use with clothes dryers. Failure to collapse, be grounded. SAVE THESE INSTRUCTIONS Do not modify the plug provided with flexible plastic venting materials. if it must be plugged into a properly grounded outlet. Check with a qualified electrician or service personnel if you are known to follow all installation instructions. •• Do not install a booster fan in the exhaust duct. •• Install all local codes and...
... for use with clothes dryers. Failure to collapse, be grounded. SAVE THESE INSTRUCTIONS Do not modify the plug provided with flexible plastic venting materials. if it must be plugged into a properly grounded outlet. Check with a qualified electrician or service personnel if you are known to follow all installation instructions. •• Do not install a booster fan in the exhaust duct. •• Install all local codes and...
Owners Manual
Page 10
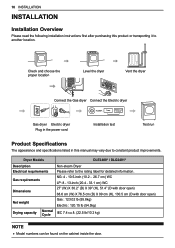
... after purchasing this manual may vary due to another location. Check and choose the proper location Level the dryer Vent the dryer Connect the Gas dryer Connect the Electric dryer Gas dryer Electric dryer Plug in the power cord Installation test Test run Product Specifications The appearance and specifications listed in this product or transporting it to constant product improvements. Dryer Models DLE3400* / DLG3401* Description Electrical requirements Gas requirements Dimensions Net weight Drying capacity Normal Cycle Non-steam Dryer Please refer to the rating label for...
... after purchasing this manual may vary due to another location. Check and choose the proper location Level the dryer Vent the dryer Connect the Gas dryer Connect the Electric dryer Gas dryer Electric dryer Plug in the power cord Installation test Test run Product Specifications The appearance and specifications listed in this product or transporting it to constant product improvements. Dryer Models DLE3400* / DLG3401* Description Electrical requirements Gas requirements Dimensions Net weight Drying capacity Normal Cycle Non-steam Dryer Please refer to the rating label for...

Owners Manual
Page 11
...;C). Contact your dryer! A gas dryer must be exposed to the bottom of 200 lb (90.7 kg). Installation Location Requirements INSTALLATION 11 ENGLISH WARNING •• Read all installation instructions completely before installing and using your dryer. Clothes may not tumble properly, and automatic sensor cycles may not operate correctly if the dryer is not level. •• For garage installation, you review this entire manual before installing and operating your local building...
...;C). Contact your dryer! A gas dryer must be exposed to the bottom of 200 lb (90.7 kg). Installation Location Requirements INSTALLATION 11 ENGLISH WARNING •• Read all installation instructions completely before installing and using your dryer. Clothes may not tumble properly, and automatic sensor cycles may not operate correctly if the dryer is not level. •• For garage installation, you review this entire manual before installing and operating your local building...

Owners Manual
Page 16
... Knockout Cover Plate Elbow 16 INSTALLATION Installing the Side Vent Kit WARNING •• Use long-sleeved gloves and safety glasses. •• Use a heavy metal vent. •• Do not use plastic or thin foil ducts. •• Clean old ducts before installing this dryer. Adapter Duct Bracket 3 Insert the 4-inch (10.2 cm) elbow through the side opening . (Right-side venting is configured to vent to the rear. An adapter kit, part number...
... Knockout Cover Plate Elbow 16 INSTALLATION Installing the Side Vent Kit WARNING •• Use long-sleeved gloves and safety glasses. •• Use a heavy metal vent. •• Do not use plastic or thin foil ducts. •• Clean old ducts before installing this dryer. Adapter Duct Bracket 3 Insert the 4-inch (10.2 cm) elbow through the side opening . (Right-side venting is configured to vent to the rear. An adapter kit, part number...
Owners Manual
Page 20
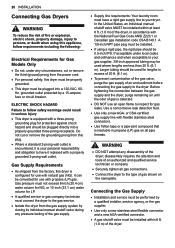
... attempt any pressure testing of the gas supply. •• Supply line requirements: Your laundry room must be plugged directly into a 120-VAC, 60Hz. grounded outlet protected by a qualified installer, service agency, or the gas supplier. •• Use only a new stainless steel flexible connector and a new AGA-certified connector. •• A gas shutoff valve must be performed by a 15-ampere fuse or circuit breaker. If acceptable under...
... attempt any pressure testing of the gas supply. •• Supply line requirements: Your laundry room must be plugged directly into a 120-VAC, 60Hz. grounded outlet protected by a qualified installer, service agency, or the gas supplier. •• Use only a new stainless steel flexible connector and a new AGA-certified connector. •• A gas shutoff valve must be performed by a 15-ampere fuse or circuit breaker. If acceptable under...

Owners Manual
Page 22
... be run with the dryer. Type of pigtail and gauge of wire must conform to the neutral terminal when a 4-wire cord is required for : (1) new branch-circuit installations, (2) mobile homes, (3) recreational vehicles, and (4) areas where local codes prohibit grounding through the neutral wire. •• Do not modify the plug and internal wire provided with instructions on manual is connected to the same color screw in length, use UL-listed...
... be run with the dryer. Type of pigtail and gauge of wire must conform to the neutral terminal when a 4-wire cord is required for : (1) new branch-circuit installations, (2) mobile homes, (3) recreational vehicles, and (4) areas where local codes prohibit grounding through the neutral wire. •• Do not modify the plug and internal wire provided with instructions on manual is connected to the same color screw in length, use UL-listed...
Owners Manual
Page 27
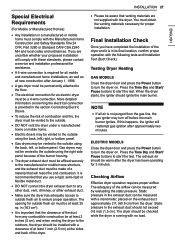
... proposed installation will reattempt gas ignition after the dryer has been operating for assistance. •• A 4-wire connection is running with these standards, please contact a service and installation professional for 3 minutes. ELECTRIC MODELS Close the dryer door and press the Power button to start the test. Gas dryers may turn off before the main burner ignites. Press the Time Dry and Start/ Pause buttons to the manufactured or mobile home structure, and the exhaust duct must...
... proposed installation will reattempt gas ignition after the dryer has been operating for assistance. •• A 4-wire connection is running with these standards, please contact a service and installation professional for 3 minutes. ELECTRIC MODELS Close the dryer door and press the Power button to start the test. Gas dryers may turn off before the main burner ignites. Press the Time Dry and Start/ Pause buttons to the manufactured or mobile home structure, and the exhaust duct must...

Owners Manual
Page 29
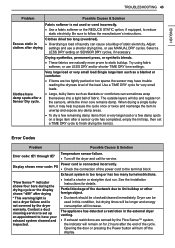
... Connecting Electric Dryers section of this manual for complete exhaust system and venting requirements. If the problem is turned on the condition of the exhaust duct than the installation test, the number of this could result in inaccurate results. •• Even if no bars are both only.) fully open. Error Code Possible Causes Solutions tE1 or Temperature Turn off the dryer and failure. PF, or nP House fuse is blown, circuit breaker...
... Connecting Electric Dryers section of this manual for complete exhaust system and venting requirements. If the problem is turned on the condition of the exhaust duct than the installation test, the number of this could result in inaccurate results. •• Even if no bars are both only.) fully open. Error Code Possible Causes Solutions tE1 or Temperature Turn off the dryer and failure. PF, or nP House fuse is blown, circuit breaker...
Owners Manual
Page 33
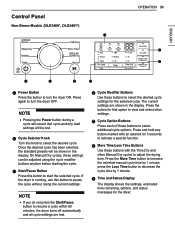
... cycle and any button marked with the Time Dry and other settings. Control Panel Non-Steam Models (DLE3400*, DLG3401*) OPERATION 33 ENGLISH a Power Button Press the button to turn the dryer OFF. Once the desired cycle has been selected, the standard presets will be shown in the display. The current settings are lost . f More Time/Less Time Buttons Use these buttons to select the desired cycle settings for the dryer. On Manual Dry cycles, these buttons to start the selected cycle...
... cycle and any button marked with the Time Dry and other settings. Control Panel Non-Steam Models (DLE3400*, DLG3401*) OPERATION 33 ENGLISH a Power Button Press the button to turn the dryer OFF. Once the desired cycle has been selected, the standard presets will be shown in the display. The current settings are lost . f More Time/Less Time Buttons Use these buttons to select the desired cycle settings for the dryer. On Manual Dry cycles, these buttons to start the selected cycle...
Owners Manual
Page 42
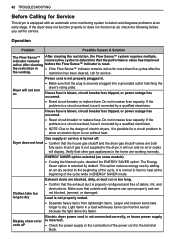
... five cycles after the the venting. Gas supply or service is blown, circuit breaker has tripped, or power outage has occurred. •• Reset circuit breaker or replace fuse. Dryer does not heat •• Confirm that other gas appliances in the home are working normally. This option reduces energy use by a qualified electrician. •• NOTE: Due to the design of the power cord to dry. Clothes take longer to the terminal block. Light...
... five cycles after the the venting. Gas supply or service is blown, circuit breaker has tripped, or power outage has occurred. •• Reset circuit breaker or replace fuse. Dryer does not heat •• Confirm that other gas appliances in the home are working normally. This option reduces energy use by a qualified electrician. •• NOTE: Due to the design of the power cord to dry. Clothes take longer to the terminal block. Light...

Owners Manual
Page 43
... electric dryers, it corrected by adding an air dry section to dry Drying time is blown, circuit breaker has tripped, or power outage has occurred. •• Reset circuit breaker or replace fuse. TROUBLESHOOTING 43 ENGLISH Problem Possible Causes & Solution Display show error code gAS Clothes take too long to the beginning of the cycle. Lint filter needs to retain more consistent drying times for better drying performance and efficiency. Dryer controls are drying a very small load, add a few extra items to run without heat. Dryer...
... electric dryers, it corrected by adding an air dry section to dry Drying time is blown, circuit breaker has tripped, or power outage has occurred. •• Reset circuit breaker or replace fuse. TROUBLESHOOTING 43 ENGLISH Problem Possible Causes & Solution Display show error code gAS Clothes take too long to the beginning of the cycle. Lint filter needs to retain more consistent drying times for better drying performance and efficiency. Dryer controls are drying a very small load, add a few extra items to run without heat. Dryer...
Owners Manual
Page 45
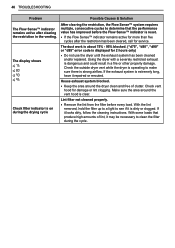
... shows error code: PS Power cord is not used or used in the external dryer venting. •• If exhaust restrictions are naturally more prone to static buildup. Partial blockage of the ductwork due to lint buildup or other foreign object. •• Ductwork should be longer and energy consumption will be checked/cleaned immediately. Clothes dried too long (overdried). Adjust clothes after a sensor cycle has completed, empty the lint trap, then set...
... shows error code: PS Power cord is not used or used in the external dryer venting. •• If exhaust restrictions are naturally more prone to static buildup. Partial blockage of the ductwork due to lint buildup or other foreign object. •• Ductwork should be longer and energy consumption will be checked/cleaned immediately. Clothes dried too long (overdried). Adjust clothes after a sensor cycle has completed, empty the lint trap, then set...
Owners Manual
Page 46
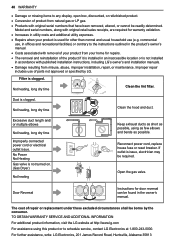
..., call for service. The duct work is about 75% - 95% blocked. ("d75", "d80", "d90" or "d95" error code is clear. House exhaust system blocked. •• Keep the area around the vent hood is displayed for damage or lint clogging. Lint filter not cleaned properly. •• Remove the lint from the filter before the Flow Sense™ indicator is extremely long, have it looks dirty, follow the cleaning instructions.
..., call for service. The duct work is about 75% - 95% blocked. ("d75", "d80", "d90" or "d95" error code is clear. House exhaust system blocked. •• Keep the area around the vent hood is displayed for damage or lint clogging. Lint filter not cleaned properly. •• Remove the lint from the filter before the Flow Sense™ indicator is extremely long, have it looks dirty, follow the cleaning instructions.

Owners Manual
Page 47
... retail purchase Ten (10) years from operating the product in a corrosive atmosphere or contrary to the instructions outlined in the product's owner's manual. •• Damage to state. Proof of original retail purchase is used within one (1) week of Warranty Parts and Labor Dryer drum HOW SERVICE IS HANDLED LG will at its option repair or replace the product. Should your product, unless...
... retail purchase Ten (10) years from operating the product in a corrosive atmosphere or contrary to the instructions outlined in the product's owner's manual. •• Damage to state. Proof of original retail purchase is used within one (1) week of Warranty Parts and Labor Dryer drum HOW SERVICE IS HANDLED LG will at its option repair or replace the product. Should your product, unless...
Owners Manual
Page 48
Duct is not turned on. (Gas Dryer) Not heating Keep exhaust ducts as short as possible. Not heating, long dry time Clean the hood and duct. Open the gas valve. Improper repair includes use of repair or replacement under these excluded circumstances shall be required. Excessive duct length and/ or multiple elbows Not heating, long dry time Improperly connected power cord or electrical outlet issue. No Power Not Heating Gas valve is clogged. Door Reversal Instructions for door reversal can be readily determined. 48 WARRANTY •• Damage or missing items to any...
Duct is not turned on. (Gas Dryer) Not heating Keep exhaust ducts as short as possible. Not heating, long dry time Clean the hood and duct. Open the gas valve. Improper repair includes use of repair or replacement under these excluded circumstances shall be required. Excessive duct length and/ or multiple elbows Not heating, long dry time Improperly connected power cord or electrical outlet issue. No Power Not Heating Gas valve is clogged. Door Reversal Instructions for door reversal can be readily determined. 48 WARRANTY •• Damage or missing items to any...


