Owner's Manual
Page 13
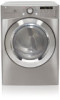
...dryer with duct tape. Attach cover plate to the next 4-in place with included screw. 13 OPTION 1: Side Venting Adapter Duct OPTION 2: Bottom Venting Adapter Duct Bracket Knockout 2 Press the tabs on the knockout and carefully remove.... Retaining Screw Rear Exhaust Duct 1 Remove the rear exhaust duct retaining screw. Pull...dryer is shipped to vent to change the dryer vent location. Be sure that the male end of the dryer as shown. Cover Plate Elbow 3 Insert the 4-in place with duct tape. CHANGING THE DRYER...to the base of the dryer with duct tape. Bracket 2 ...
...dryer with duct tape. Attach cover plate to the next 4-in place with included screw. 13 OPTION 1: Side Venting Adapter Duct OPTION 2: Bottom Venting Adapter Duct Bracket Knockout 2 Press the tabs on the knockout and carefully remove.... Retaining Screw Rear Exhaust Duct 1 Remove the rear exhaust duct retaining screw. Pull...dryer is shipped to vent to change the dryer vent location. Be sure that the male end of the dryer as shown. Cover Plate Elbow 3 Insert the 4-in place with duct tape. CHANGING THE DRYER...to the base of the dryer with duct tape. Bracket 2 ...
Owner's Manual
Page 19
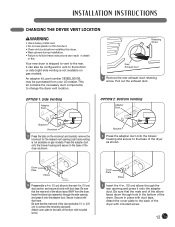
Terminal Block UL-Listed Strain Relief Hot Neutral Hot (Black) (White) (Red) UL-Listed 4-Wire Power Cord 1 Remove the terminal block access cover on manual is connected to follow these instructions may result in block. Attach the white neutral wire to same color screw.... is prohibited for all mobile and manufactured home installations, as well as all screws securely. Reinstall the terminal block access cover. 19 Ground Screw Power Cord Ground Wire 2 Transfer the dryer's ground wire from behind the green ground screw to the green ground screw. then thread a UL-listed, 30A,...
Terminal Block UL-Listed Strain Relief Hot Neutral Hot (Black) (White) (Red) UL-Listed 4-Wire Power Cord 1 Remove the terminal block access cover on manual is connected to follow these instructions may result in block. Attach the white neutral wire to same color screw.... is prohibited for all mobile and manufactured home installations, as well as all screws securely. Reinstall the terminal block access cover. 19 Ground Screw Power Cord Ground Wire 2 Transfer the dryer's ground wire from behind the green ground screw to the green ground screw. then thread a UL-listed, 30A,...

Owner's Manual
Page 20
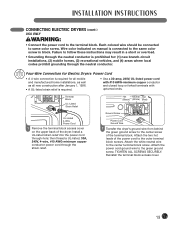
... reinstallation of the dryer. 1" (2.5 cm) 5" (12.7 cm) Ground Wire 1 Remove 5 inches (12.7 cm) of the three shorter wires into the power cord through the strain relief. Bend the ends of the outer covering from behind the green ground screw to the green ground screw. then thread...cm) insulation from the ground wire. CONNECTING ELECTRIC DRYERS (cont.) USA ONLY wWARNING: • Connect the power cord to same color screw. Terminal Block UL-Listed Strain Relief UL-Listed 4-Wire Power Cord 2 Remove the terminal block access cover on manual is prohibited for all mobile and ...
... reinstallation of the dryer. 1" (2.5 cm) 5" (12.7 cm) Ground Wire 1 Remove 5 inches (12.7 cm) of the three shorter wires into the power cord through the strain relief. Bend the ends of the outer covering from behind the green ground screw to the green ground screw. then thread...cm) insulation from the ground wire. CONNECTING ELECTRIC DRYERS (cont.) USA ONLY wWARNING: • Connect the power cord to same color screw. Terminal Block UL-Listed Strain Relief UL-Listed 4-Wire Power Cord 2 Remove the terminal block access cover on manual is prohibited for all mobile and ...
Owner's Manual
Page 21
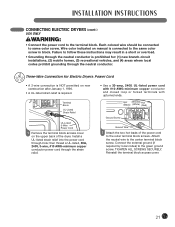
... with #10 AWG-minimum copper conductor and closed loop or forked terminals with upturned ends. Reinstall the terminal block access cover. 21 CONNECTING ELECTRIC DRYERS (cont.) USA ONLY wWARNING: • Connect the power cord to the center terminal block screw. Wire color indicated on... conductor. Terminal Block UL-Listed Strain Relief UL-Listed 3-Wire Power Cord 1 Remove the terminal block access cover on new construction after January 1, 1996. • A UL-listed strain relief is prohibited for Electric Dryers: Power Cord • A 3-wire connection is NOT permitted on the upper ...
... with #10 AWG-minimum copper conductor and closed loop or forked terminals with upturned ends. Reinstall the terminal block access cover. 21 CONNECTING ELECTRIC DRYERS (cont.) USA ONLY wWARNING: • Connect the power cord to the center terminal block screw. Wire color indicated on... conductor. Terminal Block UL-Listed Strain Relief UL-Listed 3-Wire Power Cord 1 Remove the terminal block access cover on new construction after January 1, 1996. • A UL-listed strain relief is prohibited for Electric Dryers: Power Cord • A 3-wire connection is NOT permitted on the upper ...
Owner's Manual
Page 22
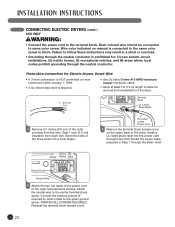
...of the three wires into the power cord through the neutral conductor is prohibited for removal and reinstallation of the dryer. 1" (2.5 cm) Terminal Block UL-Listed Strain Relief 1 Remove 31⁄2 inches (8.9 cm) of the outer covering from each wire. Install a UL-listed strain relief into a hook shape. ...Hot Neutral Hot Black) (White) (Red) Ground Screw Ground Wire 3 Attach the two hot leads of the dryer. Wire color indicated on ...
...of the three wires into the power cord through the neutral conductor is prohibited for removal and reinstallation of the dryer. 1" (2.5 cm) Terminal Block UL-Listed Strain Relief 1 Remove 31⁄2 inches (8.9 cm) of the outer covering from each wire. Install a UL-listed strain relief into a hook shape. ...Hot Neutral Hot Black) (White) (Red) Ground Screw Ground Wire 3 Attach the two hot leads of the dryer. Wire color indicated on ...


