
Specification
Page 1
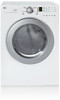
D L E 2 516 D L G 2 5 2 6 L A U N D RY ELECTRIC/GAS DRYERS D L E 2516 DLG2526 Performance • Super Capacity (7.0 cu.ft.) • LoDecibel™ Quiet System Intelligent Fabric Care • Sensor Dry System for intelligent fabric care and energy efficiency • 5 Drying Programs • 5 Temperature Levels • Wrinkle Care Option • Delicates Cycle Style and Design • Upfront Electronic Control Panel with Dial-A-Cycle™ • Silver Rimmed Door with Clear Glass • Stackable with Matching Washer • Optional Drawer Pedestals White LGusa.com
D L E 2 516 D L G 2 5 2 6 L A U N D RY ELECTRIC/GAS DRYERS D L E 2516 DLG2526 Performance • Super Capacity (7.0 cu.ft.) • LoDecibel™ Quiet System Intelligent Fabric Care • Sensor Dry System for intelligent fabric care and energy efficiency • 5 Drying Programs • 5 Temperature Levels • Wrinkle Care Option • Delicates Cycle Style and Design • Upfront Electronic Control Panel with Dial-A-Cycle™ • Silver Rimmed Door with Clear Glass • Stackable with Matching Washer • Optional Drawer Pedestals White LGusa.com
Service Manual
Page 3
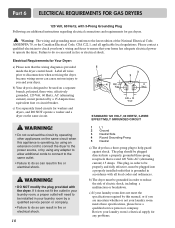
... intended for service, they must be responsible for the interpretation of all occupants. RECONNECT ALL GROUNDING DEVICES If grounding wires, screws, straps, clips, nuts, or washers used to complete a path to ground are present everywhere. WHAT TO DO IF YOU SMELL GAS: Do not try to their original position and properly...
... intended for service, they must be responsible for the interpretation of all occupants. RECONNECT ALL GROUNDING DEVICES If grounding wires, screws, straps, clips, nuts, or washers used to complete a path to ground are present everywhere. WHAT TO DO IF YOU SMELL GAS: Do not try to their original position and properly...
Service Manual
Page 8
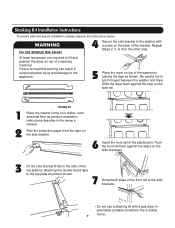
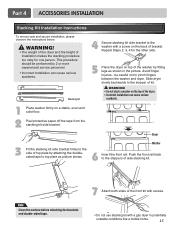
...with a screw on top of the stacking kit. Push the front rail back against the stop on the side rail. 1 2 Stacking kit Place the washer firmly on the side bracket. 6 Insert the front rail of a washing machine! Peel the protective paper from the tape on a stable, even and solid... the dryer on the back of the top plate by placing the legs as picture shown. 7 Screw both sides of the front rail to the washer with a gas dryer in potentially unstable conditions like a mobile home. 7 Repeat Steps 2, 3, & 4 for the other side. Stacking Kit Installation Instructions To ensure safe...
...with a screw on top of the stacking kit. Push the front rail back against the stop on the side rail. 1 2 Stacking kit Place the washer firmly on the side bracket. 6 Insert the front rail of a washing machine! Peel the protective paper from the tape on a stable, even and solid... the dryer on the back of the top plate by placing the legs as picture shown. 7 Screw both sides of the front rail to the washer with a gas dryer in potentially unstable conditions like a mobile home. 7 Repeat Steps 2, 3, & 4 for the other side. Stacking Kit Installation Instructions To ensure safe...
Service Manual
Page 9
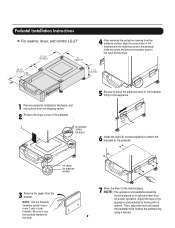
... sure to press the adhesive parts of the pedestal. , for washer/ combo for proper operation. for washer/ combo 3 Remove the paper from the shipping carton. 2 Position...the brackets marked for dryer . Adjust the legs of side brackets. Pedestal Installation Instructions For washer, dryer, and combo LG 27" 4 AAtftaecr hretmheovdinogubthle-pfarocteedcttivaepecoovfetrhinegbfroamcktehteto the dardyheersaivsesshuorfwacnes, oaltighne tbhenstcpreawrtshoolfetshien bthreackets ablriagcnkwetisthwtihthetheedgmeaatcnhdincgahnoblees aintttahcehpeeddteostahle pbeadseesatnadl wpritehssscarnedwpsr.ess...
... sure to press the adhesive parts of the pedestal. , for washer/ combo for proper operation. for washer/ combo 3 Remove the paper from the shipping carton. 2 Position...the brackets marked for dryer . Adjust the legs of side brackets. Pedestal Installation Instructions For washer, dryer, and combo LG 27" 4 AAtftaecr hretmheovdinogubthle-pfarocteedcttivaepecoovfetrhinegbfroamcktehteto the dardyheersaivsesshuorfwacnes, oaltighne tbhenstcpreawrtshoolfetshien bthreackets ablriagcnkwetisthwtihthetheedgmeaatcnhdincgahnoblees aintttahcehpeeddteostahle pbeadseesatnadl wpritehssscarnedwpsr.ess...
Service Manual
Page 38
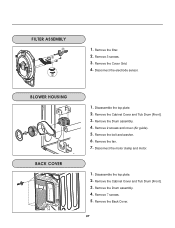
Remove the fan. 7. Disconnect the motor clamp and motor. 1. Remove the bolt and washer. 6. Remove the Cover Grid. 4. Disassemble the top plate. 2. Remove the Drum assembly. 4. Remove the Back Cover. 37 Remove the filter. 2. Remove the Drum assembly. 4. Disassemble the top plate. 2. Remove the Cabinet Cover and Tub Drum [Front]. 3. Disconnect the electrode sensor. 1. Remove 3 screws. 3. Remove the Cabinet Cover and Tub Drum [Front]. 3. Remove 7 screws. 5. 1. Remove 2 screws and cover (Air guide). 5.
Remove the fan. 7. Disconnect the motor clamp and motor. 1. Remove the bolt and washer. 6. Remove the Cover Grid. 4. Disassemble the top plate. 2. Remove the Drum assembly. 4. Remove the Back Cover. 37 Remove the filter. 2. Remove the Drum assembly. 4. Disassemble the top plate. 2. Remove the Cabinet Cover and Tub Drum [Front]. 3. Disconnect the electrode sensor. 1. Remove 3 screws. 3. Remove the Cabinet Cover and Tub Drum [Front]. 3. Remove 7 screws. 5. 1. Remove 2 screws and cover (Air guide). 5.
Owners Manual
Page 5
... a fire if it will be 4 in. (10 cm) in . Electrical shock can cause serious injury,fire, electrical shock or death. • Do not install the washer in this manual must be performed by an authorized servicer unless specifically recommended in fire or death. • The dryer exhaust system must be followed...
... a fire if it will be 4 in. (10 cm) in . Electrical shock can cause serious injury,fire, electrical shock or death. • Do not install the washer in this manual must be performed by an authorized servicer unless specifically recommended in fire or death. • The dryer exhaust system must be followed...
Owners Manual
Page 15
... kit with screws. • Do not use stacking kit with a screw on the back of side stacking kit. Push the front rail back to the washer with a gas dryer in the picture. Repeat Steps 2, 3, 4 for one person. This procedure should be careful not to the stopper of kit.... Washer 6 Insert the front rail. Stacking kit 4 Secure stacking kit side bracket to the stoppers of bracket. Dryer 3 Fit the stacking kit side bracket firmly to ...
... kit with screws. • Do not use stacking kit with a screw on the back of side stacking kit. Push the front rail back to the washer with a gas dryer in the picture. Repeat Steps 2, 3, 4 for one person. This procedure should be careful not to the stopper of kit.... Washer 6 Insert the front rail. Stacking kit 4 Secure stacking kit side bracket to the stoppers of bracket. Dryer 3 Fit the stacking kit side bracket firmly to ...

Owners Manual
Page 16
... to securely attach the appliance to the pedestal. Retainer 16 Locknut The dryer feet will fit into the dryer base as shown. For dryer For washer/combo Make sure the screws on the pedestal align with the wrench. Press up on the back of the pedestal until the pedestal is excessive... the screws are not tightened. If there is level and all 4 leveling feet of the clip and pull outward to the same height as the washer, fully retract the leveling feet of the 4 retainers into the innermost positions as shown. NOTE: The appliance and pedestal assembly must be placed on a ...
... to securely attach the appliance to the pedestal. Retainer 16 Locknut The dryer feet will fit into the dryer base as shown. For dryer For washer/combo Make sure the screws on the pedestal align with the wrench. Press up on the back of the pedestal until the pedestal is excessive... the screws are not tightened. If there is level and all 4 leveling feet of the clip and pull outward to the same height as the washer, fully retract the leveling feet of the 4 retainers into the innermost positions as shown. NOTE: The appliance and pedestal assembly must be placed on a ...
Owners Manual
Page 18
Failure to do so can cause serious injury to you are additional instructions regarding electrical connections and requirements for washers and dryers, and DO NOT operate a washer and a dryer on the same circuit. Label all wires prior to disconnection when servicing the dryer, because wiring errors can result in accordance with all ...
Failure to do so can cause serious injury to you are additional instructions regarding electrical connections and requirements for washers and dryers, and DO NOT operate a washer and a dryer on the same circuit. Label all wires prior to disconnection when servicing the dryer, because wiring errors can result in accordance with all ...
Owners Manual
Page 22
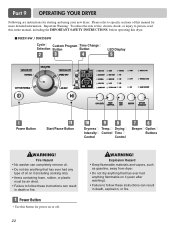
...starting and using your new dryer. Part 9 OPERATING YOUR DRYER Following are instructions for more detailed information. Fire Hazard • No washer can completely remove oil. • Do not dry anything that has ever had anything that has ever had any type of this...from dryer. • Do not dry anything flammable on or off. 22 WARNING! Drying Control Time Control Beeper Option Buttons WARNING! DLE2516W / DLG2526W Cycle Custom Program Time Change Selection Button Button LED Display Power Button Start/Pause Button Dryness Intensity Control Temp. Please refer to...
...starting and using your new dryer. Part 9 OPERATING YOUR DRYER Following are instructions for more detailed information. Fire Hazard • No washer can completely remove oil. • Do not dry anything that has ever had anything that has ever had any type of this...from dryer. • Do not dry anything flammable on or off. 22 WARNING! Drying Control Time Control Beeper Option Buttons WARNING! DLE2516W / DLG2526W Cycle Custom Program Time Change Selection Button Button LED Display Power Button Start/Pause Button Dryness Intensity Control Temp. Please refer to...


