Specification
Page 1
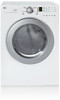
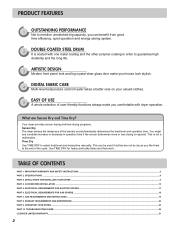
D L E 2 516 D L G 2 5 2 6 L A U N D RY ELECTRIC/GAS DRYERS D L E 2516 DLG2526 Performance • Super Capacity (7.0 cu.ft.) • LoDecibel™ Quiet System Intelligent Fabric Care • Sensor Dry System for intelligent fabric care and energy efficiency • 5 Drying Programs • 5 Temperature Levels • Wrinkle Care Option • Delicates Cycle Style and Design • Upfront Electronic Control Panel with Dial-A-Cycle™ • Silver Rimmed Door with Clear Glass • Stackable with Matching Washer • Optional Drawer Pedestals White LGusa.com
D L E 2 516 D L G 2 5 2 6 L A U N D RY ELECTRIC/GAS DRYERS D L E 2516 DLG2526 Performance • Super Capacity (7.0 cu.ft.) • LoDecibel™ Quiet System Intelligent Fabric Care • Sensor Dry System for intelligent fabric care and energy efficiency • 5 Drying Programs • 5 Temperature Levels • Wrinkle Care Option • Delicates Cycle Style and Design • Upfront Electronic Control Panel with Dial-A-Cycle™ • Silver Rimmed Door with Clear Glass • Stackable with Matching Washer • Optional Drawer Pedestals White LGusa.com
Specification
Page 2
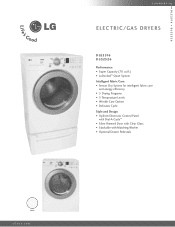
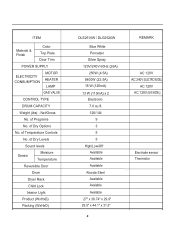
...) Carton (WxHxD) 29 1/2" x 43" x 31 1/4" Weight (lbs): Net / Shipping 126 / 144 WA R R A N T Y 1 Year Labor and Parts UPC CODE DLE2516W 048231 009096 DLG2526W 048231 009102 WDP3W 048231 008556 WSTK1 048231 008327 Design and specifications are periodically tumbled without notice. ©2008...Reserved. Electronic Control Panel with Dial-A-Cycle™ Capacity 7.0 cu.ft. Sensor Dry System Measures moisture in February 2008 SS-5020 LG Design and Life's Good are property of LG Electronics Inc. LG ELECTRONICS INC. 1000 Sylvan Ave., Englewood Cliffs, NJ 07632 800.243.0000...
...) Carton (WxHxD) 29 1/2" x 43" x 31 1/4" Weight (lbs): Net / Shipping 126 / 144 WA R R A N T Y 1 Year Labor and Parts UPC CODE DLE2516W 048231 009096 DLG2526W 048231 009102 WDP3W 048231 008556 WSTK1 048231 008327 Design and specifications are periodically tumbled without notice. ©2008...Reserved. Electronic Control Panel with Dial-A-Cycle™ Capacity 7.0 cu.ft. Sensor Dry System Measures moisture in February 2008 SS-5020 LG Design and Life's Good are property of LG Electronics Inc. LG ELECTRONICS INC. 1000 Sylvan Ave., Englewood Cliffs, NJ 07632 800.243.0000...
Service Manual
Page 4
... 8. TEST 7 GAS VALVE TEST - GAS MODEL 29 10. DISASSEMBLY INSTRUCTIONS 32 12. FEATURES AND BENEFITS ...6 3. CONTENTS 1. SPECIFICATIONS ...4 2. INSTALLATION INSTRUCTIONS 6 4. TEST 3 MOTOR TEST 25 9-4. TEST 4 MOISTURE SENSOR 26 9-5. TEST 5 DOOR SWITCH TEST 27 9-6. EXPLODED VIEW ...39 12-1. CABINET & DOOR ASSEMBLY 40 12-3-1. DRUM & MOTOR ASSEMBLY: GAS MODEL 42 13.
... 8. TEST 7 GAS VALVE TEST - GAS MODEL 29 10. DISASSEMBLY INSTRUCTIONS 32 12. FEATURES AND BENEFITS ...6 3. CONTENTS 1. SPECIFICATIONS ...4 2. INSTALLATION INSTRUCTIONS 6 4. TEST 3 MOTOR TEST 25 9-4. TEST 4 MOISTURE SENSOR 26 9-5. TEST 5 DOOR SWITCH TEST 27 9-6. EXPLODED VIEW ...39 12-1. CABINET & DOOR ASSEMBLY 40 12-3-1. DRUM & MOTOR ASSEMBLY: GAS MODEL 42 13.
Service Manual
Page 6
of Dry Options No. of Programs No. of Temperature Controls No. of Dry Levels Sound levels Sensor Moisture Temperature Reversible Door Drum Dryer Rack Child Lock Interior Light Product (WxHxD) Packing (WxHxD) DLE2516W / DLG2526W Blue White Porcelain Silver Spray 120V/240V 60Hz (26A) 250W (4.5A) 5400W (... 29.5" x 44.1" x 31.3" 5 REMARK AC 120V AC 240V (ELECTRIC MODEL) AC 120V AC 120V (GAS MODEL) Electrode sensor Thermistor Net/Gross No. ITEM Material & Finish Color Top Plate Door Trim POWER SUPPLY ELECTRICITY CONSUMPTION MOTOR HEATER LAMP GAS VALVE CONTROL TYPE...
of Dry Options No. of Programs No. of Temperature Controls No. of Dry Levels Sound levels Sensor Moisture Temperature Reversible Door Drum Dryer Rack Child Lock Interior Light Product (WxHxD) Packing (WxHxD) DLE2516W / DLG2526W Blue White Porcelain Silver Spray 120V/240V 60Hz (26A) 250W (4.5A) 5400W (... 29.5" x 44.1" x 31.3" 5 REMARK AC 120V AC 240V (ELECTRIC MODEL) AC 120V AC 120V (GAS MODEL) Electrode sensor Thermistor Net/Gross No. ITEM Material & Finish Color Top Plate Door Trim POWER SUPPLY ELECTRICITY CONSUMPTION MOTOR HEATER LAMP GAS VALVE CONTROL TYPE...
Service Manual
Page 14
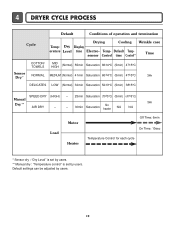
... Level time Electro- Temp- Default Tempsensor Control time Control** Time COTTON/ TOWELS MID HIGH (Normal) 55min Saturation 66±4°C (5min) 47±5°C Sensor Dry * NORMAL MEDIUM (Normal) 41min Saturation 60±4°C (5min) 47±5°C 3Hr DELICATES LOW (Normal) 32min Saturation 52±3°C (5min)... Dry ** AIR DRY - - 30min Saturation No heater N/A N/A 3Hr Load Motor Heater Off Time: 6min On Time: 10sec Temperature Control for each cycle * Sensor dry : "Dry Level" is set by users. ** Manual dry : "Temperature control" is set by users. 13
... Level time Electro- Temp- Default Tempsensor Control time Control** Time COTTON/ TOWELS MID HIGH (Normal) 55min Saturation 66±4°C (5min) 47±5°C Sensor Dry * NORMAL MEDIUM (Normal) 41min Saturation 60±4°C (5min) 47±5°C 3Hr DELICATES LOW (Normal) 32min Saturation 52±3°C (5min)... Dry ** AIR DRY - - 30min Saturation No heater N/A N/A 3Hr Load Motor Heater Off Time: 6min On Time: 10sec Temperature Control for each cycle * Sensor dry : "Dry Level" is set by users. ** Manual dry : "Temperature control" is set by users. 13
Service Manual
Page 20
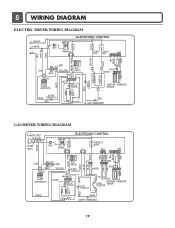
... GRAY BLUE RED 23 1212 IGNITER BLUE 21 21 YELLOW MOTOR 2379 OVERLOAD PROTECTOR HI-LIMIT THERMOSTAT WHITE DC VALVE1 DC VALVE2 MOISTURE THERMISTOR FLAME SENSOR DETECTOR CENTRIFUGAL SWITCH RED WHITE NC NO GRAY SAFETY THERMOSTAT 19 8 WIRING DIAGRAM ELECTRIC DRYER WIRING DIAGRAM L1 BLACK N WHITE L2 ELECTRONIC CONTROL 1 WH1 ... OUTER COIL INNER COIL COM NO 1 2 GRAY NC 123 DOOR SWITCH WHITE LAMP YELLOW 1 2 3 BELT SWITCH 1 2 3 7 10 MOTOR OVERLOAD PROTECTOR BLUE HEATER 2 1 2 1 MOISTURE THERMISTOR SENSOR CENTRIFUGAL SWITCH BLOWER WHITE THERMOSTAT RED RED HI -
... GRAY BLUE RED 23 1212 IGNITER BLUE 21 21 YELLOW MOTOR 2379 OVERLOAD PROTECTOR HI-LIMIT THERMOSTAT WHITE DC VALVE1 DC VALVE2 MOISTURE THERMISTOR FLAME SENSOR DETECTOR CENTRIFUGAL SWITCH RED WHITE NC NO GRAY SAFETY THERMOSTAT 19 8 WIRING DIAGRAM ELECTRIC DRYER WIRING DIAGRAM L1 BLACK N WHITE L2 ELECTRONIC CONTROL 1 WH1 ... OUTER COIL INNER COIL COM NO 1 2 GRAY NC 123 DOOR SWITCH WHITE LAMP YELLOW 1 2 3 BELT SWITCH 1 2 3 7 10 MOTOR OVERLOAD PROTECTOR BLUE HEATER 2 1 2 1 MOISTURE THERMISTOR SENSOR CENTRIFUGAL SWITCH BLOWER WHITE THERMOSTAT RED RED HI -

Service Manual
Page 21
...step 2 and press step 3 twice and finish with damp cloth. Unit must be used for Factory test /Service test. Displays Moisture Sensor Operation: If moisture sensor is contacted with step 4 by pressing start 4 times) in normal condition. This TEST should be in Standby (unit plugged in,... display off in the end. Pressing the START/PAUSE button CHECKING ACTION DISPLAY CHECKING POINT REMARK None Electric control & Temperature sensor LQC TEST tE1 tE2 Won't power up Detective LED or LCD Thermistor open ) ACTIVATING THE DIAGNOSTIC TEST MODE 1. The display number ...
...step 2 and press step 3 twice and finish with damp cloth. Unit must be used for Factory test /Service test. Displays Moisture Sensor Operation: If moisture sensor is contacted with step 4 by pressing start 4 times) in normal condition. This TEST should be in Standby (unit plugged in,... display off in the end. Pressing the START/PAUSE button CHECKING ACTION DISPLAY CHECKING POINT REMARK None Electric control & Temperature sensor LQC TEST tE1 tE2 Won't power up Detective LED or LCD Thermistor open ) ACTIVATING THE DIAGNOSTIC TEST MODE 1. The display number ...
Service Manual
Page 27
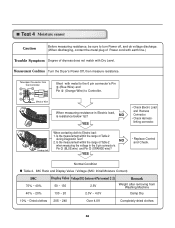
... clothes 26 Short with Dry Level. YES • Check Electro Load and Harness Connector. • Check Harnesslinking connector. • Replace Control and Check. Test 4 Moisture sensor Caution Before measuring resistance, be sure to turn Power off, and do voltage discharge. (When discharging, contact the metal plug of Power cord with earth...
... clothes 26 Short with Dry Level. YES • Check Electro Load and Harness Connector. • Check Harnesslinking connector. • Replace Control and Check. Test 4 Moisture sensor Caution Before measuring resistance, be sure to turn Power off, and do voltage discharge. (When discharging, contact the metal plug of Power cord with earth...

Service Manual
Page 36
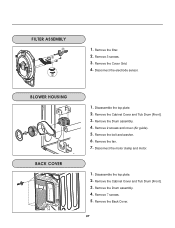
...] DRUM ASSEMBLY -1 -1 -2 ! Remove 4 screws. 5. Loosen belt from motor and idler pulleys. 4. Carefully remove the drum. Disassemble the top plate. 2. Disconnect the door lamp and electrode sensor connector. 4. Remove the Cabinet Cover and Tub drum [front]. 3. Disassemble the top plate. 2. CHANGING THE DRUM LAMP 1. Slide the shield up and remove. 4. Remove the...
...] DRUM ASSEMBLY -1 -1 -2 ! Remove 4 screws. 5. Loosen belt from motor and idler pulleys. 4. Carefully remove the drum. Disassemble the top plate. 2. Disconnect the door lamp and electrode sensor connector. 4. Remove the Cabinet Cover and Tub drum [front]. 3. Disassemble the top plate. 2. CHANGING THE DRUM LAMP 1. Slide the shield up and remove. 4. Remove the...
Service Manual
Page 38
Remove the Drum assembly. 4. Disconnect the motor clamp and motor. 1. Remove the Back Cover. 37 Remove 3 screws. 3. Disconnect the electrode sensor. 1. Disassemble the top plate. 2. Remove the Cabinet Cover and Tub Drum [Front]. 3. Remove the Drum assembly. 4. Remove 2 screws and cover (Air guide). 5. Remove the fan. 7. Remove the filter. 2. Remove the bolt and washer. 6. Remove the Cabinet Cover and Tub Drum [Front]. 3. Remove 7 screws. 5. Remove the Cover Grid. 4. Disassemble the top plate. 2. 1.
Remove the Drum assembly. 4. Disconnect the motor clamp and motor. 1. Remove the Back Cover. 37 Remove 3 screws. 3. Disconnect the electrode sensor. 1. Disassemble the top plate. 2. Remove the Cabinet Cover and Tub Drum [Front]. 3. Remove the Drum assembly. 4. Remove 2 screws and cover (Air guide). 5. Remove the fan. 7. Remove the filter. 2. Remove the bolt and washer. 6. Remove the Cabinet Cover and Tub Drum [Front]. 3. Remove 7 screws. 5. Remove the Cover Grid. 4. Disassemble the top plate. 2. 1.
Service Manual
Page 44
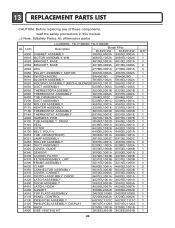
...3044EL1001A 6913EL3002C 6913EL3002C K250 ROLLER ASSEMBLY K240 DUCT ASSEMBLY 4581EL3001A 4581EL3001A 5209EL1002A 5209EL1002A K320 COVER, GUIDE 3550EL1006B 3550EL1006B K340 SENSOR K330 GUIDER, FILTER K310 FILTERASSEMBLY, LINT 6500EL3001A 6500EL3001A 4974EL1003B 4974EL1003B 5231EL1003B 5231EL1003B A390 FRAME ASSEMBLY 3211EL1005A 3211EL1005A K620 K350... in this manual. ¡Æ Note: S(Safety Parts), AL (Alternative parts) LG MODEL: TD-V10062E, TD-V10060E AL LOC Description Model P/No DLE2512W DLE2514W A500 CABINET ASSEMBLY 3091EL0003A 3091EL0003A K610 MOTOR ASSEMBLY.
...3044EL1001A 6913EL3002C 6913EL3002C K250 ROLLER ASSEMBLY K240 DUCT ASSEMBLY 4581EL3001A 4581EL3001A 5209EL1002A 5209EL1002A K320 COVER, GUIDE 3550EL1006B 3550EL1006B K340 SENSOR K330 GUIDER, FILTER K310 FILTERASSEMBLY, LINT 6500EL3001A 6500EL3001A 4974EL1003B 4974EL1003B 5231EL1003B 5231EL1003B A390 FRAME ASSEMBLY 3211EL1005A 3211EL1005A K620 K350... in this manual. ¡Æ Note: S(Safety Parts), AL (Alternative parts) LG MODEL: TD-V10062E, TD-V10060E AL LOC Description Model P/No DLE2512W DLE2514W A500 CABINET ASSEMBLY 3091EL0003A 3091EL0003A K610 MOTOR ASSEMBLY.
Service Manual
Page 45
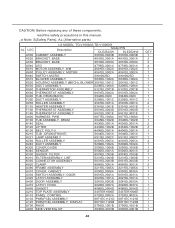
...K240 DUCT ASSEMBLY 5209EL1002A 5209EL1002A K320 COVER,GUIDE 3550EL1006B 3550EL1006B K340 SENSOR 6500EL3001A 6500EL3001A K330 GUIDER, FILTER 4974EL1003B 4974EL1003B K310 FILTERASSEMBLY, LINT...2 1 1 1 2 1 1 1 1 1 1 1 1 1 1 1 1 1 CAUTION: Before replacing any of these components, read the safety precautions in this manual. ¡Æ Note: S(Safety Parts), AL (Alternative parts) LG MODEL: TD-V10062G,TD-V10060G AL LOC Description Model P/N DLE2522W DLE2524W A500 CABINET ASSEMBLY 3091EL0003B 3091EL0003B A520 BRACKET, BASE 4810EL3001A 4810EL3001A A530 BRACKET, BASE 4810EL3009A...
...K240 DUCT ASSEMBLY 5209EL1002A 5209EL1002A K320 COVER,GUIDE 3550EL1006B 3550EL1006B K340 SENSOR 6500EL3001A 6500EL3001A K330 GUIDER, FILTER 4974EL1003B 4974EL1003B K310 FILTERASSEMBLY, LINT...2 1 1 1 2 1 1 1 1 1 1 1 1 1 1 1 1 1 CAUTION: Before replacing any of these components, read the safety precautions in this manual. ¡Æ Note: S(Safety Parts), AL (Alternative parts) LG MODEL: TD-V10062G,TD-V10060G AL LOC Description Model P/N DLE2522W DLE2524W A500 CABINET ASSEMBLY 3091EL0003B 3091EL0003B A520 BRACKET, BASE 4810EL3001A 4810EL3001A A530 BRACKET, BASE 4810EL3009A...
Owners Manual
Page 2
... Not to mention unmatched big capacity, you comfortable with one metal coating and the other polymer coating in operation time if the sensor determines more or less drying is not a malfunction. This can benefit from good time efficiency, quiet operation and energy saving system....and bulky items and thick work. TROUBLESHOOTING GUIDE...28 LG DRYER LIMITED WARRANTY...31 2 TABLE OF CONTENTS PART 1. ELECTRICAL REQUIREMENTS FOR ELECTRIC DRYERS ...17 PART 6. Your dryer provides sensor drying and time drying programs. Sensor Dry The dryer senses the dampness of the laundry and...
... Not to mention unmatched big capacity, you comfortable with one metal coating and the other polymer coating in operation time if the sensor determines more or less drying is not a malfunction. This can benefit from good time efficiency, quiet operation and energy saving system....and bulky items and thick work. TROUBLESHOOTING GUIDE...28 LG DRYER LIMITED WARRANTY...31 2 TABLE OF CONTENTS PART 1. ELECTRICAL REQUIREMENTS FOR ELECTRIC DRYERS ...17 PART 6. Your dryer provides sensor drying and time drying programs. Sensor Dry The dryer senses the dampness of the laundry and...
Owners Manual
Page 9
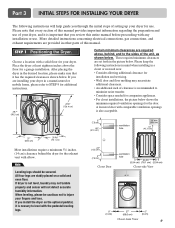
... in a closet or recessed area: • Consider allowing additional clearance for installation and servicing. • Wall, door and floor molding may not tumble properly and sensor will help guide you through the initial steps of setting up your dryer, and it is important that you install the dryer on a solid and...
... in a closet or recessed area: • Consider allowing additional clearance for installation and servicing. • Wall, door and floor molding may not tumble properly and sensor will help guide you through the initial steps of setting up your dryer, and it is important that you install the dryer on a solid and...
Owners Manual
Page 10
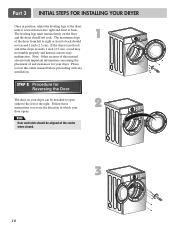
.... Note: Other sections of the dryer until it is not level, and if the slope exceeds 1 inch (2.5 cm), a load may not tumble properly and internal sensors may malfunction. Part 3 INITIAL STEPS FOR INSTALLING YOUR DRYER Once in which your dryer can be aligned at the center when closed. 2 3 10
.... Note: Other sections of the dryer until it is not level, and if the slope exceeds 1 inch (2.5 cm), a load may not tumble properly and internal sensors may malfunction. Part 3 INITIAL STEPS FOR INSTALLING YOUR DRYER Once in which your dryer can be aligned at the center when closed. 2 3 10
Owners Manual
Page 23
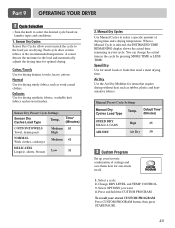
... CUSTOM PROGRAM Press CUSTOM PROGRAM button, then press START/PAUSE. 23 Change DRY LEVEL and TEMP. Select OPTIONS you are drying. A sensor detects the moisture in your cycle. Time* (Minutes) COTTON/TOWELS Towel, denim pants Medium 55 High NORMAL Medium 41 Work clothes, ...Speed Dry Use for drying denims, towels, heavy cottons. To recall your favorite combination of drying time and a drying temperature. Sensor Dry Preset Cycle Settings Sensor Dry Cycles Load Type Temp. Press and hold the CUSTOM PROGRAM. Manual Preset Cycle Settings Manual Dry Temp. CONTROL. 3. Part ...
... CUSTOM PROGRAM Press CUSTOM PROGRAM button, then press START/PAUSE. 23 Change DRY LEVEL and TEMP. Select OPTIONS you are drying. A sensor detects the moisture in your cycle. Time* (Minutes) COTTON/TOWELS Towel, denim pants Medium 55 High NORMAL Medium 41 Work clothes, ...Speed Dry Use for drying denims, towels, heavy cottons. To recall your favorite combination of drying time and a drying temperature. Sensor Dry Preset Cycle Settings Sensor Dry Cycles Load Type Temp. Press and hold the CUSTOM PROGRAM. Manual Preset Cycle Settings Manual Dry Temp. CONTROL. 3. Part ...
Owners Manual
Page 25
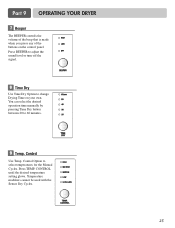
... the volume of the beep that is made when you press any of the buttons on your own. Temperature modifiers cannot be used with the Sensor Dry Cycles. 25
... the volume of the beep that is made when you press any of the buttons on your own. Temperature modifiers cannot be used with the Sensor Dry Cycles. 25
Owners Manual
Page 26
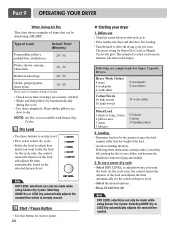
...8226; Select DRY LEVEL to select the drying cycle you want to dry the load. Following these buttons to set dry level • First, select sensor dry cycle. • Select dry level to adjust how much you want the load. To use • Clean lint screen before or after each ... the load and adjusts the time automatically based on the selected dryness level. Following are slow to see that can only be made while using Sensor Dry Cycles. NOTE: Air Dry is already sensed. 11 Start / Pause Button • Use this button for Super Capacity Dryers: Heavy Work Clothes 4 jeans 4...
...8226; Select DRY LEVEL to select the drying cycle you want to dry the load. Following these buttons to set dry level • First, select sensor dry cycle. • Select dry level to adjust how much you want the load. To use • Clean lint screen before or after each ... the load and adjusts the time automatically based on the selected dryness level. Following are slow to see that can only be made while using Sensor Dry Cycles. NOTE: Air Dry is already sensed. 11 Start / Pause Button • Use this button for Super Capacity Dryers: Heavy Work Clothes 4 jeans 4...


