Service Manual
Page 7
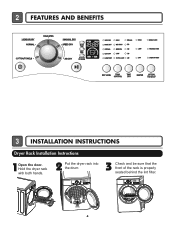
2 FEATURES AND BENEFITS 3 INSTALLATION INSTRUCTIONS Dryer Rack Installation Instructions 1Open the door. Hold the dryer rack with both hands. 2 Put the dryer rack into the drum 3 Check and be sure that the front of the rack is properly seated behind the lint filter. 6
2 FEATURES AND BENEFITS 3 INSTALLATION INSTRUCTIONS Dryer Rack Installation Instructions 1Open the door. Hold the dryer rack with both hands. 2 Put the dryer rack into the drum 3 Check and be sure that the front of the rack is properly seated behind the lint filter. 6
Service Manual
Page 38
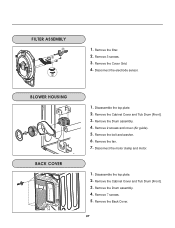
Remove the Drum assembly. 4. Remove the fan. 7. Remove the Cover Grid. 4. Disconnect the electrode sensor. 1. Remove 2 screws and cover (Air guide). 5. Disassemble the top plate. 2. Remove 7 screws. 5. Remove the filter. 2. Remove the bolt and washer. 6. Disconnect the motor clamp and motor. 1. Remove 3 screws. 3. Disassemble the top plate. 2. Remove the Cabinet Cover and Tub Drum [Front]. 3. Remove the Drum assembly. 4. Remove the Back Cover. 37 1. Remove the Cabinet Cover and Tub Drum [Front]. 3.
Remove the Drum assembly. 4. Remove the fan. 7. Remove the Cover Grid. 4. Disconnect the electrode sensor. 1. Remove 2 screws and cover (Air guide). 5. Disassemble the top plate. 2. Remove 7 screws. 5. Remove the filter. 2. Remove the bolt and washer. 6. Disconnect the motor clamp and motor. 1. Remove 3 screws. 3. Disassemble the top plate. 2. Remove the Cabinet Cover and Tub Drum [Front]. 3. Remove the Drum assembly. 4. Remove the Back Cover. 37 1. Remove the Cabinet Cover and Tub Drum [Front]. 3.

Service Manual
Page 39
Remove the Drum assembly and Tub Drum [Rear]. 4. Disconnect the Air duct from the Tub Drum [Front] and Tub Drum [Rear]. 38 Disassemble the top plate. 2. Disassemble the top plate. 2. Remove the Cover Cabinet. 3. 1. Remove the Cover Cabinet and Tub Drum [Front]. 3. Remove the filter and 2 screws. 4. Remove the air duct. 1. Remove the roller from the Tub Drum [Front]. 5.
Remove the Drum assembly and Tub Drum [Rear]. 4. Disconnect the Air duct from the Tub Drum [Front] and Tub Drum [Rear]. 38 Disassemble the top plate. 2. Disassemble the top plate. 2. Remove the Cover Cabinet. 3. 1. Remove the Cover Cabinet and Tub Drum [Front]. 3. Remove the filter and 2 screws. 4. Remove the air duct. 1. Remove the roller from the Tub Drum [Front]. 5.
Service Manual
Page 44
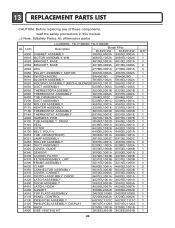
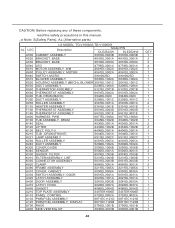
... components, read the safety precautions in this manual. ¡Æ Note: S(Safety Parts), AL (Alternative parts) LG MODEL: TD-V10062E, TD-V10060E AL LOC Description Model P/No DLE2512W DLE2514W A500 CABINET ASSEMBLY 3091EL0003A 3091EL0003A K610 MOTOR ASSEMBLY...ROLLER ASSEMBLY K240 DUCT ASSEMBLY 4581EL3001A 4581EL3001A 5209EL1002A 5209EL1002A K320 COVER, GUIDE 3550EL1006B 3550EL1006B K340 SENSOR K330 GUIDER, FILTER K310 FILTERASSEMBLY, LINT 6500EL3001A 6500EL3001A 4974EL1003B 4974EL1003B 5231EL1003B 5231EL1003B A390 FRAME ASSEMBLY 3211EL1005A 3211EL1005A K620 K350 A310 A330 ...
... components, read the safety precautions in this manual. ¡Æ Note: S(Safety Parts), AL (Alternative parts) LG MODEL: TD-V10062E, TD-V10060E AL LOC Description Model P/No DLE2512W DLE2514W A500 CABINET ASSEMBLY 3091EL0003A 3091EL0003A K610 MOTOR ASSEMBLY...ROLLER ASSEMBLY K240 DUCT ASSEMBLY 4581EL3001A 4581EL3001A 5209EL1002A 5209EL1002A K320 COVER, GUIDE 3550EL1006B 3550EL1006B K340 SENSOR K330 GUIDER, FILTER K310 FILTERASSEMBLY, LINT 6500EL3001A 6500EL3001A 4974EL1003B 4974EL1003B 5231EL1003B 5231EL1003B A390 FRAME ASSEMBLY 3211EL1005A 3211EL1005A K620 K350 A310 A330 ...
Service Manual
Page 45
...COVER,GUIDE 3550EL1006B 3550EL1006B K340 SENSOR 6500EL3001A 6500EL3001A K330 GUIDER, FILTER 4974EL1003B 4974EL1003B K310 FILTERASSEMBLY, LINT 5231EL1003B 5231EL1003B K350 CONNECTOR ASSEMBLY... 2 1 1 1 2 1 1 1 1 1 1 1 1 1 1 1 1 1 CAUTION: Before replacing any of these components, read the safety precautions in this manual. ¡Æ Note: S(Safety Parts), AL (Alternative parts) LG MODEL: TD-V10062G,TD-V10060G AL LOC Description Model P/N DLE2522W DLE2524W A500 CABINET ASSEMBLY 3091EL0003B 3091EL0003B A520 BRACKET, BASE 4810EL3001A 4810EL3001A A530 BRACKET, BASE 4810EL3009A...
...COVER,GUIDE 3550EL1006B 3550EL1006B K340 SENSOR 6500EL3001A 6500EL3001A K330 GUIDER, FILTER 4974EL1003B 4974EL1003B K310 FILTERASSEMBLY, LINT 5231EL1003B 5231EL1003B K350 CONNECTOR ASSEMBLY... 2 1 1 1 2 1 1 1 1 1 1 1 1 1 1 1 1 1 CAUTION: Before replacing any of these components, read the safety precautions in this manual. ¡Æ Note: S(Safety Parts), AL (Alternative parts) LG MODEL: TD-V10062G,TD-V10060G AL LOC Description Model P/N DLE2522W DLE2524W A500 CABINET ASSEMBLY 3091EL0003B 3091EL0003B A520 BRACKET, BASE 4810EL3001A 4810EL3001A A530 BRACKET, BASE 4810EL3009A...
Owners Manual
Page 21
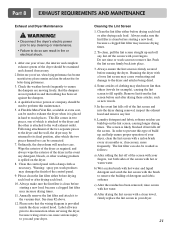
... Metal Vent Kit, available at extra cost, can be connected. 7. See item #2 above. 12. Cleaning the Lint Screen 1. Always make sure the lint filter is clean before drying each load. Always ensure the lint screen is provided inside the dryer control hood. Running the dryer with the brush to ...the lint screen before drying each load. 10. Laundry detergent and fabric softener residue can also be examined and cleaned if necessary. 2. The lint filter can build up and roll any detergent, bleach, or other is placed in and that the dampers are not pushed in hard to the dryer...
... Metal Vent Kit, available at extra cost, can be connected. 7. See item #2 above. 12. Cleaning the Lint Screen 1. Always make sure the lint filter is clean before drying each load. Always ensure the lint screen is provided inside the dryer control hood. Running the dryer with the brush to ...the lint screen before drying each load. 10. Laundry detergent and fabric softener residue can also be examined and cleaned if necessary. 2. The lint filter can build up and roll any detergent, bleach, or other is placed in and that the dampers are not pushed in hard to the dryer...
Owners Manual
Page 24
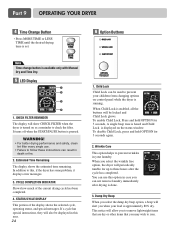
... dry or other items that you select the wrinkle free option, the dryer will show CHECK FILTER when the dryer is approximately 80% dry. Child Lock Child Lock can be used to check the filter. To enable Child Lock, Press and hold OPTION for 3 seconds, A single beep tone ...wrinkles in this , if the dryer has some problem, it displays error messages. 3. WARNING! • For better drying performance and safety, clean lint filter every single use this option in death or fire. 2. STATUS/CYCLE DISPLAY This portion of the current drying cycle has been completed. 4. You can ...
... dry or other items that you select the wrinkle free option, the dryer will show CHECK FILTER when the dryer is approximately 80% dry. Child Lock Child Lock can be used to check the filter. To enable Child Lock, Press and hold OPTION for 3 seconds, A single beep tone ...wrinkles in this , if the dryer has some problem, it displays error messages. 3. WARNING! • For better drying performance and safety, clean lint filter every single use this option in death or fire. 2. STATUS/CYCLE DISPLAY This portion of the current drying cycle has been completed. 4. You can ...
Owners Manual
Page 27
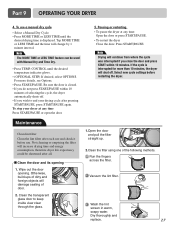
... desired temperature indicator glows. • (OPTIONAL STEP) If desired, select OPTIONS. Clean the door and its opening . Vacuum the lint filter. Note Drying will increase drying time and energy consumption, therefore dryer life expectancy could be used with Manual Dry and Time Dry. •...the cycle, the dryer automatically shuts off . Part 9 OPERATING YOUR DRYER 4. Wipe out the door opening 1. Maintenance Clean lint filter Clean the lint filter after pressing START/PAUSE, press START/PAUSE again. Pausing or restarting • To pause the dryer at any time: Open the...
... desired temperature indicator glows. • (OPTIONAL STEP) If desired, select OPTIONS. Clean the door and its opening . Vacuum the lint filter. Note Drying will increase drying time and energy consumption, therefore dryer life expectancy could be used with Manual Dry and Time Dry. •...the cycle, the dryer automatically shuts off . Part 9 OPERATING YOUR DRYER 4. Wipe out the door opening 1. Maintenance Clean lint filter Clean the lint filter after pressing START/PAUSE, press START/PAUSE again. Pausing or restarting • To pause the dryer at any time: Open the...
Owners Manual
Page 29
...you using a fabric softener. 7. Divide your clothes have excess static electricity? The drying time for a load will vary depending on cleaning the lint filter, and please confirm that the pockets of pants, shirts, and other similar material in a load of the exhaust ducts and lint filer. 8. Part ... articles of clothing are empty before each new load of a pocket, and this is condensed moisture by drying. 29 Confirm that the lint filter is clean before washing and drying. 6. Try using a fabric softener or adjust your load of dried clothes. Over-drying a load of ...
...you using a fabric softener. 7. Divide your clothes have excess static electricity? The drying time for a load will vary depending on cleaning the lint filter, and please confirm that the pockets of pants, shirts, and other similar material in a load of the exhaust ducts and lint filer. 8. Part ... articles of clothing are empty before each new load of a pocket, and this is condensed moisture by drying. 29 Confirm that the lint filter is clean before washing and drying. 6. Try using a fabric softener or adjust your load of dried clothes. Over-drying a load of ...
Owners Manual
Page 30
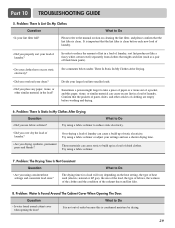
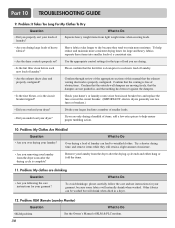
... avoid shrinkage, please carefully follow the care and use two fuses or breakers.) • Did you properly sort your laundry? Confirm that the lint filter is clean prior to Do • Did you overload your garment, because some fabrics will shrink when dried in , and that the exhaust venting ... instructions for large and heavy fabrics, separate these items into a number of smaller loads. • Did you are drying. • Is the lint filter clean before each new load of RLM & PLC modem. 30 Problem: It Takes Too Long For My Clothes To Dry Question What to each new...
... avoid shrinkage, please carefully follow the care and use two fuses or breakers.) • Did you properly sort your laundry? Confirm that the lint filter is clean prior to Do • Did you overload your garment, because some fabrics will shrink when dried in , and that the exhaust venting ... instructions for large and heavy fabrics, separate these items into a number of smaller loads. • Did you are drying. • Is the lint filter clean before each new load of RLM & PLC modem. 30 Problem: It Takes Too Long For My Clothes To Dry Question What to each new...


