
Owner's Manual
Page 3
...GUIDE ...29-31 LG DRYER LIMITED WARRANTY ...32 2 EXHAUST REQUIREMENTS AND MAINTENANCE 21-22 PART9. IMPORTANT WARRANTY AND SAFETY INSTRUCTIONS 4-6 PART3. ELECTRICAL REQUIREMENTS FOR ELECTRIC DRYER 15-18 PART6. GAS REQUIREMENTS AND INSTRUCTIONS 20 PART8. ACCESSORIES INSTALLATION ...13-14 PART5. INITIAL STEPS FOR INSTALLING YOUR DRYER 7-12 PART4. ...care on your valued clothes. 5 EASY OF USE A whole selection of user-friendly functions always make you comfortable with dryer operation. OPERATING YOUR DRYER...23-28 PART10. TABLE OF CONTENTS PART1. SPECIFICATIONS ...3 PART2.
...GUIDE ...29-31 LG DRYER LIMITED WARRANTY ...32 2 EXHAUST REQUIREMENTS AND MAINTENANCE 21-22 PART9. IMPORTANT WARRANTY AND SAFETY INSTRUCTIONS 4-6 PART3. ELECTRICAL REQUIREMENTS FOR ELECTRIC DRYER 15-18 PART6. GAS REQUIREMENTS AND INSTRUCTIONS 20 PART8. ACCESSORIES INSTALLATION ...13-14 PART5. INITIAL STEPS FOR INSTALLING YOUR DRYER 7-12 PART4. ...care on your valued clothes. 5 EASY OF USE A whole selection of user-friendly functions always make you comfortable with dryer operation. OPERATING YOUR DRYER...23-28 PART10. TABLE OF CONTENTS PART1. SPECIFICATIONS ...3 PART2.
Owner's Manual
Page 4
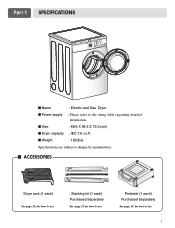
I Weight : 126(Ibs) Specifications are subject to use. 3 Pedestal (1 each) Purchased Separately See page 14 for how to change by manufacturer. Stacking kit (1 each ) See page 26 for how to the rating label regarding detailed information. I Size : 68.6 X 96.5 X 73.0 (cm) I ACCESSORIES Dryer rack (1 each ) Purchased Separately See page 13 for how to use. Part 1 SPECIFICATIONS I Name : Electric and Gas Dryer I Power supply : Please refer to use. I Dryer capacity : IEC 7.0 cu.ft.
I Weight : 126(Ibs) Specifications are subject to use. 3 Pedestal (1 each) Purchased Separately See page 14 for how to change by manufacturer. Stacking kit (1 each ) See page 26 for how to the rating label regarding detailed information. I Size : 68.6 X 96.5 X 73.0 (cm) I ACCESSORIES Dryer rack (1 each ) Purchased Separately See page 13 for how to use. Part 1 SPECIFICATIONS I Name : Electric and Gas Dryer I Power supply : Please refer to use. I Dryer capacity : IEC 7.0 cu.ft.
Owner's Manual
Page 5
... cancelled check here, because proof of fire or explosion, electric shock, or to obtain warranty service. The warranty for your new LG dryer. Use the space below to other than private family use, all warranty coverage is installed and operated according to the instructions in this...for warranty period from the date of this manual must be followed. Warranty Restriction: If the dryer is available by contacting your safety, the recommendations in this manual, LG will need the complete model and serial numbers when requesting information. Warranty service is subjected to ...
... cancelled check here, because proof of fire or explosion, electric shock, or to obtain warranty service. The warranty for your new LG dryer. Use the space below to other than private family use, all warranty coverage is installed and operated according to the instructions in this...for warranty period from the date of this manual must be followed. Warranty Restriction: If the dryer is available by contacting your safety, the recommendations in this manual, LG will need the complete model and serial numbers when requesting information. Warranty service is subjected to ...
Owner's Manual
Page 6
...must be exposed to eliminate static unless recommended by qualified service personnel. 13) Do not place items exposed to cooking oils in your dryer, please exercise care and follow basic safety precautions, including the following: 1) Read all local codes and ordinances. WARNING - Items contaminated... that have a proper outlet installed by providing a path of electric shock. WARNING! Close supervision of children is necessary when using your dryer. Do not modify the plug provided with the appliance: if it will be grounded. This appliance is moving. 6) Do not install...
...must be exposed to eliminate static unless recommended by qualified service personnel. 13) Do not place items exposed to cooking oils in your dryer, please exercise care and follow basic safety precautions, including the following: 1) Read all local codes and ordinances. WARNING - Items contaminated... that have a proper outlet installed by providing a path of electric shock. WARNING! Close supervision of children is necessary when using your dryer. Do not modify the plug provided with the appliance: if it will be grounded. This appliance is moving. 6) Do not install...
Owner's Manual
Page 7
... death when using an air cycle. • Failure to follow all occupants. • Immediately call the fire department. ! Properly adjusted dryers will minimize incomplete combustion. Follow the gas supplier's instructions carefully. • If you cannot reach your gas supplier, including the following:... rubber-like materials, plastic or similar materials should be minimized further by your gas supplier, call your gas supplier from dryer. • Place dryer at least 18 inches above the floor for a garage installation. • Failure to the outdoors. California safe drinking ...
... death when using an air cycle. • Failure to follow all occupants. • Immediately call the fire department. ! Properly adjusted dryers will minimize incomplete combustion. Follow the gas supplier's instructions carefully. • If you cannot reach your gas supplier, including the following:... rubber-like materials, plastic or similar materials should be minimized further by your gas supplier, call your gas supplier from dryer. • Place dryer at least 18 inches above the floor for a garage installation. • Failure to the outdoors. California safe drinking ...
Owner's Manual
Page 8
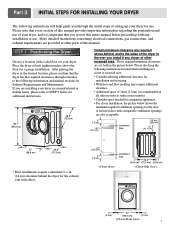
...entire manual before proceeding with comparable ventilation openings are required above the floor for the door. Place the dryer at other recessed area. If you are installing your dryer for additional instructions. 38.7" (98.3 cm) 48.4" (123 cm) Certain minimum clearance are also .... • Consider space needed for companion appliances. • For closer installation, the picture below for use. STEP 1 Positioning the Dryer. Please also keep the following instructions in mind when installing in a closet or recessed area: • Consider allowing additional clearance for ...
...entire manual before proceeding with comparable ventilation openings are required above the floor for the door. Place the dryer at other recessed area. If you are installing your dryer for additional instructions. 38.7" (98.3 cm) 48.4" (123 cm) Certain minimum clearance are also .... • Consider space needed for companion appliances. • For closer installation, the picture below for use. STEP 1 Positioning the Dryer. Please also keep the following instructions in mind when installing in a closet or recessed area: • Consider allowing additional clearance for ...
Owner's Manual
Page 9
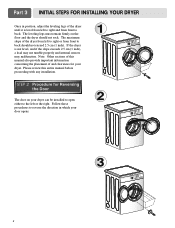
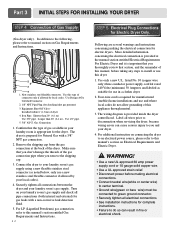
...to back. Follow these procedures to the left to right or from front to back should not rock. Part 3 INITIAL STEPS FOR INSTALLING YOUR DRYER Once in which your door opens: 1 2 3 8 Note: Other sections of this entire manual before proceeding with any installation. Please review... this manual also provide important information concerning the placement of the dryer from left or the right. The leveling legs must remain firmly on your dryer. SSTTEEPP 22: Procedure for your dryer can be installed to open either to reverse the direction in position, adjust...
...to back. Follow these procedures to the left to right or from front to back should not rock. Part 3 INITIAL STEPS FOR INSTALLING YOUR DRYER Once in which your door opens: 1 2 3 8 Note: Other sections of this entire manual before proceeding with any installation. Please review... this manual also provide important information concerning the placement of the dryer from left or the right. The leveling legs must remain firmly on your dryer. SSTTEEPP 22: Procedure for your dryer can be installed to open either to reverse the direction in position, adjust...
Owner's Manual
Page 10
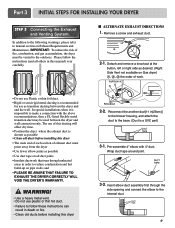
...use as possible • Use duct tape on Gas dryer the order of fire, combustion, and gas accumulation, the dryer must point away from the dryer • Use fewer elbow joints as transition ducting between the dryer and wall connection only. Reconnect the another duct[11 ...before installing this manual) very carefully. ■ ALTERNATE EXHAUST DIRECTIONS 1. and • PLEASE BE AWARE THAT FAILURE TO EXHAUST THE DRYER CORRECTLY WILL VOID THE DRYER'S WARRANTY. ! Pre-assemble 4" elbow with the above recommendations, then a UL-listed flexible metal transition duct may be vented to ...
...use as possible • Use duct tape on Gas dryer the order of fire, combustion, and gas accumulation, the dryer must point away from the dryer • Use fewer elbow joints as transition ducting between the dryer and wall connection only. Reconnect the another duct[11 ...before installing this manual) very carefully. ■ ALTERNATE EXHAUST DIRECTIONS 1. and • PLEASE BE AWARE THAT FAILURE TO EXHAUST THE DRYER CORRECTLY WILL VOID THE DRYER'S WARRANTY. ! Pre-assemble 4" elbow with the above recommendations, then a UL-listed flexible metal transition duct may be vented to ...
Owner's Manual
Page 11
...for manufactured (mobile) home installations and use a new stainless steel flexible connector if allowed by local codes. Label all connections between the dryer and your local codes). 4. New stainless steel flexible connector. Longer than 20' (6.1 m) Use 3/8" pipe. More detailed information concerning ...instructions. • Failure to your laundry room's gas supply and check all electrical connections • See installation instructions for the dryer. listed No. 10 (copper wire only) three conductor power supply cord kit rated 240 Volts (minimum) 30 Amperes and labeled ...
...for manufactured (mobile) home installations and use a new stainless steel flexible connector if allowed by local codes. Label all connections between the dryer and your local codes). 4. New stainless steel flexible connector. Longer than 20' (6.1 m) Use 3/8" pipe. More detailed information concerning ...instructions. • Failure to your laundry room's gas supply and check all electrical connections • See installation instructions for the dryer. listed No. 10 (copper wire only) three conductor power supply cord kit rated 240 Volts (minimum) 30 Amperes and labeled ...
Owner's Manual
Page 12
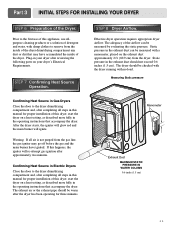
... water, with damp clothes to remove from the inside of this manual for proper installation of the dryer drum/drying compartment any dust or dirt that accompany the dryer. STEP 7 Confirming Heat Source Operation. Measuring Static pressure M1anometer E2xhaust Duct MAXIMUM STATIC PRESSURE IN WATER... after reviewing the following parts on a heat setting, as described more fully in your dryer's Electrical Requirements. Confirming Heat Source in Electric Dryers Close the door to the dryer drum/drying compartment and, after completing all steps in the exhaust duct can be measured...
... water, with damp clothes to remove from the inside of this manual for proper installation of the dryer drum/drying compartment any dust or dirt that accompany the dryer. STEP 7 Confirming Heat Source Operation. Measuring Static pressure M1anometer E2xhaust Duct MAXIMUM STATIC PRESSURE IN WATER... after reviewing the following parts on a heat setting, as described more fully in your dryer's Electrical Requirements. Confirming Heat Source in Electric Dryers Close the door to the dryer drum/drying compartment and, after completing all steps in the exhaust duct can be measured...
Owner's Manual
Page 13
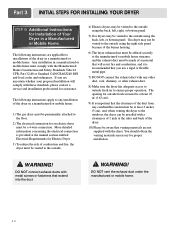
...following instructions are applicable to ensure proper operation. The opening for assistance. WARNING! The following instructions apply to any installation of the dryer. 10) Please be vented to the outside fresh air to installations of a material that will comply with the Manufactured Home Construction... MH and local codes and ordinances. More detailed information concerning the electrical connection is provided at the sides and back of the dryer in a manufactured or mobile home must be a 4-wire connection. DO NOT vent the exhaust duct under the manufactured or mobile...
...following instructions are applicable to ensure proper operation. The opening for assistance. WARNING! The following instructions apply to any installation of the dryer. 10) Please be vented to the outside fresh air to installations of a material that will comply with the Manufactured Home Construction... MH and local codes and ordinances. More detailed information concerning the electrical connection is provided at the sides and back of the dryer in a manufactured or mobile home must be a 4-wire connection. DO NOT vent the exhaust duct under the manufactured or mobile...
Owner's Manual
Page 14
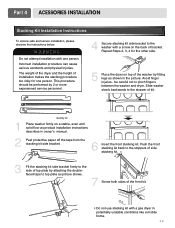
This procedure should be careful not to the stopper of installation makes the stacking procedure too risky for the other side. 5 Place the dryer on a stable, even and solid floor as shown in owner's manual. 2 Peel protective paper off the tape from the stacking kit side ...picture. Part 4 ACESSORIES INSTALLATION Stacking Kit Installation Instructions To ensure safe and secure installation, please observe the instructions below. The weight of the dryer and the height of kit. 1 Stacking kit Place washer firmly on top of the washer by attaching the doublefaced tape to the side ...
This procedure should be careful not to the stopper of installation makes the stacking procedure too risky for the other side. 5 Place the dryer on a stable, even and solid floor as shown in owner's manual. 2 Peel protective paper off the tape from the stacking kit side ...picture. Part 4 ACESSORIES INSTALLATION Stacking Kit Installation Instructions To ensure safe and secure installation, please observe the instructions below. The weight of the dryer and the height of kit. 1 Stacking kit Place washer firmly on top of the washer by attaching the doublefaced tape to the side ...
Owner's Manual
Page 16
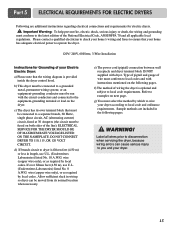
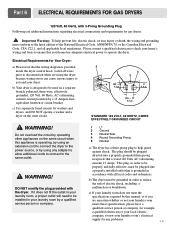
... MAXIMUM RATE VOLTAGE LISTED ON THE NAMEPLATE. wire (copper wire only), or as required by local codes. Refer to wire your Electric Electric Dryer: a) Please note that the wiring diagram is fifteen feet (4.50 m) or less in length, use U.L. (Underwriters Laboratories) listed No. ... methods are additional instructions regarding electrical connections and requirements for Grounding of wire must select the method by local codes. b) This dryer must be connected to local code and ordinance requirements. or an equipment-grounding conductor must be run with the circuit conductors and ...
... MAXIMUM RATE VOLTAGE LISTED ON THE NAMEPLATE. wire (copper wire only), or as required by local codes. Refer to wire your Electric Electric Dryer: a) Please note that the wiring diagram is fifteen feet (4.50 m) or less in length, use U.L. (Underwriters Laboratories) listed No. ... methods are additional instructions regarding electrical connections and requirements for Grounding of wire must select the method by local codes. b) This dryer must be connected to local code and ordinance requirements. or an equipment-grounding conductor must be run with the circuit conductors and ...
Owner's Manual
Page 17
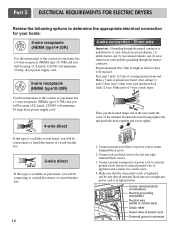
... home has a 4-wire receptacle (NEMA type 14-30R) and you will be using a UL listed, 120/240 volt minimum, 30 amp, dryer power supply cord. 3-wire receptacle (NEMA type10-30R) 4-wire connection : Direct wire Important : Grounding through the neutral conductor. peel insulation back ...of covering material from 3 other wires. Connect neutral wire(white) of length in right position. 16 Part 5 ELECTRICAL REQUIREMENTS FOR ELECTRIC DRYERS Review the following options to determine the appropriate electrical connection for your home: 4-wire receptacle (NEMA type14-30R) Use the instructions at...
... home has a 4-wire receptacle (NEMA type 14-30R) and you will be using a UL listed, 120/240 volt minimum, 30 amp, dryer power supply cord. 3-wire receptacle (NEMA type10-30R) 4-wire connection : Direct wire Important : Grounding through the neutral conductor. peel insulation back ...of covering material from 3 other wires. Connect neutral wire(white) of length in right position. 16 Part 5 ELECTRICAL REQUIREMENTS FOR ELECTRIC DRYERS Review the following options to determine the appropriate electrical connection for your home: 4-wire receptacle (NEMA type14-30R) Use the instructions at...
Owner's Manual
Page 18
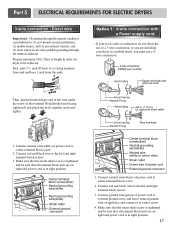
...facing rightward) and pinch the hook together and screw tightly. 1. Option 1: 4-wire connection with a Power supply cord. • lf your dryer in right position. 17 and be replaced. Then, put the hooked shape end of the wire under the screw of power cord to external ...or you must use of appliance and connect it to be sure that the strain relief screw is prohibited for dryer to center screw. 4. Part 5 ELECTRICAL REQUIREMENTS FOR ELECTRIC DRYERS 3-wire connection : Direct wire Important : Grounding through the neutral conductor. Connect ground wire(green) of power ...
...facing rightward) and pinch the hook together and screw tightly. 1. Option 1: 4-wire connection with a Power supply cord. • lf your dryer in right position. 17 and be replaced. Then, put the hooked shape end of the wire under the screw of power cord to external ...or you must use of appliance and connect it to be sure that the strain relief screw is prohibited for dryer to center screw. 4. Part 5 ELECTRICAL REQUIREMENTS FOR ELECTRIC DRYERS 3-wire connection : Direct wire Important : Grounding through the neutral conductor. Connect ground wire(green) of power ...
Owner's Manual
Page 19
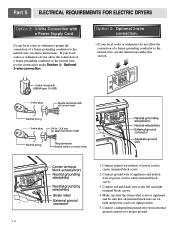
... to the left and right terminal block screws. 4. Connect red and black wire to the neutral wire, use these instructions. Part 5 ELECTRICAL REQUIREMENTS FOR ELECTRIC DRYERS Option 2: 3-Wire Connection with a Power Supply Cord lf your local codes or ordinances permit the connection of a frame-grounding conductor to the neutral wire, use...
... to the left and right terminal block screws. 4. Connect red and black wire to the neutral wire, use these instructions. Part 5 ELECTRICAL REQUIREMENTS FOR ELECTRIC DRYERS Option 2: 3-Wire Connection with a Power Supply Cord lf your local codes or ordinances permit the connection of a frame-grounding conductor to the neutral wire, use...
Owner's Manual
Page 20
... polarized, three-wire, effectively grounded, 120 Volt, 60 Hertz, AC (alternating current) circuit protected by using an extension cord to connect the dryer to the power source, or by a 15 Ampere fuse, equivalent fusetron or circuit breaker. c) If your laundry room does not meet the ...specifications required by a qualified service person or company. c) Use separately fused circuits for washers and dryers, and DO NOT operate a washer and a dryer on the same circuit when this manual, or if you and your laundry room's electrical supply for example a qualified...
... polarized, three-wire, effectively grounded, 120 Volt, 60 Hertz, AC (alternating current) circuit protected by using an extension cord to connect the dryer to the power source, or by a 15 Ampere fuse, equivalent fusetron or circuit breaker. c) If your laundry room does not meet the ...specifications required by a qualified service person or company. c) Use separately fused circuits for washers and dryers, and DO NOT operate a washer and a dryer on the same circuit when this manual, or if you and your laundry room's electrical supply for example a qualified...
Owner's Manual
Page 21
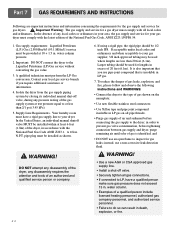
... lengths in excess of gas is insoluble in . A qualified technician must be provided at test pressure equal to inspect for gas dryers. ! Larger tubing should be used where lengths are important instructions and information concerning the requirements for the gas supply and service for... gas leaks; Supply Line Requirements. It is also important that you require additional assistance or information. 4. Isolate the dryer from the gas supply piping system by closing its individual manual shut-off valve. • Securely tighten all pipe threads; •...
... lengths in excess of gas is insoluble in . A qualified technician must be provided at test pressure equal to inspect for gas dryers. ! Larger tubing should be used where lengths are important instructions and information concerning the requirements for the gas supply and service for... gas leaks; Supply Line Requirements. It is also important that you require additional assistance or information. 4. Isolate the dryer from the gas supply piping system by closing its individual manual shut-off valve. • Securely tighten all pipe threads; •...
Owner's Manual
Page 22
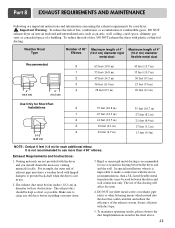
...and reduce the efficiency of this ducting will affect dry time. 4. It is not recommended to clean any old ducts before installing your dryer. ! Exhaust Requirements and Instructions: 1. To maximize operating results, please observe the duct length limitations noted in use sheet metal screws ... NOTE : Deduct 6 feet (1.8 m) for use more than 4 90° elbows. Part 8 EXHAUST REQUIREMENTS AND MAINTENANCE Following are not provided with the dryer and you should be four inches (10.2 cm) in diameter with the above . 21 Make sure to use as an attic, wall, ceiling, crawl ...
...and reduce the efficiency of this ducting will affect dry time. 4. It is not recommended to clean any old ducts before installing your dryer. ! Exhaust Requirements and Instructions: 1. To maximize operating results, please observe the duct length limitations noted in use sheet metal screws ... NOTE : Deduct 6 feet (1.8 m) for use more than 4 90° elbows. Part 8 EXHAUST REQUIREMENTS AND MAINTENANCE Following are not provided with the dryer and you should be four inches (10.2 cm) in diameter with the above . 21 Make sure to use as an attic, wall, ceiling, crawl ...
Owner's Manual
Page 23
...qualified service person or company should inspect and clean the exhaust duct at extra cost, can be connected. 7. Wipe the exterior of the dryer in your dryer, clean the lint screen with a loose lint screen may increase drying times. 2. Remove lint from the lint screen before drying each load...load, because a clogged lint filter may shed more frequently. See item #2 above. 12. In the event lint falls off the screen. Running the dryer with a nylon brush every six months or, if necessary, more lint than other towels (for example, towels made of the control panel. 9. To ...
...qualified service person or company should inspect and clean the exhaust duct at extra cost, can be connected. 7. Wipe the exterior of the dryer in your dryer, clean the lint screen with a loose lint screen may increase drying times. 2. Remove lint from the lint screen before drying each load...load, because a clogged lint filter may shed more frequently. See item #2 above. 12. In the event lint falls off the screen. Running the dryer with a nylon brush every six months or, if necessary, more lint than other towels (for example, towels made of the control panel. 9. To ...


