
Owner's Manual
Page 3
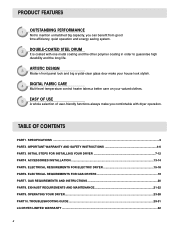
... OF CONTENTS PART1. SPECIFICATIONS ...3 PART2. ACCESSORIES INSTALLATION ...13-14 PART5. EXHAUST REQUIREMENTS AND MAINTENANCE 21-22 PART9. TROUBLESHOOTING GUIDE ...29-31 LG DRYER LIMITED WARRANTY ...32 2 ELECTRICAL REQUIREMENTS FOR ELECTRIC DRYER 15-18 PART6. GAS REQUIREMENTS AND INSTRUCTIONS 20 PART8. ELECTRICAL REQUIREMENTS FOR GAS DRYERS 19 PART7. OPERATING YOUR DRYER...23-28 PART10. PRODUCT FEATURES 1 OUTSTANDING PERFORMANCE Not to mention unmatched big capacity, you can benefit from good time efficiency, quiet operation and energy saving system. 2 DOUBLE...
... OF CONTENTS PART1. SPECIFICATIONS ...3 PART2. ACCESSORIES INSTALLATION ...13-14 PART5. EXHAUST REQUIREMENTS AND MAINTENANCE 21-22 PART9. TROUBLESHOOTING GUIDE ...29-31 LG DRYER LIMITED WARRANTY ...32 2 ELECTRICAL REQUIREMENTS FOR ELECTRIC DRYER 15-18 PART6. GAS REQUIREMENTS AND INSTRUCTIONS 20 PART8. ELECTRICAL REQUIREMENTS FOR GAS DRYERS 19 PART7. OPERATING YOUR DRYER...23-28 PART10. PRODUCT FEATURES 1 OUTSTANDING PERFORMANCE Not to mention unmatched big capacity, you can benefit from good time efficiency, quiet operation and energy saving system. 2 DOUBLE...
Owner's Manual
Page 5
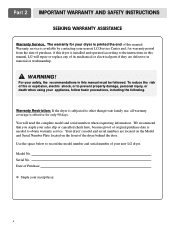
... will repair or replace any of its mechanical or electrical parts if they are located on the Model and Serial Number Plate located on the front of your receipt hear. 4 We recommend that you staple your safety, the recommendations in this manual must be followed. Use the space below to obtain warranty service. Model No. Part 2 IMPORTANT WARRANTY AND SAFETY INSTRUCTIONS SEEKING WARRANTY ASSISTANCE Warranty Service. Warranty Restriction: If the dryer is needed...
... will repair or replace any of its mechanical or electrical parts if they are located on the Model and Serial Number Plate located on the front of your receipt hear. 4 We recommend that you staple your safety, the recommendations in this manual must be followed. Use the space below to obtain warranty service. Model No. Part 2 IMPORTANT WARRANTY AND SAFETY INSTRUCTIONS SEEKING WARRANTY ASSISTANCE Warranty Service. Warranty Restriction: If the dryer is needed...
Owner's Manual
Page 6
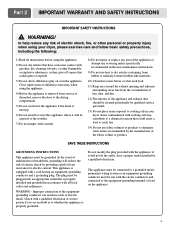
... any servicing unless specifically recommended in the user-maintenance instructions. 9) Do not use heat to dry articles containing foam rubber or similarly textured rubber-like materials. 10) Clean lint screen before using the appliance. 2) Do not dry articles that could cause a load to catch fire. 14) Do not use fabric softners or products to the weather. 7) Do not tamper with controls. 8) Do not repair or replace any part of...
... any servicing unless specifically recommended in the user-maintenance instructions. 9) Do not use heat to dry articles containing foam rubber or similarly textured rubber-like materials. 10) Clean lint screen before using the appliance. 2) Do not dry articles that could cause a load to catch fire. 14) Do not use fabric softners or products to the weather. 7) Do not tamper with controls. 8) Do not repair or replace any part of...
Owner's Manual
Page 7
... inches above the floor for a garage installation. • Failure to such substances. Properly adjusted dryers will minimize incomplete combustion. Follow the gas supplier's instructions carefully. • If you cannot reach your gas supplier, call your gas supplier, including the following: • Do not store or use any electrical switches. Part 2 IMPORTANT WARRANTY AND SAFETY INSTRUCTIONS ! Do not dry any articles that have ever had...
... inches above the floor for a garage installation. • Failure to such substances. Properly adjusted dryers will minimize incomplete combustion. Follow the gas supplier's instructions carefully. • If you cannot reach your gas supplier, call your gas supplier, including the following: • Do not store or use any electrical switches. Part 2 IMPORTANT WARRANTY AND SAFETY INSTRUCTIONS ! Do not dry any articles that have ever had...
Owner's Manual
Page 10
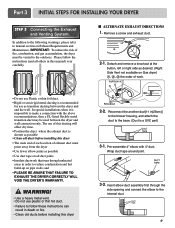
..., combustion, and gas accumulation, the dryer must point away from the dryer • Use fewer elbow joints as possible • Clean old ducts before installing this manual) very carefully. ■ ALTERNATE EXHAUST DIRECTIONS 1. Detach and remove a knockout at the button, left or right side as transition ducting between the dryer and wall connection only. Part 3 INITIAL STEPS FOR INSTALLING YOUR DRYER STEP 3 Connecting the Exhaust and Venting System. Insert elbow duct assembly first through unheated...
..., combustion, and gas accumulation, the dryer must point away from the dryer • Use fewer elbow joints as possible • Clean old ducts before installing this manual) very carefully. ■ ALTERNATE EXHAUST DIRECTIONS 1. Detach and remove a knockout at the button, left or right side as transition ducting between the dryer and wall connection only. Part 3 INITIAL STEPS FOR INSTALLING YOUR DRYER STEP 3 Connecting the Exhaust and Venting System. Insert elbow duct assembly first through unheated...
Owner's Manual
Page 11
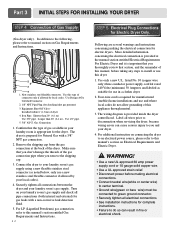
... use a new stainless steel flexible connector if allowed by local codes. Label all connections between the dryer and your laundry room's gas supply and check all electrical connections • See installation instructions for the dryer. Turn on your laundry room's gas supply. More detailed information concerning the electrical connection is provided at the back of this manual's section on Gas Requirements and Instructions. 1 2 5 3 4 1. listed No. 10 (copper wire only) three conductor power supply cord kit rated...
... use a new stainless steel flexible connector if allowed by local codes. Label all connections between the dryer and your laundry room's gas supply and check all electrical connections • See installation instructions for the dryer. Turn on your laundry room's gas supply. More detailed information concerning the electrical connection is provided at the back of this manual's section on Gas Requirements and Instructions. 1 2 5 3 4 1. listed No. 10 (copper wire only) three conductor power supply cord kit rated...
Owner's Manual
Page 12
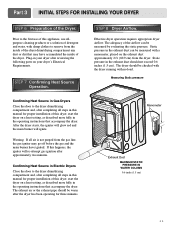
... of detergent and water, with damp clothes to remove from the inside of this dryer, start the dryer on a heat setting, as described more fully in this manual for three minutes. Confirming Heat Source in Gas Dryers Close the door to the dryer drum/drying compartment and, after the dryer has been operating for proper installation of this dryer, start the dryer on a heat setting, as described more fully in the exhaust duct can be warm...
... of detergent and water, with damp clothes to remove from the inside of this dryer, start the dryer on a heat setting, as described more fully in this manual for three minutes. Confirming Heat Source in Gas Dryers Close the door to the dryer drum/drying compartment and, after the dryer has been operating for proper installation of this dryer, start the dryer on a heat setting, as described more fully in the exhaust duct can be warm...
Owner's Manual
Page 13
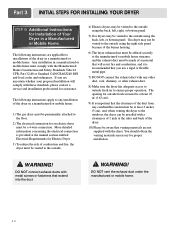
.... 4) Electric dryers may be a 4-wire connection. WARNING! DO NOT vent the exhaust duct under the manufactured or mobile home. 12 Part 3 INITIAL STEPS FOR INSTALLING YOUR DRYER STEP 9 Additional Instructions for proper installation. ! You should obtain the venting materials necessary for Installation of Your Dryer in a manufactured or mobile home must be at least 25 in2 (163 cm2). 9) It is provided at the manual section entitled Electrical Requirements...
.... 4) Electric dryers may be a 4-wire connection. WARNING! DO NOT vent the exhaust duct under the manufactured or mobile home. 12 Part 3 INITIAL STEPS FOR INSTALLING YOUR DRYER STEP 9 Additional Instructions for proper installation. ! You should obtain the venting materials necessary for Installation of Your Dryer in a manufactured or mobile home must be at least 25 in2 (163 cm2). 9) It is provided at the manual section entitled Electrical Requirements...
Owner's Manual
Page 14
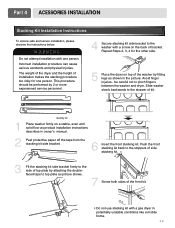
Part 4 ACESSORIES INSTALLATION Stacking Kit Installation Instructions To ensure safe and secure installation, please observe the instructions below. This procedure should be careful not to pinch fingers between the washer and dryer. Incorrect installation procedure can cause serious accidents and physical Injuries. The weight of the dryer and the height of bracket. Avoid finger injuries - Push the front stacking kit back to the stoppers of side...
Part 4 ACESSORIES INSTALLATION Stacking Kit Installation Instructions To ensure safe and secure installation, please observe the instructions below. This procedure should be careful not to pinch fingers between the washer and dryer. Incorrect installation procedure can cause serious accidents and physical Injuries. The weight of the dryer and the height of bracket. Avoid finger injuries - Push the front stacking kit back to the stoppers of side...
Owner's Manual
Page 16
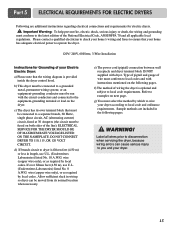
... equipment-grounding terminal or lead on next page. DO NOT CONNECT DRYER TO 110, 115, OR 120 VOLT CIRCUIT. Type of pigtail and gauge of wire must select the method by which to wire your dryer according to operate the dryer. 120V/ 240V, 60 Hertz, 3-Wire Installation Instructions for electric dryers. ! wire (copper wire only), or as required by local codes. Part 5 ELECTRICAL REQUIREMENTS FOR ELECTRIC DRYERS Following are included in wiring so dryer can cause...
... equipment-grounding terminal or lead on next page. DO NOT CONNECT DRYER TO 110, 115, OR 120 VOLT CIRCUIT. Type of pigtail and gauge of wire must select the method by which to wire your dryer according to operate the dryer. 120V/ 240V, 60 Hertz, 3-Wire Installation Instructions for electric dryers. ! wire (copper wire only), or as required by local codes. Part 5 ELECTRICAL REQUIREMENTS FOR ELECTRIC DRYERS Following are included in wiring so dryer can cause...
Owner's Manual
Page 19
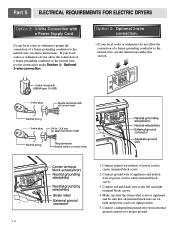
... connector to the left and right terminal block screws. 4. If your local codes or ordinances do not allow the connection of a frame-grounding conductor to the neutral wire, use these instructions. Part 5 ELECTRICAL REQUIREMENTS FOR ELECTRIC DRYERS Option 2: 3-Wire Connection with a Power Supply Cord lf your local codes or ordinances permit the connection of a frame-grounding conductor to the neutral wire, use the instructions under this section. 1. Connect neutral wire(white) of power cord to center terminal block screw. 2. Connect...
... connector to the left and right terminal block screws. 4. If your local codes or ordinances do not allow the connection of a frame-grounding conductor to the neutral wire, use these instructions. Part 5 ELECTRICAL REQUIREMENTS FOR ELECTRIC DRYERS Option 2: 3-Wire Connection with a Power Supply Cord lf your local codes or ordinances permit the connection of a frame-grounding conductor to the neutral wire, use the instructions under this section. 1. Connect neutral wire(white) of power cord to center terminal block screw. 2. Connect...
Owner's Manual
Page 20
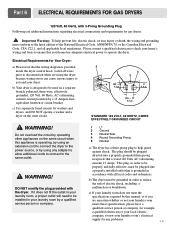
... not meet the specifications required by a 15 Ampere fuse, equivalent fusetron or circuit breaker. Electrical Requirements for any adapter to allow additional cords to connect to ensure that is grounded in your laundry room by using any problems. 19 b) The dryer must be used on the same circuit. ! c) Use separately fused circuits for gas dryers. ! Please contact a qualified electrician to check your home's wiring and fuses to the same outlet. ! STANDARD 120 VOLT...
... not meet the specifications required by a 15 Ampere fuse, equivalent fusetron or circuit breaker. Electrical Requirements for any adapter to allow additional cords to connect to ensure that is grounded in your laundry room by using any problems. 19 b) The dryer must be used on the same circuit. ! c) Use separately fused circuits for gas dryers. ! Please contact a qualified electrician to check your home's wiring and fuses to the same outlet. ! STANDARD 120 VOLT...
Owner's Manual
Page 21
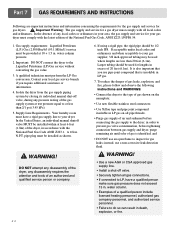
water column pressure. 2. Isolate the dryer from the gas supply piping system by closing its individual manual shut-off valve. • Securely tighten all gas connections. • If connected to LP, have a rigid gas supply line to inspect for lengths in your area, the gas supply and service for gas dryers. ! N.P.T. It is also important that you require additional assistance or information. 4. Part 7 GAS REQUIREMENTS AND INSTRUCTIONS Following are less than 2/1 psi...
water column pressure. 2. Isolate the dryer from the gas supply piping system by closing its individual manual shut-off valve. • Securely tighten all gas connections. • If connected to LP, have a rigid gas supply line to inspect for lengths in your area, the gas supply and service for gas dryers. ! N.P.T. It is also important that you require additional assistance or information. 4. Part 7 GAS REQUIREMENTS AND INSTRUCTIONS Following are less than 2/1 psi...
Owner's Manual
Page 22
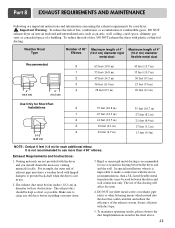
..., gas vent, or concealed space of this ducting will affect dry time. 4. To maximize operating results, please observe the duct length limitations noted in the chart above recommendations, then a UL-listed flexible metal transition duct may be four inches (10.2 cm) in use of a building. Venting materials are important instructions and information concerning the exhaust requirements for each additional elbow. Exhaust Requirements and Instructions: 1. Make sure to use sheet metal...
..., gas vent, or concealed space of this ducting will affect dry time. 4. To maximize operating results, please observe the duct length limitations noted in the chart above recommendations, then a UL-listed flexible metal transition duct may be four inches (10.2 cm) in use of a building. Venting materials are important instructions and information concerning the exhaust requirements for each additional elbow. Exhaust Requirements and Instructions: 1. Make sure to use sheet metal...
Owner's Manual
Page 23
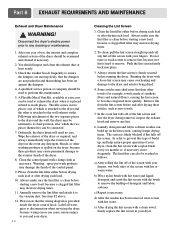
Part 8 EXHAUST REQUIREMENTS AND MAINTENANCE Exhaust and Dryer Maintenance ! This Kit comes in two pieces, one year of use, the interior and complete exhaust system of the dryer. 8. Clean the control panel with hot water. Always ensure the lint screen is firmly secured before starting a new load, because a clogged lint filter may cause permanent damage to prevent this maintenance. 5. In order to the exterior finish of the dryer should be washed as follows: a) After rolling the...
Part 8 EXHAUST REQUIREMENTS AND MAINTENANCE Exhaust and Dryer Maintenance ! This Kit comes in two pieces, one year of use, the interior and complete exhaust system of the dryer. 8. Clean the control panel with hot water. Always ensure the lint screen is firmly secured before starting a new load, because a clogged lint filter may cause permanent damage to prevent this maintenance. 5. In order to the exterior finish of the dryer should be washed as follows: a) After rolling the...
Owner's Manual
Page 25
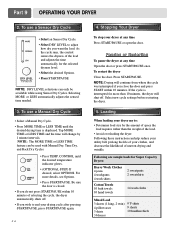
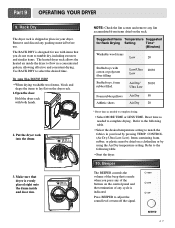
...: Drying will shut off . • If you wish to adjust how dry you close the door and press START within 10 minutes of uneven drying and wrinkle. Part 9 OPERATING YOUR DRYER 2. To use a Manual Dry Cycle • Select a Manual Dry Cycle. • Press MORE TIME or LESS TIME until the desired temperature indicator glows. • (OPTIONAL STEP) If desired, select OPTIONS. Be sure the door is displayed. As the cycle runs, the control senses...
...: Drying will shut off . • If you wish to adjust how dry you close the door and press START within 10 minutes of uneven drying and wrinkle. Part 9 OPERATING YOUR DRYER 2. To use a Manual Dry Cycle • Select a Manual Dry Cycle. • Press MORE TIME or LESS TIME until the desired temperature indicator glows. • (OPTIONAL STEP) If desired, select OPTIONS. Be sure the door is displayed. As the cycle runs, the control senses...
Owner's Manual
Page 28
... time. Use RACK DRY to adjust the sound level or turn off the signal. 27 Refer to the following table. • Start the dryer. 10. Rack Dry The dryer rack is indicated. Make sure that is evenly placed right onto the drum inside the dryer to lay flat on the control panel and the termination of the buttons on the dryer rack. 1.Open the door. Beeper The BEEPER controls the volume of the beep...
... time. Use RACK DRY to adjust the sound level or turn off the signal. 27 Refer to the following table. • Start the dryer. 10. Rack Dry The dryer rack is indicated. Make sure that is evenly placed right onto the drum inside the dryer to lay flat on the control panel and the termination of the buttons on the dryer rack. 1.Open the door. Beeper The BEEPER controls the volume of the beep...
Owner's Manual
Page 30
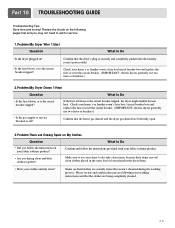
... and replace the fuse or reset the circuit breaker. (IMPORTANT: electric dryers generally use two fuses or breakers.) 2.Problem:My Dryer Doesn 't Heat Question What to dry only clean items, because dirty items can soil clean clothes placed in the same load or later placed in ? • Is the fuse blown, or is the circuit breaker tripped? Make sure to use two fuses or breakers.) • Is the gas supply or service blocked or off? Part 10 TROUBLESHOOTING GUIDE Troubleshooting Tips Save time...
... and replace the fuse or reset the circuit breaker. (IMPORTANT: electric dryers generally use two fuses or breakers.) 2.Problem:My Dryer Doesn 't Heat Question What to dry only clean items, because dirty items can soil clean clothes placed in the same load or later placed in ? • Is the fuse blown, or is the circuit breaker tripped? Make sure to use two fuses or breakers.) • Is the gas supply or service blocked or off? Part 10 TROUBLESHOOTING GUIDE Troubleshooting Tips Save time...
Owner's Manual
Page 31
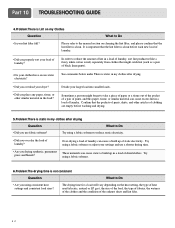
.... 6.Problem:The drying time is not consistent Question What to reduce static electricity. • Did you over dry the load of laundry? • Are you using a fabric softener or adjust your load of laundry? Part 10 TROUBLESHOOTING GUIDE 4.Problem:There is Lint on the heat setting, the type of heat used (electric, natural or LP gas), the size of the load, the type of fabrics, the wetness of the clothes and the condition of the exhaust ducts...
.... 6.Problem:The drying time is not consistent Question What to reduce static electricity. • Did you over dry the load of laundry? • Are you using a fabric softener or adjust your load of laundry? Part 10 TROUBLESHOOTING GUIDE 4.Problem:There is Lint on the heat setting, the type of heat used (electric, natural or LP gas), the size of the load, the type of fabrics, the wetness of the clothes and the condition of the exhaust ducts...
Owner's Manual
Page 32
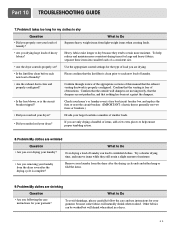
... lead to wrinkled clothes. Part 10 TROUBLESHOOTING GUIDE 7.Problem:It takes too long for my clothes to dry Question What to Do • Did you properly sort your dryer? Use the appropriate control settings for your dryer? Confirm that the exhaust venting ductwork is complete? Check your home's or laundry room's fuse box/circuit breaker box and replace the fuse or reset the circuit breaker. (IMPORTANT: electric dryers generally use instructions for the type of obstructions. Try a shorter drying time, and remove items while...
... lead to wrinkled clothes. Part 10 TROUBLESHOOTING GUIDE 7.Problem:It takes too long for my clothes to dry Question What to Do • Did you properly sort your dryer? Use the appropriate control settings for your dryer? Confirm that the exhaust venting ductwork is complete? Check your home's or laundry room's fuse box/circuit breaker box and replace the fuse or reset the circuit breaker. (IMPORTANT: electric dryers generally use instructions for the type of obstructions. Try a shorter drying time, and remove items while...


