
Owner's Manual
Page 5
...any of its mechanical or electrical parts if they are located on the Model and Serial Number Plate located on the front of this manual, LG will need the complete model and serial numbers when requesting information. To reduce the risk of original purchase date is printed the end ...Warranty Service. Model No. Use the space below to the instructions in this manual. Warranty service is available by contacting your nearest LG Service Center and, for warranty period from the date of purchase, if this manual must be followed. Your dryer's model and serial numbers are defective in this...
...any of its mechanical or electrical parts if they are located on the Model and Serial Number Plate located on the front of this manual, LG will need the complete model and serial numbers when requesting information. To reduce the risk of original purchase date is printed the end ...Warranty Service. Model No. Use the space below to the instructions in this manual. Warranty service is available by contacting your nearest LG Service Center and, for warranty period from the date of purchase, if this manual must be followed. Your dryer's model and serial numbers are defective in this...
Owner's Manual
Page 7
... them, including cooking oil. • Articles containing foam, rubber, rubber-like materials, plastic or similar materials should be dried on a clothesline or by using this manual and instructions and information provided by your building. • Clear the room, building or area of potential exposure to do so can completely remove oil...
... them, including cooking oil. • Articles containing foam, rubber, rubber-like materials, plastic or similar materials should be dried on a clothesline or by using this manual and instructions and information provided by your building. • Clear the room, building or area of potential exposure to do so can completely remove oil...
Owner's Manual
Page 8
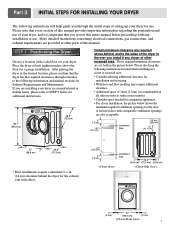
...A louvered door with any installation or use of your dryer, and it any closer of other parts of this entire manual before proceeding with comparable ventilation openings are set forth in the picture below shows the minimum required ventilation openings for the ...door. Place the dryer at other recessed area. Please note that every section of this manual provides important information regarding the preparation and use . More detailed instructions concerning electrical connections, gas connections, and exhaust requirements ...
...A louvered door with any installation or use of your dryer, and it any closer of other parts of this entire manual before proceeding with comparable ventilation openings are set forth in the picture below shows the minimum required ventilation openings for the ...door. Place the dryer at other recessed area. Please note that every section of this manual provides important information regarding the preparation and use . More detailed instructions concerning electrical connections, gas connections, and exhaust requirements ...
Owner's Manual
Page 9
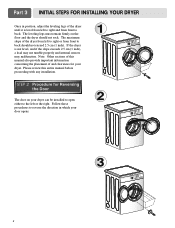
... Once in which your dryer. If the dryer is level from left to right and from front to back should not rock. Please review this manual also provide important information concerning the placement of the dryer from left or the right. Note: Other sections of this entire... manual before proceeding with any installation. Follow these procedures to back. SSTTEEPP 22: Procedure for your door opens: 1 2 3 8 The leveling legs must remain firmly on your ...
... Once in which your dryer. If the dryer is level from left to right and from front to back should not rock. Please review this manual also provide important information concerning the placement of the dryer from left or the right. Note: Other sections of this entire... manual before proceeding with any installation. Follow these procedures to back. SSTTEEPP 22: Procedure for your door opens: 1 2 3 8 The leveling legs must remain firmly on your ...
Owner's Manual
Page 10
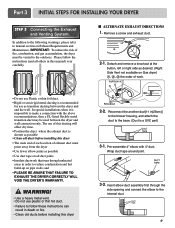
In addition to the following warnings, please refer to manual section on all others in (28cm)] to the blower housing, and attach the duct to the outdoors. Detach and remove a knockout at the button, left ... only. Remove a screw and exhaust duct. 2-1. Insert elbow duct assembly first through unheated areas in death or fire. • Clean old ducts before installing this manual) very carefully. ■ ALTERNATE EXHAUST DIRECTIONS 1. Part 3 INITIAL STEPS FOR INSTALLING YOUR DRYER STEP 3 Connecting the Exhaust and Venting System. In special installations when it...
In addition to the following warnings, please refer to manual section on all others in (28cm)] to the blower housing, and attach the duct to the outdoors. Detach and remove a knockout at the button, left ... only. Remove a screw and exhaust duct. 2-1. Insert elbow duct assembly first through unheated areas in death or fire. • Clean old ducts before installing this manual) very carefully. ■ ALTERNATE EXHAUST DIRECTIONS 1. Part 3 INITIAL STEPS FOR INSTALLING YOUR DRYER STEP 3 Connecting the Exhaust and Venting System. In special installations when it...
Owner's Manual
Page 11
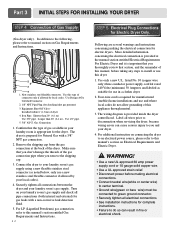
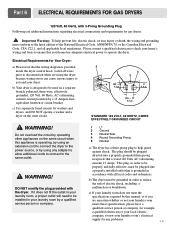
... cap. 3. More detailed information concerning the electrical connection is required for manufactured (mobile) home installations and use this manual's section entitled Gas Requirements and Instructions. 10 STEP 5 Electrical Plug Connections for Electric Dryer Only. Iron Pipe. Use... this appliance through neutral. 3. Connect the dryer to manual section on Gas Requirements and Instructions. 1 2 5 3 4 1. The wiring diagram is appropriate for complete instructions. • ...
... cap. 3. More detailed information concerning the electrical connection is required for manufactured (mobile) home installations and use this manual's section entitled Gas Requirements and Instructions. 10 STEP 5 Electrical Plug Connections for Electric Dryer Only. Iron Pipe. Use... this appliance through neutral. 3. Connect the dryer to manual section on Gas Requirements and Instructions. 1 2 5 3 4 1. The wiring diagram is appropriate for complete instructions. • ...
Owner's Manual
Page 12
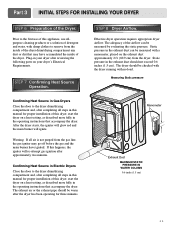
...PRESSURE IN WATER COLUMN 0.6 inche (1.5 cm) 11 Prior to the dryer drum/drying compartment and, after completing all steps in this manual for three minutes. Effective dryer operation requires appropriate dryer airflow. Static pressure in Electric Dryers Close the door to remove from the ... Confirming Heat Source in the exhaust duct can be measured with a manometer, placed on your dryer after completing all steps in this manual for proper installation of the dryer drum/drying compartment any dust or dirt that accompany the dryer. STEP 8 Dryer Airflow. Warning: ...
...PRESSURE IN WATER COLUMN 0.6 inche (1.5 cm) 11 Prior to the dryer drum/drying compartment and, after completing all steps in this manual for three minutes. Effective dryer operation requires appropriate dryer airflow. Static pressure in Electric Dryers Close the door to remove from the ... Confirming Heat Source in the exhaust duct can be measured with a manometer, placed on your dryer after completing all steps in this manual for proper installation of the dryer drum/drying compartment any dust or dirt that accompany the dryer. STEP 8 Dryer Airflow. Warning: ...
Owner's Manual
Page 13
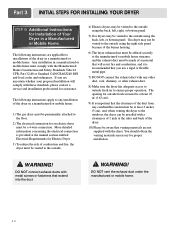
... , or bottom panel. DO NOT connect exhaust ducts with metal screws or fasteners that venting materials are not supplied with a clearances of 1 inch at the manual section entitled Electrical Requirements for Electric Dryer 3) To reduce the risk of combustion and fire, the dryer must be vented to the outside. 4) Electric dryers...
... , or bottom panel. DO NOT connect exhaust ducts with metal screws or fasteners that venting materials are not supplied with a clearances of 1 inch at the manual section entitled Electrical Requirements for Electric Dryer 3) To reduce the risk of combustion and fire, the dryer must be vented to the outside. 4) Electric dryers...
Owner's Manual
Page 14
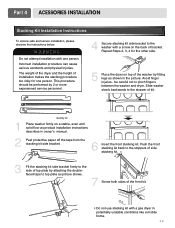
... stopper of kit. 1 Stacking kit Place washer firmly on top of the front kit. • Do not use stacking kit with a gas dryer in owner's manual. 2 Peel protective paper off the tape from the stacking kit side bracket. 6 Insert the front stacking kit. Slide washer slowly backwards to top plate as...
... stopper of kit. 1 Stacking kit Place washer firmly on top of the front kit. • Do not use stacking kit with a gas dryer in owner's manual. 2 Peel protective paper off the tape from the stacking kit side bracket. 6 Insert the front stacking kit. Slide washer slowly backwards to top plate as...
Owner's Manual
Page 20
... are additional instructions regarding electrical connections and requirements for washers and dryers, and DO NOT operate a washer and a dryer on the same circuit when this manual, or if you and your dryer. Please contact a qualified electrician to check your home's wiring and fuses to ensure that your home has adequate electrical...
... are additional instructions regarding electrical connections and requirements for washers and dryers, and DO NOT operate a washer and a dryer on the same circuit when this manual, or if you and your dryer. Please contact a qualified electrician to check your home's wiring and fuses to ensure that your home has adequate electrical...
Owner's Manual
Page 21
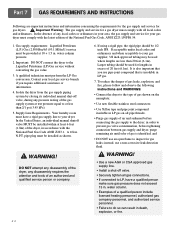
... pressure does not exceed 13 in death, explosion, or fire. 20 Isolate the dryer from the gas supply piping system by closing its individual manual shut-off valve. • Securely tighten all local codes and ordinances. Supply Line Requirements. In the United States, an individual... manual shutoff valve MUST be used where lengths are important instructions and information concerning the requirements for the gas supply and service for gas dryers. ! ...
... pressure does not exceed 13 in death, explosion, or fire. 20 Isolate the dryer from the gas supply piping system by closing its individual manual shut-off valve. • Securely tighten all local codes and ordinances. Supply Line Requirements. In the United States, an individual... manual shutoff valve MUST be used where lengths are important instructions and information concerning the requirements for the gas supply and service for gas dryers. ! ...
Owner's Manual
Page 24
... plastic must be dried on it (including cooking oils). Please refer to specific sections of this dryer. Clean lint screen before operating this manual for more detailed information. Turn the knob to follow these instructions can result in death, explosion, or fire. ! The preset settings for... it (even after each cycle. 2. The estimated or actual cycle time (in minutes) will glow. Failure to person, read this entire manual, including the Important Safety Instructions, before or after washing). Failure to select the drying cycle you want. Fire Hazard No washer can completely...
... plastic must be dried on it (including cooking oils). Please refer to specific sections of this dryer. Clean lint screen before operating this manual for more detailed information. Turn the knob to follow these instructions can result in death, explosion, or fire. ! The preset settings for... it (even after each cycle. 2. The estimated or actual cycle time (in minutes) will glow. Failure to person, read this entire manual, including the Important Safety Instructions, before or after washing). Failure to select the drying cycle you want. Fire Hazard No washer can completely...
Owner's Manual
Page 25
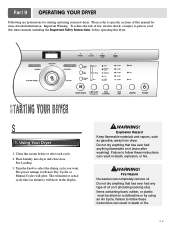
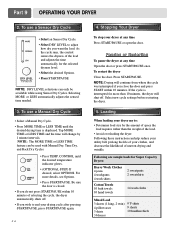
...blouses 9 T-shirts 9 shorts 10 handkerchiefs Following are sample loads for more details, see Options. • Press START/PAUSE. To use a Manual Dry Cycle • Select a Manual Dry Cycle. • Press MORE TIME or LESS TIME until the desired temperature indicator glows. • (OPTIONAL STEP) If desired, select OPTIONS...selected dryness level. • Select the desired Options. • Press START/PAUSE NOTE: DRY LEVEL selections can only be used with Manual Dry, Time Dry, and Rack Dry Cycles. • Press TEMP. Part 9 OPERATING YOUR DRYER 2. Pausing or Restarting To pause...
...blouses 9 T-shirts 9 shorts 10 handkerchiefs Following are sample loads for more details, see Options. • Press START/PAUSE. To use a Manual Dry Cycle • Select a Manual Dry Cycle. • Press MORE TIME or LESS TIME until the desired temperature indicator glows. • (OPTIONAL STEP) If desired, select OPTIONS...selected dryness level. • Select the desired Options. • Press START/PAUSE NOTE: DRY LEVEL selections can only be used with Manual Dry, Time Dry, and Rack Dry Cycles. • Press TEMP. Part 9 OPERATING YOUR DRYER 2. Pausing or Restarting To pause...
Owner's Manual
Page 26
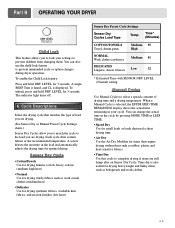
... fabrics, washable knit fabrics, and no-iron finishes (low heat) Sensor Dry Preset Cycle Settings Sensor Dry Cycles Load Type Temp. When a Manual Cycle is selected, the ESTIMATED TIME REMAINING display shows the actual time remaining in the cycle by pressing MORE TIME or LESS TIME. •...; Time Dry Use this cycle to prevent unintended cycle or option changes during dryer operation. Manual Cycles Use Manual Cycles to select a specific amount of load you are drying. (See Sensor Dry or Manual Preset Cycle Settings charts.) Sensor Dry Cycles allow you to match the cycle to the load...
... fabrics, washable knit fabrics, and no-iron finishes (low heat) Sensor Dry Preset Cycle Settings Sensor Dry Cycles Load Type Temp. When a Manual Cycle is selected, the ESTIMATED TIME REMAINING display shows the actual time remaining in the cycle by pressing MORE TIME or LESS TIME. •...; Time Dry Use this cycle to prevent unintended cycle or option changes during dryer operation. Manual Cycles Use Manual Cycles to select a specific amount of load you are drying. (See Sensor Dry or Manual Preset Cycle Settings charts.) Sensor Dry Cycles allow you to match the cycle to the load...

Owner's Manual
Page 27
... three hours when you push the wrinkle care option button on, when you select the wrinkle free option, the dryer will periodically tumble for the Manual Cycles. Modifiers Use Modifiers to select temperatures for up to the cycle has completed. CONTROL until the desired temperature setting glows. Foam rubber pillows are... Time* (Minutes) 20 - 30 20 - 30 40 - 50 10 - 20 * Reset cycle to complete drying, if needed. • Check to dry. Part 9 OPERATING YOUR DRYER Manual Preset Cycle Settings Manual Dry Temp.
... three hours when you push the wrinkle care option button on, when you select the wrinkle free option, the dryer will periodically tumble for the Manual Cycles. Modifiers Use Modifiers to select temperatures for up to the cycle has completed. CONTROL until the desired temperature setting glows. Foam rubber pillows are... Time* (Minutes) 20 - 30 20 - 30 40 - 50 10 - 20 * Reset cycle to complete drying, if needed. • Check to dry. Part 9 OPERATING YOUR DRYER Manual Preset Cycle Settings Manual Dry Temp.
Owner's Manual
Page 31
... laundry. Sometimes a person might catch lint (such as a pair of black linen pants). • Do your clothes have excess static electricity? Please refer to the manual section on cleaning the lint filter, and please confirm that might forget to take a piece of paper or a tissue out of the pocket of a pair...
... laundry. Sometimes a person might catch lint (such as a pair of black linen pants). • Do your clothes have excess static electricity? Please refer to the manual section on cleaning the lint filter, and please confirm that might forget to take a piece of paper or a tissue out of the pocket of a pair...
Owner's Manual
Page 32
.... • Are the dryer controls properly set against the dampers. • Is the fuse blown, or is clean prior to each new load of this manual that the exhaust venting ductwork is properly configured.
.... • Are the dryer controls properly set against the dampers. • Is the fuse blown, or is clean prior to each new load of this manual that the exhaust venting ductwork is properly configured.


