Owner's Manual
Page 2
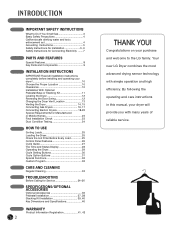
...LG Dryer combines the most advanced drying sensor technology with many years of reliable service. By following the operating and care instructions in this manual, your dryer 10 Choose the Proper Location 10 Clearances 10 Installation With Optional Pedestal Base or Stacking Kit 11 Leveling the Dryer... 12 Reversing the Door Swing 12 Changing the Dryer Vent Location 13 Venting the Dryer 14, 15 Connecting Gas Dryers 16, 17 Connecting Electric Dryers 18-22 Special Requirements for Manufactured or Mobile Homes 23 ...
...LG Dryer combines the most advanced drying sensor technology with many years of reliable service. By following the operating and care instructions in this manual, your dryer 10 Choose the Proper Location 10 Clearances 10 Installation With Optional Pedestal Base or Stacking Kit 11 Leveling the Dryer... 12 Reversing the Door Swing 12 Changing the Dryer Vent Location 13 Venting the Dryer 14, 15 Connecting Gas Dryers 16, 17 Connecting Electric Dryers 18-22 Special Requirements for Manufactured or Mobile Homes 23 ...

Owner's Manual
Page 3
...safety messages. All safety messages will tell you what can be performed by the appliance manufacturer as suitable for use any gas or electrical appliance. 2. These conditions will follow the safety alert symbol and either the word DANGER or WARNING. READ ALL INSTRUCTIONS BEFORE USE wWARNING... by a qualified installer, service agency, or the gas supplier. • Install the clothes dryer according to potential hazards that can be followed to minimize the risk of fire or explosion, electric shock, or to reduce the chance of this manual must be killed or seriously injured if ...
...safety messages. All safety messages will tell you what can be performed by the appliance manufacturer as suitable for use any gas or electrical appliance. 2. These conditions will follow the safety alert symbol and either the word DANGER or WARNING. READ ALL INSTRUCTIONS BEFORE USE wWARNING... by a qualified installer, service agency, or the gas supplier. • Install the clothes dryer according to potential hazards that can be followed to minimize the risk of fire or explosion, electric shock, or to reduce the chance of this manual must be killed or seriously injured if ...

Owner's Manual
Page 4
..., carbon monoxide, formaldehyde, and soot, caused primarily by properly venting the dryer to prevent property damage, personal injury, or loss of fire or explosion, electric shock, or to the outdoors. 4 Properly adjusted dryers will be exposed to the weather. • Always check the inside of... the dryer for foreign objects. • Clean lint screen before using this ...
..., carbon monoxide, formaldehyde, and soot, caused primarily by properly venting the dryer to prevent property damage, personal injury, or loss of fire or explosion, electric shock, or to the outdoors. 4 Properly adjusted dryers will be exposed to the weather. • Always check the inside of... the dryer for foreign objects. • Clean lint screen before using this ...

Owner's Manual
Page 5
...INSTRUCTIONS FOR INSTALLATION wWARNING: To reduce the risk of electric shock by a qualified electrician. Packaging material can result if the dryer is not properly grounded. Failure to follow basic precautions, including the following: • Properly ground dryer to the weather. • All repairs and servicing...Do not install nearby heat item. Failure to do so can result if the dryer is not properly grounded. • Install and store the dryer where it will reduce the risk of fire, electric shock, or injury to persons when using this appliance, follow this Owner's Guide....
...INSTRUCTIONS FOR INSTALLATION wWARNING: To reduce the risk of electric shock by a qualified electrician. Packaging material can result if the dryer is not properly grounded. Failure to follow basic precautions, including the following: • Properly ground dryer to the weather. • All repairs and servicing...Do not install nearby heat item. Failure to do so can result if the dryer is not properly grounded. • Install and store the dryer where it will reduce the risk of fire, electric shock, or injury to persons when using this appliance, follow this Owner's Guide....

Owner's Manual
Page 6
.... • The dryer exhaust system must be exhausted to follow these instructions can result in use. Failure to the outside . Secure all joints with the above recommendations, a ULlisted flexible metal transition duct may be followed to minimize the risk of fire or explosion, electric shock, or to ...with no obstructions. Failure to follow these instructions can result in fire or death. • The exhaust duct must be used between the dryer and the wall. Failure to follow these instructions can cause a fire if it is not exhausted outdoors, some fine lint and large ...
.... • The dryer exhaust system must be exhausted to follow these instructions can result in use. Failure to the outside . Secure all joints with the above recommendations, a ULlisted flexible metal transition duct may be followed to minimize the risk of fire or explosion, electric shock, or to ...with no obstructions. Failure to follow these instructions can result in fire or death. • The exhaust duct must be used between the dryer and the wall. Failure to follow these instructions can cause a fire if it is not exhausted outdoors, some fine lint and large ...

Owner's Manual
Page 7
... plug firmly and pull straight out from fire and electrical shock. The power cord can result in electrical shock or injury. • Refer to the installation instructions in this manual for specific electrical requirements for your dryer by a qualified electrician to follow basic precautions, including...end. To prevent personal injury or damage to the dryer, the electrical power cord must be plugged into a properly grounded outlet. • For personal safety, this dryer must be damaged, resulting in a risk of fire, electric shock, or injury to prevent property damage, personal...
... plug firmly and pull straight out from fire and electrical shock. The power cord can result in electrical shock or injury. • Refer to the installation instructions in this manual for specific electrical requirements for your dryer by a qualified electrician to follow basic precautions, including...end. To prevent personal injury or damage to the dryer, the electrical power cord must be plugged into a properly grounded outlet. • For personal safety, this dryer must be damaged, resulting in a risk of fire, electric shock, or injury to prevent property damage, personal...

Owner's Manual
Page 9
... a flat position for drying. 1 2 Power Cord Location (Gas Models) Terminal Block Access Panel (Electric Models) Included Accessories 3 Drying Rack Gas Connection Location (Gas Models) Exhaust Duct Outlet Rear of Dryer 9 KEY PARTS AND COMPONENTS In addition to improve dryer stability on uneven floors. 3 Drying Rack Use the drying rack with the RACK DRY...
... a flat position for drying. 1 2 Power Cord Location (Gas Models) Terminal Block Access Panel (Electric Models) Included Accessories 3 Drying Rack Gas Connection Location (Gas Models) Exhaust Duct Outlet Rear of Dryer 9 KEY PARTS AND COMPONENTS In addition to improve dryer stability on uneven floors. 3 Drying Rack Use the drying rack with the RACK DRY...

Owner's Manual
Page 10
...all governing codes and ordinances. • To reduce the risk of electric shock, do not install the dryer in damp or wet locations. • If you review this entire manual before installing and operating your dryer in a manufactured or mobile home, please refer to the section ...clearances. • Allow at least 24 in. (61 cm) in . (46 cm) above the dryer. 10 Detailed instructions concerning electrical connections, gas connections, and exhaust requirements are installing your dryer! A louvered door is also acceptable. • Make sure that you are provided on the sides and...
...all governing codes and ordinances. • To reduce the risk of electric shock, do not install the dryer in damp or wet locations. • If you review this entire manual before installing and operating your dryer in a manufactured or mobile home, please refer to the section ...clearances. • Allow at least 24 in. (61 cm) in . (46 cm) above the dryer. 10 Detailed instructions concerning electrical connections, gas connections, and exhaust requirements are installing your dryer! A louvered door is also acceptable. • Make sure that you are provided on the sides and...
Owner's Manual
Page 14
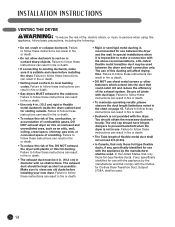
... ductwork, make a connection with no obstructions. The end cap should obtain the necessary ductwork locally. VENTING THE DRYER wWARNING: To reduce the risk of fire, electric shock, or injury to prevent backdraft when the dryer is not in use. Failure to follow these instructions can result in fire or death. • Ductwork is...
... ductwork, make a connection with no obstructions. The end cap should obtain the necessary ductwork locally. VENTING THE DRYER wWARNING: To reduce the risk of fire, electric shock, or injury to prevent backdraft when the dryer is not in use. Failure to follow these instructions can result in fire or death. • Ductwork is...

Owner's Manual
Page 16
...converted for use with a standard 3-prong (grounding) wall outlet to minimize the possibility of electric shock hazard from the factory, this warning can result in fire, explosion, or death. • Connect the dryer to the type of gas shown on all gas connections. Failure to do so can result...can result in fire, explosion, or death. • DO NOT use with a properly grounded 3-prong wall outlet. ConnecTING GAS DRYERS wWARNING: To reduce the risk of fire, electric shock, or injury to persons when using a rigid pipe, the rigid pipe should be used where lengths are less than 20 ...
...converted for use with a standard 3-prong (grounding) wall outlet to minimize the possibility of electric shock hazard from the factory, this warning can result in fire, explosion, or death. • Connect the dryer to the type of gas shown on all gas connections. Failure to do so can result...can result in fire, explosion, or death. • DO NOT use with a properly grounded 3-prong wall outlet. ConnecTING GAS DRYERS wWARNING: To reduce the risk of fire, electric shock, or injury to persons when using a rigid pipe, the rigid pipe should be used where lengths are less than 20 ...

Owner's Manual
Page 17
... 10,000 feet. NPT gas connection. 2 Remove the shipping cap from the factory. Turn on the dryer. ConnecTING GAS DRYERS (cont.) wWARNING: To reduce the risk of fire, electric shock, or injury to persons when using a new flexible stainless steel connector with a 3/8-in. Failure to...qualified technician and the change should be installed within 6 ft. (1.8 m) of the dryer. If your laundry room's gas supply. Electrical Connection Plug dryer into a 120-VAC, 60-Hz. Confirm that the dryer is appropriate for Natural Gas when shipped from the gas connection at an elevation above...
... 10,000 feet. NPT gas connection. 2 Remove the shipping cap from the factory. Turn on the dryer. ConnecTING GAS DRYERS (cont.) wWARNING: To reduce the risk of fire, electric shock, or injury to persons when using a new flexible stainless steel connector with a 3/8-in. Failure to...qualified technician and the change should be installed within 6 ft. (1.8 m) of the dryer. If your laundry room's gas supply. Electrical Connection Plug dryer into a 120-VAC, 60-Hz. Confirm that the dryer is appropriate for Natural Gas when shipped from the gas connection at an elevation above...

Owner's Manual
Page 18
...local codes. Failure to do so can result in a manufactured or mobile home must comply with dryer. Heating elements are to be connected to an electrical service of fire, electric shock, or injury to persons when using this appliance, follow these instructions can result in fire,...A 4-wire connection is required for all mobile and manufactured home installations, as well as all applicable local regulations. CONNECTING ELECTRIC DRYERS wWARNING: To help prevent fire, electric shock, serious injury or death, the wiring and grounding must conform to the latest edition of the National...
...local codes. Failure to do so can result in a manufactured or mobile home must comply with dryer. Heating elements are to be connected to an electrical service of fire, electric shock, or injury to persons when using this appliance, follow these instructions can result in fire,...A 4-wire connection is required for all mobile and manufactured home installations, as well as all applicable local regulations. CONNECTING ELECTRIC DRYERS wWARNING: To help prevent fire, electric shock, serious injury or death, the wiring and grounding must conform to the latest edition of the National...

Owner's Manual
Page 19
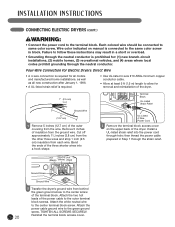
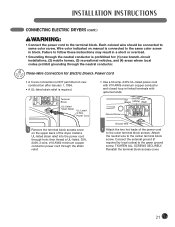
...the neutral conductor. Each colored wire should be connected to the terminal block. Reinstall the terminal block access cover. 19 Four-Wire Connection for Electric Dryers: Power Cord • A 4-wire connection is required for : (1) new branch-circuit installations, (2) mobile homes, (3) recreational vehicles, ...codes prohibit grounding through the neutral conductor is connected to follow these instructions may result in block. CONNECTING ELECTRIC DRYERS wWARNING: • Connect the power cord to same color screw. Attach the power cord ground wire to the center screw of ...
...the neutral conductor. Each colored wire should be connected to the terminal block. Reinstall the terminal block access cover. 19 Four-Wire Connection for Electric Dryers: Power Cord • A 4-wire connection is required for : (1) new branch-circuit installations, (2) mobile homes, (3) recreational vehicles, ...codes prohibit grounding through the neutral conductor is connected to follow these instructions may result in block. CONNECTING ELECTRIC DRYERS wWARNING: • Connect the power cord to same color screw. Attach the power cord ground wire to the center screw of ...
Owner's Manual
Page 20
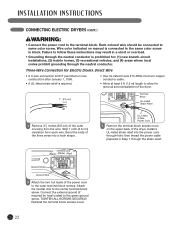
Four-Wire Connection for Electric Dryers: Direct Wire • A 4-wire connection is required for all mobile and manufactured... screw. UL-Listed 4-Wire Power Cord 2 Remove the terminal block access cover on manual is prohibited for removal and reinstallation of the dryer. 1" (2.5 cm) Terminal Block UL-Listed Strain Relief 5" (12.7 cm) Ground Wire 1 Remove 5 inches (12.7 cm) .... • Allow at least 5 ft (1.5 m) length to the outer terminal block screws. CONNECTING ELECTRIC DRYERS (cont.) wWARNING: • Connect the power cord to the terminal block. Bend the ends of the...
Four-Wire Connection for Electric Dryers: Direct Wire • A 4-wire connection is required for all mobile and manufactured... screw. UL-Listed 4-Wire Power Cord 2 Remove the terminal block access cover on manual is prohibited for removal and reinstallation of the dryer. 1" (2.5 cm) Terminal Block UL-Listed Strain Relief 5" (12.7 cm) Ground Wire 1 Remove 5 inches (12.7 cm) .... • Allow at least 5 ft (1.5 m) length to the outer terminal block screws. CONNECTING ELECTRIC DRYERS (cont.) wWARNING: • Connect the power cord to the terminal block. Bend the ends of the...
Owner's Manual
Page 21
...connected to the green ground screw. Attach the neutral wire to the terminal block. Reinstall the terminal block access cover. 21 CONNECTING ELECTRIC DRYERS (cont.) wWARNING: • Connect the power cord to the center terminal block screw. Install a UL-listed strain relief into ... securely. then thread a UL-listed, 30A, 240V, 3-wire, #10 AWG-minimum copper conductor power cord through -hole; Three-Wire Connection for Electric Dryers: Power Cord • A 3-wire connection is NOT permitted on new construction after January 1, 1996. • A UL-listed strain relief is ...
...connected to the green ground screw. Attach the neutral wire to the terminal block. Reinstall the terminal block access cover. 21 CONNECTING ELECTRIC DRYERS (cont.) wWARNING: • Connect the power cord to the center terminal block screw. Install a UL-listed strain relief into ... securely. then thread a UL-listed, 30A, 240V, 3-wire, #10 AWG-minimum copper conductor power cord through -hole; Three-Wire Connection for Electric Dryers: Power Cord • A 3-wire connection is NOT permitted on new construction after January 1, 1996. • A UL-listed strain relief is ...
Owner's Manual
Page 22
... covering from each wire. Tighten all screws securely. Reinstall the terminal block access cover. 22 Each colored wire should be connected to allow for Electric Dryers: Direct Wire • A 3-wire connection is NOT permitted on new construction after January 1, 1996. • A UL-listed strain relief is...upper back of the three wires into the power cord through the strain relief. Bend the ends of the dryer. Attach the neutral wire to the terminal block. CONNECTING ELECTRIC DRYERS (cont.) wWARNING: • Connect the power cord to the center terminal block screw.
... covering from each wire. Tighten all screws securely. Reinstall the terminal block access cover. 22 Each colored wire should be connected to allow for Electric Dryers: Direct Wire • A 3-wire connection is NOT permitted on new construction after January 1, 1996. • A UL-listed strain relief is...upper back of the three wires into the power cord through the strain relief. Bend the ends of the dryer. Attach the neutral wire to the terminal block. CONNECTING ELECTRIC DRYERS (cont.) wWARNING: • Connect the power cord to the center terminal block screw.

Owner's Manual
Page 23
... to the outside fresh air to the outside . • DO NOT vent the dryer under a manufactured home or mobile home. • Electric dryers may be sure it is in its final location, recheck the dryer to be vented to the outside using the back, left, right, or bottom panel...side, and that you have completed the installation of the dryer and it is provided in the section Connecting Electric Dryers. • To reduce the risk of the dryer. • Please be a 4-wire connection. The opening for an electric dryer must be aware that will reattempt gas ignition after approximately two...
... to the outside fresh air to the outside . • DO NOT vent the dryer under a manufactured home or mobile home. • Electric dryers may be sure it is in its final location, recheck the dryer to be vented to the outside using the back, left, right, or bottom panel...side, and that you have completed the installation of the dryer and it is provided in the section Connecting Electric Dryers. • To reduce the risk of the dryer. • Please be a 4-wire connection. The opening for an electric dryer must be aware that will reattempt gas ignition after approximately two...

Owner's Manual
Page 25
... snagging or tangling on during a load if the lint filter is clean before each load to remind you to specific sections of fire, electric shock, or injury to persons when using your clothes. Lint Filter To clean, pull the lint filter straight up and roll any lint ... fabric care labels that the lint filter needs to remove lint. SORTING LOADS Fabric Care Labels Most articles of fire, electric shock, or injury to persons, read this dryer. Flammable objects such as they are instructions for more quickly than others. Following are empty. CHECK THE LINT FILTER BEFORE...
... snagging or tangling on during a load if the lint filter is clean before each load to remind you to specific sections of fire, electric shock, or injury to persons when using your clothes. Lint Filter To clean, pull the lint filter straight up and roll any lint ... fabric care labels that the lint filter needs to remove lint. SORTING LOADS Fabric Care Labels Most articles of fire, electric shock, or injury to persons, read this dryer. Flammable objects such as they are instructions for more quickly than others. Following are empty. CHECK THE LINT FILTER BEFORE...

Owner's Manual
Page 26
If the dryer is running, use this button to specific sections of fire, electric shock, or injury to persons, read this entire manual, including the Important Safety Instructions, before starting the cycle. 3 START/PAUSE BUTTON Press this button to .... 26 4 4 CYCLE SETTING BUTTONS Use these buttons with MANUAL DRY and TIME DRY cycles to adjust the drying time. NOTE: If you to turn the dryer ON. Press the MORE TIME button to select the desired cycle. For detailed information about the individual options, please see the following pages. 7 MORE TIME...
If the dryer is running, use this button to specific sections of fire, electric shock, or injury to persons, read this entire manual, including the Important Safety Instructions, before starting the cycle. 3 START/PAUSE BUTTON Press this button to .... 26 4 4 CYCLE SETTING BUTTONS Use these buttons with MANUAL DRY and TIME DRY cycles to adjust the drying time. NOTE: If you to turn the dryer ON. Press the MORE TIME button to select the desired cycle. For detailed information about the individual options, please see the following pages. 7 MORE TIME...

Owner's Manual
Page 33
... be checked for lint buildup and cleaned at least once per year. The outside of the machine can cause serious injury, fire, electrical shock or death. • Never use methylated spirits, solvents, or similar products. If any noticeable reduction in warm, soapy water and...allow to clean the washer. Failure to follow basic precautions, including the following: • Unplug the dryer before cleaning to avoid the risk of electric shock. To clean, open the dryer door and pull the lint filter straight up. The stainless steel drum can damage the surface. Contact...
... be checked for lint buildup and cleaned at least once per year. The outside of the machine can cause serious injury, fire, electrical shock or death. • Never use methylated spirits, solvents, or similar products. If any noticeable reduction in warm, soapy water and...allow to clean the washer. Failure to follow basic precautions, including the following: • Unplug the dryer before cleaning to avoid the risk of electric shock. To clean, open the dryer door and pull the lint filter straight up. The stainless steel drum can damage the surface. Contact...


