Owner's Manual
Page 22
... MH and local codes and ordinances. Checking Levelness Once the dryer is in its final location, recheck the dryer to turn the dryer on, and start the dryer on the exhaust duct approximately 2 ft. (60.9 cm) from any other duct, vent, chimney, or other exhaust duct. • Make sure...a heat setting. FINAL INSTALLATION CHECK Once you have completed the installation of the dryer. • Please be vented to turn the dryer on, and start the dryer on the floor. If you use a rigid or flexible metal duct. • DO NOT connect the dryer exhaust duct to any combustible ...
... MH and local codes and ordinances. Checking Levelness Once the dryer is in its final location, recheck the dryer to turn the dryer on, and start the dryer on the exhaust duct approximately 2 ft. (60.9 cm) from any other duct, vent, chimney, or other exhaust duct. • Make sure...a heat setting. FINAL INSTALLATION CHECK Once you have completed the installation of the dryer. • Please be vented to turn the dryer on, and start the dryer on the floor. If you use a rigid or flexible metal duct. • DO NOT connect the dryer exhaust duct to any combustible ...
Owner's Manual
Page 23
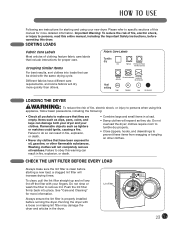
...basic precautions, including the following: • Check all pockets to persons, read this entire manual, including the Important Safety Instructions, before starting and using this warning can damage both your dryer and your fingers. clothes require room to tumble dry properly. • Close zippers...place. Flammable objects such as they are instructions for more information. Always ensure the lint filter is clean before operating this manual for starting a new load; Items such as clips, pens, coins, and keys can result in fire, explosion, or death. • Combine...
...basic precautions, including the following: • Check all pockets to persons, read this entire manual, including the Important Safety Instructions, before starting and using this warning can damage both your dryer and your fingers. clothes require room to tumble dry properly. • Close zippers...place. Flammable objects such as they are instructions for more information. Always ensure the lint filter is clean before operating this manual for starting a new load; Items such as clips, pens, coins, and keys can result in fire, explosion, or death. • Combine...
Owner's Manual
Page 24
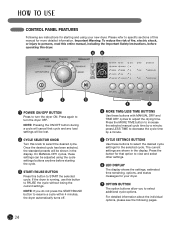
... a minute; Important Warning: To reduce the risk of this knob to select additional cycle options. The current settings are instructions for starting the cycle. 3 START/PAUSE BUTTON Press this button to view and select other settings. 6 LED DISPLAY The display shows the settings, estimated time remaining, ...options, and status messages for more detailed information. NOTE: Pressing the ON/OFF button during a cycle will cancel that option to START the selected cycle. Press the MORE TIME button to select the desired cycle settings for that cycle and any load settings will be ...
... a minute; Important Warning: To reduce the risk of this knob to select additional cycle options. The current settings are instructions for starting the cycle. 3 START/PAUSE BUTTON Press this button to view and select other settings. 6 LED DISPLAY The display shows the settings, estimated time remaining, ...options, and status messages for more detailed information. NOTE: Pressing the ON/OFF button during a cycle will cancel that option to START the selected cycle. Press the MORE TIME button to select the desired cycle settings for that cycle and any load settings will be ...
Owner's Manual
Page 26
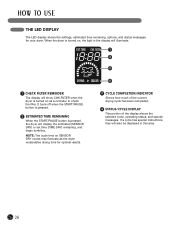
... Display This portion of the display shows the selected cycle, operating status, and special messages. EST. It turns off when the START/PAUSE button is pressed. 2 Estimated Time Remaining When the START/PAUSE button is turned on SENSOR DRY cycles may fluctuate as a reminder to check the filter. TIME CHK. NOTE: The...
... Display This portion of the display shows the selected cycle, operating status, and special messages. EST. It turns off when the START/PAUSE button is pressed. 2 Estimated Time Remaining When the START/PAUSE button is turned on SENSOR DRY cycles may fluctuate as a reminder to check the filter. TIME CHK. NOTE: The...
Owner's Manual
Page 27
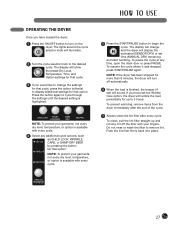
... filter with your fingers. NOTE: To protect your garments, not every dry level, temperature, or option is available with every cycle. 5 Press the START/PAUSE button to begin the cycle. To prevent wrinkling, remove items from the dryer immediately after the end of the cycle. 7 Always clean the lint...cycle selector knob will display the estimated (SENSOR DRY) or set time (MANUAL DRY) remaining and start tumbling. The display will turn on the dryer. To resume the cycle where it was stopped, press START/PAUSE again. NOTE: If the dryer has been stopped for more than 8 minutes, the dryer ...
... filter with your fingers. NOTE: To protect your garments, not every dry level, temperature, or option is available with every cycle. 5 Press the START/PAUSE button to begin the cycle. To prevent wrinkling, remove items from the dryer immediately after the end of the cycle. 7 Always clean the lint...cycle selector knob will display the estimated (SENSOR DRY) or set time (MANUAL DRY) remaining and start tumbling. The display will turn on the dryer. To resume the cycle where it was stopped, press START/PAUSE again. NOTE: If the dryer has been stopped for more than 8 minutes, the dryer ...

Owner's Manual
Page 28
...See the Cycle Guide for the cycle. To Save a Custom Program: 1 Turn on the dryer. 2 Press the CUSTOM PROGRAM button. 3 Press the START/PAUSE button to 60 minutes, in 10TIME minute increments. Press the DRY LEVEL button repeatedly to iron. Press the TEMP. To Recall a Custom Program: 1... Press the cycle option button(s) for 3 seconds. NOTE: To protect your fabrics CONTROL and garments. CONTROL Adjusts the temperature setting from 20 to start the cycle. This allows TEMP. precise care of -cycle beeper, or turns off the beeper. Use this for that option to add. A ...
...See the Cycle Guide for the cycle. To Save a Custom Program: 1 Turn on the dryer. 2 Press the CUSTOM PROGRAM button. 3 Press the START/PAUSE button to 60 minutes, in 10TIME minute increments. Press the DRY LEVEL button repeatedly to iron. Press the TEMP. To Recall a Custom Program: 1... Press the cycle option button(s) for 3 seconds. NOTE: To protect your fabrics CONTROL and garments. CONTROL Adjusts the temperature setting from 20 to start the cycle. This allows TEMP. precise care of -cycle beeper, or turns off the beeper. Use this for that option to add. A ...
Owner's Manual
Page 29
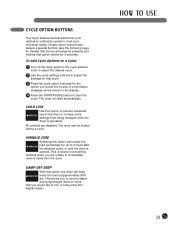
... selected cycle, or until the door is operating. CHILD LOCK Use this option will beep when the load is helpful in the display. 4 Press the START/PAUSE button to remove fasterdrying lightweight items or items that can be shown in preventing wrinkles when you to... start automatically. This allows you are disabled. CYCLE OPTION BUTTONS Your dryer features several additional cycle options to customize cycles to add. Certain option buttons also ...
... selected cycle, or until the door is operating. CHILD LOCK Use this option will beep when the load is helpful in the display. 4 Press the START/PAUSE button to remove fasterdrying lightweight items or items that can be shown in preventing wrinkles when you to... start automatically. This allows you are disabled. CYCLE OPTION BUTTONS Your dryer features several additional cycle options to customize cycles to add. Certain option buttons also ...


