

Owners Manual
Page 2
2 TABLE OF CONTENTS 3 IMPORTANT SAFETY INSTRUCTIONS 3 READ ALL INSTRUCTIONS BEFORE USE 3 WARNING STATEMENTS 6 CAUTION STATEMENTS 8 PRODUCT OVERVIEW 8 Product Features 9 INSTALLATION 9 Before Installing 13 Installing the Cooktop 16 OPERATION 16 Introduction to Induction Cooking 16 Cookware 19 Control Panel 31 SMART FUNCTIONS 31 LG ThinQ Application 34 MAINTENANCE 34 Care and Cleaning 36 TROUBLESHOOTING 36 Before Calling for Service 39 LIMITED WARRANTY 39 USA 43 CANADA
2 TABLE OF CONTENTS 3 IMPORTANT SAFETY INSTRUCTIONS 3 READ ALL INSTRUCTIONS BEFORE USE 3 WARNING STATEMENTS 6 CAUTION STATEMENTS 8 PRODUCT OVERVIEW 8 Product Features 9 INSTALLATION 9 Before Installing 13 Installing the Cooktop 16 OPERATION 16 Introduction to Induction Cooking 16 Cookware 19 Control Panel 31 SMART FUNCTIONS 31 LG ThinQ Application 34 MAINTENANCE 34 Care and Cleaning 36 TROUBLESHOOTING 36 Before Calling for Service 39 LIMITED WARRANTY 39 USA 43 CANADA

Owners Manual
Page 3
...circuit breaker or fuse box in case of an emergency. Operation • Know how to disconnect the electrical power to potential hazards that can kill or injure you what may affect the working of the pacemaker or similar medical device. Mark the breaker or fuse for ease of identification and swift action if necessary. • Never use... or CAUTION. Install only per installation instructions. • The safety aspects of this appliance comply with a pacemaker or similar medical device should exercise caution using this manual and on your appliance for warming or heating a room. ...
...circuit breaker or fuse box in case of an emergency. Operation • Know how to disconnect the electrical power to potential hazards that can kill or injure you what may affect the working of the pacemaker or similar medical device. Mark the breaker or fuse for ease of identification and swift action if necessary. • Never use... or CAUTION. Install only per installation instructions. • The safety aspects of this appliance comply with a pacemaker or similar medical device should exercise caution using this manual and on your appliance for warming or heating a room. ...

Owners Manual
Page 4
.... Metal objects can use the appliance safely. • Young children should be supervised to ensure that they can become too hot. • Overheated fats and oils catch fire quickly. To reduce the risk of burns, ignition of the appliance. • Take care when plugging in cabinets above a cooktop or on grease fires. children climbing on the cooking surface. Boilovers cause...
.... Metal objects can use the appliance safely. • Young children should be supervised to ensure that they can become too hot. • Overheated fats and oils catch fire quickly. To reduce the risk of burns, ignition of the appliance. • Take care when plugging in cabinets above a cooktop or on grease fires. children climbing on the cooking surface. Boilovers cause...

Owners Manual
Page 5
... a risk of electric shock. Use extreme care when inserting a spoon or other use of aluminum foil may result in the fan could catch fire. Boilover causes smoking and greasy spillovers that could catch fire. Maintenance • Do not repair or replace any part of the cooktop. Contact a qualified technician immediately. • Never leave surface units unattended at high heat settings. After heating, allow grease to...
... a risk of electric shock. Use extreme care when inserting a spoon or other use of aluminum foil may result in the fan could catch fire. Boilover causes smoking and greasy spillovers that could catch fire. Maintenance • Do not repair or replace any part of the cooktop. Contact a qualified technician immediately. • Never leave surface units unattended at high heat settings. After heating, allow grease to...

Owners Manual
Page 6
... rangetop service without a pan present. • Only certain types of glass, glass/ceramic, ceramic, earthenware, or other pots with the maintenance and cleaning instructions in shattering of the glass. • Clean the cooktop cautiously. Cooking to these can cause scratches on glass. • Do not slide metal or glass across the cooktop surface. Use a proper metal scraper. • If sugar or a mixture containing sugar falls onto a hot cooking zone and melts, remove...
... rangetop service without a pan present. • Only certain types of glass, glass/ceramic, ceramic, earthenware, or other pots with the maintenance and cleaning instructions in shattering of the glass. • Clean the cooktop cautiously. Cooking to these can cause scratches on glass. • Do not slide metal or glass across the cooktop surface. Use a proper metal scraper. • If sugar or a mixture containing sugar falls onto a hot cooking zone and melts, remove...
Owners Manual
Page 9
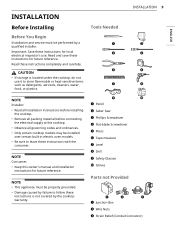
... is not covered by a qualified installer. Tools Needed INSTALLATION 9 NOTE Installer: • Read all installation instructions before installing the cooktop. • Remove all packing material before connecting the electrical supply to the cooktop. • Observe all governing codes and ordinances. • Only certain cooktop models may be installed over certain built-in electric oven models. • Be sure to leave these instructions completely and carefully. NOTE Consumer: • Keep this owner's manual and installation instructions for future...
... is not covered by a qualified installer. Tools Needed INSTALLATION 9 NOTE Installer: • Read all installation instructions before installing the cooktop. • Remove all packing material before connecting the electrical supply to the cooktop. • Observe all governing codes and ordinances. • Only certain cooktop models may be installed over certain built-in electric oven models. • Be sure to leave these instructions completely and carefully. NOTE Consumer: • Keep this owner's manual and installation instructions for future...

Owners Manual
Page 10
... damage or missing components. 2 Be sure the bottle of cleaner and conditioner packed in this guide; Model and Serial Number Location The model and serial numbers are located on a plate on the size and material of the cooktop. Technical Specifications Models Description Electrical Specificatio ns Connection voltage Maximum connected power load Cooktop Dimensions Countertop Cutout Dimensions Cooking Zones Induction Cooktop CBIS3618B 240/208 VAC 60 Hz., 44.4 A / 41.6 A 10650 W / 8650 W 36 5/8" (930 mm) (W) × 3 9/16" (91...
... damage or missing components. 2 Be sure the bottle of cleaner and conditioner packed in this guide; Model and Serial Number Location The model and serial numbers are located on a plate on the size and material of the cooktop. Technical Specifications Models Description Electrical Specificatio ns Connection voltage Maximum connected power load Cooktop Dimensions Countertop Cutout Dimensions Cooking Zones Induction Cooktop CBIS3618B 240/208 VAC 60 Hz., 44.4 A / 41.6 A 10650 W / 8650 W 36 5/8" (930 mm) (W) × 3 9/16" (91...

Owners Manual
Page 12
... by reaching over heated surfaces, cabinet storage space located above the cooktop should be reduced by installing a range hood that projects horizontally a minimum of 5″ (127 mm) beyond the face of the cabinets. • It is very important to clear the electric cable and allow space for optimum performance.) O Depth of overhead cabinets 113″ (330 mm) P Clearance from top of cooking surface to bottom...
... by reaching over heated surfaces, cabinet storage space located above the cooktop should be reduced by installing a range hood that projects horizontally a minimum of 5″ (127 mm) beyond the face of the cabinets. • It is very important to clear the electric cable and allow space for optimum performance.) O Depth of overhead cabinets 113″ (330 mm) P Clearance from top of cooking surface to bottom...

Owners Manual
Page 13
... a qualified installer or service technician. • This cooktop must be connected directly to the grounded junction box. ENGLISH Such use an extension cord with as follows. The fuse size must not exceed the circuit rating of the appliance specified on both sides of the line (time-delay fuse or circuit breaker is recommended). Electrical Connection Connect the flexible armored cable that extends from the surface unit to electrical power supply until...
... a qualified installer or service technician. • This cooktop must be connected directly to the grounded junction box. ENGLISH Such use an extension cord with as follows. The fuse size must not exceed the circuit rating of the appliance specified on both sides of the line (time-delay fuse or circuit breaker is recommended). Electrical Connection Connect the flexible armored cable that extends from the surface unit to electrical power supply until...

Owners Manual
Page 15
... and prepare the installation location. • See Dimensions and Clearances. 3 Carefully lower the cooktop into the countertop cutout, making sure the cooktop powers on properly and that each cooking zone operates correctly. The cooktop must be removable, should service be installed to trap any wires. ENGLISH e Green Wire (Ground) f UL-listed Conduit Connector g Black Wires h Junction Box i White Wire (No Connection) Installing the Cooktop Unit 1 Visually inspect the cooktop for locations). Make sure all cooktop screws are tight...
... and prepare the installation location. • See Dimensions and Clearances. 3 Carefully lower the cooktop into the countertop cutout, making sure the cooktop powers on properly and that each cooking zone operates correctly. The cooktop must be removable, should service be installed to trap any wires. ENGLISH e Green Wire (Ground) f UL-listed Conduit Connector g Black Wires h Junction Box i White Wire (No Connection) Installing the Cooktop Unit 1 Visually inspect the cooktop for locations). Make sure all cooktop screws are tight...

Owners Manual
Page 16
... ceramic cooktop. NOTE • Not all stainless steel cookware is generated directly in use only high-quality, heavy gauge steel cookware on the cooktop; Incompatible Cookware • Aluminum, nickel-silver pots • Heat-resistant glass pots • Roasting pans • Stone pots • Stainless steel pots (without the IH mark) IH mark Induction - Do not slide cast iron cookware on the induction cooking elements. Instead of heating the ceramic glass, this method heats the base...
... ceramic cooktop. NOTE • Not all stainless steel cookware is generated directly in use only high-quality, heavy gauge steel cookware on the cooktop; Incompatible Cookware • Aluminum, nickel-silver pots • Heat-resistant glass pots • Roasting pans • Stone pots • Stainless steel pots (without the IH mark) IH mark Induction - Do not slide cast iron cookware on the induction cooking elements. Instead of heating the ceramic glass, this method heats the base...
Owners Manual
Page 20
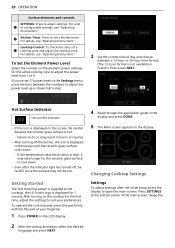
... for the active cooking zone to adjust the power level from 1 to adjust the power level up or down . - Changing Cooktop Settings Settings To adjust settings after the indicator light has turned off the burner, the icon is hot. - After turning on the element power settings for 1 second. 20 OPERATION Surface elements and controls SETTINGS: Press to do so may still be careful because the ceramic glass surface is displayed continuously until the ceramic glass surface cools down half a step. 3 Set the correct time...
... for the active cooking zone to adjust the power level from 1 to adjust the power level up or down . - Changing Cooktop Settings Settings To adjust settings after the indicator light has turned off the burner, the icon is hot. - After turning on the element power settings for 1 second. 20 OPERATION Surface elements and controls SETTINGS: Press to do so may still be careful because the ceramic glass surface is displayed continuously until the ceramic glass surface cools down half a step. 3 Set the correct time...
Owners Manual
Page 21
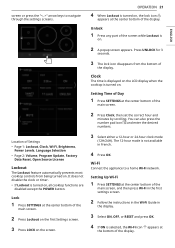
..., Program Update, Factory Data Reset, Open Source License Lockout The Lockout feature automatically prevents most cooktop controls from the bottom of the display. Unlock 1 Press any part of the display. ENGLISH It does not disable the clock or timer. • If Lockout is on , all cooktop functions are disabled except the POWER button. Press UNLOCK for 3 seconds. 3 The lock icon disappears...
..., Program Update, Factory Data Reset, Open Source License Lockout The Lockout feature automatically prevents most cooktop controls from the bottom of the display. Unlock 1 Press any part of the display. ENGLISH It does not disable the clock or timer. • If Lockout is on , all cooktop functions are disabled except the POWER button. Press UNLOCK for 3 seconds. 3 The lock icon disappears...
Owners Manual
Page 31
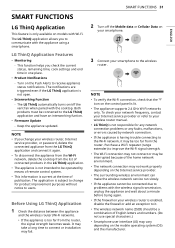
... because of English letters and numbers. (Do not use special characters.) • Smartphone user interface (UI) may fail. Turn on your wireless router, Internet service provider, or password, delete the connected appliance from the list of publication. NOTE • If you change for any network connection problems or any faults, malfunctions, or errors caused by means of remote control system. • This information...
... because of English letters and numbers. (Do not use special characters.) • Smartphone user interface (UI) may fail. Turn on your wireless router, Internet service provider, or password, delete the connected appliance from the list of publication. NOTE • If you change for any network connection problems or any faults, malfunctions, or errors caused by means of remote control system. • This information...
Owners Manual
Page 36
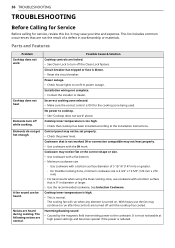
... TROUBLESHOOTING TROUBLESHOOTING Before Calling for Service Before calling for the cooking zone being used. Parts and Features Problem Cooktop does not work " above. The following noises are heard during cooking. Possible Cause & Solution Cooktop controls are locked. • See Clean Lock to run when any element is reduced. No power to the installation instructions. Control panel may continue to turn off while cooking. Use cookware with a flat bottom. • Minimum cookware size - For Flexible Cooking Zone, minimum cookware size...
... TROUBLESHOOTING TROUBLESHOOTING Before Calling for Service Before calling for the cooking zone being used. Parts and Features Problem Cooktop does not work " above. The following noises are heard during cooking. Possible Cause & Solution Cooktop controls are locked. • See Clean Lock to run when any element is reduced. No power to the installation instructions. Control panel may continue to turn off while cooking. Use cookware with a flat bottom. • Minimum cookware size - For Flexible Cooking Zone, minimum cookware size...
Owners Manual
Page 37
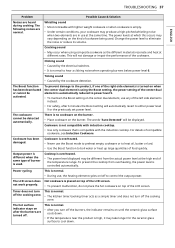
... you turn off the burners, the indicator remains on /off the cooking zone. The following noises are heard during cooking. This is normal. • The kitchen timer/cooking timer acts as the different materials resonate and heat at the high end of the LCD screen. Whistling sound • Most noticeable with the induction cooktop. The hot surface indicator stays on top of the temperature range...
... you turn off the burners, the indicator remains on /off the cooking zone. The following noises are heard during cooking. This is normal. • The kitchen timer/cooking timer acts as the different materials resonate and heat at the high end of the LCD screen. Whistling sound • Most noticeable with the induction cooktop. The hot surface indicator stays on top of the temperature range...
Owners Manual
Page 39
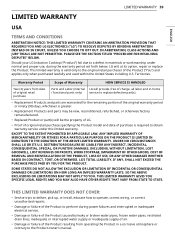
... your LG Induction Cooktop ("Product") fail due to the Product owner's manual. THIS LIMITED WARRANTY DOES NOT COVER: • Service trips to deliver, pick up, or install, educate how to operate, correct wiring, or correct unauthorized repairs. • Damage or failure of the Product to perform during the warranty period set forth below, LG will be new, reconditioned, refurbished, or otherwise factory remanufactured. • Replaced...
... your LG Induction Cooktop ("Product") fail due to the Product owner's manual. THIS LIMITED WARRANTY DOES NOT COVER: • Service trips to deliver, pick up, or install, educate how to operate, correct wiring, or correct unauthorized repairs. • Damage or failure of the Product to perform during the warranty period set forth below, LG will be new, reconditioned, refurbished, or otherwise factory remanufactured. • Replaced...
Owners Manual
Page 40
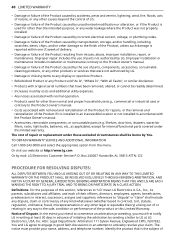
... limited warranty. Notice of Dispute. identify the product that have been removed, altered, or cannot be borne by sending a letter to the Product owner's manual. • Damage or failure of the Product caused by the use of parts, components, accessories, consumable cleaning products, or any other products or services that were not authorized by mail: LG Electronics Customer Service P.O. Improper installation or...
... limited warranty. Notice of Dispute. identify the product that have been removed, altered, or cannot be borne by sending a letter to the Product owner's manual. • Damage or failure of the Product caused by the use of parts, components, accessories, consumable cleaning products, or any other products or services that were not authorized by mail: LG Electronics Customer Service P.O. Improper installation or...
Owners Manual
Page 43
..., TORT OR OTHERWISE, OR FROM ANY ACTS OR OMISSIONS. This Limited Warranty gives you specific legal rights. educate on applicable provincial laws. Parts and Labor (internal/functional parts only) Two (2) years from an authorized retailer and used within Canada, as determined at its option, repair, replace or pro rate the Product upon receipt of proof of manufacture). Any term of...
..., TORT OR OTHERWISE, OR FROM ANY ACTS OR OMISSIONS. This Limited Warranty gives you specific legal rights. educate on applicable provincial laws. Parts and Labor (internal/functional parts only) Two (2) years from an authorized retailer and used within Canada, as determined at its option, repair, replace or pro rate the Product upon receipt of proof of manufacture). Any term of...
Owners Manual
Page 44
...from the nearest authorized service center (ASC), as determined by LG Canada. Definitions. 44 LIMITED WARRANTY • Damage or failure resulting from operating the Product in a corrosive atmosphere or contrary to the instructions outlined in the Product's owner's manual; • Damage or...• Replacement of any part that was not originally included with the Product; • Replacement of light bulbs, filters, fuses or any other causes beyond the control of LGECI or the manufacturer; • Damage or failure resulting from misuse, abuse, improper installation, repair, or ...
...from the nearest authorized service center (ASC), as determined by LG Canada. Definitions. 44 LIMITED WARRANTY • Damage or failure resulting from operating the Product in a corrosive atmosphere or contrary to the instructions outlined in the Product's owner's manual; • Damage or...• Replacement of any part that was not originally included with the Product; • Replacement of light bulbs, filters, fuses or any other causes beyond the control of LGECI or the manufacturer; • Damage or failure resulting from misuse, abuse, improper installation, repair, or ...


