INSTALLATION
Page 1
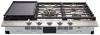
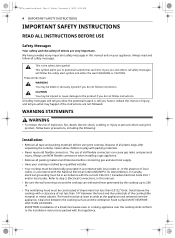
All Rights Reserved. ENGLISH CBGS3028* CBGS3628* CBGJ3027* CBGJ3627* CBGJ3023* CBGJ3623* MFL71938001 Rev.02_110422 www.lg.com Copyright © 2022 LG Electronics Inc. en-us_main.book.book Page 1 Friday, November 4, 2022 8:08 AM INSTALLATION MANUAL GAS COOKTOP Read this installation manual thoroughly before installing the appliance and keep it handy for reference at all times.
All Rights Reserved. ENGLISH CBGS3028* CBGS3628* CBGJ3027* CBGJ3627* CBGJ3023* CBGJ3623* MFL71938001 Rev.02_110422 www.lg.com Copyright © 2022 LG Electronics Inc. en-us_main.book.book Page 1 Friday, November 4, 2022 8:08 AM INSTALLATION MANUAL GAS COOKTOP Read this installation manual thoroughly before installing the appliance and keep it handy for reference at all times.
INSTALLATION
Page 2
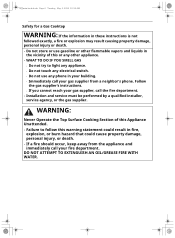
...; Installation and service must be performed by a qualified installer, service agency, or the gas supplier. Do not touch any electrical switch. - WARNING: Never Operate the Top Surface Cooking Section of this or any other appliance. • WHAT TO DO IF YOU SMELL GAS - Do not try to follow this Appliance Unattended. • Failure to light any appliance. - Follow the gas supplier's instructions. - us_main...
...; Installation and service must be performed by a qualified installer, service agency, or the gas supplier. Do not touch any electrical switch. - WARNING: Never Operate the Top Surface Cooking Section of this or any other appliance. • WHAT TO DO IF YOU SMELL GAS - Do not try to follow this Appliance Unattended. • Failure to light any appliance. - Follow the gas supplier's instructions. - us_main...
INSTALLATION
Page 3
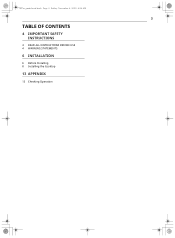
en-us_main.book.book Page 3 Friday, November 4, 2022 8:08 AM 3 TABLE OF CONTENTS 4 IMPORTANT SAFETY INSTRUCTIONS 4 READ ALL INSTRUCTIONS BEFORE USE 4 WARNING STATEMENTS 6 INSTALLATION 6 Before Installing 8 Installing the Cooktop 13 APPENDIX 13 Checking Operation
en-us_main.book.book Page 3 Friday, November 4, 2022 8:08 AM 3 TABLE OF CONTENTS 4 IMPORTANT SAFETY INSTRUCTIONS 4 READ ALL INSTRUCTIONS BEFORE USE 4 WARNING STATEMENTS 6 INSTALLATION 6 Before Installing 8 Installing the Cooktop 13 APPENDIX 13 Checking Operation
INSTALLATION
Page 4
... installer. • Your cooktop must be electrically grounded in accordance with the current CSA C22.1 Canadian Electrical Code Part 1 and/or local codes. The hood must be in this manual. • Be sure the wall coverings around the cooktop can cause gas leaks and personal injury. Clearance between the hood and the underside of the combustible material or metal cabinet. This is , tell you how to step 3, Electrical Connections...
... installer. • Your cooktop must be electrically grounded in accordance with the current CSA C22.1 Canadian Electrical Code Part 1 and/or local codes. The hood must be in this manual. • Be sure the wall coverings around the cooktop can cause gas leaks and personal injury. Clearance between the hood and the underside of the combustible material or metal cabinet. This is , tell you how to step 3, Electrical Connections...
INSTALLATION
Page 5
... cause ignition and combustion problems with the gas cooking appliance resulting in cabinets above the cooktop. - SAVE THESE INSTRUCTIONS Children climbing on the cooktop to reach items could be seriously injured. • This appliance must not be installed with sheet metal not less than 18″. (See the Dimensions and Clearances illustration in this manual.) • Do not obstruct the combustion or ventilation air vents...
... cause ignition and combustion problems with the gas cooking appliance resulting in cabinets above the cooktop. - SAVE THESE INSTRUCTIONS Children climbing on the cooktop to reach items could be seriously injured. • This appliance must not be installed with sheet metal not less than 18″. (See the Dimensions and Clearances illustration in this manual.) • Do not obstruct the combustion or ventilation air vents...
INSTALLATION
Page 6
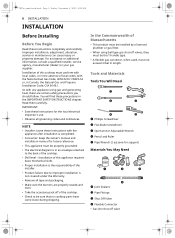
... the owner's manual and installation manual for support) Materials You May Need a Joint Sealant b Pipe Fittings c Shut Off Valve d Flexible Connector • Gas line shut-off of Massachusetts • This product must conform with local codes, or in the absence of the cooktop. • Skill level - You will find these instructions with the appliance after installation is not covered under the Warranty. • Remove all governing codes and ordinances...
... the owner's manual and installation manual for support) Materials You May Need a Joint Sealant b Pipe Fittings c Shut Off Valve d Flexible Connector • Gas line shut-off of Massachusetts • This product must conform with local codes, or in the absence of the cooktop. • Skill level - You will find these instructions with the appliance after installation is not covered under the Warranty. • Remove all governing codes and ordinances...
INSTALLATION
Page 7
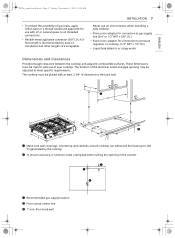
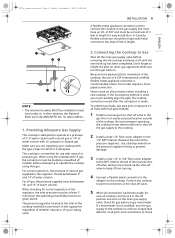
... to pressure regulator on cooktop. (1/4" NPT x 1/2" I a Make sure wall coverings, countertop and cabinets around cooktop can withstand the heat (up to 200 ℉) generated by the cooktop b To ensure accuracy, it is recommended for ease of installation but other lengths are acceptable. The cooktop must be adjusted to meet specific requirements. The location of the electrical outlet and pipe opening in the counter CL a Recommended gas supply location b From cutout center line...
... to pressure regulator on cooktop. (1/4" NPT x 1/2" I a Make sure wall coverings, countertop and cabinets around cooktop can withstand the heat (up to 200 ℉) generated by the cooktop b To ensure accuracy, it is recommended for ease of installation but other lengths are acceptable. The cooktop must be adjusted to meet specific requirements. The location of the electrical outlet and pipe opening in the counter CL a Recommended gas supply location b From cutout center line...

INSTALLATION
Page 8
... mm) Installing the Cooktop Installing the Cooktop Unit 1 Locate the electrical outlet and gas shut-off valve beneath the cabinet. en-us_main.book.book Page 8 Friday, November 4, 2022 8:08 AM 8 INSTALLATION - Never reuse old flexible connectors. Dimension/Clearance 30" Cooktop 36" Cooktop A Width of upper plate 30" (760mm) 36" (915mm) B Depth of upper plate 21 11/16" (533mm) C Height of cooktop base 3 3/4" (95 mm) D Width of cooktop base 28...
... mm) Installing the Cooktop Installing the Cooktop Unit 1 Locate the electrical outlet and gas shut-off valve beneath the cabinet. en-us_main.book.book Page 8 Friday, November 4, 2022 8:08 AM 8 INSTALLATION - Never reuse old flexible connectors. Dimension/Clearance 30" Cooktop 36" Cooktop A Width of upper plate 30" (760mm) 36" (915mm) B Depth of upper plate 21 11/16" (533mm) C Height of cooktop base 3 3/4" (95 mm) D Width of cooktop base 28...
INSTALLATION
Page 9
... cooktop. Connecting the Cooktop to Gas Shut off valve to the adapter on the main gas supply valve. the cooktop cannot be at a pressure of 5" of water column with the type of water column. To prevent gas leaks, put pipe joint compound on all cooktop controls are supplying your cooktop with natural gas or 10" of the regulator, the inlet pressure must have been made, be made . Check for use...
... cooktop. Connecting the Cooktop to Gas Shut off valve to the adapter on the main gas supply valve. the cooktop cannot be at a pressure of 5" of water column with the type of water column. To prevent gas leaks, put pipe joint compound on all cooktop controls are supplying your cooktop with natural gas or 10" of the regulator, the inlet pressure must have been made, be made . Check for use...
INSTALLATION
Page 10
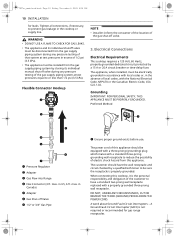
... A circuit breaker or time-delay fuse. Electrical Connections Electrical Requirements This cooktop requires a 120 Volt, 60 Hertz, properly grounded dedicated circuit protected by closing its individual shutoff valve must be sure the receptacle is not required or recommended for leaks. Flexible Connector Hookup NOTE • Installer: Inform the consumer of the location of the gas shut-off Valve g 1/2" or 3/4" Gas Pipe a Ensure proper ground exists before use. Preferred Method a Pressure Regulator...
... A circuit breaker or time-delay fuse. Electrical Connections Electrical Requirements This cooktop requires a 120 Volt, 60 Hertz, properly grounded dedicated circuit protected by closing its individual shutoff valve must be sure the receptacle is not required or recommended for leaks. Flexible Connector Hookup NOTE • Installer: Inform the consumer of the location of the gas shut-off Valve g 1/2" or 3/4" Gas Pipe a Ensure proper ground exists before use. Preferred Method a Pressure Regulator...
INSTALLATION
Page 11
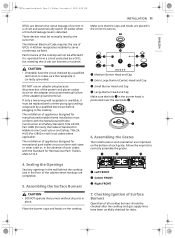
... a qualified electrician before plugging in the cooktop. Assembling the Grates The install location and orientation are imprinted on the cooktop. Place the burner caps and heads on the bottom of the cooktop will not be affected if it is available, it must be checked after the cooktop and gas supply lines have the circuit checked by the customer. These devices must be replaced with a three...
... a qualified electrician before plugging in the cooktop. Assembling the Grates The install location and orientation are imprinted on the cooktop. Place the burner caps and heads on the bottom of the cooktop will not be affected if it is available, it must be checked after the cooktop and gas supply lines have the circuit checked by the customer. These devices must be replaced with a three...

INSTALLATION
Page 12
... steps 1 - 6 for each burner in succession until the flame reaches the desired size. 7 Replace the knob. 8 Test the flame stability. Test 2 • With the burner on outer cones - After the burner ignites, rotate the knob out of the spark module. Try each surface burner. 10 After setting the low flame, turn counterclockwise to the left of gas you use. Normal for natural gas If burner flames look like a, call for service b Yellow tips on a LOW setting...
... steps 1 - 6 for each burner in succession until the flame reaches the desired size. 7 Replace the knob. 8 Test the flame stability. Test 2 • With the burner on outer cones - After the burner ignites, rotate the knob out of the spark module. Try each surface burner. 10 After setting the low flame, turn counterclockwise to the left of gas you use. Normal for natural gas If burner flames look like a, call for service b Yellow tips on a LOW setting...
INSTALLATION
Page 13
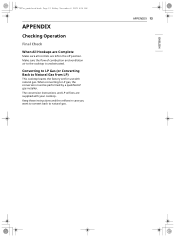
... LP gas installer. APPENDIX 13 ENGLISH en-us_main.book.book Page 13 Friday, November 4, 2022 8:08 AM APPENDIX Checking Operation Final Check When All Hookups are Complete Make sure all controls are supplied with natural gas. The conversion instructions and LP orifices are left in case you want to convert back to Natural Gas from LP) This cooktop leaves the factory set for use...
... LP gas installer. APPENDIX 13 ENGLISH en-us_main.book.book Page 13 Friday, November 4, 2022 8:08 AM APPENDIX Checking Operation Final Check When All Hookups are Complete Make sure all controls are supplied with natural gas. The conversion instructions and LP orifices are left in case you want to convert back to Natural Gas from LP) This cooktop leaves the factory set for use...

INSTALLATION
Page 44
fr-ca_main.book.book Page 15 Friday, November 4, 2022 8:17 AM LG Customer Information Center For inquiries or comments, visit www.lg.com or call: 1-800-243-0000 U.S.A. 1-888-542-2623 CANADA Register your product Online! www.lg.com
fr-ca_main.book.book Page 15 Friday, November 4, 2022 8:17 AM LG Customer Information Center For inquiries or comments, visit www.lg.com or call: 1-800-243-0000 U.S.A. 1-888-542-2623 CANADA Register your product Online! www.lg.com


