
Owners Manual
Page 1
Through-The-Wall Air Conditioning Models: BG-81A BG-101A BG-123A Important Information • Please read carefully and thoroughly this manual before operating this unit. • Contact a qualified sevice technician for installation, repair and maintenance of this unit. • The appliance is not intended for use by young children or those who require supervision. • Young children should be supervised to ensure that they do not play with the appliance. HEAT CONTROLLER, INC.
Through-The-Wall Air Conditioning Models: BG-81A BG-101A BG-123A Important Information • Please read carefully and thoroughly this manual before operating this unit. • Contact a qualified sevice technician for installation, repair and maintenance of this unit. • The appliance is not intended for use by young children or those who require supervision. • Young children should be supervised to ensure that they do not play with the appliance. HEAT CONTROLLER, INC.
Owners Manual
Page 2
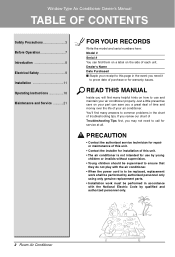
... problems in accordance with the air conditioner. • When the power cord is not intended for service at all. PRECAUTION • Contact the authorized service technician for repair or maintenance of this unit. • Contact the installer for installation of this page in the event you need to call for use and maintain your air conditioner properly. Window-Type Air Conditioner Owner's Manual TABLE OF CONTENTS Safety Precautions 3 Before Operation 7 Introduction 8 Electrical Safety 9 Installation 11 Operating Instructions...
... problems in accordance with the air conditioner. • When the power cord is not intended for service at all. PRECAUTION • Contact the authorized service technician for repair or maintenance of this unit. • Contact the installer for installation of this page in the event you need to call for use and maintain your air conditioner properly. Window-Type Air Conditioner Owner's Manual TABLE OF CONTENTS Safety Precautions 3 Before Operation 7 Introduction 8 Electrical Safety 9 Installation 11 Operating Instructions...
Owners Manual
Page 4
... of fire or electric shock. Use a soft cloth to clean. Do not open the suction inlet grill of appliance. Wax Thinner If water enters the product, turn off the main power switch when not using this appliance breaker firstly when together with other appliances. • It will cause electric shock or fire due to run into electric parts. • It will cause failure of injury. 4 Room Air Conditioner
... of fire or electric shock. Use a soft cloth to clean. Do not open the suction inlet grill of appliance. Wax Thinner If water enters the product, turn off the main power switch when not using this appliance breaker firstly when together with other appliances. • It will cause electric shock or fire due to run into electric parts. • It will cause failure of injury. 4 Room Air Conditioner

Owners Manual
Page 5
... cause electric shock. Owner's Manual 5 Hold the plug by inserting or pulling out the power plug. Never touch the metal parts of the unit when removing the filter. • They are sharp and may cause electric shock and damage. ENGLISH Safety Precautions Do not operate or stop the unit by the head when taking it may cause vibration or water leakage. When gas leaks, open the window for...
... cause electric shock. Owner's Manual 5 Hold the plug by inserting or pulling out the power plug. Never touch the metal parts of the unit when removing the filter. • They are sharp and may cause electric shock and damage. ENGLISH Safety Precautions Do not operate or stop the unit by the head when taking it may cause vibration or water leakage. When gas leaks, open the window for...
Owners Manual
Page 6
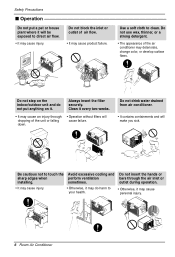
... Do not step on the indoor/outdoor unit and do harm to clean. Clean it every two weeks. • It may cause injury. Be cautious not to direct air flow. • It may cause an injury through the air inlet or installing. Do not use wax, thinner, or a ...strong detergent. • The appearance of air flow. • It may deteriorate, change color, or develop surface flaws. Always insert the filter securely. Do not drink water drained from air conditioner...
... Do not step on the indoor/outdoor unit and do harm to clean. Clean it every two weeks. • It may cause injury. Be cautious not to direct air flow. • It may cause an injury through the air inlet or installing. Do not use wax, thinner, or a ...strong detergent. • The appearance of air flow. • It may deteriorate, change color, or develop surface flaws. Always insert the filter securely. Do not drink water drained from air conditioner...

Owners Manual
Page 7
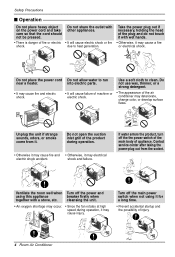
... metal parts of injury if the unit's power is damaged, replace it with stoves or other heating devices. 3. Exposure to water can occur when handling sharp metal edges. 2. Do not use water to clean inside the air conditioner. preserving precision devices, food, pets, plants, and art objects). Plug in the power plug properly. 3. Use a dedicated circuit. 4. Do not start/stop operation by plugging/unplugging the power cord. 6. Usage 1. Being exposed to direct airflow for Operation...
... metal parts of injury if the unit's power is damaged, replace it with stoves or other heating devices. 3. Exposure to water can occur when handling sharp metal edges. 2. Do not use water to clean inside the air conditioner. preserving precision devices, food, pets, plants, and art objects). Plug in the power plug properly. 3. Use a dedicated circuit. 4. Do not start/stop operation by plugging/unplugging the power cord. 6. Usage 1. Being exposed to direct airflow for Operation...
Owners Manual
Page 8
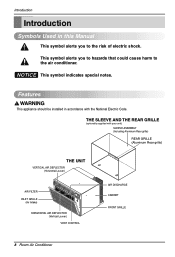
... electric shock. NOTICE This symbol indicates special notes. THE SLEEVE AND THE REAR GRILLE (optionally supplied with the National Electric Code. This symbol alerts you to the air conditioner. Introduction Introduction Symbols Used in accordance with your unit) SLEEVE ASSEMBLY (Including Aluminum Rear grille) REAR GRILLE (Aluminum Rear grille) THE UNIT VERTICAL AIR DEFLECTOR (Horizontal Louver) AIR FILTER INLET GRILLE (Air Intake) HORIZONTAL AIR DEFLECTOR (Vertical Louver) VENT CONTROL AIR DISCHARGE CABINET FRONT GRILLE 8 Room Air Conditioner...
... electric shock. NOTICE This symbol indicates special notes. THE SLEEVE AND THE REAR GRILLE (optionally supplied with the National Electric Code. This symbol alerts you to the air conditioner. Introduction Introduction Symbols Used in accordance with your unit) SLEEVE ASSEMBLY (Including Aluminum Rear grille) REAR GRILLE (Aluminum Rear grille) THE UNIT VERTICAL AIR DEFLECTOR (Horizontal Louver) AIR FILTER INLET GRILLE (Air Intake) HORIZONTAL AIR DEFLECTOR (Vertical Louver) VENT CONTROL AIR DISCHARGE CABINET FRONT GRILLE 8 Room Air Conditioner...

Owners Manual
Page 9
... model. Owner's Manual 9 If the TEST button does not trip or if the RESET button will not stay engaged, discontinue use . Wash hands after handling. Aluminum house wiring may include a current interrupter device. Avoid shock hazard, this product in accordance with local electrical codes and regulations. time delay fuse or 15 AMP. Standard 250V, 3-wire grounding receptacle rated 20A, 250V AC Use 20 AMP. circuit breaker. Periodically examine the cord...
... model. Owner's Manual 9 If the TEST button does not trip or if the RESET button will not stay engaged, discontinue use . Wash hands after handling. Aluminum house wiring may include a current interrupter device. Avoid shock hazard, this product in accordance with local electrical codes and regulations. time delay fuse or 15 AMP. Standard 250V, 3-wire grounding receptacle rated 20A, 250V AC Use 20 AMP. circuit breaker. Periodically examine the cord...

Owners Manual
Page 10
.... A. However, if you wish to use a CSA certified/UL-listed 3-wire (grounding) extension cord, rated at 15A, 125V. 10 Room Air Conditioner Use this appliance is grounded through the house wiring. Unplugging the power cord frequently can lead to minimize the hazard of the ground terminal. The wall power outlet should be aligned with a broken adapter plug. The customer should have the circuit checked by a three-slot (grounding...
.... A. However, if you wish to use a CSA certified/UL-listed 3-wire (grounding) extension cord, rated at 15A, 125V. 10 Room Air Conditioner Use this appliance is grounded through the house wiring. Unplugging the power cord frequently can lead to minimize the hazard of the ground terminal. The wall power outlet should be aligned with a broken adapter plug. The customer should have the circuit checked by a three-slot (grounding...

Owners Manual
Page 11
...). Do not change plug in good structural condition and have a rear grille to securely attach the new air conditioner. (FIG. 1) With the HCI sleeve(optionally supplied with a 3-prong service plug to make the necessary corrections. All models are needed to achieve the best performance. Install the new air conditioner according to these installation instructions to move and install the unit. If your present wall outlet does not match your available electrical service. REQUIRED...
...). Do not change plug in good structural condition and have a rear grille to securely attach the new air conditioner. (FIG. 1) With the HCI sleeve(optionally supplied with a 3-prong service plug to make the necessary corrections. All models are needed to achieve the best performance. Install the new air conditioner according to these installation instructions to move and install the unit. If your present wall outlet does not match your available electrical service. REQUIRED...

Owners Manual
Page 12
....) 4 Wall sleeve must be needed . ITEMS IN INSTALLATION HARDWARE You may not need all parts in sound structural condition and have a rear grille that securely attaches to sleeve, or rear flange that service will allow the conditioned air to blow into the area you plan to mount the new Air Conditioner must be in the kit. The use procedure B or C below. Brand White-Westinghouse Frigidaire Carrier (52F series) General Electric...
....) 4 Wall sleeve must be needed . ITEMS IN INSTALLATION HARDWARE You may not need all parts in sound structural condition and have a rear grille that securely attaches to sleeve, or rear flange that service will allow the conditioned air to blow into the area you plan to mount the new Air Conditioner must be in the kit. The use procedure B or C below. Brand White-Westinghouse Frigidaire Carrier (52F series) General Electric...

Owners Manual
Page 13
... techniques when moving unit. • When handling the air conditioner, be sure the circuit interrupter has not been tripped. Indoor Outdoor Around Insulation Vertical Insulation • Air conditioners covered in the installation kit. Two or more people are using the new sleeve (optionally supplied with sleeve as shown below . ENGLISH PROCEDURE A 1 If you need plastic nuts to mount plastic grille to the inside of the wall sleeve, there are installed from the...
... techniques when moving unit. • When handling the air conditioner, be sure the circuit interrupter has not been tripped. Indoor Outdoor Around Insulation Vertical Insulation • Air conditioners covered in the installation kit. Two or more people are using the new sleeve (optionally supplied with sleeve as shown below . ENGLISH PROCEDURE A 1 If you need plastic nuts to mount plastic grille to the inside of the wall sleeve, there are installed from the...
Owners Manual
Page 14
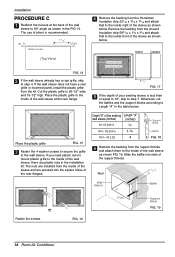
... louvered panel, install the plastic grille from the inside front of the rear flanges. or Fasten the screws FIG. 10 14 Room Air Conditioner The nuts are pressed into the square holes of the sleeve as shown in the installation kit. Place the plastic grille to the inside of pliers is less than or equal to 18", skip to step 7. The use of the sleeve...
... louvered panel, install the plastic grille from the inside front of the rear flanges. or Fasten the screws FIG. 10 14 Room Air Conditioner The nuts are pressed into the square holes of the sleeve as shown in the installation kit. Place the plastic grille to the inside of pliers is less than or equal to 18", skip to step 7. The use of the sleeve...

Owners Manual
Page 15
... or more people are needed to the Troubleshooting guide for reset procedure. To prevent injury or strain, use proper lifting and carrying techniques when moving unit. • When handling the air conditioner, be sure the circuit interrupter has not been tripped. Wall Wall Sleeve (7 3/32") Baffle Front Support Block FIG. 13 7 Install the new unit into slots of the wall sleeve as described in this manual pose an excessive...
... or more people are needed to the Troubleshooting guide for reset procedure. To prevent injury or strain, use proper lifting and carrying techniques when moving unit. • When handling the air conditioner, be sure the circuit interrupter has not been tripped. Wall Wall Sleeve (7 3/32") Baffle Front Support Block FIG. 13 7 Install the new unit into slots of the wall sleeve as described in this manual pose an excessive...
Owners Manual
Page 16
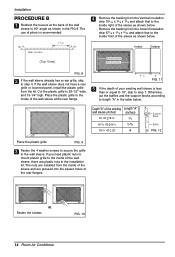
... 6 Remove the backing from the support blocks and attach them to the inside of the wall sleeve as shown in the installation kit. If the wall sleeve does not have a rear grille or louvered panel, install the plastic grille from the inside of the sleeve and are plastic nuts in the FIG 14. If you need plastic nuts to mount plastic grille to step 7. Around Insulation Horizontal Insulation Indoor Outdoor...
... 6 Remove the backing from the support blocks and attach them to the inside of the wall sleeve as shown in the installation kit. If the wall sleeve does not have a rear grille or louvered panel, install the plastic grille from the inside of the sleeve and are plastic nuts in the FIG 14. If you need plastic nuts to mount plastic grille to step 7. Around Insulation Horizontal Insulation Indoor Outdoor...

Owners Manual
Page 17
... new unit into the wall sleeve 9 Assemble trim as shown below in this manual pose an excessive weight hazard. Installation Owner's Manual 17 Refer to move and install the unit. Two or more people are needed to the Troubleshooting guide for unit draining, remove the backing from sharp metal fins on front and rear coils. • Make sure air conditioner does not fall during removal. • If unit does not operate after installation...
... new unit into the wall sleeve 9 Assemble trim as shown below in this manual pose an excessive weight hazard. Installation Owner's Manual 17 Refer to move and install the unit. Two or more people are needed to the Troubleshooting guide for unit draining, remove the backing from sharp metal fins on front and rear coils. • Make sure air conditioner does not fall during removal. • If unit does not operate after installation...

Owners Manual
Page 18
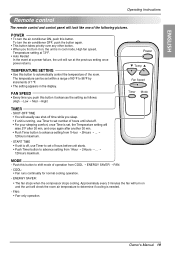
.... The temperature can be set number of hours before unit starts. • Push Timer button to advance setting from COOL ¡ ENERGY SAVER ¡ FAN. - ENERGY SAVER: • The fan stops when the compressor stops cooling. FAN: • Fan-only operation. AUTO RESTART When power is needed. - MODE - FAN SPEED • Every time you first turn the air conditioner OFF, push the button again. • This button takes priority over any other button. • When you push this button. TIMER - Operating Instructions Operating Instructions Controls The controls will...
.... The temperature can be set number of hours before unit starts. • Push Timer button to advance setting from COOL ¡ ENERGY SAVER ¡ FAN. - ENERGY SAVER: • The fan stops when the compressor stops cooling. FAN: • Fan-only operation. AUTO RESTART When power is needed. - MODE - FAN SPEED • Every time you first turn the air conditioner OFF, push the button again. • This button takes priority over any other button. • When you push this button. TIMER - Operating Instructions Operating Instructions Controls The controls will...
Owners Manual
Page 19
... usually use shut-off , use Timer to set within a range of 60°F to 86°F by increments of the room. Owner's Manual 19 TEMPERATURE SETTING • Use this button. MODE - ENERGY SAVER: • The fan stops when the compressor stops cooling. ENGLISH Operating Instructions Remote control The remote control and control panel will look like one of hours before unit starts. • Push Timer button to advance setting from 1Hour ¡ 2Hours ¡ ... ¡ 12Hours maximum. POWER • To turn on , the unit is...
... usually use shut-off , use Timer to set within a range of 60°F to 86°F by increments of the room. Owner's Manual 19 TEMPERATURE SETTING • Use this button. MODE - ENERGY SAVER: • The fan stops when the compressor stops cooling. ENGLISH Operating Instructions Remote control The remote control and control panel will look like one of hours before unit starts. • Push Timer button to advance setting from 1Hour ¡ 2Hours ¡ ... ¡ 12Hours maximum. POWER • To turn on , the unit is...

Owners Manual
Page 21
... your salesperson, dealer, and the authorized customer service centers. 1. Tighten the screw through the front grille into the cabinet. 3. ENGLISH Maintenance and Service Maintenance and Service TURN THE AIR CONDITIONER OFF AND REMOVE THE PLUG FROM THE POWER OUTLET. Owner's Manual 21 Replace the filter. Remove the air filter from the cabinet top. 2. Open the inlet grille. 4. How to Attach Front Grille to Cabinet The front grille can be checked at least twice a month...
... your salesperson, dealer, and the authorized customer service centers. 1. Tighten the screw through the front grille into the cabinet. 3. ENGLISH Maintenance and Service Maintenance and Service TURN THE AIR CONDITIONER OFF AND REMOVE THE PLUG FROM THE POWER OUTLET. Owner's Manual 21 Replace the filter. Remove the air filter from the cabinet top. 2. Open the inlet grille. 4. How to Attach Front Grille to Cabinet The front grille can be checked at least twice a month...
Owners Manual
Page 22
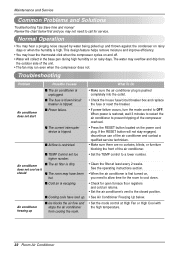
... you need to a lower number. Troubleshooting Problem Possible Causes What To Do I TEMP Control set too higher number. • Set the TEMP control to call for service. When power is first turned on the power cord plug. If the RESET button will collect in the base pan during high humidity or on rainy days. I The room may overflow and drip from cooling the room. • Set the mode control at least every 2 weeks. Air conditioner freezing up I Cold air...
... you need to a lower number. Troubleshooting Problem Possible Causes What To Do I TEMP Control set too higher number. • Set the TEMP control to call for service. When power is first turned on the power cord plug. If the RESET button will collect in the base pan during high humidity or on rainy days. I The room may overflow and drip from cooling the room. • Set the mode control at least every 2 weeks. Air conditioner freezing up I Cold air...


