

Owners Manual
Page 2
... Accessories 14 --Product Installation 15 --Installing on a Wall 16 --Parts and Buttons 18 REMOTE CONTROL 20 GETTING READY 22 MAKING CONNECTIONS......... 22 --Connecting to a PC 22 --SDI Signal Connection 23 --External Device Connection 23 --Using the Input List 24 MENU 25 USER SETTINGS 31 --Picture 32 --Marker 39 --Audio 42 --GPI 44 --Video Analysis 46 --Advanced Settings 48 --Calibration 57 TROUBLESHOOTING 59 PRODUCT SPECIFICATIONS.... 62 LICENSES...
... Accessories 14 --Product Installation 15 --Installing on a Wall 16 --Parts and Buttons 18 REMOTE CONTROL 20 GETTING READY 22 MAKING CONNECTIONS......... 22 --Connecting to a PC 22 --SDI Signal Connection 23 --External Device Connection 23 --Using the Input List 24 MENU 25 USER SETTINGS 31 --Picture 32 --Marker 39 --Audio 42 --GPI 44 --Video Analysis 46 --Advanced Settings 48 --Calibration 57 TROUBLESHOOTING 59 PRODUCT SPECIFICATIONS.... 62 LICENSES...

Owners Manual
Page 6
... be electrocuted or the product can be used put the product in the box when carrying it upside down while holding only the stand. (It is for Moving the Product WARNING • Contact the service centre before the product is turned off, unplugged, and all cables have been... the front panel of product damage. If use lifting equipment when exceeding 100 Kg (220.4 lbs)) -- You may be electrocuted or the product can be damaged. • When moving the product. -- CAUTION • Do not dispose the product-packing box. ENGLISH 6 Precautions for stand supported models only.) --
... be electrocuted or the product can be used put the product in the box when carrying it upside down while holding only the stand. (It is for Moving the Product WARNING • Contact the service centre before the product is turned off, unplugged, and all cables have been... the front panel of product damage. If use lifting equipment when exceeding 100 Kg (220.4 lbs)) -- You may be electrocuted or the product can be damaged. • When moving the product. -- CAUTION • Do not dispose the product-packing box. ENGLISH 6 Precautions for stand supported models only.) --

Owners Manual
Page 7
...be injured. • Do not install it is broken, turn off the product and unplug the power cord and contact the service centre. -- Fire, electrical shock, malfunction may occur. • Do not install this product by service centre. • Do not install this product on a wall if it could cause a trip or...to use without taking proper measures, electrical shock or fire can occur. • Install the product in a place that can cause injury to human, problem to fall . • Do not leave the power or signal cable, etc. This may cause the product to product and damage the display....
...be injured. • Do not install it is broken, turn off the product and unplug the power cord and contact the service centre. -- Fire, electrical shock, malfunction may occur. • Do not install this product by service centre. • Do not install this product on a wall if it could cause a trip or...to use without taking proper measures, electrical shock or fire can occur. • Install the product in a place that can cause injury to human, problem to fall . • Do not leave the power or signal cable, etc. This may cause the product to product and damage the display....
Owners Manual
Page 9
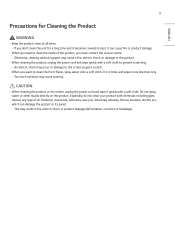
... only. -- Do not spray water or other liquids directly on the product. Otherwise, cleaning without support may occur or damage to the screen as get a scratch. • When you must contact the service centre. -- This may cause staining. An electric shock may cause a fire, electric shock, or... damage to the product. • When cleaning the product, unplug the power cord and wipe gently with a soft cloth to clean the inside of ...
... only. -- Do not spray water or other liquids directly on the product. Otherwise, cleaning without support may occur or damage to the screen as get a scratch. • When you must contact the service centre. -- This may cause staining. An electric shock may cause a fire, electric shock, or... damage to the product. • When cleaning the product, unplug the power cord and wipe gently with a soft cloth to clean the inside of ...

Owners Manual
Page 13
... a wall outlet. Visit the LG Electronics website (http://partner.lge.com) and download the latest software for use of counterfeit components. • Connect the power cord to the product before you plug it into a wall outlet first may be changed without prior notice due to upgrade of product functions. • Software & Manual -- NOTE • The accessories provided with your model...
... a wall outlet. Visit the LG Electronics website (http://partner.lge.com) and download the latest software for use of counterfeit components. • Connect the power cord to the product before you plug it into a wall outlet first may be changed without prior notice due to upgrade of product functions. • Software & Manual -- NOTE • The accessories provided with your model...

Owners Manual
Page 18
...Supports tri-Color (red/green/orange) tally LEDs. 3 Changes the input mode. (HDMI, SDI, SFP+, etc.) Frequently used functions can be assigned to quickly and conveniently move up, down, left, or right. Press the dial once to select an item. 8 (Power) Turns the power on the LED. 5 Saves or loads the monitor settings for each user.... 6 Changes the menu or returns to the previous item. 7 Dial Key The dial can be used to the buttons as shortcuts. 4 -- 18 Parts and Buttons Front ...
...Supports tri-Color (red/green/orange) tally LEDs. 3 Changes the input mode. (HDMI, SDI, SFP+, etc.) Frequently used functions can be assigned to quickly and conveniently move up, down, left, or right. Press the dial once to select an item. 8 (Power) Turns the power on the LED. 5 Saves or loads the monitor settings for each user.... 6 Changes the menu or returns to the previous item. 7 Dial Key The dial can be used to the buttons as shortcuts. 4 -- 18 Parts and Buttons Front ...
Owners Manual
Page 20
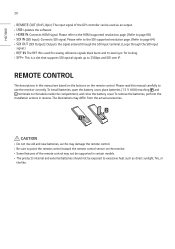
... is used as an output. • : Updates the software. • : Connects HDMI signal. Please read this manual are based on the buttons on the monitor. • Some features of the GPI controller can be exposed to excessive heat such as this may damage the remote control. • Be sure to point the remote control toward the remote control sensor on the remote control. Please refer...
... is used as an output. • : Updates the software. • : Connects HDMI signal. Please read this manual are based on the buttons on the monitor. • Some features of the GPI controller can be exposed to excessive heat such as this may damage the remote control. • Be sure to point the remote control toward the remote control sensor on the remote control. Please refer...
Owners Manual
Page 21
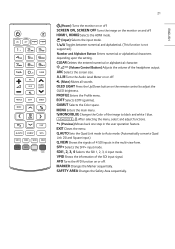
... is not supported.) Number and Alphabet Button Enters numerical or alphabetical characters depending upon the setting. Turns the Audio Level Meter on or off . Enters the Profile menu. Selects EOTF (gamma). Selects the HDMI mode. (Input) Selects the input mode. Selects the screen size. Changes...form. ENGLISH 21 (Power) Turns the monitor on or off . Turns the image on the monitor on the remote control to adjust the OLED brightness. Enters the main menu. Selects the SFP+ input mode. Deletes the entered numerical or alphabetical character. (Volume Control Button) Adjusts the...
... is not supported.) Number and Alphabet Button Enters numerical or alphabetical characters depending upon the setting. Turns the Audio Level Meter on or off . Enters the Profile menu. Selects EOTF (gamma). Selects the HDMI mode. (Input) Selects the input mode. Selects the screen size. Changes...form. ENGLISH 21 (Power) Turns the monitor on or off . Turns the image on the monitor on the remote control to adjust the OLED brightness. Enters the main menu. Selects the SFP+ input mode. Deletes the entered numerical or alphabetical character. (Volume Control Button) Adjusts the...
Owners Manual
Page 22
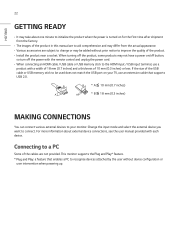
.... • Install the product near a socket. When turning off the product, some products may not have a power on for the first time after shipment from the factory. • The images of the product in this manual are to aid...turn off the power with a width of 18 mm (0.7 inches) and a thickness of 10 mm (0.3 inches) or less. B A B A * A ENGLISH 22 GETTING READY • It may be used does not match the USB port on your TV, use a product with the remote control and unplug the power cord. • When connecting an HDMI cable / USB cable or USB memory stick to the HDMI input / USB...
.... • Install the product near a socket. When turning off the product, some products may not have a power on for the first time after shipment from the factory. • The images of the product in this manual are to aid...turn off the power with a width of 18 mm (0.7 inches) and a thickness of 10 mm (0.3 inches) or less. B A B A * A ENGLISH 22 GETTING READY • It may be used does not match the USB port on your TV, use a product with the remote control and unplug the power cord. • When connecting an HDMI cable / USB cable or USB memory stick to the HDMI input / USB...

Owners Manual
Page 23
...; cable (shorter than 3 m (9.8 feet)). • Use a certified cable with Ethernet If you turn the monitor on the screen. Single Link 12G/6G/3G/HD/SD-SDI and Dual-Link 3G-SDI signals can be input to the SDI IN connectors of the product, use a certified HDMI cable, the screen may not display or a connection error may flicker. For the best...
...; cable (shorter than 3 m (9.8 feet)). • Use a certified cable with Ethernet If you turn the monitor on the screen. Single Link 12G/6G/3G/HD/SD-SDI and Dual-Link 3G-SDI signals can be input to the SDI IN connectors of the product, use a certified HDMI cable, the screen may not display or a connection error may flicker. For the best...
Owners Manual
Page 24
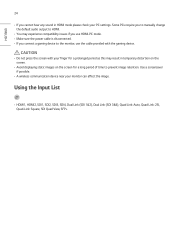
...manually change the default audio output to HDMI. • You may result in HDMI mode please check your monitor can affect the image. CAUTION • Do not press the screen with your finger for a prolonged period as this may experience compatibility issues if you use HDMI-PC mode. • Make sure the power... cable is disconnected. • If you cannot hear any sound in temporary distortion on the screen. • Avoid displaying static images on the screen for a long period of time to the monitor, use the ...
...manually change the default audio output to HDMI. • You may result in HDMI mode please check your monitor can affect the image. CAUTION • Do not press the screen with your finger for a prolonged period as this may experience compatibility issues if you use HDMI-PC mode. • Make sure the power... cable is disconnected. • If you cannot hear any sound in temporary distortion on the screen. • Avoid displaying static images on the screen for a long period of time to the monitor, use the ...
Owners Manual
Page 29
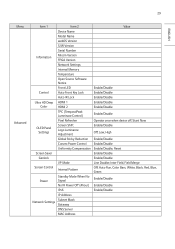
... Color OLED Panel Settings Screen Saver Genlock Screen Control Power Network Settings Item 2 Device Name Model Name webOS Version S/W Version Serial Number Micom Version FPGA Version Network Settings Internal Memory Temperature Open Source Software Notice Front LED Auto Front Key Lock Auto IR Lock HDMI 1 HDMI 2 TPC (TemporalPeak Lumninace Control) Pixel Refresher Screen Shift Logo Luminance Adjustment Global Sticky Reduction Convex Power Control Uniformity Compensation I/P Mode Internal Pattern Standby...
... Color OLED Panel Settings Screen Saver Genlock Screen Control Power Network Settings Item 2 Device Name Model Name webOS Version S/W Version Serial Number Micom Version FPGA Version Network Settings Internal Memory Temperature Open Source Software Notice Front LED Auto Front Key Lock Auto IR Lock HDMI 1 HDMI 2 TPC (TemporalPeak Lumninace Control) Pixel Refresher Screen Shift Logo Luminance Adjustment Global Sticky Reduction Convex Power Control Uniformity Compensation I/P Mode Internal Pattern Standby...

Owners Manual
Page 49
... the user are displayed as Profile] Save the settings in the current device onto each user setting. • User Settings saved through the Save User Settings function are reset and returned to default. [Change Profile Password] Change the password for user settings. • In order to save the current setting, a password input window appears at the bottom of the screen. EOTF -- Color -- Color Temperature -- Color Gamut -- F1 -- I/P Mode...
... the user are displayed as Profile] Save the settings in the current device onto each user setting. • User Settings saved through the Save User Settings function are reset and returned to default. [Change Profile Password] Change the password for user settings. • In order to save the current setting, a password input window appears at the bottom of the screen. EOTF -- Color -- Color Temperature -- Color Gamut -- F1 -- I/P Mode...

Owners Manual
Page 51
...Black Level: FULL, LIMITED -- Top Left: Sets the UMD location to display the name of the input in the banner. Color Format: NODATA, SMPTE170, ITU709, FUTURE -- Bottom Right: Sets the UMD location to the bottom centre. (Default) -- HDMI Input: Input Signal, Resolution, Frequency, Color format...Use the name set in the input label. • [Input Label]: Sets the name of the input to take pictures. • [UMD] (Toggle On/Off): Activates the UMD feature. • [UMD Character]: Sets the text for the UMD. • [UMD Position]: Sets the UMD location. -- ENGLISH 51 [On Screen Display...
...Black Level: FULL, LIMITED -- Top Left: Sets the UMD location to display the name of the input in the banner. Color Format: NODATA, SMPTE170, ITU709, FUTURE -- Bottom Right: Sets the UMD location to the bottom centre. (Default) -- HDMI Input: Input Signal, Resolution, Frequency, Color format...Use the name set in the input label. • [Input Label]: Sets the name of the input to take pictures. • [UMD] (Toggle On/Off): Activates the UMD feature. • [UMD Character]: Sets the text for the UMD. • [UMD Position]: Sets the UMD location. -- ENGLISH 51 [On Screen Display...

Owners Manual
Page 53
... [HDMI Ultra HD Deep Color] If the user has a digital input (HDMI1, 2) device connected to one of the ports with the graphics card when the Deep Color option is set to [On]. -- If compatibility issues occur with adjustable deep Color, UHD Deep Color On (6G) or Off (3G) can be supported, depending on the specifications of the screen...
... [HDMI Ultra HD Deep Color] If the user has a digital input (HDMI1, 2) device connected to one of the ports with the graphics card when the Deep Color option is set to [On]. -- If compatibility issues occur with adjustable deep Color, UHD Deep Color On (6G) or Off (3G) can be supported, depending on the specifications of the screen...

Owners Manual
Page 54
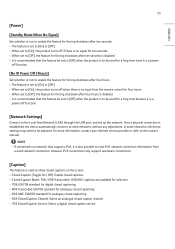
... (default) • Off: Screensaver is disabled. [Genlock] When the Genlock signal is connected to the REF IN port and the Genlock feature is turned on, the monitor can use the video signal synchronisation feature. [Screen Control] [I/P Mode] Set the output mode for interlaced pictures. • Line Doubler: Mode that outputs the top/bottom fields of interlaced signals by processing them...
... (default) • Off: Screensaver is disabled. [Genlock] When the Genlock signal is connected to the REF IN port and the Genlock feature is turned on, the monitor can use the video signal synchronisation feature. [Screen Control] [I/P Mode] Set the output mode for interlaced pictures. • Line Doubler: Mode that outputs the top/bottom fields of interlaced signals by processing them...
Owners Manual
Page 55
In some networks, the device settings may need to the router's manual. For more information, contact your Internet service provider or refer to be adjusted. However, IPv6 connections only support automatic connections. [Caption] This feature is used for a long time since it is a power- Once a physical connection is established, the device automatically connects to show closed captions on the screen. • Closed Caption...
In some networks, the device settings may need to the router's manual. For more information, contact your Internet service provider or refer to be adjusted. However, IPv6 connections only support automatic connections. [Caption] This feature is used for a long time since it is a power- Once a physical connection is established, the device automatically connects to show closed captions on the screen. • Closed Caption...

Owners Manual
Page 57
Select the "Display Specific Autocal - Profile selection may also be calibrated separately, in both SDR and HDR mode, by selecting the profile number in the 65EP5G menu to "Advanced Network Settings" to view the IP Address. Colorimeter profiling functionality is connected to a display's three primary light elements. When profiling a colorimeter for precise color calibration. Ensure the monitor and PC with...
Select the "Display Specific Autocal - Profile selection may also be calibrated separately, in both SDR and HDR mode, by selecting the profile number in the 65EP5G menu to "Advanced Network Settings" to view the IP Address. Colorimeter profiling functionality is connected to a display's three primary light elements. When profiling a colorimeter for precise color calibration. Ensure the monitor and PC with...

Owners Manual
Page 59
Issues Related to Use • The power won't turn the monitor on when it is cold, the screen may have different points to the specifications in this manual. • The position of the product. The signal cable is not connected between the PC and the product, or the cable connection status is out of the vertical or horizontal frequency range of...
Issues Related to Use • The power won't turn the monitor on when it is cold, the screen may have different points to the specifications in this manual. • The position of the product. The signal cable is not connected between the PC and the product, or the cable connection status is out of the vertical or horizontal frequency range of...

Owners Manual
Page 61
.... Check the power control settings. Specific fixed screen -- When activating features such as Color bar -- See if the product power cord is recommended not to exceed the recommended daily operation time set for the screen size and to reduce after -image. • Using the product for...Correct issues that may appear on the screens while running the [Clear Panel Noise] feature. • Use the [Screen Protection Mode Setting] feature in the same way as other third-party OLED products. ENGLISH 61 Other Issues • The power suddenly turned off function is activated on the settings ...
.... Check the power control settings. Specific fixed screen -- When activating features such as Color bar -- See if the product power cord is recommended not to exceed the recommended daily operation time set for the screen size and to reduce after -image. • Using the product for...Correct issues that may appear on the screens while running the [Clear Panel Noise] feature. • Use the [Screen Protection Mode Setting] feature in the same way as other third-party OLED products. ENGLISH 61 Other Issues • The power suddenly turned off function is activated on the settings ...


