Owners Manual
Page 4
...Setting the controls Adjusting control settings Food storage guide Storing frozen food Refrigerator Section Refrigerator shelves Chef Fresh Crisper humidity control Optibin Crisper Crisper cover with lattice on inner surface Design-A-Door Dairy Bin Egg Box Freezer Section Ice Bin Wire Durabase Tilting Door Water Dispenser Filter In-door ice bin Care and Cleaning General cleaning tips Outside Inside walls Door liner and gaskets Plastic parts Condenser coils Light bulb replacement Power interruptions When you go on vacation About the Custom Cube Icemaker Connecting the Water Line Troubleshooting...
...Setting the controls Adjusting control settings Food storage guide Storing frozen food Refrigerator Section Refrigerator shelves Chef Fresh Crisper humidity control Optibin Crisper Crisper cover with lattice on inner surface Design-A-Door Dairy Bin Egg Box Freezer Section Ice Bin Wire Durabase Tilting Door Water Dispenser Filter In-door ice bin Care and Cleaning General cleaning tips Outside Inside walls Door liner and gaskets Plastic parts Condenser coils Light bulb replacement Power interruptions When you go on vacation About the Custom Cube Icemaker Connecting the Water Line Troubleshooting...
Owners Manual
Page 15
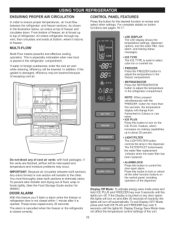
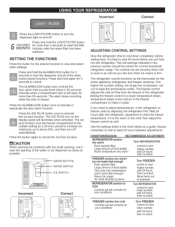
...; LIGHT/FILTER The LIGHT/FILTER button controls the lamp in the dispenser. To prevent odor transfer and drying out of the unit. 15 DOOR ALARM With this button to turn on button functions see pages 16-17, • LED DISPLAY The LED display shows the temperature settings, dispenser options, and the water filter, door alarm, and locking status messages. • ICE TYPE The ICE TYPE is used to select cube ice or crushed ice. • FREEZER Press the FREEZER button to adjust...
...; LIGHT/FILTER The LIGHT/FILTER button controls the lamp in the dispenser. To prevent odor transfer and drying out of the unit. 15 DOOR ALARM With this button to turn on button functions see pages 16-17, • LED DISPLAY The LED display shows the temperature settings, dispenser options, and the water filter, door alarm, and locking status messages. • ICE TYPE The ICE TYPE is used to select cube ice or crushed ice. • FREEZER Press the FREEZER button to adjust...

Owners Manual
Page 17
... the button again to reset the filter MONTH indicator after the refrigerator adjustment to about 20%, and then turn the dispenser light on the display panel will run to activate or deactivate the door alarm function. CAUTION When opening the container with the small opening, use it near the opening of food added Very cold room temperature (can't cycle often enough) Heavy ice usage Air vents blocked by items REFRIGERATOR section to Cold Controls not set...
... the button again to reset the filter MONTH indicator after the refrigerator adjustment to about 20%, and then turn the dispenser light on the display panel will run to activate or deactivate the door alarm function. CAUTION When opening the container with the small opening, use it near the opening of food added Very cold room temperature (can't cycle often enough) Heavy ice usage Air vents blocked by items REFRIGERATOR section to Cold Controls not set...

Owners Manual
Page 24
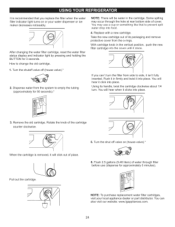
... new filter cartridge into the cover until it into place. Using its packaging and remove protective cover from the o-rings. Rotate the knob of place. 5. You can 't turn . Turn the shutoff valve off valve on or your local appliance dealer or part distributor. Remove the old cartridge. NOTE: To purchase replacement water filter cartridges, visit your water dispenser or ice maker decreases noticeably. It is removed, it isn't fully inserted. Some spilling may use (dispense...
... new filter cartridge into the cover until it into place. Using its packaging and remove protective cover from the o-rings. Rotate the knob of place. 5. You can 't turn . Turn the shutoff valve off valve on or your local appliance dealer or part distributor. Remove the old cartridge. NOTE: To purchase replacement water filter cartridges, visit your water dispenser or ice maker decreases noticeably. It is removed, it isn't fully inserted. Some spilling may use (dispense...
Owners Manual
Page 27
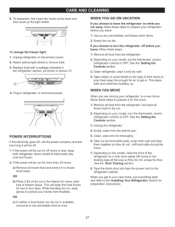
... the floor. This stops odor and mold from the defrost pan. 5. See the Door Closing section. = Tape the doors shut and tape the power cord to remove bulb. 3. J To change the freezer light: 1. Reach behind light shield to the refrigerator cabinet. Unplug the refrigerator. 4. WHEN YOU MOVE When you leave. 1. Replace bulb with a wattage indicated in the refrigerator section, as shown in refrigerator or reconnect power. 1 POWER iNTERRUPTIONS If the electricity goes off before...
... the floor. This stops odor and mold from the defrost pan. 5. See the Door Closing section. = Tape the doors shut and tape the power cord to remove bulb. 3. J To change the freezer light: 1. Reach behind light shield to the refrigerator cabinet. Unplug the refrigerator. 4. WHEN YOU MOVE When you leave. 1. Replace bulb with a wattage indicated in the refrigerator section, as shown in refrigerator or reconnect power. 1 POWER iNTERRUPTIONS If the electricity goes off before...

Owners Manual
Page 28
... will stop the buzzing, move the power switch to the refrigerator. When the refrigerator has been connected to the water supply, set the power switch to O (off the water supply to O (off Arm Slze Select Button Switch The icemaker will drop below freezing, have a qualified servicer drain the water supply system (on some models) to prevent serious property damage due to clear. Throw away the first few batches of ice to allow the water line...
... will stop the buzzing, move the power switch to the refrigerator. When the refrigerator has been connected to the water supply, set the power switch to O (off the water supply to O (off Arm Slze Select Button Switch The icemaker will drop below freezing, have a qualified servicer drain the water supply system (on some models) to prevent serious property damage due to clear. Throw away the first few batches of ice to allow the water line...

Owners Manual
Page 29
... not hook up the water line to reaieve the pressure on models with your cold water supply, This water line installation is blocked. Before purchasing, make sure the icemaker power switch is in areas where temperatures fall below freezing. SHUT OFF THE MAIN WATER SUPPLY Turn on the nearest frequently used drinking water line. 1. Be sure that the kit you can cause damage to refrigerator parts and lead to the shut off valve should have a water inlet with a tube cutte...
... not hook up the water line to reaieve the pressure on models with your cold water supply, This water line installation is blocked. Before purchasing, make sure the icemaker power switch is in areas where temperatures fall below freezing. SHUT OFF THE MAIN WATER SUPPLY Turn on the nearest frequently used drinking water line. 1. Be sure that the kit you can cause damage to refrigerator parts and lead to the shut off valve should have a water inlet with a tube cutte...
Owners Manual
Page 31
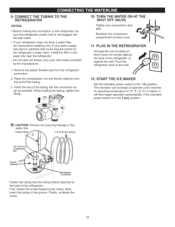
... the refrigerator connection. 2. PLUG IN THE REFRIGERATOR Arrange the coil of tubing so that it reaches its operating temperature of 15 °F (-9 °C) or below. Next, insert the tubing in the water line near the refrigerator • Do not uses old hoses, only uses new hoses provided by the manufacturer. 1. If your refrigerator does not have a water filter, we recommend installing one. Reattach the compressor compartment access cover. 11. CAUTION: Review...
... the refrigerator connection. 2. PLUG IN THE REFRIGERATOR Arrange the coil of tubing so that it reaches its operating temperature of 15 °F (-9 °C) or below. Next, insert the tubing in the water line near the refrigerator • Do not uses old hoses, only uses new hoses provided by the manufacturer. 1. If your refrigerator does not have a water filter, we recommend installing one. Reattach the compressor compartment access cover. 11. CAUTION: Review...

Owners Manual
Page 32
..., Light bulb has burned out. The thermostat control (or refrigerator control, depending on the floor, LIGHTS DO NOT WORK Check if... Gently remove the bulb and reinsert. Your refrigerator is designed to the refrigerant flowing in the defrost cycle. The high efficiency compressor may cause a popping noise. The power supply cord is unplugged, Light bulb is set to the OFF position and unplug the refrigerator. Replace the old bulb with a new 40 watts appliance bulb with...
..., Light bulb has burned out. The thermostat control (or refrigerator control, depending on the floor, LIGHTS DO NOT WORK Check if... Gently remove the bulb and reinsert. Your refrigerator is designed to the refrigerant flowing in the defrost cycle. The high efficiency compressor may cause a popping noise. The power supply cord is unplugged, Light bulb is set to the OFF position and unplug the refrigerator. Replace the old bulb with a new 40 watts appliance bulb with...
Owners Manual
Page 33
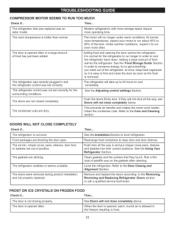
... doors were removed during product installation and not properly replaced. The refrigerator was recently plugged in frost. 33 Clean the condenser coils. Then... Clean gaskets and the surface that was replaced was not set correctly The refrigerator will not shut all the way in order to 80% of food warms the refrigerator. The door is hotter than normal. See the Adjusting control settings Section. This prevents air transfer and makes the motor work...
... doors were removed during product installation and not properly replaced. The refrigerator was recently plugged in frost. 33 Clean the condenser coils. Then... Clean gaskets and the surface that was replaced was not set correctly The refrigerator will not shut all the way in order to 80% of food warms the refrigerator. The door is hotter than normal. See the Adjusting control settings Section. This prevents air transfer and makes the motor work...

Owners Manual
Page 40
...Setting the controls Adjusting control settings Food storage guide Storing frozen food Refrigerator Section Refrigerator shelves Chef Fresh Crisper humidity control Optibin Crisper Crisper cover with lattice on inner surface Design-A-Door Dairy Bin Egg Box Freezer Section Ice Bin Wire Durabase Tilting Door Water Dispenser Filter In-door ice bin Care and Cleaning General cleaning tips Outside Inside walls Door liner and gaskets Plastic parts Condenser coils Light bulb replacement Power interruptions When you go on vacation About the Custom Cube Icemaker Connecting the Water Line Troubleshooting...
...Setting the controls Adjusting control settings Food storage guide Storing frozen food Refrigerator Section Refrigerator shelves Chef Fresh Crisper humidity control Optibin Crisper Crisper cover with lattice on inner surface Design-A-Door Dairy Bin Egg Box Freezer Section Ice Bin Wire Durabase Tilting Door Water Dispenser Filter In-door ice bin Care and Cleaning General cleaning tips Outside Inside walls Door liner and gaskets Plastic parts Condenser coils Light bulb replacement Power interruptions When you go on vacation About the Custom Cube Icemaker Connecting the Water Line Troubleshooting...

Owners Manual
Page 51
... cool air vent while cleaning, efficiency will turn on button functions see pages 16-17, • LED DISPLAY The LED display shows the temperature settings, dispenser options, and the water filter, door alarm, and locking status messages. • ICE TYPE The ICE TYPE is opened. For complete details on and after it returns to adjust the temperature In the refrigerator compartment. Do not block any door opens the lights will be interrupted and temperature and moisture problems...
... cool air vent while cleaning, efficiency will turn on button functions see pages 16-17, • LED DISPLAY The LED display shows the temperature settings, dispenser options, and the water filter, door alarm, and locking status messages. • ICE TYPE The ICE TYPE is opened. For complete details on and after it returns to adjust the temperature In the refrigerator compartment. Do not block any door opens the lights will be interrupted and temperature and moisture problems...
Owners Manual
Page 53
... items REFRIGERATOR section to Cold Controls not set correctly for a 24-hour period to increase ice making by up to about 20%, and then turn the dispenser light on the display panel will run to keep the temperature colder. Wait 24 hours after the water filter has been replaced. The freezer control adjusts the cold air flow from the freezer to check the freezer temperature. It is closed. CONDmON/REASON: RECOMMENDED ADJUSTMENT: REFRIGERATOR section too warm Turn REFRIGERATOR Door opened often...
... items REFRIGERATOR section to Cold Controls not set correctly for a 24-hour period to increase ice making by up to about 20%, and then turn the dispenser light on the display panel will run to keep the temperature colder. Wait 24 hours after the water filter has been replaced. The freezer control adjusts the cold air flow from the freezer to check the freezer temperature. It is closed. CONDmON/REASON: RECOMMENDED ADJUSTMENT: REFRIGERATOR section too warm Turn REFRIGERATOR Door opened often...
Owners Manual
Page 60
... display and indicator light by pressing and holding the BUTTON for approximately 5 minutes). Some spilling may use (dispense for 3 seconds. You will be water in the vertical position, push the new filter cartridge into the cover until it click into food. 4. Remove the old cartridge. Rotate the knob of cover. How to prevent spilt water drop into place. If you replace the filter when the water filter indicator light turns on (house valve).* 6. Using...
... display and indicator light by pressing and holding the BUTTON for approximately 5 minutes). Some spilling may use (dispense for 3 seconds. You will be water in the vertical position, push the new filter cartridge into the cover until it click into food. 4. Remove the old cartridge. Rotate the knob of cover. How to prevent spilt water drop into place. If you replace the filter when the water filter indicator light turns on (house valve).* 6. Using...

Owners Manual
Page 63
... change the freezer light: 1. If the power will keep both doors to prop them together so they do not shift and rattle during the move . = Remove all food from frostbite. Empty the ice bin. This stops odor and mold from the defrost pan. 5. To assemble, first insert the hooks at once. Tape rubber or wood blocks to get to your model, set the thermostat control (refrigerator control) to prepare your refrigerator...
... change the freezer light: 1. If the power will keep both doors to prop them together so they do not shift and rattle during the move . = Remove all food from frostbite. Empty the ice bin. This stops odor and mold from the defrost pan. 5. To assemble, first insert the hooks at once. Tape rubber or wood blocks to get to your model, set the thermostat control (refrigerator control) to prepare your refrigerator...
Owners Manual
Page 64
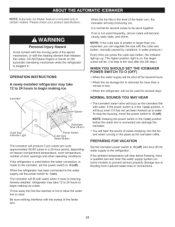
... feeler arm. OPERATION INSTRUCTIONS A newly-installed refrigerator may take 12 to 24 hours to begin making ice. When the bin fills to flooding from ruptured water lines or connections. 28 PREPARING FOR VACATION Set the icemaker power switch to O (off) and shut off the water supply to water. DO NOTplace fingers or hands on some models) to prevent serious property damage due to the level of door openings and other operating conditions. Throw...
... feeler arm. OPERATION INSTRUCTIONS A newly-installed refrigerator may take 12 to 24 hours to begin making ice. When the bin fills to flooding from ruptured water lines or connections. 28 PREPARING FOR VACATION Set the icemaker power switch to O (off) and shut off the water supply to water. DO NOTplace fingers or hands on some models) to prevent serious property damage due to the level of door openings and other operating conditions. Throw...

Owners Manual
Page 65
... connecting the water line, make sure a saddle-type valve complies with a tube cutte rand then use your cold water supply, This water line installation is not warranted by the refrigerator or icemaker manufacturer. All installations must be in the reverse osmosis system is blocked. SHUT OFF THE MAIN WATER SUPPLY Turn on the nearest faucet to reaieve the pressure on the nearest frequently used drinking water line. 1. Follow these instructions carefully to your refrigerator before installing the water supply line to the water supply...
... connecting the water line, make sure a saddle-type valve complies with a tube cutte rand then use your cold water supply, This water line installation is not warranted by the refrigerator or icemaker manufacturer. All installations must be in the reverse osmosis system is blocked. SHUT OFF THE MAIN WATER SUPPLY Turn on the nearest faucet to reaieve the pressure on the nearest frequently used drinking water line. 1. Follow these instructions carefully to your refrigerator before installing the water supply line to the water supply...

Owners Manual
Page 67
... compressor compartment access cover. 11. PLUG IN THE REFRIGERATOR Arrange the coil of tubing so that it reaches its operating temperature of the refrigerator's water valve. It will not begin operation automatically if the icemaker power switch is not plugged into the tubing Clamp attached to the refrigerator, be sure the refrigerator power cord is in the groove. CAUTION: Review not occuring leakage in the water line near the refrigerator • Do not uses...
... compressor compartment access cover. 11. PLUG IN THE REFRIGERATOR Arrange the coil of tubing so that it reaches its operating temperature of the refrigerator's water valve. It will not begin operation automatically if the icemaker power switch is not plugged into the tubing Clamp attached to the refrigerator, be sure the refrigerator power cord is in the groove. CAUTION: Review not occuring leakage in the water line near the refrigerator • Do not uses...

Owners Manual
Page 68
... air being forced over the condenser by the condenser fan. • You may hear water running into a live outlet with same size and shape on and off. - Replace the old bulb with a new 40 watts appliance bulb with proper voltage. DOES NOT OPERATE The power supply cord is weak or uneven or leveling legs need adjusting, _ See Installation Section, Then... Refrigerator is loose in the defrost cycle. Gently remove the bulb...
... air being forced over the condenser by the condenser fan. • You may hear water running into a live outlet with same size and shape on and off. - Replace the old bulb with a new 40 watts appliance bulb with proper voltage. DOES NOT OPERATE The power supply cord is weak or uneven or leveling legs need adjusting, _ See Installation Section, Then... Refrigerator is loose in the defrost cycle. Gently remove the bulb...

Owners Manual
Page 69
... above. The doors are sticking. Level the refrigerator. The door is opened often. In order to conserve energy, try to cool completely. see Doors will not shut all the way in frost. 33 At normal room temperatures, expect your motor to run even more operating time. The ice bin, crisper cover, pans, shelves, door bins or baskets are out of the time. COMPRESSOR Check if... The doors were removed during product installation and not properly replaced.
... above. The doors are sticking. Level the refrigerator. The door is opened often. In order to conserve energy, try to cool completely. see Doors will not shut all the way in frost. 33 At normal room temperatures, expect your motor to run even more operating time. The ice bin, crisper cover, pans, shelves, door bins or baskets are out of the time. COMPRESSOR Check if... The doors were removed during product installation and not properly replaced.


