Owners Manual
Page 1
OWNER'S MANUAL LG Digital Signage (MONITOR SIGNAGE) Please read the user manual before using this product to ensure safe and convenient use. 43UH7J 43UH5J 49UH7J 49UH5J 55UH7J 55UH5J 65UH7J 65UH5J www.lg.com Copyright © 2022 LG Electronics Inc. All Rights Reserved.
OWNER'S MANUAL LG Digital Signage (MONITOR SIGNAGE) Please read the user manual before using this product to ensure safe and convenient use. 43UH7J 43UH5J 49UH7J 49UH5J 55UH7J 55UH5J 65UH7J 65UH5J www.lg.com Copyright © 2022 LG Electronics Inc. All Rights Reserved.

Owners Manual
Page 5
Close the quick menu. Quick Menu Turns the power off. 5 Learning the Buttons The illustrations may differ depending on , press the button one time. 2 You can use the function when you control menu. 3 All running apps will close. ENGLISH Power On (Press) Quick Menu (Press 1) Menu Selection (Press 2) Power Off 3 (Press and Hold) Volume Control Menu Control 2 Menu Control 2 1 When the monitor is turned on the model. Accesses the main menu. Changes the input source.
Close the quick menu. Quick Menu Turns the power off. 5 Learning the Buttons The illustrations may differ depending on , press the button one time. 2 You can use the function when you control menu. 3 All running apps will close. ENGLISH Power On (Press) Quick Menu (Press 1) Menu Selection (Press 2) Power Off 3 (Press and Hold) Volume Control Menu Control 2 Menu Control 2 1 When the monitor is turned on the model. Accesses the main menu. Changes the input source.
Owners Manual
Page 7
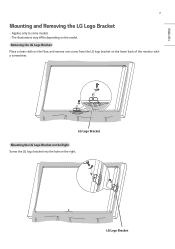
Removing the LG Logo Bracket Place a clean cloth on the floor, and remove one screw from the LG logo bracket on the model. The illustrations may differ depending on the lower back of the monitor with a screwdriver. LG Logo Bracket Mounting the LG Logo Bracket on the Right Screw the LG logo bracket into the hole on the right. LG Logo Bracket ENGLISH 7 Mounting and Removing the LG Logo Bracket -- Applies only to some models. --
Removing the LG Logo Bracket Place a clean cloth on the floor, and remove one screw from the LG logo bracket on the model. The illustrations may differ depending on the lower back of the monitor with a screwdriver. LG Logo Bracket Mounting the LG Logo Bracket on the Right Screw the LG logo bracket into the hole on the right. LG Logo Bracket ENGLISH 7 Mounting and Removing the LG Logo Bracket -- Applies only to some models. --
Owners Manual
Page 8
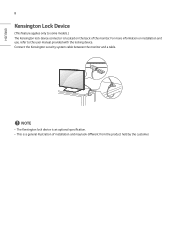
Connect the Kensington security system cable between the monitor and a table. ENGLISH 8 Kensington Lock Device (This feature applies only to the user manual provided with the locking device. For more information on the back of installation and may look different from the product held by the customer. NOTE •• The Kensington lock device is an optional specification. •• This is located on installation and use, refer to some models.) The Kensington lock device connector is a general illustration of the monitor.
Connect the Kensington security system cable between the monitor and a table. ENGLISH 8 Kensington Lock Device (This feature applies only to the user manual provided with the locking device. For more information on the back of installation and may look different from the product held by the customer. NOTE •• The Kensington lock device is an optional specification. •• This is located on installation and use, refer to some models.) The Kensington lock device connector is a general illustration of the monitor.
Owners Manual
Page 9
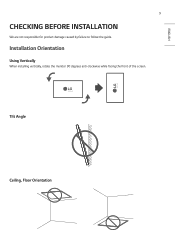
Tilt Angle Ceiling, Floor Orientation 15˚ 40 mm ENGLISH 9 CHECKING BEFORE INSTALLATION We are not responsible for product damage caused by failure to follow the guide. Installation Orientation Using Vertically When installing vertically, rotate the monitor 90 degrees anti-clockwise while facing the front of the screen.
Tilt Angle Ceiling, Floor Orientation 15˚ 40 mm ENGLISH 9 CHECKING BEFORE INSTALLATION We are not responsible for product damage caused by failure to follow the guide. Installation Orientation Using Vertically When installing vertically, rotate the monitor 90 degrees anti-clockwise while facing the front of the screen.
Owners Manual
Page 11
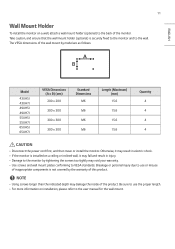
... mount by tightening the screws too tightly may void your warranty. •• Use screws and wall mount plates conforming to VESA standards. A B Model 43UH5J 43UH7J 49UH5J 49UH7J 55UH5J 55UH7J 65UH5J 65UH7J VESA Dimensions (A x B) (mm) 200 x 200 300 x 300 300 x 300 300 x 300 Standard Dimensions ... please refer to the user manual for the wall mount. Otherwise, it may damage the inside of inappropriate components is securely fixed to the monitor and to the back of this product. Breakage or personal injury due to use the proper length. •• For more information on...
... mount by tightening the screws too tightly may void your warranty. •• Use screws and wall mount plates conforming to VESA standards. A B Model 43UH5J 43UH7J 49UH5J 49UH7J 55UH5J 55UH7J 65UH5J 65UH7J VESA Dimensions (A x B) (mm) 200 x 200 300 x 300 300 x 300 300 x 300 Standard Dimensions ... please refer to the user manual for the wall mount. Otherwise, it may damage the inside of inappropriate components is securely fixed to the monitor and to the back of this product. Breakage or personal injury due to use the proper length. •• For more information on...