
Owners Manual
Page 6
... 9 Front Panel Information 10 Back Panel Information 11 Stand Instruction 12 VESA Wall Mounting 14 Cable Management 15 Desktop Pedestal Installation 16 Swivel Stand 16 Kensington Security System 16 Attaching the TV to a Desk 17 Securing the TV to the wall to prevent falling when the TV is used on ... 23 VCR Setup 25 Other A/V Source Setup 27 USB Connection 28 Audio out Connection 29 PC Setup 30 WATCHING TV / CHANNEL CONTROL Remote Control Functions 36 Turning On TV 38 Channel Selection 38 Volume Adjustment 38 Initial Setting 39 On-Screen Menus Selection 40 Quick Menu 41 ...
... 9 Front Panel Information 10 Back Panel Information 11 Stand Instruction 12 VESA Wall Mounting 14 Cable Management 15 Desktop Pedestal Installation 16 Swivel Stand 16 Kensington Security System 16 Attaching the TV to a Desk 17 Securing the TV to the wall to prevent falling when the TV is used on ... 23 VCR Setup 25 Other A/V Source Setup 27 USB Connection 28 Audio out Connection 29 PC Setup 30 WATCHING TV / CHANNEL CONTROL Remote Control Functions 36 Turning On TV 38 Channel Selection 38 Volume Adjustment 38 Initial Setting 39 On-Screen Menus Selection 40 Quick Menu 41 ...

Owners Manual
Page 9
...1 4 7 5 8 TIMER 0 INPUT 9 FLASHBK RETURN VOL CH OK CH VOL 2 3 6 BED1 BED2 1.5V 1.5V Owner's Manual CD Manual Installer Remote Control, User Remote Control, Batteries Batteries Power Cord (Except 47LH300C) x 4 Screws for stand assembly Screw for stand fixing (Refer to P.12) (Refer to P.17) Protection Cover... spots on the exterior only with ferrite cores to maintain standards compliance. 9 Option Extras D-sub 15 pin Cable When using the VGA (D-sub 15 pin cable) PC connection, the user must use shielded signal interface cables with the polishing cloth. * Do not ...
...1 4 7 5 8 TIMER 0 INPUT 9 FLASHBK RETURN VOL CH OK CH VOL 2 3 6 BED1 BED2 1.5V 1.5V Owner's Manual CD Manual Installer Remote Control, User Remote Control, Batteries Batteries Power Cord (Except 47LH300C) x 4 Screws for stand assembly Screw for stand fixing (Refer to P.12) (Refer to P.17) Protection Cover... spots on the exterior only with ferrite cores to maintain standards compliance. 9 Option Extras D-sub 15 pin Cable When using the VGA (D-sub 15 pin cable) PC connection, the user must use shielded signal interface cables with the polishing cloth. * Do not ...

Owners Manual
Page 10
..., 26LH210C INPUT Button POWER Button MENU Button ENTER Button VOLUME CHANNEL (-, +) Buttons (E,D) Buttons INPUT MENU ENTER VOL CH 32LH210C, 32/37/42LH200C, 42/47LH300C SPEAKER Remote Control Sensor, Power/Standby Indicator Illuminates red in the OPTION menu. Illuminates blue when the TV is switched on. (Can be adjusted using the Power...
..., 26LH210C INPUT Button POWER Button MENU Button ENTER Button VOLUME CHANNEL (-, +) Buttons (E,D) Buttons INPUT MENU ENTER VOL CH 32LH210C, 32/37/42LH200C, 42/47LH300C SPEAKER Remote Control Sensor, Power/Standby Indicator Illuminates red in the OPTION menu. Illuminates blue when the TV is switched on. (Can be adjusted using the Power...
Owners Manual
Page 11
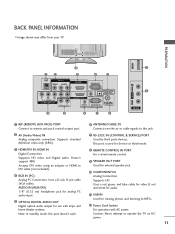
... remote control. 9 SPEAKER OUT PORT Used for external speaker jack. 10 COMPONENT IN Analog Connection. AUDIO IN (RGB/DVI) 1/8" (0.32 cm) headphone jack for analog PC audio input. 5 OPTICAL DIGITAL AUDIO OUT Digital optical audio output for Service or Hotel mode. 3 HDMI/DVI IN, HDMI IN... Digital Connection. Doesn't support 480i. Caution: Never attempt to DVI cable (not included). 4 RGB IN (PC) Analog PC Connection. Supports standard definition video only (480i). 7 RS-232C IN (CONTROL & SERVICE) PORT Used by third party devices. Uses a D-sub 15 pin cable (VGA...
... remote control. 9 SPEAKER OUT PORT Used for external speaker jack. 10 COMPONENT IN Analog Connection. AUDIO IN (RGB/DVI) 1/8" (0.32 cm) headphone jack for analog PC audio input. 5 OPTICAL DIGITAL AUDIO OUT Digital optical audio output for Service or Hotel mode. 3 HDMI/DVI IN, HDMI IN... Digital Connection. Doesn't support 480i. Caution: Never attempt to DVI cable (not included). 4 RGB IN (PC) Analog PC Connection. Supports standard definition video only (480i). 7 RS-232C IN (CONTROL & SERVICE) PORT Used by third party devices. Uses a D-sub 15 pin cable (VGA...
Owners Manual
Page 20
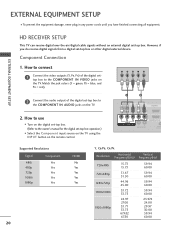
...receive digital signals from a digital set -top box. EXTERNAL EQUIPMENT SETUP I Select the Component input source on the TV using the INPUT button on the remote control. 1 2 RJP AV IN 1 VIDEO AUDIO 2 L(MONO) R 1 VIDEO COMPONENT IN L AUDIO R L R SPEAKER OUT /DVI IN REMO... CONTRO Supported Resolutions Signal Component 480i Yes 480p Yes 720p Yes 1080i Yes 1080p Yes HDMI No Yes Yes Yes Yes 20 Y, CB/PB, CR/PR Resolution Horizontal Vertical Frequency(KHz) Frequency(Hz) 720x480i 720x480p 1280x720p 1920x1080i 1920x1080p 15....
...receive digital signals from a digital set -top box. EXTERNAL EQUIPMENT SETUP I Select the Component input source on the TV using the INPUT button on the remote control. 1 2 RJP AV IN 1 VIDEO AUDIO 2 L(MONO) R 1 VIDEO COMPONENT IN L AUDIO R L R SPEAKER OUT /DVI IN REMO... CONTRO Supported Resolutions Signal Component 480i Yes 480p Yes 720p Yes 1080i Yes 1080p Yes HDMI No Yes Yes Yes Yes 20 Y, CB/PB, CR/PR Resolution Horizontal Vertical Frequency(KHz) Frequency(Hz) 720x480i 720x480p 1280x720p 1920x1080i 1920x1080p 15....
Owners Manual
Page 21
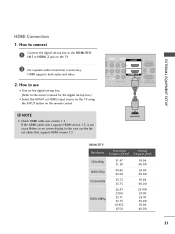
P AV IN 1 VIDEO AUDIO 2 L(MONO) R 1 DEO ONENT IN L AUDIO R L R SPEAKER OUT RGB IN (PC) AUDIO IN O /DVI IN (RGB/DVI) REMOTE RS-232C IN CONTROL IN (CONTROL&SERVICE) 1 HDMI OUTPUT HDMI-DTV Resolution Horizontal Vertical Frequency(KHz) Frequency(Hz) 720x480p 1280x720p 1920x1080i 1920x1080p 31.47 31.50 44.96 45.00 33.72 33...
P AV IN 1 VIDEO AUDIO 2 L(MONO) R 1 DEO ONENT IN L AUDIO R L R SPEAKER OUT RGB IN (PC) AUDIO IN O /DVI IN (RGB/DVI) REMOTE RS-232C IN CONTROL IN (CONTROL&SERVICE) 1 HDMI OUTPUT HDMI-DTV Resolution Horizontal Vertical Frequency(KHz) Frequency(Hz) 720x480p 1280x720p 1920x1080i 1920x1080p 31.47 31.50 44.96 45.00 33.72 33...
Owners Manual
Page 22
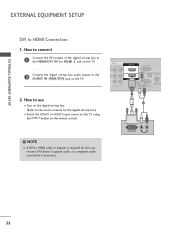
... the TV. 2. How to connect 1 Connect the DVI output of the digital set-top box to the HDMI/DVI IN 1or HDMI 2 jack on the TV. 2 Connect the digital set-top box audio output to HDMI cable or adapter is necessary. AV IN 1 O AUDIO 2 L(MONO) R 1 L AUDIO R L R SPEAKER OUT ...RGB IN (PC) AUDIO IN /DVI IN (RGB/DVI) OPTICAL DIGIT AUDIO OUT REMOTE RS-232C IN ACNATBELNENIAN CONTROL IN (CONTROL&SERVICE) 1 2 ! EXTERNAL...
... the TV. 2. How to connect 1 Connect the DVI output of the digital set-top box to the HDMI/DVI IN 1or HDMI 2 jack on the TV. 2 Connect the digital set-top box audio output to HDMI cable or adapter is necessary. AV IN 1 O AUDIO 2 L(MONO) R 1 L AUDIO R L R SPEAKER OUT ...RGB IN (PC) AUDIO IN /DVI IN (RGB/DVI) OPTICAL DIGIT AUDIO OUT REMOTE RS-232C IN ACNATBELNENIAN CONTROL IN (CONTROL&SERVICE) 1 2 ! EXTERNAL...

Owners Manual
Page 23
... player Y Y PB PR PB PR B-Y R-Y Cb Cr Pb Pr Y PB PR L R 1 2 RJP AV IN 1 VIDEO AUDIO 2 L(MONO) R 1 VIDEO COMPONENT IN L AUDIO R L R SPEAKER OUT /DVI IN REMOT CONTRO 23 Component Input ports To get better picture quality, connect a DVD player to the COMPONENT IN VIDEO jacks on the DVD player, insert a DVD... of the DVD to the component input ports as shown below. I Turn on the TV. Component ports on the TV Y Y Video output ports Y on the remote control.
... player Y Y PB PR PB PR B-Y R-Y Cb Cr Pb Pr Y PB PR L R 1 2 RJP AV IN 1 VIDEO AUDIO 2 L(MONO) R 1 VIDEO COMPONENT IN L AUDIO R L R SPEAKER OUT /DVI IN REMOT CONTRO 23 Component Input ports To get better picture quality, connect a DVD player to the COMPONENT IN VIDEO jacks on the DVD player, insert a DVD... of the DVD to the component input ports as shown below. I Turn on the TV. Component ports on the TV Y Y Video output ports Y on the remote control.
Owners Manual
Page 24
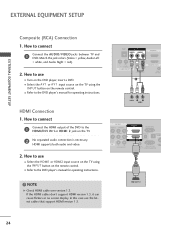
..., and Audio Right = red). 2. I Select the A V 1 or A V 1 input source on the TV using the INPUT button on the remote control. HDMI supports both audio and video. 2. How to use the latest cables that support HDMI version 1.3. EXTERNAL EQUIPMENT SETUP EXTERNAL EQUIPMENT SETUP Composite (RCA) Connection 1. How to use I Turn on the TV. 2 No...
..., and Audio Right = red). 2. I Select the A V 1 or A V 1 input source on the TV using the INPUT button on the remote control. HDMI supports both audio and video. 2. How to use the latest cables that support HDMI version 1.3. EXTERNAL EQUIPMENT SETUP EXTERNAL EQUIPMENT SETUP Composite (RCA) Connection 1. How to use I Turn on the TV. 2 No...
Owners Manual
Page 26
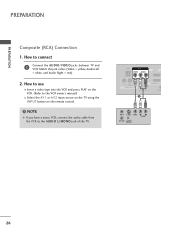
... Left = white, and Audio Right = red). 2. PREPARATION PREPARATION Composite (RCA) Connection 1. How to use I Insert a video tape into the VCR and press PLAY on the remote control. ! How to connect 1 Connect the AUDIO/VIDEO jacks between TV and VCR.
... Left = white, and Audio Right = red). 2. PREPARATION PREPARATION Composite (RCA) Connection 1. How to use I Insert a video tape into the VCR and press PLAY on the remote control. ! How to connect 1 Connect the AUDIO/VIDEO jacks between TV and VCR.
Owners Manual
Page 27
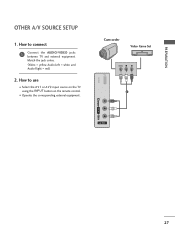
I Select the A V 1 or A V 2 input source on the TV using the INPUT button on the remote control. USB IN Camcorder Video Game Set VIDEO L R 1 VIDEO L/MONO AUDIO R AV IN 2 27 Match the jack colors. (Video = yellow, Audio Left = white, and Audio Right = red) 2. How to connect 1 Connect the AUDIO/VIDEO jacks between TV and external equipment. PREPARATION OTHER A/V SOURCE SETUP 1. How to use I Operate the corresponding external equipment.
I Select the A V 1 or A V 2 input source on the TV using the INPUT button on the remote control. USB IN Camcorder Video Game Set VIDEO L R 1 VIDEO L/MONO AUDIO R AV IN 2 27 Match the jack colors. (Video = yellow, Audio Left = white, and Audio Right = red) 2. How to connect 1 Connect the AUDIO/VIDEO jacks between TV and external equipment. PREPARATION OTHER A/V SOURCE SETUP 1. How to use I Operate the corresponding external equipment.
Owners Manual
Page 29
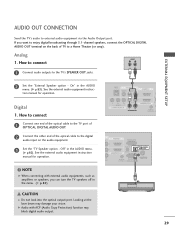
.... (G p.82) 1 RJP AV IN 1 VIDEO AUDIO 2 L(MONO) R 1 VIDEO COMPONENT IN L AUDIO R L R SPEAKER OUT AU (RG /DVI IN REMOTE CONTROL IN (C O 2 R 1 R R OUT RGB IN (PC) AUDIO IN OPTICAL DIGITAL AUDIO OUT /DVI IN (RGB/DVI) 1 REMOTE ANTENNA/ RS-232C IN CABLE IN CONTROL IN (CONTROL&SERVICE) 2 CAUTION G Do not look into the optical...
.... (G p.82) 1 RJP AV IN 1 VIDEO AUDIO 2 L(MONO) R 1 VIDEO COMPONENT IN L AUDIO R L R SPEAKER OUT AU (RG /DVI IN REMOTE CONTROL IN (C O 2 R 1 R R OUT RGB IN (PC) AUDIO IN OPTICAL DIGITAL AUDIO OUT /DVI IN (RGB/DVI) 1 REMOTE ANTENNA/ RS-232C IN CABLE IN CONTROL IN (CONTROL&SERVICE) 2 CAUTION G Do not look into the optical...

Owners Manual
Page 30
...the TV. 2 R 1 R R UT RGB IN (PC) AUDIO IN /DVI IN (RGB/DVI) OPTICAL DIGITAL AUDIO OUT REMOTE RS-232C IN ANTENNA/ CABLE IN CONTROL IN (CONTROL&SERVICE) 2. NOTE G Check HDMI cable over version 1.3. VGA (D-Sub 15 pin) Connection 1. In this case use the latest cables that the PC adjusts automatically to the... or HDMI2 input source on the TV using the INPUT button on the remote control. 2 1 DVI to the AUDIO IN (RGB/DVI) jack on the remote control. ! How to connect 1 Connect the VGA output of the PC to the HDMI/DVI I Select the RGB-PC input source on the TV using the...
...the TV. 2 R 1 R R UT RGB IN (PC) AUDIO IN /DVI IN (RGB/DVI) OPTICAL DIGITAL AUDIO OUT REMOTE RS-232C IN ANTENNA/ CABLE IN CONTROL IN (CONTROL&SERVICE) 2. NOTE G Check HDMI cable over version 1.3. VGA (D-Sub 15 pin) Connection 1. In this case use the latest cables that the PC adjusts automatically to the... or HDMI2 input source on the TV using the INPUT button on the remote control. 2 1 DVI to the AUDIO IN (RGB/DVI) jack on the remote control. ! How to connect 1 Connect the VGA output of the PC to the HDMI/DVI I Select the RGB-PC input source on the TV using the...
Owners Manual
Page 36
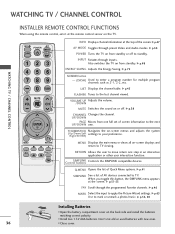
... . MENU Displays the main menu or clears all on from standby. WATCHING TV / CHANNEL CONTROL WATCHING TV / CHANNEL CONTROL INSTALLER REMOTE CONTROL FUNCTIONS When using the remote control, aim it at the remote control sensor on or off to standby. INFO POWER INPUT AV MODE ENERGY SAVING 123 456 789 0 FLASHBK LIST VOL...
... . MENU Displays the main menu or clears all on from standby. WATCHING TV / CHANNEL CONTROL WATCHING TV / CHANNEL CONTROL INSTALLER REMOTE CONTROL FUNCTIONS When using the remote control, aim it at the remote control sensor on or off to standby. INFO POWER INPUT AV MODE ENERGY SAVING 123 456 789 0 FLASHBK LIST VOL...

Owners Manual
Page 37
... of the screen. The default is 2. Installing Batteries I Install two 1.5V AAA batteries. BED1, 2 Determines the code set by using the remote control, aim it to the Bed 1/Bed 2 position. I Close cover. 37 Also switches the TV on the back side and install the batteries... an interactive application or other user interaction function. Don't mix old or used batteries with new ones. INFO Displays channel information at the remote control sensor on from standby. The position of the Bed 1/Bed 2 switch must correspond to standby. NUMBER button - (DASH) Used ...
... of the screen. The default is 2. Installing Batteries I Install two 1.5V AAA batteries. BED1, 2 Determines the code set by using the remote control, aim it to the Bed 1/Bed 2 position. I Close cover. 37 Also switches the TV on the back side and install the batteries... an interactive application or other user interaction function. Don't mix old or used batteries with new ones. INFO Displays channel information at the remote control sensor on from standby. The position of the Bed 1/Bed 2 switch must correspond to standby. NUMBER button - (DASH) Used ...

Owners Manual
Page 38
... to switch the sound off, press the MUTE button. 3 You can cancel the Mute function by using the TV, press the POWER button on the remote control. 2 Select the viewing source by pressing the MUTE or VOL (+ or -) button. 38 NOTE G If you want to turn TV on, press the , INPUT... or ) button on the TV or press the POWER, INPUT, CH ( or ), Number (0~9) button on the remote control. G If you do not complete the Initial setting, it was last set to be away on the remote control. CHANNEL SELECTION 1 Press the CH ( or ) or NUMBER buttons to standby mode. VOLUME ADJUSTMENT Adjust...
... to switch the sound off, press the MUTE button. 3 You can cancel the Mute function by using the TV, press the POWER button on the remote control. 2 Select the viewing source by pressing the MUTE or VOL (+ or -) button. 38 NOTE G If you want to turn TV on, press the , INPUT... or ) button on the TV or press the POWER, INPUT, CH ( or ), Number (0~9) button on the remote control. G If you do not complete the Initial setting, it was last set to be away on the remote control. CHANNEL SELECTION 1 Press the CH ( or ) or NUMBER buttons to standby mode. VOLUME ADJUSTMENT Adjust...
Owners Manual
Page 51
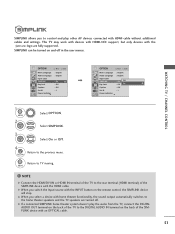
...On Off : Off On Caption : Off Set ID : 1 Power Indicator E 1 MENU 2 ENTER Select OPTION. This TV may work with devices with HDMI-CEC support, but only devices with the logo are turned off in the user menus. G If a connected SIMPLINK home theater system doesn't play other .... Select SIMPLINK. 3 ENTER Select O n or O f f. 4 Return to the DIGITAL AUDIO IN terminal on the remote control, the SIMPLINK device will stop. RETURN Return to the rear terminal (HDMI terminal) of the TV to the previous menu. G When you select a device with an OPTICAL cable. 51 NOTE G...
...On Off : Off On Caption : Off Set ID : 1 Power Indicator E 1 MENU 2 ENTER Select OPTION. This TV may work with devices with HDMI-CEC support, but only devices with the logo are turned off in the user menus. G If a connected SIMPLINK home theater system doesn't play other .... Select SIMPLINK. 3 ENTER Select O n or O f f. 4 Return to the DIGITAL AUDIO IN terminal on the remote control, the SIMPLINK device will stop. RETURN Return to the rear terminal (HDMI terminal) of the TV to the previous menu. G When you select a device with an OPTICAL cable. 51 NOTE G...

Owners Manual
Page 55
.../Total pages 4 Total number of marked photos 5 Corresponding buttons on your model may be slightly different. The On-Screen Display on 1 the remote control 3 4 Photo List Drive1 JMJ001 1366x768, 125KB Up Folder Page 2/3 No Marked Up Folder KY101 06/10/2008 KY102 04/03/2008 JMJ001 01/01/2000 JMJ002 06/15...
.../Total pages 4 Total number of marked photos 5 Corresponding buttons on your model may be slightly different. The On-Screen Display on 1 the remote control 3 4 Photo List Drive1 JMJ001 1366x768, 125KB Up Folder Page 2/3 No Marked Up Folder KY101 06/10/2008 KY102 04/03/2008 JMJ001 01/01/2000 JMJ002 06/15...

Owners Manual
Page 59
... music file: *.MP3 Bit rate range 32 Kbps - 320 Kbps • Sampling rate (Sampling Frequency) MPEG1 layer 3: 32 kHz, 44.1 kHz, 48 kHz MPEG2 layer 3: 16 kHz, 22.05 kHz, 24 kHz MPEG2.5 layer 3: 8 kHz, 11.025 kHz, 12 kHz Screen Components 1 MENU Select U S B. 2 ENTER ENTER Select M u s i c L i ...TV cannot play MP3 files from a USB storage device. The On Screen Display on 5 the remote control. 1 Music List Drive1 3 4 Page 2/3 No Marked Title Up Folder A 00:00 / 04:16 Up Folder Navigation Popup Menu CH Page Change 5 Duration MARK Mark Exit 59 Corresponding buttons on ...
... music file: *.MP3 Bit rate range 32 Kbps - 320 Kbps • Sampling rate (Sampling Frequency) MPEG1 layer 3: 32 kHz, 44.1 kHz, 48 kHz MPEG2 layer 3: 16 kHz, 22.05 kHz, 24 kHz MPEG2.5 layer 3: 8 kHz, 11.025 kHz, 12 kHz Screen Components 1 MENU Select U S B. 2 ENTER ENTER Select M u s i c L i ...TV cannot play MP3 files from a USB storage device. The On Screen Display on 5 the remote control. 1 Music List Drive1 3 4 Page 2/3 No Marked Title Up Folder A 00:00 / 04:16 Up Folder Navigation Popup Menu CH Page Change 5 Duration MARK Mark Exit 59 Corresponding buttons on ...

Owners Manual
Page 103
... display ' ! MENU I In Key Lock 'O n', if the TV is pressed while viewing the TV. Key Lock' appears on the screen if any button on the remote control. I , INPUT, CH (DE or ) button on the TV or POWER, INPUT, CH ( ) or NUMBER buttons on the front panel is turned off . OPTION Move... Indicator E : English : English : On : On Off : Off On : 1 1 MENU 2 ENTER Select OPTION. PARENTAL CONTROL / RATING 103 KEY LOCK This feature can be used with the remote control. Select Key Lock. 3 ENTER Select O n or O f f. 4 Return to TV viewing.
... display ' ! MENU I In Key Lock 'O n', if the TV is pressed while viewing the TV. Key Lock' appears on the screen if any button on the remote control. I , INPUT, CH (DE or ) button on the TV or POWER, INPUT, CH ( ) or NUMBER buttons on the front panel is turned off . OPTION Move... Indicator E : English : English : On : On Off : Off On : 1 1 MENU 2 ENTER Select OPTION. PARENTAL CONTROL / RATING 103 KEY LOCK This feature can be used with the remote control. Select Key Lock. 3 ENTER Select O n or O f f. 4 Return to TV viewing.


