Specification (English)
Page 2
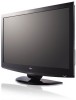
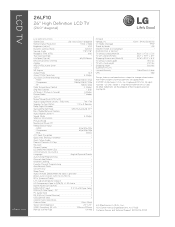
... a registered trademark of their respective owners. 05/26/09 LG Electronics U.S.A., Inc. 1000 Sylvan Avenue Englewood Cliffs, NJ 07632 Customer Service and Technical Support: (800) 243-0000 RF 1080i/720p Color Temperature Control 3 Modes 24p Real Cinema • ... © 2009 LG Electronics U.S.A., Inc., Englewood Cliffs, NJ. Component 1080p/1080i/720p - HDMI 1080p/1080i/720p - Non-metric weights and messurements are the property of LG Corp. LCD TV 26LF10 26" High Definition LCD TV (26.0" diagonal) LGusa.com LCD SPECIFICATION Screen Size 26" Class...
... a registered trademark of their respective owners. 05/26/09 LG Electronics U.S.A., Inc. 1000 Sylvan Avenue Englewood Cliffs, NJ 07632 Customer Service and Technical Support: (800) 243-0000 RF 1080i/720p Color Temperature Control 3 Modes 24p Real Cinema • ... © 2009 LG Electronics U.S.A., Inc., Englewood Cliffs, NJ. Component 1080p/1080i/720p - HDMI 1080p/1080i/720p - Non-metric weights and messurements are the property of LG Corp. LCD TV 26LF10 26" High Definition LCD TV (26.0" diagonal) LGusa.com LCD SPECIFICATION Screen Size 26" Class...
Owner's Manual (English)
Page 4
... the TV by connecting it , discontinue use a damaged or loose power cord. Do not use of fire or electrical shock, do not drop onto the screen with a three-prong grounded AC plug must remain readily operable. 19 Keep the product away from physical or mechanical abuse, such as gasoline or candles...
... the TV by connecting it , discontinue use a damaged or loose power cord. Do not use of fire or electrical shock, do not drop onto the screen with a three-prong grounded AC plug must remain readily operable. 19 Keep the product away from physical or mechanical abuse, such as gasoline or candles...
Owner's Manual (English)
Page 6
... CONTROL Remote Control Functions 38 Turning On TV 40 Channel Selection 40 Volume Adjustment 40 Quick Menu / Favorite Channel Setup 41 Initial Setting 42 On-Screen Menus Selection 44 Channel Setup - Caption Option 72 4 Preset 53 Manual Picture Adjustment - Add / Delete Channel (Manual Tuning 46 - User Mode 54 Picture ...Control - User Mode 63 Balance 64 TV Speakers On/Off Setup 65 Audio Reset 66 Stereo/SAP Broadcasts Setup 67 Audio Language 68 On-Screen Menus Language Selection 69 Caption Mode - Auto Scan (Auto Tuning 45 - Preset 52 Color Tone -
... CONTROL Remote Control Functions 38 Turning On TV 40 Channel Selection 40 Volume Adjustment 40 Quick Menu / Favorite Channel Setup 41 Initial Setting 42 On-Screen Menus Selection 44 Channel Setup - Caption Option 72 4 Preset 53 Manual Picture Adjustment - Add / Delete Channel (Manual Tuning 46 - User Mode 54 Picture ...Control - User Mode 63 Balance 64 TV Speakers On/Off Setup 65 Audio Reset 66 Stereo/SAP Broadcasts Setup 67 Audio Language 68 On-Screen Menus Language Selection 69 Caption Mode - Auto Scan (Auto Tuning 45 - Preset 52 Color Tone -
Owner's Manual (English)
Page 8
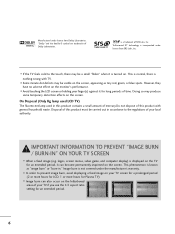
... the manufacturer's warranty. Image burn is a trademark of this product with TV. Manufactured under license from SRS Labs, Inc. I Avoid touching the LCD screen or holding your finger(s) against it for an extended period. 6 However, they have no adverse effect on the TV for Plasma TV). On Disposal...Inc. IMPORTANT INFORMATION TO PREVENT "IMAGE BURN / BURN-IN" ON YOUR TV SCREEN I If the TV feels cold to prevent image burn, avoid displaying a fixed image on your TV screen for a prolonged period (2 or more hours for LCD, 1 or more hours for an extended period, it is displayed on the...
... the manufacturer's warranty. Image burn is a trademark of this product with TV. Manufactured under license from SRS Labs, Inc. I Avoid touching the LCD screen or holding your finger(s) against it for an extended period. 6 However, they have no adverse effect on the TV for Plasma TV). On Disposal...Inc. IMPORTANT INFORMATION TO PREVENT "IMAGE BURN / BURN-IN" ON YOUR TV SCREEN I If the TV feels cold to prevent image burn, avoid displaying a fixed image on your TV screen for a prolonged period (2 or more hours for LCD, 1 or more hours for an extended period, it is displayed on the...

Owner's Manual (English)
Page 14
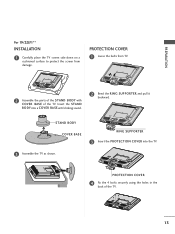
... the TV. PREPARATION PREPARATION STAND INSTRUCTION I Image shown may differ from your TV For 19/22LG3** INSTALLATION 1 Carefully place the TV screen side down on a cushioned surface to protect the screen from TV. 2 Assemble the parts of the STAND BODY with COVER BASE of the TV. 12 PROTECTION COVER 4 Fix the 4 bolts...
... the TV. PREPARATION PREPARATION STAND INSTRUCTION I Image shown may differ from your TV For 19/22LG3** INSTALLATION 1 Carefully place the TV screen side down on a cushioned surface to protect the screen from TV. 2 Assemble the parts of the STAND BODY with COVER BASE of the TV. 12 PROTECTION COVER 4 Fix the 4 bolts...
Owner's Manual (English)
Page 15
RING SUPPORTER 3 Insert the PROTECTION COVER into a COVER BASE until clicking sound. 2 Bend the RING SUPPORTER and pull it backward. PROTECTION COVER 4 Fix the 4 bolts securely using the holes in the back of the TV. PROTECTION COVER 1 Loose the bolts from damage. STAND BODY COVER BASE 3 Assemble the TV as shown. Insert the STAND BODY into the TV. PREPARATION For 19/22LF1** INSTALLATION 1 Carefully place the TV screen side down on a cushioned surface to protect the screen from TV. 2 Assemble the parts of the STAND BODY with COVER BASE of the TV. 13
RING SUPPORTER 3 Insert the PROTECTION COVER into a COVER BASE until clicking sound. 2 Bend the RING SUPPORTER and pull it backward. PROTECTION COVER 4 Fix the 4 bolts securely using the holes in the back of the TV. PROTECTION COVER 1 Loose the bolts from damage. STAND BODY COVER BASE 3 Assemble the TV as shown. Insert the STAND BODY into the TV. PREPARATION For 19/22LF1** INSTALLATION 1 Carefully place the TV screen side down on a cushioned surface to protect the screen from TV. 2 Assemble the parts of the STAND BODY with COVER BASE of the TV. 13
Owner's Manual (English)
Page 16
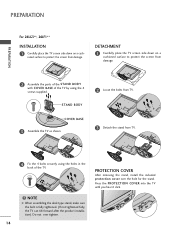
...not tightened fully, the TV can tilt forward after the product installation). ioned surface to protect the screen from TV. DETACHMENT 1 Carefully place the TV screen side down on a cushioned surface to protect the screen from TV. 4 Fix the 4 bolts securely using the holes in the back of the TV... by using the 4 screws supplied. PREPARATION PREPARATION For 26LG3**, 26LF1** INSTALLATION 1 Carefully place the TV screen side down on a cush- STAND BODY 2 Loose the bolts from damage. 2 Assemble the parts of the STAND BODY with COVER BASE of the...
...not tightened fully, the TV can tilt forward after the product installation). ioned surface to protect the screen from TV. DETACHMENT 1 Carefully place the TV screen side down on a cushioned surface to protect the screen from TV. 4 Fix the 4 bolts securely using the holes in the back of the TV... by using the 4 screws supplied. PREPARATION PREPARATION For 26LG3**, 26LF1** INSTALLATION 1 Carefully place the TV screen side down on a cush- STAND BODY 2 Loose the bolts from damage. 2 Assemble the parts of the STAND BODY with COVER BASE of the...
Owner's Manual (English)
Page 35
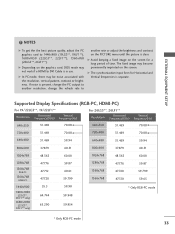
.... NOTES G To get the the best picture quality, adjust the PC graphics card to another rate or adjust the brightness and contrast on the screen for Horizontal and Vertical frequencies is present, change the PC output to another resolution, change the refresh rate to 1440x900 (19LG3**, 19LF1**), 1680x1050 (...-PC mode * Only RGB-PC mode 33 EXTERNAL EQUIPMENT SETUP ! G Depending on the graphics card, DOS mode may become permanently imprinted on the screen. G In PC mode, there may be noise associated with the resolution, vertical pattern, contrast or brightness. If noise is separate.
.... NOTES G To get the the best picture quality, adjust the PC graphics card to another rate or adjust the brightness and contrast on the screen for Horizontal and Vertical frequencies is present, change the PC output to another resolution, change the refresh rate to 1440x900 (19LG3**, 19LF1**), 1680x1050 (...-PC mode * Only RGB-PC mode 33 EXTERNAL EQUIPMENT SETUP ! G Depending on the graphics card, DOS mode may become permanently imprinted on the screen. G In PC mode, there may be noise associated with the resolution, vertical pattern, contrast or brightness. If noise is separate.

Owner's Manual (English)
Page 36
...Enter E • Contrast 50 • Brightness 50 • Sharpness 50 • Color 50 • Tint 0R G • Advanced Control • Reset Screen (RGB-PC) SCREEN Resolution G Auto config. Select Screen (RGB-PC). Select the desired resolution. 34 Position Size Phase Reset Move MENU Prev. 1024 x 768 1280 x 768 1360 x 768 1366 x 768... 3 ENTER 4 ENTER 5 ENTER Select PICTURE. The Position, Phase, and Size can choose the resolution in RGB-PC mode. EXTERNAL EQUIPMENT SETUP EXTERNAL EQUIPMENT SETUP Screen Setup for PC mode Selecting Resolution You can also be adjusted.
...Enter E • Contrast 50 • Brightness 50 • Sharpness 50 • Color 50 • Tint 0R G • Advanced Control • Reset Screen (RGB-PC) SCREEN Resolution G Auto config. Select Screen (RGB-PC). Select the desired resolution. 34 Position Size Phase Reset Move MENU Prev. 1024 x 768 1280 x 768 1360 x 768 1366 x 768... 3 ENTER 4 ENTER 5 ENTER Select PICTURE. The Position, Phase, and Size can choose the resolution in RGB-PC mode. EXTERNAL EQUIPMENT SETUP EXTERNAL EQUIPMENT SETUP Screen Setup for PC mode Selecting Resolution You can also be adjusted.

Owner's Manual (English)
Page 37
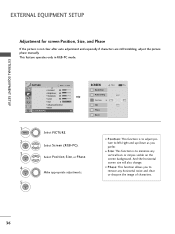
... again. PICTURE Move Enter E • Contrast 50 • Brightness 50 • Sharpness 50 • Color 50 • Tint 0R G • Advanced Control • Reset Screen (RGB-PC) SCREEN Resolution Auto config. EXTERNAL EQUIPMENT SETUP Auto Configure Automatically adjusts picture position and minimizes image instability. I If picture needs to be adjusted again after... P h a s e. 35 After adjustment, if the image is still not correct, try using the manual settings or a different resolution or refresh rate on the PC. Select Screen (RGB-PC).
... again. PICTURE Move Enter E • Contrast 50 • Brightness 50 • Sharpness 50 • Color 50 • Tint 0R G • Advanced Control • Reset Screen (RGB-PC) SCREEN Resolution Auto config. EXTERNAL EQUIPMENT SETUP Auto Configure Automatically adjusts picture position and minimizes image instability. I If picture needs to be adjusted again after... P h a s e. 35 After adjustment, if the image is still not correct, try using the manual settings or a different resolution or refresh rate on the PC. Select Screen (RGB-PC).
Owner's Manual (English)
Page 38
...• Brightness 50 • Sharpness 50 • Color 50 • Tint 0R G • Advanced Control • Reset Screen (RGB-PC) SCREEN Resolution Auto config. I Position: This function is not clear after auto adjustment and especially if characters are still trembling, adjust the picture... phase manually. And the horizontal screen size will also change. I Phase: This function allows you prefer. Position G Size Phase Reset Move MENU Prev. I S i z...
...• Brightness 50 • Sharpness 50 • Color 50 • Tint 0R G • Advanced Control • Reset Screen (RGB-PC) SCREEN Resolution Auto config. I Position: This function is not clear after auto adjustment and especially if characters are still trembling, adjust the picture... phase manually. And the horizontal screen size will also change. I Phase: This function allows you prefer. Position G Size Phase Reset Move MENU Prev. I S i z...
Owner's Manual (English)
Page 39
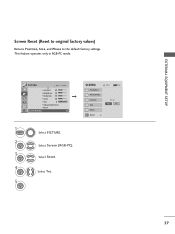
...-PC) 1 MENU 2 ENTER 3 ENTER 4 ENTER 5 ENTER Select PICTURE. Select Reset. Position Size Phase Reset G Move MENU Prev. SCREEN Resolution Auto config. Select Y e s. To set Yes No 37 Select Screen (RGB-PC). EXTERNAL EQUIPMENT SETUP Screen Reset (Reset to original factory values) Returns Position, S i z e, and Phase to the default factory settings. This feature operates...
...-PC) 1 MENU 2 ENTER 3 ENTER 4 ENTER 5 ENTER Select PICTURE. Select Reset. Position Size Phase Reset G Move MENU Prev. SCREEN Resolution Auto config. Select Y e s. To set Yes No 37 Select Screen (RGB-PC). EXTERNAL EQUIPMENT SETUP Screen Reset (Reset to original factory values) Returns Position, S i z e, and Phase to the default factory settings. This feature operates...
Owner's Manual (English)
Page 40
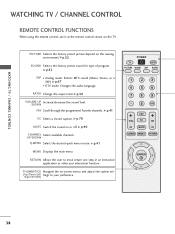
... the viewing environment. G p.40 CHANNEL UP/DOWN Select available channels. RETURN Allows the user to your preference. PICTURE Selects the factory preset picture depend on -screen menus and adjust the system set- (Up/Down/Left Right/ENTER) tings to move return one step in an interactive application or other user interaction...
... the viewing environment. G p.40 CHANNEL UP/DOWN Select available channels. RETURN Allows the user to your preference. PICTURE Selects the factory preset picture depend on -screen menus and adjust the system set- (Up/Down/Left Right/ENTER) tings to move return one step in an interactive application or other user interaction...
Owner's Manual (English)
Page 43
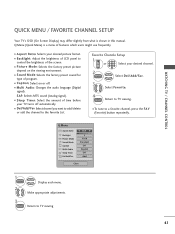
WATCHING TV / CHANNEL CONTROL QUICK MENU / FAVORITE CHANNEL SETUP Your TV's OSD (On Screen Display) may differ slightly from what is a menu of the screen. I To tune to a favorite channel, press the F A V (Favorite) button repeatedly. I Sound Mode: Selects the factory preset sound for type of time before... TV viewing. I Caption: Select on the viewing environment. I Multi Audio: Changes the audio language (Digital signal). I Backlight: Adjust the brightness of LCD panel to TV viewing 41 Favorite Channle Setup 1 CH 123 or 4 5 6 Select your desired picture format.
WATCHING TV / CHANNEL CONTROL QUICK MENU / FAVORITE CHANNEL SETUP Your TV's OSD (On Screen Display) may differ slightly from what is a menu of the screen. I To tune to a favorite channel, press the F A V (Favorite) button repeatedly. I Sound Mode: Selects the factory preset sound for type of time before... TV viewing. I Caption: Select on the viewing environment. I Multi Audio: Changes the audio language (Digital signal). I Backlight: Adjust the brightness of LCD panel to TV viewing 41 Favorite Channle Setup 1 CH 123 or 4 5 6 Select your desired picture format.
Owner's Manual (English)
Page 44
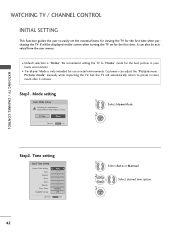
Mode setting Step1. Time setting Step2. Customers can also be displayed on the screen when turning the TV on for the best picture in your home environment. WATCHING TV / CHANNEL CONTROL INITIAL SETTING This Function guides the user to ...
Mode setting Step1. Time setting Step2. Customers can also be displayed on the screen when turning the TV on for the best picture in your home environment. WATCHING TV / CHANNEL CONTROL INITIAL SETTING This Function guides the user to ...
Owner's Manual (English)
Page 46
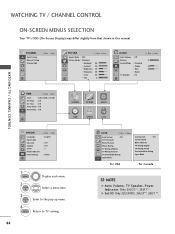
... For USA For Canada ! NOTE G Auto Volume, TV Speaker, Power Indicator: Only 26LG3**, 26LF1**. G Set ID: Only 22LG30DC, 26LG3**, 26LF1**. WATCHING TV / CHANNEL CONTROL ON-SCREEN MENUS SELECTION Your TV's OSD (On Screen Display) may differ slightly from that shown in this manual.
... For USA For Canada ! NOTE G Auto Volume, TV Speaker, Power Indicator: Only 26LG3**, 26LF1**. G Set ID: Only 22LG30DC, 26LG3**, 26LF1**. WATCHING TV / CHANNEL CONTROL ON-SCREEN MENUS SELECTION Your TV's OSD (On Screen Display) may differ slightly from that shown in this manual.
Owner's Manual (English)
Page 48
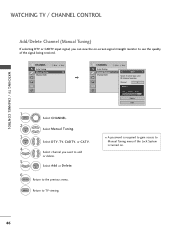
..., or C A T V. Select channel you can view the on . I A password is required to gain access to Manual Tuning menu if the Lock System is turned on -screen signal strength monitor to TV viewing. 46 Select Manual Tuning. WATCHING TV / CHANNEL CONTROL WATCHING TV / CHANNEL CONTROL Add/Delete Channel (Manual Tuning) If selecting...
..., or C A T V. Select channel you can view the on . I A password is required to gain access to Manual Tuning menu if the Lock System is turned on -screen signal strength monitor to TV viewing. 46 Select Manual Tuning. WATCHING TV / CHANNEL CONTROL WATCHING TV / CHANNEL CONTROL Add/Delete Channel (Manual Tuning) If selecting...
Owner's Manual (English)
Page 49
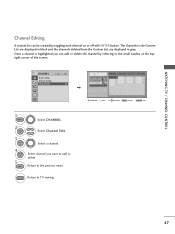
.... Move Page MENU Previous RETURN Exit 47 Select channel you can be created by referring to the small window at the topright corner of the screen. WATCHING TV / CHANNEL CONTROL Channel Editing A custom list can add or delete the channel by toggling each channel on or off with ENTER button. Return...
.... Move Page MENU Previous RETURN Exit 47 Select channel you can be created by referring to the small window at the topright corner of the screen. WATCHING TV / CHANNEL CONTROL Channel Editing A custom list can add or delete the channel by toggling each channel on or off with ENTER button. Return...
Owner's Manual (English)
Page 53
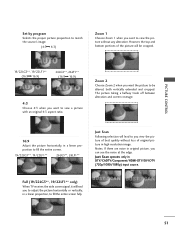
...there are noise in DTV/CADTV/Component/HDMI-DTV/DVI-DTV (720p/1080i/1080p) input source. The picture taking a halfway trade off between alteration and screen coverage. 16:9 Adjust the picture horizontally, in a linear proportion to fill the entire screen. 19/22LG3**, 19/22LF1** 26LG3**, 26LF1** Just Scan Following...lead you to view a picture with an original 4:3 aspect ratio. Full (19/22LG3**, 19/22LF1** only) When TV receives the wide screen signal, it will lead to you view the picture of best quality without loss of the picture will be altered, both vertically extended and...
...there are noise in DTV/CADTV/Component/HDMI-DTV/DVI-DTV (720p/1080i/1080p) input source. The picture taking a halfway trade off between alteration and screen coverage. 16:9 Adjust the picture horizontally, in a linear proportion to fill the entire screen. 19/22LG3**, 19/22LF1** 26LG3**, 26LF1** Just Scan Following...lead you to view a picture with an original 4:3 aspect ratio. Full (19/22LG3**, 19/22LF1** only) When TV receives the wide screen signal, it will lead to you view the picture of best quality without loss of the picture will be altered, both vertically extended and...
Owner's Manual (English)
Page 55
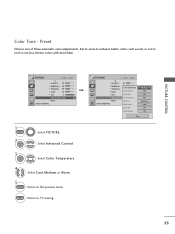
...• Sharpness • Color • Tint 50 Color Temperature 50 5F0resh Contrast F0reshR Color G • Advanced ContNrooisle Reduction • Reset Gamma Screen (RGB-PC) Black Level Eye Care Real Cinema F Medium G Off Off Off Medium Low Off Off Close 53 Color Tone - PICTURE CONTROL PICTURE... • Contrast 50 • Brightness 50 • Sharpness 50 • Color 50 • Tint 0R G • Advanced Control • Reset Screen (RGB-PC) 1 MENU 2 ENTER Select PICTURE. Set to warm to enhance hotter colors such as red, or set to cool to the previous menu....
...• Sharpness • Color • Tint 50 Color Temperature 50 5F0resh Contrast F0reshR Color G • Advanced ContNrooisle Reduction • Reset Gamma Screen (RGB-PC) Black Level Eye Care Real Cinema F Medium G Off Off Off Medium Low Off Off Close 53 Color Tone - PICTURE CONTROL PICTURE... • Contrast 50 • Brightness 50 • Sharpness 50 • Color 50 • Tint 0R G • Advanced Control • Reset Screen (RGB-PC) 1 MENU 2 ENTER Select PICTURE. Set to warm to enhance hotter colors such as red, or set to cool to the previous menu....


