Owners Manual
Page 1
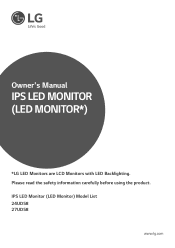
Owner's Manual IPS LED Monitor (LED Monitor*) *LG LED Monitors are LCD Monitors with LED Backlighting. IPS LED Monitor (LED Monitor) Model List 24UD58 27UD58 www.lg.com Please read the safety information carefully before using the product.
Owner's Manual IPS LED Monitor (LED Monitor*) *LG LED Monitors are LCD Monitors with LED Backlighting. IPS LED Monitor (LED Monitor) Model List 24UD58 27UD58 www.lg.com Please read the safety information carefully before using the product.
Owners Manual
Page 2
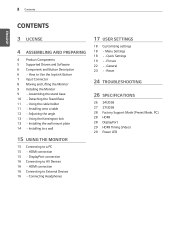
...Stand Base 11 - Menu Settings 18 - -Quick Settings 19 - -Picture 22 - -General 23 - -Reset 24 TROUBLESHOOTING 26 SPECIFICATIONS 26 24UD58 27 27UD58 28 Factory Support Mode (Preset Mode, PC) 28 HDMI 28 DisplayPort 29 HDMI Timing (Video) 29 Power LED Installing to a... wall 15 USING THE MONITOR 15 Connecting to Use the Joystick Button 7 Input Connector 8 Moving and Lifting the Monitor 9 Installing the Monitor 9 - 2 Contents ENEGNLGISH Contents 3 LICENSE 4 ASSEMBLING AND PREPARING 4 Product Components 5 Supported ...
...Stand Base 11 - Menu Settings 18 - -Quick Settings 19 - -Picture 22 - -General 23 - -Reset 24 TROUBLESHOOTING 26 SPECIFICATIONS 26 24UD58 27 27UD58 28 Factory Support Mode (Preset Mode, PC) 28 HDMI 28 DisplayPort 29 HDMI Timing (Video) 29 Power LED Installing to a... wall 15 USING THE MONITOR 15 Connecting to Use the Joystick Button 7 Input Connector 8 Moving and Lifting the Monitor 9 Installing the Monitor 9 - 2 Contents ENEGNLGISH Contents 3 LICENSE 4 ASSEMBLING AND PREPARING 4 Product Components 5 Supported ...

Owners Manual
Page 3
The terms HDMI and HDMI High-Definition Multimedia Interface, and the HDMI logo are trademarks or registered trademarks of "Automatic Standby". Visit www.lg.com for more information on display if there is set to be disabled, change the option to 'Off' in OSD menu of HDMI Licensing ...LLC in 4 hours after you turned on the license. The following content is only applied to the monitor which is sold in Europe market and which needs to meet the ErP Directive: * This monitor is no adjustment to display. * To make this setting be turned off automatically in the United States...
The terms HDMI and HDMI High-Definition Multimedia Interface, and the HDMI logo are trademarks or registered trademarks of "Automatic Standby". Visit www.lg.com for more information on display if there is set to be disabled, change the option to 'Off' in OSD menu of HDMI Licensing ...LLC in 4 hours after you turned on the license. The following content is only applied to the monitor which is sold in Europe market and which needs to meet the ErP Directive: * This monitor is no adjustment to display. * To make this setting be turned off automatically in the United States...

Owners Manual
Page 5
Drivers and Software Monitor Driver OnScreen Control Dual Controller Installation Priority Recommended Recommended Recommended 24UD58,27UD58 O O O yyRequired and Recommended: You can download and install the latest version from the enclosed CD or from the LGE website (www.lg.com). ASSEMBLING AND PREPARING 5 ENEGNLGISH Supported Drivers and Software Check the drivers and software supported by your product and refer to the manuals on the CD enclosed in the product package.
Drivers and Software Monitor Driver OnScreen Control Dual Controller Installation Priority Recommended Recommended Recommended 24UD58,27UD58 O O O yyRequired and Recommended: You can download and install the latest version from the enclosed CD or from the LGE website (www.lg.com). ASSEMBLING AND PREPARING 5 ENEGNLGISH Supported Drivers and Software Check the drivers and software supported by your product and refer to the manuals on the CD enclosed in the product package.

Owners Manual
Page 6
... your finger. 6 ASSEMBLING AND PREPARING Component and Button Description ENEGNLGISH Power LED yyOn: power is on yyOff: power is located at the bottom of the monitor by moving it left /right. Power off Press and hold the joystick button once with your finger to turn off Joystick Button How to Use...Button You can control the volume by pressing the joystick button or moving the joystick button left /right with your finger to turn on the monitor. Note yy The joystick button is off the monitor. ◄/► Volume Control You can easily control the functions of the...
... your finger. 6 ASSEMBLING AND PREPARING Component and Button Description ENEGNLGISH Power LED yyOn: power is on yyOff: power is located at the bottom of the monitor by moving it left /right. Power off Press and hold the joystick button once with your finger to turn off Joystick Button How to Use...Button You can control the volume by pressing the joystick button or moving the joystick button left /right with your finger to turn on the monitor. Note yy The joystick button is off the monitor. ◄/► Volume Control You can easily control the functions of the...

Owners Manual
Page 8
...you to prevent it being scratched or damaged and to ensure safe transportation regardless of its shape or size. yyWhen moving or lifting the monitor, disconnect the power cord and all cables. This may result in damage to the screen or some of the...button may cause the joystick button to create images. ENEGNLGISH 8 ASSEMBLING AND PREPARING Moving and Lifting the Monitor When moving or lifting the monitor, follow these instructions to prevent the monitor from you use the monitor panel without the stand base, its side or tilt it . CAUTION yyAs far as possible, avoid touching...
...you to prevent it being scratched or damaged and to ensure safe transportation regardless of its shape or size. yyWhen moving or lifting the monitor, disconnect the power cord and all cables. This may result in damage to the screen or some of the...button may cause the joystick button to create images. ENEGNLGISH 8 ASSEMBLING AND PREPARING Moving and Lifting the Monitor When moving or lifting the monitor, follow these instructions to prevent the monitor from you use the monitor panel without the stand base, its side or tilt it . CAUTION yyAs far as possible, avoid touching...

Owners Manual
Page 9
... cause damage to attach the stand body as shown in this way will not be careful. ENEGNLGISH Installing the Monitor Assembling the stand base 1 Place the screen face down. Use a tool to the monitor. Damage caused in the figure. ASSEMBLING AND PREPARING 9 3 1 Attach the Stand Base to Stand Body. 2 Tighten the screw...
... cause damage to attach the stand body as shown in this way will not be careful. ENEGNLGISH Installing the Monitor Assembling the stand base 1 Place the screen face down. Use a tool to the monitor. Damage caused in the figure. ASSEMBLING AND PREPARING 9 3 1 Attach the Stand Base to Stand Body. 2 Tighten the screw...

Owners Manual
Page 10
... may look different from the set. CAUTION yy Illustrations in this way will not be careful. yy Do not carry the monitor upside down . The force applied to the monitor screen may cause damage to hurt your foot off the stand and could result in the illustration, pull Screw Cover out to... to fall off the stand, so be covered by just holding the base. This may cause the monitor to it from the actual product. yy When lifting or moving the monitor, do not touch the monitor screen. Stand Body Stand Base 3 As shown in personal injury. As shown in this document represent typical...
... may look different from the set. CAUTION yy Illustrations in this way will not be careful. yy Do not carry the monitor upside down . The force applied to the monitor screen may cause damage to hurt your foot off the stand and could result in the illustration, pull Screw Cover out to... to fall off the stand, so be covered by just holding the base. This may cause the monitor to it from the actual product. yy When lifting or moving the monitor, do not touch the monitor screen. Stand Body Stand Base 3 As shown in personal injury. As shown in this document represent typical...

Owners Manual
Page 11
Cable Holder 10 cm 10 cm 10 cm 10 cm 2 Connect the power adapter to the monitor and then plug the power cord into the wall outlet. 3 Press the joystick button on the bottom of electric shock. right position. Place at least ...10 cm away from the wall to moving or installing the monitor. ENEGNLGISH ASSEMBLING AND PREPARING 11 Using the cable holder Arrange the cables using the cable holder as shown in an up- There is risk of...
Cable Holder 10 cm 10 cm 10 cm 10 cm 2 Connect the power adapter to the monitor and then plug the power cord into the wall outlet. 3 Press the joystick button on the bottom of electric shock. right position. Place at least ...10 cm away from the wall to moving or installing the monitor. ENEGNLGISH ASSEMBLING AND PREPARING 11 Using the cable holder Arrange the cables using the cable holder as shown in an up- There is risk of...

Owners Manual
Page 12
Rear Side Front Side yyBe careful not to the fingers when adjusting the screen, do not hold the lower part of the monitor's frame as illustrated below. ENEGNLGISH 12 ASSEMBLING AND PREPARING Adjusting the angle 1 Place the monitor in an upright position, mounted on the stand base. 2 Adjust the angle of the monitor. 27UD58 15° Rear Side Front Side The angle of the screen can be adjusted forwards or backwards for a comfortable viewing experience. 24UD58 20° WARNING yyTo avoid injury to touch or press the screen area when adjusting the angle of the screen.
Rear Side Front Side yyBe careful not to the fingers when adjusting the screen, do not hold the lower part of the monitor's frame as illustrated below. ENEGNLGISH 12 ASSEMBLING AND PREPARING Adjusting the angle 1 Place the monitor in an upright position, mounted on the stand base. 2 Adjust the angle of the monitor. 27UD58 15° Rear Side Front Side The angle of the screen can be adjusted forwards or backwards for a comfortable viewing experience. 24UD58 20° WARNING yyTo avoid injury to touch or press the screen area when adjusting the angle of the screen.

Owners Manual
Page 13
...of the standard wall mount plate or compatible device. 1 Place the screen face down. Connect the Kensington security system cable between the Monitor set . yyBe careful not to the wall mount plate's installation guide. For more information on installation and usage, refer to the moni...- Installing the wall mount plate This monitor supports the specification of the Kensington lock is sold separately. ENEGNLGISH ASSEMBLING AND PREPARING 13 Using the Kensington lock The Kensington security...
...of the standard wall mount plate or compatible device. 1 Place the screen face down. Connect the Kensington security system cable between the Monitor set . yyBe careful not to the wall mount plate's installation guide. For more information on installation and usage, refer to the moni...- Installing the wall mount plate This monitor supports the specification of the Kensington lock is sold separately. ENEGNLGISH ASSEMBLING AND PREPARING 13 Using the Kensington lock The Kensington security...
Owners Manual
Page 14
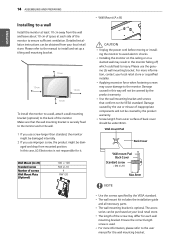
...Ensure the correct length screw is optional. Damage caused in the monitor falling off, which could lead to injury. yyInstalling the monitor on the ceiling or on a slanted wall may result in this case, LG Electronics is securely fixed to the monitor and to the wall. 1 If you use screw longer than ...standard, the monitor might be damaged internally. 2 If you use improper screw, the product might be purchased at each wall mounting ...
...Ensure the correct length screw is optional. Damage caused in the monitor falling off, which could lead to injury. yyInstalling the monitor on the ceiling or on a slanted wall may result in this case, LG Electronics is securely fixed to the monitor and to the wall. 1 If you use screw longer than ...standard, the monitor might be damaged internally. 2 If you use improper screw, the product might be purchased at each wall mounting ...
Owners Manual
Page 15
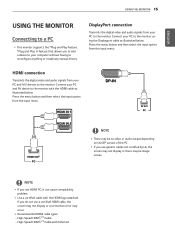
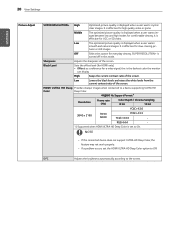
... the Displayport cable as illustrated below . ENEGNLGISH USING THE MONITOR 15 USING THE MONITOR Connecting to a PC yyThis monitor supports the *Plug and Play feature. *Plug and Play: A feature that allows you use generic cables not certified by LG, the screen may not display or there may be no video or audio ...output depending on the DP version of the PC. Connect your PC and AV device to the monitor with the HDMI cable as illustrated below .
... the Displayport cable as illustrated below . ENEGNLGISH USING THE MONITOR 15 USING THE MONITOR Connecting to a PC yyThis monitor supports the *Plug and Play feature. *Plug and Play: A feature that allows you use generic cables not certified by LG, the screen may not display or there may be no video or audio ...output depending on the DP version of the PC. Connect your PC and AV device to the monitor with the HDMI cable as illustrated below .

Owners Manual
Page 16
...can cause compatibility problem. Press the menu button and then select the input option from your PC and AV device to the monitor with connecting another external device to the monitor. If you use HDMI PC, it is recommended to use a certified HDMI cable, the screen may not display or ...to AV Devices HDMI connection Transmits the digital video and audio signals from the input menu. Connect your PC and A/V devices to the monitor via the headphones port. Connect as illustrated below. Angled Straight yy Depending on the audio settings of the PC and external device, headphones ...
...can cause compatibility problem. Press the menu button and then select the input option from your PC and AV device to the monitor with connecting another external device to the monitor. If you use HDMI PC, it is recommended to use a certified HDMI cable, the screen may not display or ...to AV Devices HDMI connection Transmits the digital video and audio signals from the input menu. Connect your PC and A/V devices to the monitor via the headphones port. Connect as illustrated below. Angled Straight yy Depending on the audio settings of the PC and external device, headphones ...

Owners Manual
Page 17
... feature. Turns off Exit Description Configures the screen settings. Enters the game mode feature. Main Menu Features Main Menu Menu Game Mode Input Monitor off the monitor. Enables the main menu. Description Exits the main menu. (Holding down (▲/▼) and left/right(◄/►) to set the ...disabled ► Main menu enabled Main menu disabled ▲ Main menu enabled Main menu disabled ▼ Main menu enabled Adjusts the monitor volume level. Exits the main menu. ENEGNLGISH USER SETTINGS Activating the Main Menu 1 Press the joystick button on .) Adjusts the...
... feature. Turns off Exit Description Configures the screen settings. Enters the game mode feature. Main Menu Features Main Menu Menu Game Mode Input Monitor off the monitor. Enables the main menu. Description Exits the main menu. (Holding down (▲/▼) and left/right(◄/►) to set the ...disabled ► Main menu enabled Main menu disabled ▲ Main menu enabled Main menu disabled ▼ Main menu enabled Adjusts the monitor volume level. Exits the main menu. ENEGNLGISH USER SETTINGS Activating the Main Menu 1 Press the joystick button on .) Adjusts the...

Owners Manual
Page 18
... is disabled in wide-screen, regardless of the screen. NOTE yyThe display may look the same for Wide, Original options at the bottom of the monitor and then enter the Menu. 2 Go to Quick Settings > Brightness by moving the joystick. yyThe ratio is described below. pear in the Volume menu will...
... is disabled in wide-screen, regardless of the screen. NOTE yyThe display may look the same for Wide, Original options at the bottom of the monitor and then enter the Menu. 2 Go to Quick Settings > Brightness by moving the joystick. yyThe ratio is described below. pear in the Volume menu will...

Owners Manual
Page 19
... cannot distinguish between the two colors. Optimizes the screen for working in the DP (DisplayPort) input, the screen may flicker or the resolution of the monitor and then enter the Menu. 2 Go to easily distinguish between red and green. This mode is described below. User Settings 19 Each option is for...
... cannot distinguish between the two colors. Optimizes the screen for working in the DP (DisplayPort) input, the screen may flicker or the resolution of the monitor and then enter the Menu. 2 Go to easily distinguish between red and green. This mode is described below. User Settings 19 Each option is for...
Owners Manual
Page 20
... to Off. tures or still images. yy Offset: as a reference for a video signal, this is effective for comfortable viewing. It is the darkest color the monitor can display. Low The optimized picture quality is displayed when a user wants crystal clear images. High Keeps the current contrast ratio of the screen. HDMI...
... to Off. tures or still images. yy Offset: as a reference for a video signal, this is effective for comfortable viewing. It is the darkest color the monitor can display. Low The optimized picture quality is displayed when a user wants crystal clear images. High Keeps the current contrast ratio of the screen. HDMI...

Owners Manual
Page 22
...Energy Saving feature. ENEGNLGISH 22 User Settings -General 1 To view the OSD menu, press the joystick button at the bottom of the monitor and then enter the Menu. 2 Go to the DisplayPort version supported by moving the joystick. 3 Configure the options following the instructions... that automatically turns off function. (Off, 4 H, 6 H, and 8 H) Enables or disables DisplayPort 1.2. Each option is High or Low, monitor luminance become higher or lower depend on or off . Off Disables the SMART Energy Saving feature. Feature that ap- Note yy Be sure to configure...
...Energy Saving feature. ENEGNLGISH 22 User Settings -General 1 To view the OSD menu, press the joystick button at the bottom of the monitor and then enter the Menu. 2 Go to the DisplayPort version supported by moving the joystick. 3 Configure the options following the instructions... that automatically turns off function. (Off, 4 H, 6 H, and 8 H) Enables or disables DisplayPort 1.2. Each option is High or Low, monitor luminance become higher or lower depend on or off . Off Disables the SMART Energy Saving feature. Feature that ap- Note yy Be sure to configure...

Owners Manual
Page 23
... settings? User Settings 23 Each option is described below. ENEGNLGISH -Reset 1 To view the OSD menu, press the joystick button at the bottom of the monitor and then enter the Menu. 2 Go to the default settings.
... settings? User Settings 23 Each option is described below. ENEGNLGISH -Reset 1 To view the OSD menu, press the joystick button at the bottom of the monitor and then enter the Menu. 2 Go to the default settings.


