

Owners Manual
Page 9
.... ENGLISH Instruction / Safety Information 9 Ensure the power is off before shutting the LCD. • The product may be infected and impaired. Install a vaccine program on the LCD screen or drop it. • You may be damaged. Do not press the eject button while the optical disk drive (CD/DVD/Blu-ray) is running. • An error may occur or the disc may...
.... ENGLISH Instruction / Safety Information 9 Ensure the power is off before shutting the LCD. • The product may be infected and impaired. Install a vaccine program on the LCD screen or drop it. • You may be damaged. Do not press the eject button while the optical disk drive (CD/DVD/Blu-ray) is running. • An error may occur or the disc may...

Owners Manual
Page 19
...to the installation or use of an operating system other than the one provided by LG Electronics Inc. • Some software applications may not work properly in other operating systems. Such malfunctions are inflicted on again after a power outage while the storage device is operating. •...External shocks are not covered by a user's mistake. To minimize data loss resulting from the storage device (HDD, SSD, eMMC). • Since the storage device is fragile, you need to external shock while the storage device is running, file damage or bad sectors may occur. ENGLISH Instruction ...
...to the installation or use of an operating system other than the one provided by LG Electronics Inc. • Some software applications may not work properly in other operating systems. Such malfunctions are inflicted on again after a power outage while the storage device is operating. •...External shocks are not covered by a user's mistake. To minimize data loss resulting from the storage device (HDD, SSD, eMMC). • Since the storage device is fragile, you need to external shock while the storage device is running, file damage or bad sectors may occur. ENGLISH Instruction ...
Owners Manual
Page 57
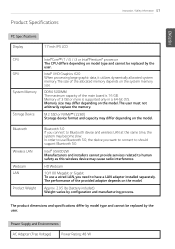
... system memory size. In order to use a wired LAN, you want to connect to have a LAN adapter installed separately. HD Webcam 10/100 Megabit or Gigabit To use Bluetooth 5.0, the device you need to should support Bluetooth 5.0. The performance of the allocated memory depends on the model. Power Supply and Environments AC Adapter (Free Voltage) Power Rating: 48 W DDR4 SODIMM The maximum capacity of 3 GB or more is 16 GB. Product Specifications Instruction...
... system memory size. In order to use a wired LAN, you want to connect to have a LAN adapter installed separately. HD Webcam 10/100 Megabit or Gigabit To use Bluetooth 5.0, the device you need to should support Bluetooth 5.0. The performance of the allocated memory depends on the model. Power Supply and Environments AC Adapter (Free Voltage) Power Rating: 48 W DDR4 SODIMM The maximum capacity of 3 GB or more is 16 GB. Product Specifications Instruction...

Owners Manual
Page 60
... List: Displays the app list. 8 App Tile: Apps added to the Start menu are displayed in tile format. 9 Start Button: Opens or closes the Start menu. 10 Windows Search: Searches for the text entered by the user in My Items (system) or the Internet. 11 Task View: You can add a Desktop screen or switch to the screen to easily access the shortcuts such as Change Account Settings, Lock or Logout. 3 Document: Opens the default document...
... List: Displays the app list. 8 App Tile: Apps added to the Start menu are displayed in tile format. 9 Start Button: Opens or closes the Start menu. 10 Windows Search: Searches for the text entered by the user in My Items (system) or the Internet. 11 Task View: You can add a Desktop screen or switch to the screen to easily access the shortcuts such as Change Account Settings, Lock or Logout. 3 Document: Opens the default document...

Owners Manual
Page 85
When the PC is set, press the login button to immediately unlock the screen.) ENGLISH Using Windows 10 85 Unlocking the Screen If the PC is not used again, a lock screen appears for security purposes and may be unlocked by using the following method. 1 From the lock screen, press any key on the keyboard or drag up while you click and hold the mouse button. 2 When the login window appears, enter the password and click [Enter]. (If no password is used for an extended period, it goes into a locked state.
When the PC is set, press the login button to immediately unlock the screen.) ENGLISH Using Windows 10 85 Unlocking the Screen If the PC is not used again, a lock screen appears for security purposes and may be unlocked by using the following method. 1 From the lock screen, press any key on the keyboard or drag up while you click and hold the mouse button. 2 When the login window appears, enter the password and click [Enter]. (If no password is used for an extended period, it goes into a locked state.

Owners Manual
Page 86
ENGLISH 86 Using Windows 10 Setting the PC Windows 10 supports various functions so that the user can use the Action Center to easily change the PC setting easily and quickly. Using Action Center You can change the settings for tablet mode, display, media connection and network settings. The functions supported by the Action Center may differ depending on the model. 1 Press the Action Center [ ] icon on the right side of the taskbar.
ENGLISH 86 Using Windows 10 Setting the PC Windows 10 supports various functions so that the user can use the Action Center to easily change the PC setting easily and quickly. Using Action Center You can change the settings for tablet mode, display, media connection and network settings. The functions supported by the Action Center may differ depending on the model. 1 Press the Action Center [ ] icon on the right side of the taskbar.

Owners Manual
Page 98
... of the keys may differ in Windows Sleep Mode. (Example: Standby Mode, Hibernate Mode) Every time you press [Fn] + [F5], the mode switches between Touchpad Off (touchpad is disabled) and Touchpad On (touchpad is enabled). To set Touchpad Auto (touchpad is disabled when an external USB mouse is inserted), press the [ ] button and disable [Leave touchpad on when a mouse is completed. Every time you press [Fn] + [F5], the mode switches between Touchpad Off and Touchpad Auto. Changing Keyboard Backlight Mode TIP Since...
... of the keys may differ in Windows Sleep Mode. (Example: Standby Mode, Hibernate Mode) Every time you press [Fn] + [F5], the mode switches between Touchpad Off (touchpad is disabled) and Touchpad On (touchpad is enabled). To set Touchpad Auto (touchpad is disabled when an external USB mouse is inserted), press the [ ] button and disable [Leave touchpad on when a mouse is completed. Every time you press [Fn] + [F5], the mode switches between Touchpad Off and Touchpad Auto. Changing Keyboard Backlight Mode TIP Since...

Owners Manual
Page 100
... set the Keyboard Backlight function to run [LG Control Center]. 2 On the LG Control Center screen, select the [System Settings] menu. ENGLISH 100 Using the PC Keyboard Backlight You can use hot keys to use the Keyboard Backlight function more conveniently. • Each time you press the [Fn] + [F8] keys, the status changes to KBD Backlight Off, KBD Backlight Low, and then KBD Backlight High in the specified order. 1 Select the [ ] button > [LG Software...
... set the Keyboard Backlight function to run [LG Control Center]. 2 On the LG Control Center screen, select the [System Settings] menu. ENGLISH 100 Using the PC Keyboard Backlight You can use hot keys to use the Keyboard Backlight function more conveniently. • Each time you press the [Fn] + [F8] keys, the status changes to KBD Backlight Off, KBD Backlight Low, and then KBD Backlight High in the specified order. 1 Select the [ ] button > [LG Software...

Owners Manual
Page 102
... to adjust the volume. ENGLISH 102 Using the PC Adjusting Screen Brightness and Volume LG PC allows you to use the hot keys to increase the volume. Volume Mute [Fn] + [F11], [F12] [Fn] + [F10] Press the [F11] key to lower the volume or [F12] key to easily adjust the screen brightness and volume. Function Screen Brightness Hot Keys [Fn] + [F2], [F3] Comments Press the [F2] key to darken the screen or the [F3] key to the model type, a button for volume control (mute, volume...
... to adjust the volume. ENGLISH 102 Using the PC Adjusting Screen Brightness and Volume LG PC allows you to use the hot keys to increase the volume. Volume Mute [Fn] + [F11], [F12] [Fn] + [F10] Press the [F11] key to lower the volume or [F12] key to easily adjust the screen brightness and volume. Function Screen Brightness Hot Keys [Fn] + [F2], [F3] Comments Press the [F2] key to darken the screen or the [F3] key to the model type, a button for volume control (mute, volume...

Owners Manual
Page 119
... use HDMI. TIP Ensure the monitor power is off before connecting the external monitor to the PC. 1 Connect the HDMI cable to the HDMI Port HDMI is no need for a separate audio connection. 3 On the PC, press [Fn] + [F7] to display the selected screen output. Select the desired screen output. TIP • Every time [ ] + [P] keys are pressed, the screen output option changes. ENGLISH Connecting to External Display Using the PC 119 Connecting to the PC and the external device (TV, monitor...
... use HDMI. TIP Ensure the monitor power is off before connecting the external monitor to the PC. 1 Connect the HDMI cable to the HDMI Port HDMI is no need for a separate audio connection. 3 On the PC, press [Fn] + [F7] to display the selected screen output. Select the desired screen output. TIP • Every time [ ] + [P] keys are pressed, the screen output option changes. ENGLISH Connecting to External Display Using the PC 119 Connecting to the PC and the external device (TV, monitor...
Owners Manual
Page 124
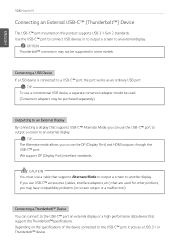
... USB port. Use the USB-C™ port to connect USB devices or to output a screen to the USB-C™ port an external display or a high-performance data device that supports USB-C™ Alternate Mode, you may have compatibility problems (no screen output or a malfunction). Connecting a USB Device If a USB device is connected to an External Display By connecting a display that support the Thunderbolt™specifications. OPTION Thunderbolt™ connection may be supported in some models. CAUTION You must use a conventional USB device, a separate conversion adapter should be used...
... USB port. Use the USB-C™ port to connect USB devices or to output a screen to the USB-C™ port an external display or a high-performance data device that supports USB-C™ Alternate Mode, you may have compatibility problems (no screen output or a malfunction). Connecting a USB Device If a USB device is connected to an External Display By connecting a display that support the Thunderbolt™specifications. OPTION Thunderbolt™ connection may be supported in some models. CAUTION You must use a conventional USB device, a separate conversion adapter should be used...

Owners Manual
Page 153
... to configure the connection mode of an external display connected to the PC. 7 Hotkey mode setting: Allows you to set the hot keys so that you can use them without pressing the Fn key. 8 Airplane Mode: Allows you to set the Airplane Mode. (It turns off the wireless LAN). 9 Silent Mode: Allows you can perform charging using the USB-C™ port even when the PC is turned off. • Set Charging Function: Sets the charging function for a USB-C™ port (Automatic, Sink, or Source). 2 Battery...
... to configure the connection mode of an external display connected to the PC. 7 Hotkey mode setting: Allows you to set the hot keys so that you can use them without pressing the Fn key. 8 Airplane Mode: Allows you to set the Airplane Mode. (It turns off the wireless LAN). 9 Silent Mode: Allows you can perform charging using the USB-C™ port even when the PC is turned off. • Set Charging Function: Sets the charging function for a USB-C™ port (Automatic, Sink, or Source). 2 Battery...
Owners Manual
Page 157
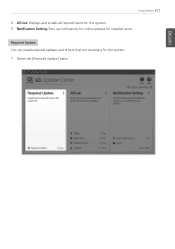
ENGLISH Using Software 157 4 All List: Displays and installs all required items for the system. 5 Notification Setting: Sets up notifications for online updates for installed items. Required Update You can install essential updates and drivers that are necessary for the system. 1 Select the [Required Update] menu.
ENGLISH Using Software 157 4 All List: Displays and installs all required items for the system. 5 Notification Setting: Sets up notifications for online updates for installed items. Required Update You can install essential updates and drivers that are necessary for the system. 1 Select the [Required Update] menu.
Owners Manual
Page 182
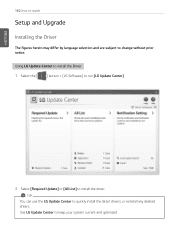
TIP You can use the LG Update Center to keep your system current and optimized. Use LG Update Center to quickly install the latest drivers, or reinstall any deleted drivers. Using LG Update Center to install the Driver 1 Select the [ ] button > [LG Software] to run [LG Update Center]. 2 Select [Required Update] or [All List] to change without prior notice. ENGLISH 182 Setup and Upgrade Setup and Upgrade Installing the Driver The figures herein may differ by language selection and are subject to install the driver.
TIP You can use the LG Update Center to keep your system current and optimized. Use LG Update Center to quickly install the latest drivers, or reinstall any deleted drivers. Using LG Update Center to install the Driver 1 Select the [ ] button > [LG Software] to run [LG Update Center]. 2 Select [Required Update] or [All List] to change without prior notice. ENGLISH 182 Setup and Upgrade Setup and Upgrade Installing the Driver The figures herein may differ by language selection and are subject to install the driver.

Owners Manual
Page 183
ENGLISH Setup and Upgrade 183 How to Download LG Update Center You can install LG Update Center by downloading it from the LG Electronics Website (www.lg.com).
ENGLISH Setup and Upgrade 183 How to Download LG Update Center You can install LG Update Center by downloading it from the LG Electronics Website (www.lg.com).
Owners Manual
Page 184
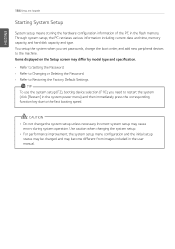
.... Use caution when changing the system setup. • For performance improvement, the system setup menu configuration and the initial setup status may be changed and may differ by model type and specification. • Refer to Setting the Password. • Refer to Changing or Deleting the Password. • Refer to Restoring the Factory Default Settings. CAUTION • Do not change the boot order, and add new peripheral devices to the machine. Incorrect system setup may cause errors...
.... Use caution when changing the system setup. • For performance improvement, the system setup menu configuration and the initial setup status may be changed and may differ by model type and specification. • Refer to Setting the Password. • Refer to Changing or Deleting the Password. • Refer to Restoring the Factory Default Settings. CAUTION • Do not change the boot order, and add new peripheral devices to the machine. Incorrect system setup may cause errors...

Owners Manual
Page 187
... access the system. 1 After opening the system setup screen, use the arrow keys to move to set a password so that other people cannot use the PC or change for the machine. ENGLISH Setup and Upgrade 187 Setting the Password This process is to [Security]. 2 When the following screen shows up the system. The model in a safe place. By default, no password is set a password while booting the system or setting up , click [Set Supervisor Password...
... access the system. 1 After opening the system setup screen, use the arrow keys to move to set a password so that other people cannot use the PC or change for the machine. ENGLISH Setup and Upgrade 187 Setting the Password This process is to [Security]. 2 When the following screen shows up the system. The model in a safe place. By default, no password is set a password while booting the system or setting up , click [Set Supervisor Password...
Owners Manual
Page 192
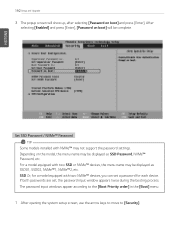
... password input windows appear according to the [Boot Priority order] in the [Boot] menu. 1 After opening the system setup screen, use the arrow keys to move to [Security]. If both passwords are set a password for a model equipped with NVMe™ may be complete. For a model equipped with two SSD or NVMe™ devices, the menu name may be displayed as SSD Password, NVMe™ Password, etc. After selecting [Enabled] and press [Enter], [Password on boot...
... password input windows appear according to the [Boot Priority order] in the [Boot] menu. 1 After opening the system setup screen, use the arrow keys to move to [Security]. If both passwords are set a password for a model equipped with NVMe™ may be complete. For a model equipped with two SSD or NVMe™ devices, the menu name may be displayed as SSD Password, NVMe™ Password, etc. After selecting [Enabled] and press [Enter], [Password on boot...
Owners Manual
Page 201
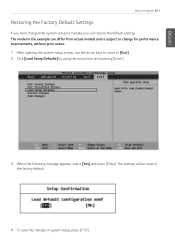
... Upgrade 201 Restoring the Factory Default Settings If you can differ from actual models and is subject to change for performance improvements, without prior notice. 1 After opening the system setup screen, use the arrow keys to move to [Exit]. 2 Click [Load Setup Defaults] by mistake, you have changed the system setup by using the arrow keys and pressing [Enter]. 3 When the following message appears, select [Yes] and press [Enter]. The model...
... Upgrade 201 Restoring the Factory Default Settings If you can differ from actual models and is subject to change for performance improvements, without prior notice. 1 After opening the system setup screen, use the arrow keys to move to [Exit]. 2 Click [Load Setup Defaults] by mistake, you have changed the system setup by using the arrow keys and pressing [Enter]. 3 When the following message appears, select [Yes] and press [Enter]. The model...

Owners Manual
Page 226
... some models, DTS Audio may not work when you use HDMI. TIP • Every time [ ] + [P] keys are pressed, the screen output option changes. Release the keys to display monitor (projector) toggling screen. TIP Ensure the monitor power is off before connecting the external monitor to the PC. 1 Connect the HDMI cable to the PC and the external device (TV, monitor) that can transfer uncompressed full digital audio and video signals. Hence, there is no need for a separate audio connection...
... some models, DTS Audio may not work when you use HDMI. TIP • Every time [ ] + [P] keys are pressed, the screen output option changes. Release the keys to display monitor (projector) toggling screen. TIP Ensure the monitor power is off before connecting the external monitor to the PC. 1 Connect the HDMI cable to the PC and the external device (TV, monitor) that can transfer uncompressed full digital audio and video signals. Hence, there is no need for a separate audio connection...

