
FS-2100DN/4100DN/4200DN/4300DN Operation Guide
Page 192
... network settings. This is set to Normal. 4-130 This specifies the setting for confirmation of replacement with the new Yes, No Maintenance Kit (resets the total number of the main charger. appears. Auto DrumRefresh An automatic drum refresh is sometimes carried out when the power supply is inserted. Normal, High 1, High 2 This...
... network settings. This is set to Normal. 4-130 This specifies the setting for confirmation of replacement with the new Yes, No Maintenance Kit (resets the total number of the main charger. appears. Auto DrumRefresh An automatic drum refresh is sometimes carried out when the power supply is inserted. Normal, High 1, High 2 This...
FS-2100DN/4100DN/4200DN/4300DN Operation Guide
Page 253
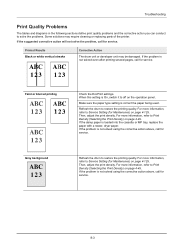
Printed Results Black or white vertical streaks Corrective Action The drum unit or developer unit may require cleaning or replacing parts of the printer. For more information, refer to Service Setting (for service. 8-3 For more information, refer to Print Density (Selecting the Print... corrective action will not solve the problem, call for service. Make sure the paper type setting is loaded into the cassette or MP tray, replace the paper with a newer, dryer paper. If the problem is not solved using the corrective action above , call for service. Troubleshooting Print ...
Printed Results Black or white vertical streaks Corrective Action The drum unit or developer unit may require cleaning or replacing parts of the printer. For more information, refer to Service Setting (for service. 8-3 For more information, refer to Print Density (Selecting the Print... corrective action will not solve the problem, call for service. Make sure the paper type setting is loaded into the cassette or MP tray, replace the paper with a newer, dryer paper. If the problem is not solved using the corrective action above , call for service. Troubleshooting Print ...
FS-2100DN/4100DN/4200DN/4300DN Operation Guide
Page 258
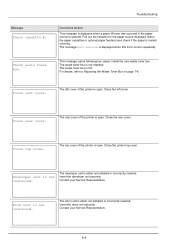
For details, refer to Replacing the Waste Toner Box on page 7-6. Close rear cover. Close the rear cover...in the paper source's cassette. Check waste toner box. Install the new waste toner box. The drum unit is open . Insert the drum unit securely. The message Call service. This message warns following two cases. The left cover of ...installed. Developer unit is open . The top cover of the printer is either not installed or incorrectly inserted. Drum unit is loaded correctly. Pull out the cassette for the paper source displayed (either not installed or incorrectly inserted...
For details, refer to Replacing the Waste Toner Box on page 7-6. Close rear cover. Close the rear cover...in the paper source's cassette. Check waste toner box. Install the new waste toner box. The drum unit is open . Insert the drum unit securely. The message Call service. This message warns following two cases. The left cover of ...installed. Developer unit is open . The top cover of the printer is either not installed or incorrectly inserted. Drum unit is loaded correctly. Pull out the cassette for the paper source displayed (either not installed or incorrectly inserted...


