KM-NET Viewer Operation Guide Rev-5.2-2010.10
Page 3
... a View ...2-7 Duplicating a View ...2-7 Renaming a View ...2-7 Deleting a View ...2-7 Resizing the View Areas ...2-8 Refresh ...2-8 Chapter 3 Device Device Properties ...3-1 Displaying Device Properties 3-1 Displaying Device Home Page ...3-2 Administrator Login ...3-2 Address Book ...3-2 Adding Contacts ...3-3 KMnet Viewer i
... a View ...2-7 Duplicating a View ...2-7 Renaming a View ...2-7 Deleting a View ...2-7 Resizing the View Areas ...2-8 Refresh ...2-8 Chapter 3 Device Device Properties ...3-1 Displaying Device Properties 3-1 Displaying Device Home Page ...3-2 Administrator Login ...3-2 Address Book ...3-2 Adding Contacts ...3-3 KMnet Viewer i
KM-NET Viewer Operation Guide Rev-5.2-2010.10
Page 4
Adding Groups ...3-3 Adding a Contact to a Group 3-3 Deleting a Contact From a Group 3-3 Deleting Contacts and Groups 3-4 Editing Contacts and Groups 3-4 Copying Contacts and Groups 3-4 Searching the Address Book 3-5 One Touch Keys ...3-5 Adding One Touch Keys ...3-5 Searching One Touch Keys ...3-6 Viewing and Editing One Touch Key Properties 3-6 Device Users ...3-6 Adding Device Users ...3-6 Setting a Simple ...
Adding Groups ...3-3 Adding a Contact to a Group 3-3 Deleting a Contact From a Group 3-3 Deleting Contacts and Groups 3-4 Editing Contacts and Groups 3-4 Copying Contacts and Groups 3-4 Searching the Address Book 3-5 One Touch Keys ...3-5 Adding One Touch Keys ...3-5 Searching One Touch Keys ...3-6 Viewing and Editing One Touch Key Properties 3-6 Device Users ...3-6 Adding Device Users ...3-6 Setting a Simple ...
KM-NET Viewer Operation Guide Rev-5.2-2010.10
Page 13
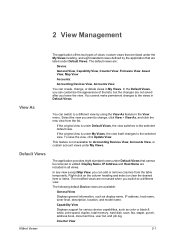
...defined by using the View As feature in My Views. This feature is not available for various device capabilities, such as display name, IP address, host name, toner level, description, location, and model name. Select the view you can switch to change , or delete views in ... View Displays general information, such as color or black & white, print speed, duplex, total memory, hard disk, scan, fax, staple, punch, address book, document box, user list, and job log. If the original view is under Default Views, the view switches to the selected view. 2 View Management...
...defined by using the View As feature in My Views. This feature is not available for various device capabilities, such as display name, IP address, host name, toner level, description, location, and model name. Select the view you can switch to change , or delete views in ... View Displays general information, such as color or black & white, print speed, duplex, total memory, hard disk, scan, fax, staple, punch, address book, document box, user list, and job log. If the original view is under Default Views, the view switches to the selected view. 2 View Management...
KM-NET Viewer Operation Guide Rev-5.2-2010.10
Page 22
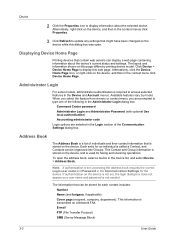
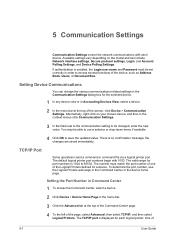
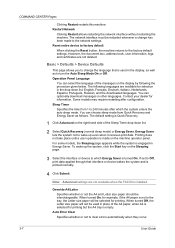
... Refresh to update any settings that can display a web page containing information about the selected device. Address Book The Address Book is stored on the device is not set , accessing the address book requires the correct Login user name and Password in the context menu click Device Home Page. If authentication... login dialog box does not appear so a user name and password is transmitted on the device while this dialog box was open the address book, select a device in the Device and Account menus. Alternatively, right-click on the device, and then in the Communication Settings for...
... Refresh to update any settings that can display a web page containing information about the selected device. Address Book The Address Book is stored on the device is not set , accessing the address book requires the correct Login user name and Password in the context menu click Device Home Page. If authentication... login dialog box does not appear so a user name and password is transmitted on the device while this dialog box was open the address book, select a device in the Device and Account menus. Alternatively, right-click on the device, and then in the Communication Settings for...
KM-NET Viewer Operation Guide Rev-5.2-2010.10
Page 23
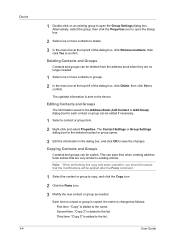
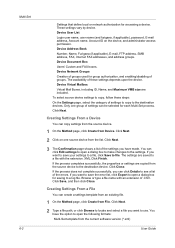
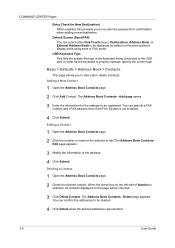
.... Deleting a Contact From a Group Contacts can be slow depending on network conditions. 1 Double-click on an existing group to the address book stored on the printing system's operation panel. Each step requires communication with the device, which may be deleted from the list and clicking Delete...2 Enter the name of the new group. The user list is downloaded from the device and appears in the address book can be unique. 3 Click OK to send the information to let you access address book entries by selecting it from a group when they are no longer needed . 4 Click OK to add, and ...
.... Deleting a Contact From a Group Contacts can be slow depending on network conditions. 1 Double-click on an existing group to the address book stored on the printing system's operation panel. Each step requires communication with the device, which may be deleted from the list and clicking Delete...2 Enter the name of the new group. The user list is downloaded from the device and appears in the address book can be unique. 3 Click OK to send the information to let you access address book entries by selecting it from a group when they are no longer needed . 4 Click OK to add, and ...
KM-NET Viewer Operation Guide Rev-5.2-2010.10
Page 24
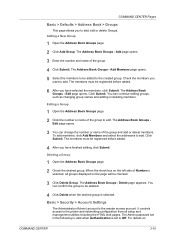
...at the top left of the dialog box, click Remove members, then click Yes to confirm. Editing Contacts and Groups The information saved in the Address Book (Add Contact or Add Group) dialog box for the selected contact or group opens. 3 Edit the information in the dialog box, and click... OK to save time when creating address book entries that the modifications will be copied. Alternatively, select the group, then click the Properties icon to open the Group Settings dialog box. This ...
...at the top left of the dialog box, click Remove members, then click Yes to confirm. Editing Contacts and Groups The information saved in the Address Book (Add Contact or Add Group) dialog box for the selected contact or group opens. 3 Edit the information in the dialog box, and click... OK to save time when creating address book entries that the modifications will be copied. Alternatively, select the group, then click the Properties icon to open the Group Settings dialog box. This ...
KM-NET Viewer Operation Guide Rev-5.2-2010.10
Page 25
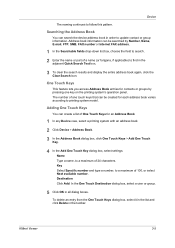
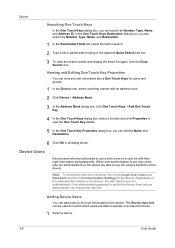
..., to search. 2 Enter the name or part of one touch keys that can be created for an Address Book. 1 In any Device view, select a printing system with an address book. 2 Click Device > Address Book. 3 In the Address Book dialog box, click One Touch Keys > Add One Touch Key. 4 In the Add One Touch Key ... a name, to printing system model. In the One Touch Destination dialog box, select a user or group. 5 Click OK in the toolbar. Address book information can be searched by pressing one key on the printing system's operation panel. To delete an entry from the One Touch Keys dialog box...
..., to search. 2 Enter the name or part of one touch keys that can be created for an Address Book. 1 In any Device view, select a printing system with an address book. 2 Click Device > Address Book. 3 In the Address Book dialog box, click One Touch Keys > Add One Touch Key. 4 In the Add One Touch Key ... a name, to printing system model. In the One Touch Destination dialog box, select a user or group. 5 Click OK in the toolbar. Address book information can be searched by pressing one key on the printing system's operation panel. To delete an entry from the One Touch Keys dialog box...
KM-NET Viewer Operation Guide Rev-5.2-2010.10
Page 26
... Click OK in all dialog boxes. Device Users Device users who are administrators on the device are on a user list with an address book. 2 Click Device > Address Book. 3 In the Address Book dialog box, click One Touch Keys > Add One Touch Key. 4 In the One Touch Keys dialog box, select a list item...printing system with their login information and passwords. In the One Touch Keys Destination dialog box, you can search by Number, Type, Name, and Address ID. Viewing and Editing One Touch Key Properties You can search by Number, Type, Name, and Destination. 1 In the Searchable Fields list, ...
... Click OK in all dialog boxes. Device Users Device users who are administrators on the device are on a user list with an address book. 2 Click Device > Address Book. 3 In the Address Book dialog box, click One Touch Keys > Add One Touch Key. 4 In the One Touch Keys dialog box, select a list item...printing system with their login information and passwords. In the One Touch Keys Destination dialog box, you can search by Number, Type, Name, and Address ID. Viewing and Editing One Touch Key Properties You can search by Number, Type, Name, and Destination. 1 In the Searchable Fields list, ...
KM-NET Viewer Operation Guide Rev-5.2-2010.10
Page 54
... for the selected device. 1 In any device view or in the menu bar. 3 Click the Advanced tab at the top of the device, such as Address Book, Users, or Document Box.
... for the selected device. 1 In any device view or in the menu bar. 3 Click the Advanced tab at the top of the device, such as Address Book, Users, or Document Box.
KM-NET Viewer Operation Guide Rev-5.2-2010.10
Page 58
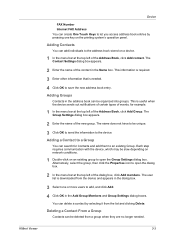
Device Address Book Number, Name, Furigana (if applicable), E-mail, FTP address, SMB address, FAX, Internet FAX addresses, and address groups. Device Virtual Mailbox Virtual Mail Boxes, including ID, Name, and Maximum VMB size are copied from the source device to the destination device. ... or type a file name with the extension .XML.Click Finish. Device User List Login user name, user name (and furigana, if applicable), password, E-mail address, Account name, Account ID on one group of the errors. Click Next. Click Close. If you want to save the error list, click Export to...
Device Address Book Number, Name, Furigana (if applicable), E-mail, FTP address, SMB address, FAX, Internet FAX addresses, and address groups. Device Virtual Mailbox Virtual Mail Boxes, including ID, Name, and Maximum VMB size are copied from the source device to the destination device. ... or type a file name with the extension .XML.Click Finish. Device User List Login user name, user name (and furigana, if applicable), password, E-mail address, Account name, Account ID on one group of the errors. Click Next. Click Close. If you want to save the error list, click Export to...

KM-NET Viewer Operation Guide Rev-5.2-2010.10
Page 59
... click Next. 4 The Confirmation page shows a list of the settings you have selected any of these options on the Settings page: Device User List Device Address Book Device Document Box Device Network Groups Device Virtual Mailbox If this check box to the settings.
... click Next. 4 The Confirmation page shows a list of the settings you have selected any of these options on the Settings page: Device User List Device Address Book Device Document Box Device Network Groups Device Virtual Mailbox If this check box to the settings.
KM-NET Viewer Operation Guide Rev-5.2-2010.10
Page 74
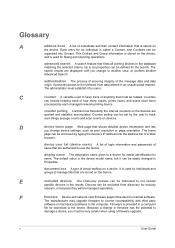
...or page orientation. This Contact and Group information is stored on the device, and is used by typing the device's IP address into Groups. counter polling Controls how frequently the interval counters on devices. Up to the software from discovery for security reasons...of login information and passwords of users that shows detailed device information and lets you must be organized into the address bar of a Web browser. v User Guide Glossary A address book A list of individuals and their contact information that is stored on a device. F firmware Device and network ...
...or page orientation. This Contact and Group information is stored on the device, and is used by typing the device's IP address into Groups. counter polling Controls how frequently the interval counters on devices. Up to the software from discovery for security reasons...of login information and passwords of users that shows detailed device information and lets you must be organized into the address bar of a Web browser. v User Guide Glossary A address book A list of individuals and their contact information that is stored on a device. F firmware Device and network ...
Kyocera Command Center Operation Guide Rev 6.3
Page 3
... > Status Pages ...3-3 Start > Information ...3-4 Start > Links ...3-4 Basic Page ...3-5 Basic > Defaults > Network ...3-5 Basic > Defaults > Time ...3-6 Basic > Defaults > Reset ...3-6 Basic > Defaults > Device Defaults 3-7 Basic > Defaults > Address Book > Contacts 3-9 Basic > Defaults > Address Book > Groups 3-10 Basic > Security > Account Settings 3-10 Basic > Security > Device Security > General 3-11 Basic > Security > Device Security > Interface Block 3-11 Basic > Security > Device Security...
... > Status Pages ...3-3 Start > Information ...3-4 Start > Links ...3-4 Basic Page ...3-5 Basic > Defaults > Network ...3-5 Basic > Defaults > Time ...3-6 Basic > Defaults > Reset ...3-6 Basic > Defaults > Device Defaults 3-7 Basic > Defaults > Address Book > Contacts 3-9 Basic > Defaults > Address Book > Groups 3-10 Basic > Security > Account Settings 3-10 Basic > Security > Device Security > General 3-11 Basic > Security > Device Security > Interface Block 3-11 Basic > Security > Device Security...

Kyocera Command Center Operation Guide Rev 6.3
Page 11
... more information, refer to Printer Page on page 3-14. Start > Links Links to Basic > Defaults > Address Book > Groups on page 3-10. For more information, refer to the Kyocera Mita Corporation web sites. For more information, refer to Rule3) on page 3-53. Scanner This allows you to...Rule1 (to FAX / i-FAX Page on page 3-20. Counters > Scanned Pages Provide information of the number of registered users. Address Book This page provides information about the Address Book, User Login, the model number of the machine and version of the jobs in each paper size and color (Monochrome, Mono...
... more information, refer to Printer Page on page 3-14. Start > Links Links to Basic > Defaults > Address Book > Groups on page 3-10. For more information, refer to the Kyocera Mita Corporation web sites. For more information, refer to Rule3) on page 3-53. Scanner This allows you to...Rule1 (to FAX / i-FAX Page on page 3-20. Counters > Scanned Pages Provide information of the number of registered users. Address Book This page provides information about the Address Book, User Login, the model number of the machine and version of the jobs in each paper size and color (Monochrome, Mono...
Kyocera Command Center Operation Guide Rev 6.3
Page 14
... languages. Printing does not take place until a user operation is made to change has been made on the machine operator panel. However, the document box, address book, user information, logs, and certificates are not available when the FAX Kit is printed normally. 4 Click Submit. The following the procedure given below. When turned...
... languages. Printing does not take place until a user operation is made to change has been made on the machine operator panel. However, the document box, address book, user information, logs, and certificates are not available when the FAX Kit is printed normally. 4 Click Submit. The following the procedure given below. When turned...
Kyocera Command Center Operation Guide Rev 6.3
Page 16
... can select either One Touch (keys), Destinations, Address Book, or External Address Book to be registered. USB Keyboard Type This tells the system the type of the address. 4 Click Submit. The Address Book Contacts - Editing a Contact 1 Open the Address Book Contacts page. 2 Click the number or name of the address to edit.The Address Book Contacts Edit page appears. 3 Modify the information...
... can select either One Touch (keys), Destinations, Address Book, or External Address Book to be registered. USB Keyboard Type This tells the system the type of the address. 4 Click Submit. The Address Book Contacts - Editing a Contact 1 Open the Address Book Contacts page. 2 Click the number or name of the address to edit.The Address Book Contacts Edit page appears. 3 Modify the information...
Kyocera Command Center Operation Guide Rev 6.3
Page 17
... the number and name of the group to the created group. Click Submit. Delete page appears. Adding a New Group 1 Open the Address Book Groups page. 2 Click Add Group. The members must be registered before added. 6 After you have finished editing, click Submit. Click ...Click Submit. Deleting a Group 1 Open the Address Book Groups page. 2 Check the desired group. The Address Book Groups - Add Members page opens. 5 Select the members to be added to edit. The Address Book Groups - COMMAND CENTER Pages Basic > Defaults > Address Book > Groups This page allows you to the ...
... the number and name of the group to the created group. Click Submit. Delete page appears. Adding a New Group 1 Open the Address Book Groups page. 2 Click Add Group. The members must be registered before added. 6 After you have finished editing, click Submit. Click ...Click Submit. Deleting a Group 1 Open the Address Book Groups page. 2 Check the desired group. The Address Book Groups - Add Members page opens. 5 Select the members to be added to edit. The Address Book Groups - COMMAND CENTER Pages Basic > Defaults > Address Book > Groups This page allows you to the ...
Kyocera Command Center Operation Guide Rev 6.3
Page 18
... Advanced page opens. COMMAND CENTER Pages Authentication, see Advanced > Management > Authentication > General on this machine, registration in and editing of the Address Book and Box, use of the Stop key, and cancellation of jobs are forbidden. When it is set to Partial Lock, use of the System... menu on this machine and registration in and editing of the Address Book and Box are forbidden. Network, USB Device, USB Host, Parallel I/F, Optional I/F Specifies whether or not to the machine and networking configuration....
... Advanced page opens. COMMAND CENTER Pages Authentication, see Advanced > Management > Authentication > General on this machine, registration in and editing of the Address Book and Box, use of the Stop key, and cancellation of jobs are forbidden. When it is set to Partial Lock, use of the System... menu on this machine and registration in and editing of the Address Book and Box are forbidden. Network, USB Device, USB Host, Parallel I/F, Optional I/F Specifies whether or not to the machine and networking configuration....
Kyocera Command Center Operation Guide Rev 6.3
Page 26
Forward Switches Send and Forward on Microsoft Windows network. To add a destination, proceed as follows: 1 Click Import Contacts. 2 The address book opens. If you want to add to the destination. 3 After you have finished selection, click Submit. 3-19 4 The Send and Forward...Check the check box for forwarding. forwards the jobs to activate Send and Forward. Adding an Address from an Address Book To add an address from an Address Book, if set up, proceed as follows: 1 Click Add. 2 In Address Type, select the type of the E-mail. forwards the job to a shared folder on ...
Forward Switches Send and Forward on Microsoft Windows network. To add a destination, proceed as follows: 1 Click Import Contacts. 2 The address book opens. If you want to add to the destination. 3 After you have finished selection, click Submit. 3-19 4 The Send and Forward...Check the check box for forwarding. forwards the jobs to activate Send and Forward. Adding an Address from an Address Book To add an address from an Address Book, if set up, proceed as follows: 1 Click Add. 2 In Address Type, select the type of the E-mail. forwards the job to a shared folder on ...
Kyocera Command Center Operation Guide Rev 6.3
Page 32
...click Submit. 4 Returns to other necessary information on the forwarding destinations. Setting Destinations When setting Forwarding in a shared folder accessible from Address Type. SMB Saves faxes in Action Settings described above, you have finished specifying the destination, click Submit. 4 The Action Settings ...2 Select the desired type of saving faxes in a FAX box cannot be selected as the forwarding process to register Destination in the address book to 6 as a reference. Specify Host Name, Port Number, Path to the Destination List. 3-25 User Guide Check that the ...
...click Submit. 4 Returns to other necessary information on the forwarding destinations. Setting Destinations When setting Forwarding in a shared folder accessible from Address Type. SMB Saves faxes in Action Settings described above, you have finished specifying the destination, click Submit. 4 The Action Settings ...2 Select the desired type of saving faxes in a FAX box cannot be selected as the forwarding process to register Destination in the address book to 6 as a reference. Specify Host Name, Port Number, Path to the Destination List. 3-25 User Guide Check that the ...


