
IC-601 Color Centro User Guide
Page 195
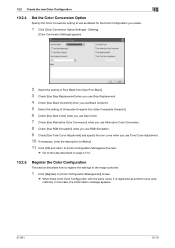
...is clicked. Appears when [RGB] tab is clicked. When you execute the composite overprint as default. Check when you use the RGB simulation as default. Appears when [CMYK] tab is clicked. Select this screen. Appears when [Other Settings] tab is clicked. Displays the ... [No Color Conversion] [Use RGB-CMYK Device Link Profile] [Use RGB Source Profile] [Rendering] [RGB Simulation] [No Color Conversion] [Use CMYK-CMYK Device Link Profile] [Use CMYK Target Profile] [Paper Simulation] [Printer Profile] [Paper Type Link] [Tone Curve] [Pure Black] [Gray Replacement] [Black Overprint] ...
...is clicked. Appears when [RGB] tab is clicked. When you execute the composite overprint as default. Check when you use the RGB simulation as default. Appears when [CMYK] tab is clicked. Select this screen. Appears when [Other Settings] tab is clicked. Displays the ... [No Color Conversion] [Use RGB-CMYK Device Link Profile] [Use RGB Source Profile] [Rendering] [RGB Simulation] [No Color Conversion] [Use CMYK-CMYK Device Link Profile] [Use CMYK Target Profile] [Paper Simulation] [Printer Profile] [Paper Type Link] [Tone Curve] [Pure Black] [Gray Replacement] [Black Overprint] ...

IC-601 Color Centro User Guide
Page 198
...[Graphic], select the rendering method for Graphic. 7 From [Rendering] - [Text], select the rendering method for Text. 8 Check [Use RGB Simulation] when you use RGB Simulation. % Go to the step described on page 12-7. 12.3.2 Set the Default Settings of the image controller manually. The Color Default Settings function... is used on page 12-8. Then, select the CMYK target profile to use. 5 Check [Use Paper Simulation] when you use RGB Simulation. % Go to the step described on screens displayed par 3 tabs. 12.3.1 Set the Default Settings of the RGB-CMYK ...
...[Graphic], select the rendering method for Graphic. 7 From [Rendering] - [Text], select the rendering method for Text. 8 Check [Use RGB Simulation] when you use RGB Simulation. % Go to the step described on page 12-7. 12.3.2 Set the Default Settings of the image controller manually. The Color Default Settings function... is used on page 12-8. Then, select the CMYK target profile to use. 5 Check [Use Paper Simulation] when you use RGB Simulation. % Go to the step described on screens displayed par 3 tabs. 12.3.1 Set the Default Settings of the RGB-CMYK ...
IC-601 Color Centro User Guide
Page 201
...as follows; [RGB] tab [No Color Conversion] [Use RGB-CMYK Device Link Profile] [Use RGB Source Profile] [Rendering] RGB Simulation Check Job OFF OFF ON C8000/C7000/C6000: Saturation C70hc: Perceptual OFF [CMYK] tab [No Color Conversion] [Use CMYK-CMYK Device Link Profile] [Use CMYK Target Profile]... [Paper Simulation] Check Job OFF OFF ON OFF [Other Settings] tab [Printer Profile] [Paper Type Link] [Tone Curve] [Pure Black] [Gray ...
...as follows; [RGB] tab [No Color Conversion] [Use RGB-CMYK Device Link Profile] [Use RGB Source Profile] [Rendering] RGB Simulation Check Job OFF OFF ON C8000/C7000/C6000: Saturation C70hc: Perceptual OFF [CMYK] tab [No Color Conversion] [Use CMYK-CMYK Device Link Profile] [Use CMYK Target Profile]... [Paper Simulation] Check Job OFF OFF ON OFF [Other Settings] tab [Printer Profile] [Paper Type Link] [Tone Curve] [Pure Black] [Gray ...
IC-601 Color Centro User Guide
Page 205
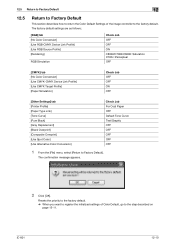
... settings which are corresponding to the multiple paper types, Color Configuration is enabled. Basic Color Settings Spot Color Black Overprint (ON/OFF) Alternative Color RGB Simulation (ON/OFF) Pure Black (OFF/Text/Text & Graphic) Grey Replacement (ON/OFF) Composite Overprint (OFF/Image Quality/Speed) Tone Curve Information Tone Curve Adjustment (ON...
... settings which are corresponding to the multiple paper types, Color Configuration is enabled. Basic Color Settings Spot Color Black Overprint (ON/OFF) Alternative Color RGB Simulation (ON/OFF) Pure Black (OFF/Text/Text & Graphic) Grey Replacement (ON/OFF) Composite Overprint (OFF/Image Quality/Speed) Tone Curve Information Tone Curve Adjustment (ON...
IC-601 Color Centro User Guide
Page 206
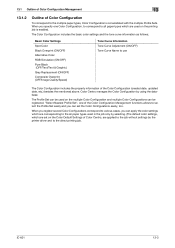
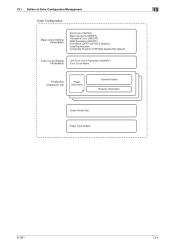
13.1 Outline of Color Configuration Management Color Configuration Basic Color Setting Information Spot Color (ON/OFF) Black Overprint (ON/OFF) Alternative Color (ON/OFF) RGB Simulation (ON/OFF) Pure Black (OFF/Text/Text & Graphic) Gray Replacement Composite Overprint (OFF/High Quality/High Speed) Tone Curve Setting Information Use Tone Curve Adjustment (ON/OFF) Tone Curve Name Profile Set (maximum 16) Paper Infomration Several Profiles Property Information Default Profile Set Paper Type Default 13 IC-601 13-4
13.1 Outline of Color Configuration Management Color Configuration Basic Color Setting Information Spot Color (ON/OFF) Black Overprint (ON/OFF) Alternative Color (ON/OFF) RGB Simulation (ON/OFF) Pure Black (OFF/Text/Text & Graphic) Gray Replacement Composite Overprint (OFF/High Quality/High Speed) Tone Curve Setting Information Use Tone Curve Adjustment (ON/OFF) Tone Curve Name Profile Set (maximum 16) Paper Infomration Several Profiles Property Information Default Profile Set Paper Type Default 13 IC-601 13-4
IC-601 Color Centro User Guide
Page 212
...]. 6 Check [Use Spot Color] when you use Spot Color. 7 Check [Use Alternative Color Conversion] when you use Alternative Color Conversion. 8 Check [Use RGB Simulation] when you use RGB Simulation. 9 Check [Use Tone Curve Adjustment] and specify the torn curve when you use Tone Curve Adjustment. 10 If necessary, enter the description to...
...]. 6 Check [Use Spot Color] when you use Spot Color. 7 Check [Use Alternative Color Conversion] when you use Alternative Color Conversion. 8 Check [Use RGB Simulation] when you use RGB Simulation. 9 Check [Use Tone Curve Adjustment] and specify the torn curve when you use Tone Curve Adjustment. 10 If necessary, enter the description to...
IC-307 User Guide
Page 87
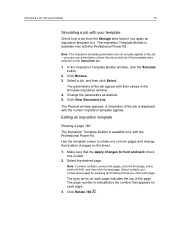
...Imposition Template Builder window, click the Simulate button. 2. Editing an imposition template Rotating a page 180° The Imposition Template Builder is available only with the Professional Power Kit. Select the desired page. The page number is indicated by pressing and holding Ctrl as desired. 5. ...pages, click the first page, press and hold Shift, and then click the last page. The gray arrow on each page. 3. The parameters of the job appear with the current imposition template applied. Simulating a job with your template 79 Simulating a job with your template Check ...
...Imposition Template Builder window, click the Simulate button. 2. Editing an imposition template Rotating a page 180° The Imposition Template Builder is available only with the Professional Power Kit. Select the desired page. The page number is indicated by pressing and holding Ctrl as desired. 5. ...pages, click the first page, press and hold Shift, and then click the last page. The gray arrow on each page. 3. The parameters of the job appear with the current imposition template applied. Simulating a job with your template 79 Simulating a job with your template Check ...

IC-307 User Guide
Page 193
... Template Builder changing position of a page 80 creating a template 77 overview 76 rotating a page 180° 79 rotating both sides of a page 180° 80 simulating job with imposition template 79 J Job History 169 Job Preview & Editor 28-31 deleting a page from a job 29 finding CMYK values of a specific area 31...
... Template Builder changing position of a page 80 creating a template 77 overview 76 rotating a page 180° 79 rotating both sides of a page 180° 80 simulating job with imposition template 79 J Job History 169 Job Preview & Editor 28-31 deleting a page from a job 29 finding CMYK values of a specific area 31...

IC-306 Procedure to upgrade to Version 2.0
Page 4
...Select Language screen displays, select a language. At the message "System software is connected), reboot the Fiery PRO80. Remove media and press OK to reboot. During this segment. Coordinate with the fonts provided in system software, the customer may be deleted?" The network ...described on the HDD. Along with the network administrator at the customer site before installing system software. Do not push any custom simulation and output profiles. NOTE: This installation segment takes approximately 10 minutes. 8. NOTE: This installation segment takes approximately 20 minutes....
...Select Language screen displays, select a language. At the message "System software is connected), reboot the Fiery PRO80. Remove media and press OK to reboot. During this segment. Coordinate with the fonts provided in system software, the customer may be deleted?" The network ...described on the HDD. Along with the network administrator at the customer site before installing system software. Do not push any custom simulation and output profiles. NOTE: This installation segment takes approximately 10 minutes. 8. NOTE: This installation segment takes approximately 20 minutes....
IC-306 Procedure to upgrade to Version 2.0
Page 6
Ask the network administrator to reinstall any custom simulations that may have been deleted when you install version 2.0 system software. 18. Print the Font List and ask the network administrator to reinstall any customer-...
Ask the network administrator to reinstall any custom simulations that may have been deleted when you install version 2.0 system software. 18. Print the Font List and ask the network administrator to reinstall any customer-...