Cube3 User Guide
Page 5
...or modifications to operate this equipment not specifically approved by one or more of the device. This document is the property of 3D Systems, Inc. FCC NOTICE This equipment has been tested and found to part 15 of the applicable EC directives. COMPLIANCE This ... of materials, enjoy the freedom to express their creativity like never before. All rights reserved. The 3D Systems logo, 3D Systems, Cube and Cubify are designed to correct the interference by 3D Systems may cause undesired operation of the following two conditions: (1) this device may not cause interference, and...
...or modifications to operate this equipment not specifically approved by one or more of the device. This document is the property of 3D Systems, Inc. FCC NOTICE This equipment has been tested and found to part 15 of the applicable EC directives. COMPLIANCE This ... of materials, enjoy the freedom to express their creativity like never before. All rights reserved. The 3D Systems logo, 3D Systems, Cube and Cubify are designed to correct the interference by 3D Systems may cause undesired operation of the following two conditions: (1) this device may not cause interference, and...
Cube3 User Guide
Page 6
...during the warranty period because of abnormal use or conditions (such as riots, floods, misuse, neglect or improper service by anyone except 3D Systems or its authorized service provider), and (iii) repairs required during the warranty period because of the use of (i) 90 days from the...WHETHER THOSE WARRANTIES ARE EXPRESS, IMPLIED OR STATUTORY, INCLUDING WARRANTIES OF MERCHANTABILITY AND FITNESS FOR INTENDED OR PARTICULAR PURPOSES. Warranty Hotline from 3D Systems to make it free of the use or conditions (such as Material Cartridges, Print Pads, and Cube Glue), (ii) repairs required...
...during the warranty period because of abnormal use or conditions (such as riots, floods, misuse, neglect or improper service by anyone except 3D Systems or its authorized service provider), and (iii) repairs required during the warranty period because of the use of (i) 90 days from the...WHETHER THOSE WARRANTIES ARE EXPRESS, IMPLIED OR STATUTORY, INCLUDING WARRANTIES OF MERCHANTABILITY AND FITNESS FOR INTENDED OR PARTICULAR PURPOSES. Warranty Hotline from 3D Systems to make it free of the use or conditions (such as Material Cartridges, Print Pads, and Cube Glue), (ii) repairs required...
Cube3 User Guide
Page 7
... hazard that could cause loss of data, damage to setting up the printer. ranty. • Use of and avoid hot surfaces. 3D Systems, Inc. 3 observe children closely and intervene as necessary to the Cube. Wait until the print jet's amber light turns off before disconnecting... are not accessible to ensure proper printing and be mindful of print materials, or 3D prints other than 3D Systems' print materials and genuine 3D Systems' components may damage the Cube. Ensure small 3D prints are potential choking hazards for young children. • DO NOT change a material cartridge ...
... hazard that could cause loss of data, damage to setting up the printer. ranty. • Use of and avoid hot surfaces. 3D Systems, Inc. 3 observe children closely and intervene as necessary to the Cube. Wait until the print jet's amber light turns off before disconnecting... are not accessible to ensure proper printing and be mindful of print materials, or 3D prints other than 3D Systems' print materials and genuine 3D Systems' components may damage the Cube. Ensure small 3D prints are potential choking hazards for young children. • DO NOT change a material cartridge ...
Cube3 User Guide
Page 8
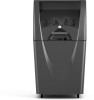
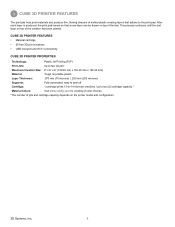
...) Supports: Fully automated; Up to the print pad. This process continues until the last layer on the printer model and configuration. 3D Systems, Inc. 4 3 CUBE 3D PRINTER FEATURES The print jets heat print materials and produce thin, flowing streams of the creation has been printed. CUBE... 3D PRINTER FEATURES • Material cartridge • 25 free 3D print creations • USB inlet port and Wi-Fi connectivity CUBE 3D PRINTER PROPERTIES Technology: Plastic Jet Printing (PJP) Print Jets: Up to -...
...) Supports: Fully automated; Up to the print pad. This process continues until the last layer on the printer model and configuration. 3D Systems, Inc. 4 3 CUBE 3D PRINTER FEATURES The print jets heat print materials and produce thin, flowing streams of the creation has been printed. CUBE... 3D PRINTER FEATURES • Material cartridge • 25 free 3D print creations • USB inlet port and Wi-Fi connectivity CUBE 3D PRINTER PROPERTIES Technology: Plastic Jet Printing (PJP) Print Jets: Up to -...

Cube3 User Guide
Page 9
4 AT A GLANCE B C F A G B C J D H H E KI A Print Jets B Print Jet Tubes C Material Cartridges D Print Pad E Print Platform F Touchscreen Display I K G On / Off Button H USB Inlet Port (Mass Storage Device) I Power Inlet J Refuse Bins K USB B Port (for future use) 3D Systems, Inc. 5
4 AT A GLANCE B C F A G B C J D H H E KI A Print Jets B Print Jet Tubes C Material Cartridges D Print Pad E Print Platform F Touchscreen Display I K G On / Off Button H USB Inlet Port (Mass Storage Device) I Power Inlet J Refuse Bins K USB B Port (for future use) 3D Systems, Inc. 5
Cube3 User Guide
Page 10
...100 - 240 Volts, at room temperature: 16-29° C (60 - 85° F) • Non-condensing relative humidity: 5% - 25% 3D Systems, Inc. 6 The following conditions ensure the material remains high quality: • Do not unpack cartridges from the foil until the material is required for ...) to transfer print files to the printer using 3.2 library of GLU) WINDOWS REQUIREMENTS • Cubify software runs on your printer. and 64-bit operating systems • Windows 7, 8 and 8.1 • Minimum screen resolution: 1024 x 768 • Windows is needed. • Store at 50/60 Hz...
...100 - 240 Volts, at room temperature: 16-29° C (60 - 85° F) • Non-condensing relative humidity: 5% - 25% 3D Systems, Inc. 6 The following conditions ensure the material remains high quality: • Do not unpack cartridges from the foil until the material is required for ...) to transfer print files to the printer using 3.2 library of GLU) WINDOWS REQUIREMENTS • Cubify software runs on your printer. and 64-bit operating systems • Windows 7, 8 and 8.1 • Minimum screen resolution: 1024 x 768 • Windows is needed. • Store at 50/60 Hz...
Cube3 User Guide
Page 12
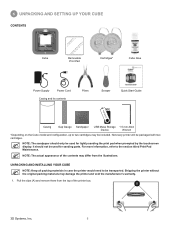
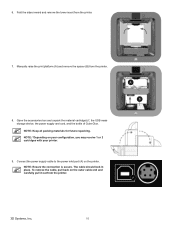
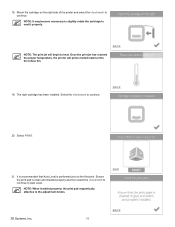
... the contents may damage the printer and void the manufacturer's warranty. 1. Not every printer will be included. NOTE: The actual appearance of the printer box. A 3D Systems, Inc. 8 NOTE: The sandpaper should not be transported. For more information, refer to be used for sanding parts. It should only be used for lightly...
... the contents may damage the printer and void the manufacturer's warranty. 1. Not every printer will be included. NOTE: The actual appearance of the printer box. A 3D Systems, Inc. 8 NOTE: The sandpaper should not be transported. For more information, refer to be used for sanding parts. It should only be used for lightly...
Cube3 User Guide
Page 13
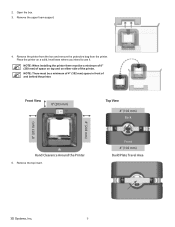
...: There must be a minimum of 4" (102 mm) space in front of and behind the printer. Open the box. 3. Front 4" (102 mm) Build Plate Travel Area 3D Systems, Inc. 9 Front View 8" (203 mm) Top View 4" (102 mm) Back 8" (203 mm) 8" (203 mm) Hand Clearance Around the Printer 5. Remove the top insert. Place the...
...: There must be a minimum of 4" (102 mm) space in front of and behind the printer. Open the box. 3. Front 4" (102 mm) Build Plate Travel Area 3D Systems, Inc. 9 Front View 8" (203 mm) Top View 4" (102 mm) Back 8" (203 mm) 8" (203 mm) Hand Clearance Around the Printer 5. Remove the top insert. Place the...
Cube3 User Guide
Page 14
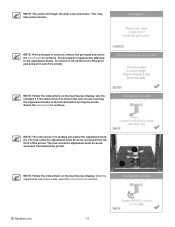
... and carefully pull it out from the printer. To remove the cable, pull back on the printer. NOTE: Keep all packing materials for future repacking. A B A 3D Systems, Inc. 10 Manually raise the print platform (A) and remove the spacer (B) from the printer. 7. NOTE: Ensure the connection is secure. The cable should lock in...
... and carefully pull it out from the printer. To remove the cable, pull back on the printer. NOTE: Keep all packing materials for future repacking. A B A 3D Systems, Inc. 10 Manually raise the print platform (A) and remove the spacer (B) from the printer. 7. NOTE: Ensure the connection is secure. The cable should lock in...
Cube3 User Guide
Page 15
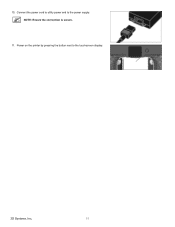
NOTE: Ensure the connection is secure. 11. 10. Power on the printer by pressing the button next to the power supply. Connect the power cord to utility power and to the touchscreen display. 3D Systems, Inc. 11
NOTE: Ensure the connection is secure. 11. 10. Power on the printer by pressing the button next to the power supply. Connect the power cord to utility power and to the touchscreen display. 3D Systems, Inc. 11
Cube3 User Guide
Page 16
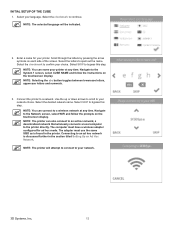
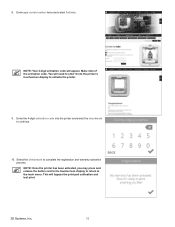
..., select CUBE NAME and follow the prompts on the touchscreen display. The adapter must have a wireless adapter configured for your network. 3D Systems, Inc. 12 Navigate to the Network screen, select WIFI and follow the instructions on each side of the screen. NOTE: You can connect to the ...
..., select CUBE NAME and follow the prompts on the touchscreen display. The adapter must have a wireless adapter configured for your network. 3D Systems, Inc. 12 Navigate to the Network screen, select WIFI and follow the instructions on each side of the screen. NOTE: You can connect to the ...
Cube3 User Guide
Page 17
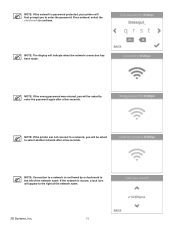
... the wrong password was entered, you to enter the password. NOTE: Connection to a network is confirmed by a checkmark to the left of the network name. 3D Systems, Inc. 13 NOTE: If the network is password protected, your printer will first prompt you will be asked to enter the password again after a few...
... the wrong password was entered, you to enter the password. NOTE: Connection to a network is confirmed by a checkmark to the left of the network name. 3D Systems, Inc. 13 NOTE: If the network is password protected, your printer will first prompt you will be asked to enter the password again after a few...
Cube3 User Guide
Page 18
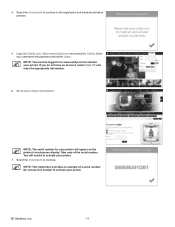
Enter your printer. 7. Go to activate your printer. 3D Systems, Inc. 14 Do not use this number to www.cubify.com/activate. Log in to www.cubify.com to www.cubify.com and select My ...
Enter your printer. 7. Go to activate your printer. 3D Systems, Inc. 14 Do not use this number to www.cubify.com/activate. Log in to www.cubify.com to www.cubify.com and select My ...
Cube3 User Guide
Page 19
NOTE: Your 4-digit activation code will bypass the print pad calibration and test print. 3D Systems, Inc. 15 This will appear. Make note of the activation code. Select the checkmark to the main menu. Enter the 4-digit activation code into the ...
NOTE: Your 4-digit activation code will bypass the print pad calibration and test print. 3D Systems, Inc. 15 This will appear. Make note of the activation code. Select the checkmark to the main menu. Enter the 4-digit activation code into the ...
Cube3 User Guide
Page 20
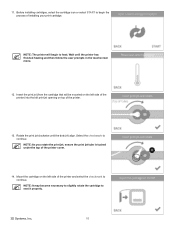
... cartridge that will begin the process of the printer cover. A 14. Before installing cartridges, select the cartridge icon or select START to seat it properly. 3D Systems, Inc. 16 NOTE: The printer will be mounted on top of the printer. 13. Rotate the print jet clockwise until the printer has finished heating...
... cartridge that will begin the process of the printer cover. A 14. Before installing cartridges, select the cartridge icon or select START to seat it properly. 3D Systems, Inc. 16 NOTE: The printer will be mounted on top of the printer. 13. Rotate the print jet clockwise until the printer has finished heating...
Cube3 User Guide
Page 21
.... NOTE: As you rotate the print jet, ensure the print jet tube is tucked under the top of the printer) into the refuse bin. 15. A 3D Systems, Inc. 17 Rotate the print jet clockwise until the printer has finished heating and then follow the user prompts in the touchscreen menu. 16. NOTE...
.... NOTE: As you rotate the print jet, ensure the print jet tube is tucked under the top of the printer) into the refuse bin. 15. A 3D Systems, Inc. 17 Rotate the print jet clockwise until the printer has finished heating and then follow the user prompts in the touchscreen menu. 16. NOTE...
Cube3 User Guide
Page 22
... properly and then select the checkmark to continue to Auto Level. NOTE: It may become necessary to slightly rotate the cartridge to the adjustment knobs. 3D Systems, Inc. 18 The right cartridge has been installed. NOTE: When installed properly, the print pad magnetically attaches to seat it properly. Ensure the print pad...
... properly and then select the checkmark to continue to Auto Level. NOTE: It may become necessary to slightly rotate the cartridge to the adjustment knobs. 3D Systems, Inc. 18 The right cartridge has been installed. NOTE: When installed properly, the print pad magnetically attaches to seat it properly. Ensure the print pad...
Cube3 User Guide
Page 23
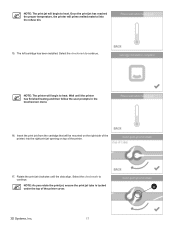
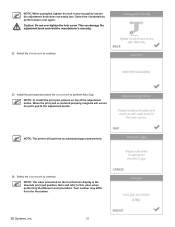
Use the included 1.5 mm Allen wrench to loosen the lock screws securing the adjustment knobs to continue. 2 1 3D Systems, Inc. 19 NOTE: Follow the instructions on the touchscreen display. To remove it, lift up the front of the print pad and pull it out ...
Use the included 1.5 mm Allen wrench to loosen the lock screws securing the adjustment knobs to continue. 2 1 3D Systems, Inc. 19 NOTE: Follow the instructions on the touchscreen display. To remove it, lift up the front of the print pad and pull it out ...
Cube3 User Guide
Page 24
... refer to perform Auto Level again. Select the checkmark to this value when performing the Manual Level procedure. Your number may differ from the illustration. 3D Systems, Inc. 20
... refer to perform Auto Level again. Select the checkmark to this value when performing the Manual Level procedure. Your number may differ from the illustration. 3D Systems, Inc. 20

Cube3 User Guide
Page 25
...successful the second time, select PLATE MAINTENANCE. NOTE: The printer will begin to heat and then begin printing the welcome message test print. 3D Systems, Inc. 21 Navigate to continue. NOTE: The printer will continue the process of the installed print cartridges, the printer will assign an ...installed cartridge color to bypass this test print at any time. Select SKIP to the test print. Select the checkmark to the System 1 screen and select TEST PRINT. Once the Manual Gap Adjustment procedure has been performed, note the final reading for more information about...
...successful the second time, select PLATE MAINTENANCE. NOTE: The printer will begin to heat and then begin printing the welcome message test print. 3D Systems, Inc. 21 Navigate to continue. NOTE: The printer will continue the process of the installed print cartridges, the printer will assign an ...installed cartridge color to bypass this test print at any time. Select SKIP to the test print. Select the checkmark to the System 1 screen and select TEST PRINT. Once the Manual Gap Adjustment procedure has been performed, note the final reading for more information about...


