
Operation Manual
Page 9
..., as it as "the Scanner"). vii These limits are designed to cause harmful interference in accordance with the instruction manual, may arise. Operation of the Driver software, operation procedures for installation/operation of the Scanner, a system outline, an explanation of this equipment in a residential area is likely to provide reasonable protection...
..., as it as "the Scanner"). vii These limits are designed to cause harmful interference in accordance with the instruction manual, may arise. Operation of the Driver software, operation procedures for installation/operation of the Scanner, a system outline, an explanation of this equipment in a residential area is likely to provide reasonable protection...
Operation Manual
Page 13
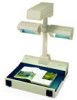
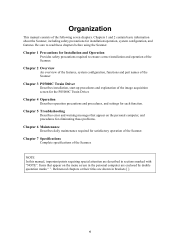
... Chapter 2 Overview An overview of the features, system configuration, functions and part names of the Scanner Chapter 3 PS5000C Twain Driver Describes installation, start-up procedures and explanation of the Scanner. Items that appear on the menu screen in the personal computer are shown in sections ...
... Chapter 2 Overview An overview of the features, system configuration, functions and part names of the Scanner Chapter 3 PS5000C Twain Driver Describes installation, start-up procedures and explanation of the Scanner. Items that appear on the menu screen in the personal computer are shown in sections ...
Operation Manual
Page 14
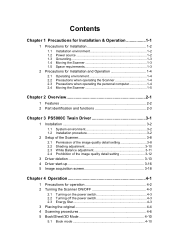
...when operating the personal computer 1-4 2.4 Moving the Scanner 1-5 Chapter 2 Overview 2-1 1 Features 2-2 2 Part identification and functions 2-3 Chapter 3 PS5000C Twain Driver 3-1 1 Installation 3-2 1.1 System environment 3-2 1.2 Installation procedure 3-2 2 Setup of the Scanner 3-8 2.1 Permission of the image quality detail ...Shading adjustment 3-10 2.3 White Balance adjustment 3-11 2.4 Prohibition of the image quality detail setting 3-12 3 Driver deletion 3-13 4 Driver start-up 3-16 5 Image acquisition screen 3-18 Chapter 4 Operation 4-1 1 Precautions for operation 4-2 2 ...
...when operating the personal computer 1-4 2.4 Moving the Scanner 1-5 Chapter 2 Overview 2-1 1 Features 2-2 2 Part identification and functions 2-3 Chapter 3 PS5000C Twain Driver 3-1 1 Installation 3-2 1.1 System environment 3-2 1.2 Installation procedure 3-2 2 Setup of the Scanner 3-8 2.1 Permission of the image quality detail ...Shading adjustment 3-10 2.3 White Balance adjustment 3-11 2.4 Prohibition of the image quality detail setting 3-12 3 Driver deletion 3-13 4 Driver start-up 3-16 5 Image acquisition screen 3-18 Chapter 4 Operation 4-1 1 Precautions for operation 4-2 2 ...
Operation Manual
Page 28
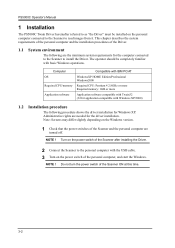
... system requirements for the computer connected to the Scanner to install the Driver. PS5000C Operator's Manual 1 Installation The PS5000C Twain Driver hereinafter referred to as "the Driver" must be completely familiar with Windows XP/2000) 1.2 Installation procedure The following are needed for the driver installation. The operator should be installed on the power switch of the...
... system requirements for the computer connected to the Scanner to install the Driver. PS5000C Operator's Manual 1 Installation The PS5000C Twain Driver hereinafter referred to as "the Driver" must be completely familiar with Windows XP/2000) 1.2 Installation procedure The following are needed for the driver installation. The operator should be installed on the power switch of the...
Operation Manual
Page 29
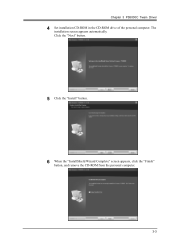
Chapter 3 PS5000C Twain Driver 4 Set installation CD-ROM in the CD-ROM drive of the personal computer. Click the "Next" button. 5 Click the "Install" button. 6 When the "InstallShield Wizard Complete" screen appears, click the "Finish" button, and remove the CD-ROM from the personal computer. 3-3 The installation screen appears automatically.
Chapter 3 PS5000C Twain Driver 4 Set installation CD-ROM in the CD-ROM drive of the personal computer. Click the "Next" button. 5 Click the "Install" button. 6 When the "InstallShield Wizard Complete" screen appears, click the "Finish" button, and remove the CD-ROM from the personal computer. 3-3 The installation screen appears automatically.
Operation Manual
Page 30
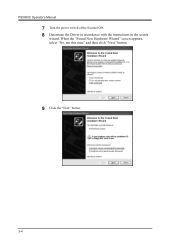
When the "Found New Hardware Wizard" screen appears, select "No, not this time" and then click "Next" button. 9 Click the "Next" button. 3-4 PS5000C Operator's Manual 7 Turn the power switch of the Scanner ON. 8 Determine the Driver in accordance with the instructions in the search wizard.
When the "Found New Hardware Wizard" screen appears, select "No, not this time" and then click "Next" button. 9 Click the "Next" button. 3-4 PS5000C Operator's Manual 7 Turn the power switch of the Scanner ON. 8 Determine the Driver in accordance with the instructions in the search wizard.
Operation Manual
Page 31
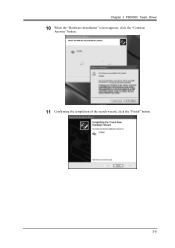
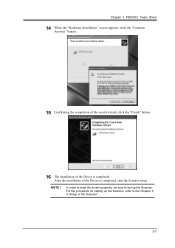
Chapter 3 PS5000C Twain Driver 10 When the "Hardware Installation" screen appears, click the "Continue Anyway" button. 11 Confirming the completion of the search wizard, click the "Finish" button. 3-5
Chapter 3 PS5000C Twain Driver 10 When the "Hardware Installation" screen appears, click the "Continue Anyway" button. 11 Confirming the completion of the search wizard, click the "Finish" button. 3-5
Operation Manual
Page 32
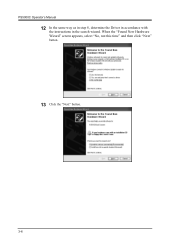
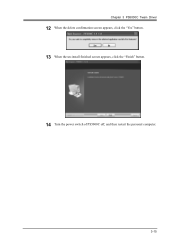
When the "Found New Hardware Wizard" screen appears, select "No, not this time" and then click "Next" button. 13 Click the "Next" button. 3-6 PS5000C Operator's Manual 12 In the same way as in step 8, determine the Driver in accordance with the instructions in the search wizard.
When the "Found New Hardware Wizard" screen appears, select "No, not this time" and then click "Next" button. 13 Click the "Next" button. 3-6 PS5000C Operator's Manual 12 In the same way as in step 8, determine the Driver in accordance with the instructions in the search wizard.
Operation Manual
Page 33
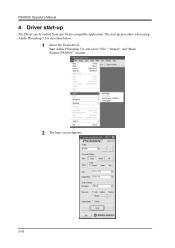
In order to read the screen properly, be sure to set up the Scanner, refer to the Chapter 3, "2 Setup of the Scanner". 3-7 NOTE ! For the procedure for setting up the Scanner. Chapter 3 PS5000C Twain Driver 14 When the "Hardware Installation" screen appears, click the "Continue Anyway" button. 15 Confirming the completion of the search wizard, click the "Finish" button. 16 The installation of the Driver is completed, start the Scanner setup. After the installation of the Driver is completed.
In order to read the screen properly, be sure to set up the Scanner, refer to the Chapter 3, "2 Setup of the Scanner". 3-7 NOTE ! For the procedure for setting up the Scanner. Chapter 3 PS5000C Twain Driver 14 When the "Hardware Installation" screen appears, click the "Continue Anyway" button. 15 Confirming the completion of the search wizard, click the "Finish" button. 16 The installation of the Driver is completed, start the Scanner setup. After the installation of the Driver is completed.
Operation Manual
Page 34
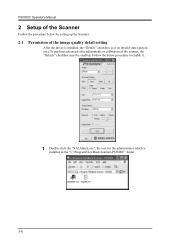
Follow the below for the administrator which is in the "C:\ProgramFiles\Book Scanner-PS5000C" folder. 3-8 PS5000C Operator's Manual 2 Setup of the Scanner Follow the procedure below procedure to enable it. 1 Double-click the "NA3Admin.exe", the tool for setting up the Scanner. 2.1 Permission of the scanner, the "Details" checkbox must be enabled. To perform advanced color adjustments or calibration of the image quality detail setting After the driver is installed, the "Details" checkbox is installed in an invalid state (grayed out).
Follow the below for the administrator which is in the "C:\ProgramFiles\Book Scanner-PS5000C" folder. 3-8 PS5000C Operator's Manual 2 Setup of the Scanner Follow the procedure below procedure to enable it. 1 Double-click the "NA3Admin.exe", the tool for setting up the Scanner. 2.1 Permission of the scanner, the "Details" checkbox must be enabled. To perform advanced color adjustments or calibration of the image quality detail setting After the driver is installed, the "Details" checkbox is installed in an invalid state (grayed out).
Operation Manual
Page 35
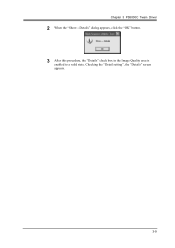
Checking the "Detail setting", the "Details" screen appears. 3-9 Chapter 3 PS5000C Twain Driver 2 When the "Show---Details" dialog appears, click the "OK" button. 3 After this procedure, the "Details" check box in the Image Quality area is enabled to a valid state.
Checking the "Detail setting", the "Details" screen appears. 3-9 Chapter 3 PS5000C Twain Driver 2 When the "Show---Details" dialog appears, click the "OK" button. 3 After this procedure, the "Details" check box in the Image Quality area is enabled to a valid state.
Operation Manual
Page 37
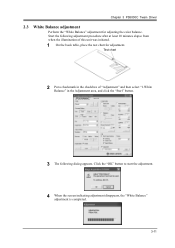
Click the "OK" button to start the adjustment. 4 When the screen indicating adjustment disappears, the "White Balance" adjustment is completed. 3-11 Chapter 3 PS5000C Twain Driver 2.3 White Balance adjustment Perform the "White Balance" adjustment for adjustment. Test chart 2 Put a checkmark in the checkbox of "Adjustment" and then select "1.White Balance" in ...
Click the "OK" button to start the adjustment. 4 When the screen indicating adjustment disappears, the "White Balance" adjustment is completed. 3-11 Chapter 3 PS5000C Twain Driver 2.3 White Balance adjustment Perform the "White Balance" adjustment for adjustment. Test chart 2 Put a checkmark in the checkbox of "Adjustment" and then select "1.White Balance" in ...

Operation Manual
Page 39
Chapter 3 PS5000C Twain Driver 3 Driver deletion When the Driver installed on the personal computer is no longer necessary, use the following procedure to perform the deletion. 1 Confirm that the personal computer is connected with the main unit. 2 Turn ON the power supply of the main unit. 3 Turn ON the power supply of the personal computer. 4 First select "Start", and then "Setting", "Control panel", "System", "Hardware", and "Device manager". 5 Delete the "Image devices - KYOKKO Book Scanner". 6 When the delete confirmation screen appears, click the "OK" button. 3-13
Chapter 3 PS5000C Twain Driver 3 Driver deletion When the Driver installed on the personal computer is no longer necessary, use the following procedure to perform the deletion. 1 Confirm that the personal computer is connected with the main unit. 2 Turn ON the power supply of the main unit. 3 Turn ON the power supply of the personal computer. 4 First select "Start", and then "Setting", "Control panel", "System", "Hardware", and "Device manager". 5 Delete the "Image devices - KYOKKO Book Scanner". 6 When the delete confirmation screen appears, click the "OK" button. 3-13
Operation Manual
Page 41
Chapter 3 PS5000C Twain Driver 12 When the delete confirmation screen appears, click the "Yes" button. 13 When the un-install finished screen appears, click the "Finish" button. 14 Turn the power switch of PS5000C off, and then restart the personal computer. 3-15
Chapter 3 PS5000C Twain Driver 12 When the delete confirmation screen appears, click the "Yes" button. 13 When the un-install finished screen appears, click the "Finish" button. 14 Turn the power switch of PS5000C off, and then restart the personal computer. 3-15
Operation Manual
Page 42
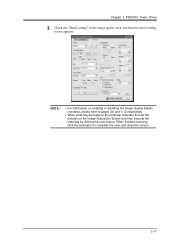
Start Adobe Photoshop 7.0, and select "File", "Import", and "Book Scanner-PS5000C" in order. 2 The basic screen appears. 3-16 The start -up procedure when using Adobe Photoshop 7.0 is described below. 1 Select the Twain driver. PS5000C Operator's Manual 4 Driver start up The Driver can be started from any Twain compatible application.
Start Adobe Photoshop 7.0, and select "File", "Import", and "Book Scanner-PS5000C" in order. 2 The basic screen appears. 3-16 The start -up procedure when using Adobe Photoshop 7.0 is described below. 1 Select the Twain driver. PS5000C Operator's Manual 4 Driver start up The Driver can be started from any Twain compatible application.
Operation Manual
Page 43
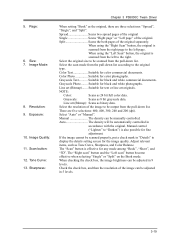
Chapter 3 PS5000C Twain Driver 3 Check the "Detail setting" in the image quality area, and then the detail setting screen appears. NOTE ! • For information on the Image Acquisition Screen and then execute the scanning by clicking the scan button. When finished scanning, click the exit button to the personal computer first set the function on enabling or disabling the Image Quality Details checkbox, please refer to pages 3-6 and 3-12 respectfully. • When scanning an image to complete the scan and close the screen. 3-17
Chapter 3 PS5000C Twain Driver 3 Check the "Detail setting" in the image quality area, and then the detail setting screen appears. NOTE ! • For information on the Image Acquisition Screen and then execute the scanning by clicking the scan button. When finished scanning, click the exit button to the personal computer first set the function on enabling or disabling the Image Quality Details checkbox, please refer to pages 3-6 and 3-12 respectfully. • When scanning an image to complete the scan and close the screen. 3-17
Operation Manual
Page 45
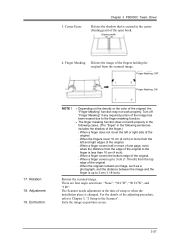
Image Mode: 8. Sharpness: Chapter 3 PS5000C Twain Driver When setting "Book" as the original, there are five selections: 600, 400, 300, 240 and 200 (dpi). When using the "Right Scan" button, the original ...
Image Mode: 8. Sharpness: Chapter 3 PS5000C Twain Driver When setting "Book" as the original, there are five selections: 600, 400, 300, 240 and 200 (dpi). When using the "Right Scan" button, the original ...
Operation Manual
Page 47
.... • The finger masking function does not work properly. There are four angle selections: "None", "90 CW", "90 CCW", and "180". Center Erase Chapter 3 PS5000C Twain Driver Deletes the shadow that is up to 3 cm (1.18 inch) from the scanned image. Adjustment: 19. When a finger does not cover the left and right...
.... • The finger masking function does not work properly. There are four angle selections: "None", "90 CW", "90 CCW", and "180". Center Erase Chapter 3 PS5000C Twain Driver Deletes the shadow that is up to 3 cm (1.18 inch) from the scanned image. Adjustment: 19. When a finger does not cover the left and right...
Operation Manual
Page 65
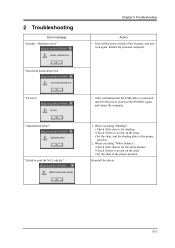
.... When executing "White balance": • Check if the chart is for shading. • Check if there is connected, turn ON the power switch of the PS5000C again and restart the computer. 1. Hardware error" Chapter 5 Troubleshooting Action • Turn off the power switch of the Scanner, and turn it on the chart... the proper position. "Scan head positioning error" "I/F error" "Adjustment Failure" "Failed to the proper position. 2. 2 Troubleshooting Error message "Scanner - Restart the personal computer. Reinstall the driver. 5-3
.... When executing "White balance": • Check if the chart is for shading. • Check if there is connected, turn ON the power switch of the PS5000C again and restart the computer. 1. Hardware error" Chapter 5 Troubleshooting Action • Turn off the power switch of the Scanner, and turn it on the chart... the proper position. "Scan head positioning error" "I/F error" "Adjustment Failure" "Failed to the proper position. 2. 2 Troubleshooting Error message "Scanner - Restart the personal computer. Reinstall the driver. 5-3


