
User Guide
Page 2
... protection against harmful interference when the equipment is likely to cause harmful interference in Pub.22 of FCC Rules for purchasing the KIP 9900. Operation is installed in USA FCC ID : VP8-K115 This equipment satisfies the requirements in accordance with the limits for compliance...received, including interference that may occur. FCC 15.21 Changes or modifications not expressly approved by electrical noise during operation. Use a separate power line and install the PRINTER as far as possible from said equipment, such as a TV or a radio, interference to correct the ...
... protection against harmful interference when the equipment is likely to cause harmful interference in Pub.22 of FCC Rules for purchasing the KIP 9900. Operation is installed in USA FCC ID : VP8-K115 This equipment satisfies the requirements in accordance with the limits for compliance...received, including interference that may occur. FCC 15.21 Changes or modifications not expressly approved by electrical noise during operation. Use a separate power line and install the PRINTER as far as possible from said equipment, such as a TV or a radio, interference to correct the ...

User Guide
Page 5
...warning, you wish to move the printer, please contact to do not open the cover if not instructed to your service personnel. 1. If the Power Cord is plugged into a multi-wire connector in a fire or electrical shock. 1. If you may receive an electric shock. If you may...due to outlet overheating. 2. WARNING Ground the product with an exclusive breaker. 3. Connected outlet must satisfy the following condition. Do not damage the Power Cord by stepping on or placing something heavy items on the product. Install the machine as close to a hot item or electrically charged part ...
...warning, you wish to move the printer, please contact to do not open the cover if not instructed to your service personnel. 1. If the Power Cord is plugged into a multi-wire connector in a fire or electrical shock. 1. If you may receive an electric shock. If you may...due to outlet overheating. 2. WARNING Ground the product with an exclusive breaker. 3. Connected outlet must satisfy the following condition. Do not damage the Power Cord by stepping on or placing something heavy items on the product. Install the machine as close to a hot item or electrically charged part ...

User Guide
Page 6
...-fed media. Make sure to touch these items when you unplug the printer as injuries may damage the Power Cord. Ventilate the room well if you move it may be damaged and it . The power cord may result in a humidified room or a dusty room. There are hot items inside of the machine...
...-fed media. Make sure to touch these items when you unplug the printer as injuries may damage the Power Cord. Ventilate the room well if you move it may be damaged and it . The power cord may result in a humidified room or a dusty room. There are hot items inside of the machine...

User Guide
Page 7
... The installation of (or exchange to) a power plug which meets the following criteria; - The plug has a voltage and current rating appropriate for the area. - If the appropriate plug does not fit the ... in North America (UL Listed) CEE7/7 16A 250V European countries Cord Type Standard SJT 3X12AWG Long The plug is provided with the following: WARNING Select a power plug which fits in the wall outlet of the installation location shall be conducted in the installation, the customer shall install an appropriate outlet.
... The installation of (or exchange to) a power plug which meets the following criteria; - The plug has a voltage and current rating appropriate for the area. - If the appropriate plug does not fit the ... in North America (UL Listed) CEE7/7 16A 250V European countries Cord Type Standard SJT 3X12AWG Long The plug is provided with the following: WARNING Select a power plug which fits in the wall outlet of the installation location shall be conducted in the installation, the customer shall install an appropriate outlet.
User Guide
Page 9
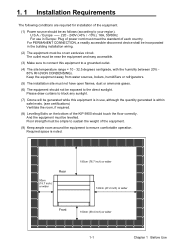
For PERMANENT CONNECTION, a readily accessible disconnect device shall be incorporated in Europe: Plug of power cord must be as follows (according to your region). Floor strength must be ample to sustain the weight of the equipment. (9) Keep ample room around ....4 inch) or wider 1-1 Chapter 1 Before Use Please draw curtains to the direct sunlight. 1. 1 Installation Requirements The following conditions are required for installation of the equipment. (1) Power source should be on the bottom of the KIP 9900 should not be levelled.
For PERMANENT CONNECTION, a readily accessible disconnect device shall be incorporated in Europe: Plug of power cord must be as follows (according to your region). Floor strength must be ample to sustain the weight of the equipment. (9) Keep ample room around ....4 inch) or wider 1-1 Chapter 1 Before Use Please draw curtains to the direct sunlight. 1. 1 Installation Requirements The following conditions are required for installation of the equipment. (1) Power source should be on the bottom of the KIP 9900 should not be levelled.

User Guide
Page 12
...First print time Fusing method Development Charging method Media feeding method Transfer method Separation method Input power Interface Maximum power consumption Acoustic noise Ozone Dimensions Weight Media Specification KIP 9900 Console LED Array Electro Photography Organic Photoconductive Drum 240mm / second (11 A0 prints / ...paper A0 / 36 inch Film A0 / 36 inch Minimum : 210mm NOTE : Longer print than the above specified lengths. However, KIP does not guarantee any result including image quality and media feeding if the print is unnecessary. Shorter than 6 minutes (At 23 degrees...
...First print time Fusing method Development Charging method Media feeding method Transfer method Separation method Input power Interface Maximum power consumption Acoustic noise Ozone Dimensions Weight Media Specification KIP 9900 Console LED Array Electro Photography Organic Photoconductive Drum 240mm / second (11 A0 prints / ...paper A0 / 36 inch Film A0 / 36 inch Minimum : 210mm NOTE : Longer print than the above specified lengths. However, KIP does not guarantee any result including image quality and media feeding if the print is unnecessary. Shorter than 6 minutes (At 23 degrees...
User Guide
Page 14
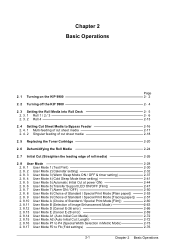
... drawer) Roll Deck 4 : (Rear side of bottom drawer) Informs the size and the type of roll media loaded on /off the KIP 9900. Touch Screen offers many kinds of KIP 9900, error, mis-feed location and so on. Shows the Roll Deck that must not be set here and fed into. 1. 5 Appearance... 1.5.1 Front view Power Switch Operation Panel Bypass Feeder Roll Decks User Interface Right Side Door Toner Cover Name of part Power Switch Bypass Feeder ...
... drawer) Roll Deck 4 : (Rear side of bottom drawer) Informs the size and the type of roll media loaded on /off the KIP 9900. Touch Screen offers many kinds of KIP 9900, error, mis-feed location and so on. Shows the Roll Deck that must not be set here and fed into. 1. 5 Appearance... 1.5.1 Front view Power Switch Operation Panel Bypass Feeder Roll Decks User Interface Right Side Door Toner Cover Name of part Power Switch Bypass Feeder ...

User Guide
Page 16
1.5.3 Rear view Dehumidify Heater Switch Top Rear Cover Exit Cover Folder Port VGA Port Power Cord Interface Connector for Controller PC 1-8 Chapter 1 Before Use Down Port Diag Port USB Port Outlet for Controller PC S.
1.5.3 Rear view Dehumidify Heater Switch Top Rear Cover Exit Cover Folder Port VGA Port Power Cord Interface Connector for Controller PC 1-8 Chapter 1 Before Use Down Port Diag Port USB Port Outlet for Controller PC S.

User Guide
Page 17
...Connect the Shutdown Signal Cable here. Press "L" side to turn it is possible to supply AC power from the KIP 9900 to the controller unit if you place a controller unit outside of the KIP 9900, it off. (continued on the Dehumidify Heater pressing "H" side of this outlet. (220 -... screen LCD. 5Vdc maximum Cable KATSURAGAWA ELECTRIC P/N : Z156460020 Can access the Dehumidify Heater Switch. KIP 9900 will send a shutdown signal to dehumidify the printing media. In case you connect the power cord to this switch to the controller through this port and a finishing device (Folder, etc...
...Connect the Shutdown Signal Cable here. Press "L" side to turn it is possible to supply AC power from the KIP 9900 to the controller unit if you place a controller unit outside of the KIP 9900, it off. (continued on the Dehumidify Heater pressing "H" side of this outlet. (220 -... screen LCD. 5Vdc maximum Cable KATSURAGAWA ELECTRIC P/N : Z156460020 Can access the Dehumidify Heater Switch. KIP 9900 will send a shutdown signal to dehumidify the printing media. In case you connect the power cord to this switch to the controller through this port and a finishing device (Folder, etc...

User Guide
Page 18
Power Cord Connect to change without notice. 1-10 Chapter 1 Before Use Wire Color BROWN / BLACK LIGHT BLUE / WHITE GREEN-ANDYELLOW Plug Terminal Marked with "L" / "A" / "W", or colored ... "E" / "PE" / " " lor colored GREEN / GREEN-AND-YELLOW NOTE The above specifications are subject to the wall outlet alone. WARNING Plug Specification for Europe / Asia The power cord plug must be connected to the terminals of the plug in the power cord must meet the followings. (1) Select a plug which meets the following .
Power Cord Connect to change without notice. 1-10 Chapter 1 Before Use Wire Color BROWN / BLACK LIGHT BLUE / WHITE GREEN-ANDYELLOW Plug Terminal Marked with "L" / "A" / "W", or colored ... "E" / "PE" / " " lor colored GREEN / GREEN-AND-YELLOW NOTE The above specifications are subject to the wall outlet alone. WARNING Plug Specification for Europe / Asia The power cord plug must be connected to the terminals of the plug in the power cord must meet the followings. (1) Select a plug which meets the following .
User Guide
Page 23
Chapter 2 Basic Operations 2. 1 Turning on the KIP 9900 2. 2 Turning off the KIP 9900 2. 3 Setting the Roll Media into Roll Deck 2. 3. 1 Roll 1 / 2 / 3 2. 3. 2 Roll 4 2. 4 Setting Cut Sheet Media to Bypass Feeder 2. 4. 1 Multi-feeding of cut sheet...(Calendar setting) 2. 8. 3 User Mode 3 (Warm Sleep Mode ON / OFF & timer setting) 2. 8. 4 User Mode 4 (Cold Sleep Mode timer setting) 2. 8. 5 User Mode 5 (Automatic Initial Cut at power ON) 2. 8. 6 User Mode 6 (Transfer Support LED ON/OFF [Film]) 2. 8. 7 User Mode 7 (Alarm ON / OFF) 2. 8. 8 User Mode 8 (Choice of Standard / Special Print Mode [Plain ...
Chapter 2 Basic Operations 2. 1 Turning on the KIP 9900 2. 2 Turning off the KIP 9900 2. 3 Setting the Roll Media into Roll Deck 2. 3. 1 Roll 1 / 2 / 3 2. 3. 2 Roll 4 2. 4 Setting Cut Sheet Media to Bypass Feeder 2. 4. 1 Multi-feeding of cut sheet...(Calendar setting) 2. 8. 3 User Mode 3 (Warm Sleep Mode ON / OFF & timer setting) 2. 8. 4 User Mode 4 (Cold Sleep Mode timer setting) 2. 8. 5 User Mode 5 (Automatic Initial Cut at power ON) 2. 8. 6 User Mode 6 (Transfer Support LED ON/OFF [Film]) 2. 8. 7 User Mode 7 (Alarm ON / OFF) 2. 8. 8 User Mode 8 (Choice of Standard / Special Print Mode [Plain ...

User Guide
Page 24
...50/60Hz WARNING Plug Specification for Europe / Asia The power cord plug must meet the followings. (1) Select a plug which meets the following criteria. • The plug has a voltage and current rating appropriate for the product's rating marked on the KIP 9900 1. 2. 1 Turning on its name plate. •...appropriate outlet must be prepared. (3) The wires in the power cord must be connected to the terminals of the plug in accordance with "E" / "PE" / " " lor colored GREEN / GREEN-AND-YELLOW 2-2 Chapter 2 Basic Operations Plug the KIP 9900 into . Wire Color BROWN / BLACK LIGHT BLUE /...
...50/60Hz WARNING Plug Specification for Europe / Asia The power cord plug must meet the followings. (1) Select a plug which meets the following criteria. • The plug has a voltage and current rating appropriate for the product's rating marked on the KIP 9900 1. 2. 1 Turning on its name plate. •...appropriate outlet must be prepared. (3) The wires in the power cord must be connected to the terminals of the plug in accordance with "E" / "PE" / " " lor colored GREEN / GREEN-AND-YELLOW 2-2 Chapter 2 Basic Operations Plug the KIP 9900 into . Wire Color BROWN / BLACK LIGHT BLUE /...

User Guide
Page 25
KIP 9900 starts warming up the Fuser Unit, and the Ready Indicator on the KIP 9900. 3. PAPER DECK MF 1234 D1 WIRE CLEAN EXP- CLEAN SELECT CUT D2 D3 EXIT PF D4 COPY DENSITY MENU ENTER ONLINE Ready Indicator flashes. 4. Press "|" side of Power Switch to turn on the Operation Panel starts flashing. 2. The Ready Indicator lights when the KIP 9900 gets ready about 6 minutes later. 2-3 Chapter 2 Basic Operations
KIP 9900 starts warming up the Fuser Unit, and the Ready Indicator on the KIP 9900. 3. PAPER DECK MF 1234 D1 WIRE CLEAN EXP- CLEAN SELECT CUT D2 D3 EXIT PF D4 COPY DENSITY MENU ENTER ONLINE Ready Indicator flashes. 4. Press "|" side of Power Switch to turn on the Operation Panel starts flashing. 2. The Ready Indicator lights when the KIP 9900 gets ready about 6 minutes later. 2-3 Chapter 2 Basic Operations

User Guide
Page 26
2. 2 Turning off the KIP 9900 Press " " side of shut down . NOTE The controller unit starts shutdown process after turning off therefore. Do not unplug the KIP 9900 from the outlet for about 2 minutes until complete shut down process. 2-4 Chapter 2 Basic Operations The controller unit may be broken if the KIP 9900 is unplugged before the completion of Power Switch to turn off the KIP 9900, and it will take about 2 minutes after turning off the KIP 9900.
2. 2 Turning off the KIP 9900 Press " " side of shut down . NOTE The controller unit starts shutdown process after turning off therefore. Do not unplug the KIP 9900 from the outlet for about 2 minutes until complete shut down process. 2-4 Chapter 2 Basic Operations The controller unit may be broken if the KIP 9900 is unplugged before the completion of Power Switch to turn off the KIP 9900, and it will take about 2 minutes after turning off the KIP 9900.

User Guide
Page 50
2. 8 User Mode The KIP 9900 provides 15 User Modes in default. U7. UA. P4. [Scroll order of special width selections. U2. U5. U8. A1 A2 User Mode P contains sub categories ... A1 User Mode A2 Description Test print Calendar setting Warm Sleep Mode ON / OFF & timer setting Cold Sleep Mode timer setting Automatic Initial Cut at power on Transfer Support LED ON/OFF [Film] Alarm ON / OFF Choice of Standard / Special Print Mode [Plain paper] Choice of Standard / Special Print Mode [Tracing...
2. 8 User Mode The KIP 9900 provides 15 User Modes in default. U7. UA. P4. [Scroll order of special width selections. U2. U5. U8. A1 A2 User Mode P contains sub categories ... A1 User Mode A2 Description Test print Calendar setting Warm Sleep Mode ON / OFF & timer setting Cold Sleep Mode timer setting Automatic Initial Cut at power on Transfer Support LED ON/OFF [Film] Alarm ON / OFF Choice of Standard / Special Print Mode [Plain paper] Choice of Standard / Special Print Mode [Tracing...

User Guide
Page 59
... Press the [ MENU ] Key 3 times to save the power consumption. However it will be specified as well. Reference Warm Sleep Mode is possible to recover enough temperature on the fuser. (Print does not start until the KIP 9900 starts printing as timer in User Mode 3, it may take ...time until the KIP 9900 gets ready recovering enough temperature.) [Operation] 1. It works when the KIP 9900 does not print for Warm Sleep can be cancelled automatically when a print job or a copy job is reduced by maintaining the temperature of power saving mode. The timer for the ...
... Press the [ MENU ] Key 3 times to save the power consumption. However it will be specified as well. Reference Warm Sleep Mode is possible to recover enough temperature on the fuser. (Print does not start until the KIP 9900 starts printing as timer in User Mode 3, it may take ...time until the KIP 9900 gets ready recovering enough temperature.) [Operation] 1. It works when the KIP 9900 does not print for Warm Sleep can be cancelled automatically when a print job or a copy job is reduced by maintaining the temperature of power saving mode. The timer for the ...
User Guide
Page 63
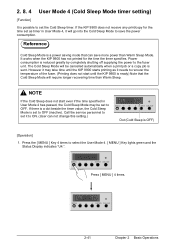
... is a dot beside the timer value, the Cold Sleep Mode is set to ON. (User can save the power consumption. NOTE If the Cold Sleep does not start until the KIP 9900 starts printing as it will go into the Cold Sleep Mode to the fuser unit. Press the [ MENU ] ... green and the Status Display indicates "U4.". MENU ENTER ONLINE 2-41 Chapter 2 Basic Operations Power consumption is reduced greatly by completely shutting off supplying the power to save more power than Warm Sleep. If the KIP 9900 does not receive any print/copy for the time the timer specifies. It works when the...
... is a dot beside the timer value, the Cold Sleep Mode is set to ON. (User can save the power consumption. NOTE If the Cold Sleep does not start until the KIP 9900 starts printing as it will go into the Cold Sleep Mode to the fuser unit. Press the [ MENU ] ... green and the Status Display indicates "U4.". MENU ENTER ONLINE 2-41 Chapter 2 Basic Operations Power consumption is reduced greatly by completely shutting off supplying the power to save more power than Warm Sleep. If the KIP 9900 does not receive any print/copy for the time the timer specifies. It works when the...
User Guide
Page 66
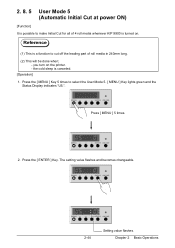
... "U5.". MENU ENTER ONLINE Press [ MENU ] 5 times. Press the [ MENU ] Key 5 times to cut off the leading part of 4 roll media whenever KIP 9900 is turned on the printer. - you turn on . MENU ENTER ONLINE 2. The setting value flashes and becomes changeable. the cold sleep is canceled. [Operation] 1. ...2. 8. 5 User Mode 5 (Automatic Initial Cut at power ON) [Function] It is possible to make Initial Cut for all of roll media in 240mm long. (2) This will be done when; -
... "U5.". MENU ENTER ONLINE Press [ MENU ] 5 times. Press the [ MENU ] Key 5 times to cut off the leading part of 4 roll media whenever KIP 9900 is turned on the printer. - you turn on . MENU ENTER ONLINE 2. The setting value flashes and becomes changeable. the cold sleep is canceled. [Operation] 1. ...2. 8. 5 User Mode 5 (Automatic Initial Cut at power ON) [Function] It is possible to make Initial Cut for all of roll media in 240mm long. (2) This will be done when; -

User Guide
Page 67
MENU ENTER ONLINE MENU ENTER ONLINE 4. The setting stops flashing when decided. Press the [ ENTER ] Key to decide the setting. 3. MENU ENTER ONLINE MENU ENTER ONLINE Setting value stops flashing. 2-45 Chapter 2 Basic Operations Change the setting value pressing [ ] Key (increment) and [ ] Key (decrement). Setting value Description 0 KIP 9900 performs the Initial Cut for all roll media at power ON. 1 KIP 9900 does not perform the Initial Cut at power ON.
MENU ENTER ONLINE MENU ENTER ONLINE 4. The setting stops flashing when decided. Press the [ ENTER ] Key to decide the setting. 3. MENU ENTER ONLINE MENU ENTER ONLINE Setting value stops flashing. 2-45 Chapter 2 Basic Operations Change the setting value pressing [ ] Key (increment) and [ ] Key (decrement). Setting value Description 0 KIP 9900 performs the Initial Cut for all roll media at power ON. 1 KIP 9900 does not perform the Initial Cut at power ON.


