KIP 7900 User Guide
Page 2
...Part 15 of this equipment in a residential area is an international program that effectively reduce energy consumption. These limits are office equipment such as possible from said equipment, such as noise or flickering, may be affected by the party responsible for purchasing the KIP 7900..., monitors, printers, facsimiles, copiers, scanners, and multifunction devices. Please read this USER'S MANUAL for the KIP 7900. When this machine is subject to radio communications. This USER'S MANUAL contains functional and operational explanations for future reference. 1.
...Part 15 of this equipment in a residential area is an international program that effectively reduce energy consumption. These limits are office equipment such as possible from said equipment, such as noise or flickering, may be affected by the party responsible for purchasing the KIP 7900..., monitors, printers, facsimiles, copiers, scanners, and multifunction devices. Please read this USER'S MANUAL for the KIP 7900. When this machine is subject to radio communications. This USER'S MANUAL contains functional and operational explanations for future reference. 1.

KIP 7900 User Guide
Page 5
... you may result in which some other sources of the printer. 2. If you may cause a fire or you wish to a hot item or electrically charged part inside of heat, as close to 240V plus 6% or minus 10%, 50/60Hz, 20A or higher 2. Do not disassemble or tamper with the printer. REPLACE...
... you may result in which some other sources of the printer. 2. If you may cause a fire or you wish to a hot item or electrically charged part inside of heat, as close to 240V plus 6% or minus 10%, 50/60Hz, 20A or higher 2. Do not disassemble or tamper with the printer. REPLACE...
KIP 7900 User Guide
Page 16
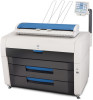
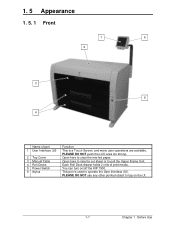
... pointed object to operate the User Interface (UI). Each Roll Deck drawer holds 2 rolls of part 1 User Interface (UI) 2 Top Cover 3 Manual Table 4 Roll Decks 5 Power Switch 6 Stylus Function This is used to tap on /off the KIP 7900. PLEASE DO NOT push the LCD area too strong. Open here to insert a cut...
... pointed object to operate the User Interface (UI). Each Roll Deck drawer holds 2 rolls of part 1 User Interface (UI) 2 Top Cover 3 Manual Table 4 Roll Decks 5 Power Switch 6 Stylus Function This is used to tap on /off the KIP 7900. PLEASE DO NOT push the LCD area too strong. Open here to insert a cut...

KIP 7900 User Guide
Page 17
Press "H" to turn on the Dehumidify Heater, and press "L" to turn it off. Connect the power cord here. NOTE: Specification for the power cord used in North America Use the following type of part 1 Exit Cover 2 Dehumidify Heater Switch 3 Inlet Socket 4 Breaker 5 USB connector (USB2.0) 6 COM Port 7 LAN Port Function Open the Exit Cover when you remove the mis-fed media. 1. 5. 2 Rear 1 2 4 5 3 6 7 Name of power cord (UL-Listed). (1) Rating 250VAC, 20A (2) Plug type NEMA6-20 (3) Socket type IEC60320 : C19 (4) Cord SJT 3xAWG12 L
Press "H" to turn on the Dehumidify Heater, and press "L" to turn it off. Connect the power cord here. NOTE: Specification for the power cord used in North America Use the following type of part 1 Exit Cover 2 Dehumidify Heater Switch 3 Inlet Socket 4 Breaker 5 USB connector (USB2.0) 6 COM Port 7 LAN Port Function Open the Exit Cover when you remove the mis-fed media. 1. 5. 2 Rear 1 2 4 5 3 6 7 Name of power cord (UL-Listed). (1) Rating 250VAC, 20A (2) Plug type NEMA6-20 (3) Socket type IEC60320 : C19 (4) Cord SJT 3xAWG12 L

KIP 7900 User Guide
Page 29
Holding both Flanges (4) from the roll core (3). 3 4 2 2 2 3. The right and left Side Guides will automatically move together. 5 Hold here to match your roll media's width. Raise the green lever (4) on Flange (2). Move it to slide 2-6 Chapter 2 Basic Operations Hold the shown part of the right Slide Guide (5). Remove both Flanges (2), lift and remove a roll media or an empty roll core (2). 2 2 1 3 2. Open Roll Deck (1). 1.
Holding both Flanges (4) from the roll core (3). 3 4 2 2 2 3. The right and left Side Guides will automatically move together. 5 Hold here to match your roll media's width. Raise the green lever (4) on Flange (2). Move it to slide 2-6 Chapter 2 Basic Operations Hold the shown part of the right Slide Guide (5). Remove both Flanges (2), lift and remove a roll media or an empty roll core (2). 2 2 1 3 2. Open Roll Deck (1). 1.
KIP 7900 User Guide
Page 44
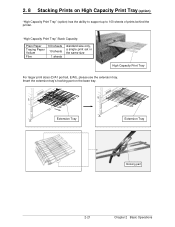
Extension Tray Extension Tray Hooking part 2-21 Chapter 2 Basic Operations 2. 8 Stacking Prints on the base tray. Insert the extension tray's hooking part on High Capacity Print Tray (option) "High Capacity Print Tray" (option) has the ability to support up to 100 sheets of prints behind the printer. "High Capacity Print Tray" Stack Capacity: Plain Paper Tracing Paper Vellum Film 100 sheets 10 sheets 1 sheets standard size only, a single print set in the same size High Capacity Print Tray For larger print sizes (D/A1 portrait, E/A0), please use the extension tray.
Extension Tray Extension Tray Hooking part 2-21 Chapter 2 Basic Operations 2. 8 Stacking Prints on the base tray. Insert the extension tray's hooking part on High Capacity Print Tray (option) "High Capacity Print Tray" (option) has the ability to support up to 100 sheets of prints behind the printer. "High Capacity Print Tray" Stack Capacity: Plain Paper Tracing Paper Vellum Film 100 sheets 10 sheets 1 sheets standard size only, a single print set in the same size High Capacity Print Tray For larger print sizes (D/A1 portrait, E/A0), please use the extension tray.

KIP 7900 User Guide
Page 45
...: all prints stacked as ejected NG: all the prints stacked on the tray. See the device's documents if you remove all stacked prints displaced NG: part of stacked prints displaced (2) Do not place any object except for the ejected prints from the printer on Print Tray. Doing so may cause a paper...
...: all prints stacked as ejected NG: all the prints stacked on the tray. See the device's documents if you remove all stacked prints displaced NG: part of stacked prints displaced (2) Do not place any object except for the ejected prints from the printer on Print Tray. Doing so may cause a paper...

KIP 7900 User Guide
Page 55
... Support Rod Lock Slide NOTE Please note that the tray may slightly bounce at the "release position" on the tray rest. Hold the thick wire parts of the tray to release the tray. Slide the Lock Slide down to lift the entire tray. Hold the thick wire Hold the thick wire... Lock Position Lift up the Lock Lever on the tray with mounted at "release position". 3-10 Chapter 3 Error Correction 2. Insert the hook parts at the time of the Support Rod. Flip up the entire tray Release Position Tray Rest NOTE (1) Do not hold a thinner wire to carry the...
... Support Rod Lock Slide NOTE Please note that the tray may slightly bounce at the "release position" on the tray rest. Hold the thick wire parts of the tray to release the tray. Slide the Lock Slide down to lift the entire tray. Hold the thick wire Hold the thick wire... Lock Position Lift up the Lock Lever on the tray with mounted at "release position". 3-10 Chapter 3 Error Correction 2. Insert the hook parts at the time of the Support Rod. Flip up the entire tray Release Position Tray Rest NOTE (1) Do not hold a thinner wire to carry the...

KIP 7900 User Guide
Page 56
Exit Cover WARNING There are extremely hot parts inside the Heater Unit. See step 12 on page 3-14. Print Manual Table 3-11 Chapter 3 Error Correction 4. If it is possible to access it is ... Cover. Be careful not to the next step. 6. If it is possible to tear the mis-fed paper. Open Exit Cover. Do not touch any parts in the Heater Unit, or you remove it out backward gently. Also the mis-fed media can be burnt. Open the Manual Table.
Exit Cover WARNING There are extremely hot parts inside the Heater Unit. See step 12 on page 3-14. Print Manual Table 3-11 Chapter 3 Error Correction 4. If it is possible to access it is ... Cover. Be careful not to the next step. 6. If it is possible to tear the mis-fed paper. Open Exit Cover. Do not touch any parts in the Heater Unit, or you remove it out backward gently. Also the mis-fed media can be burnt. Open the Manual Table.

KIP 7900 User Guide
Page 59
Hold the thick wire parts of the tray and insert the hook parts at the "lock position" on Print Tray until you move it from "release position" to "lock position". 3-14 Chapter 3 Error Correction 12. Hold the thick wire Hold the thick wire Lock Position Lift up the entire tray Release Position rear beam NOTE (1) Do not hold a thinner wire to carry the entire tray. (2) Ejected prints will be stacked incorrectly on the top face of the printer's rear beam.
Hold the thick wire parts of the tray and insert the hook parts at the "lock position" on Print Tray until you move it from "release position" to "lock position". 3-14 Chapter 3 Error Correction 12. Hold the thick wire Hold the thick wire Lock Position Lift up the entire tray Release Position rear beam NOTE (1) Do not hold a thinner wire to carry the entire tray. (2) Ejected prints will be stacked incorrectly on the top face of the printer's rear beam.

KIP 7900 User Guide
Page 60
Push down to catch its bottom hooking part on the top of the Support Rod. Fully press the Lock Lever down to the printer. Lock Lever not fit in position, fully slide the Lock Slide upward. Lift the Support Rod to lock the tray. Lock Slide Lock Lever NOTE To fit the Lock Lever in 3-15 Chapter 3 Error Correction Fully slide the Lock Slide upward. 13. Slightly push the tray down Support Rod 14.
Push down to catch its bottom hooking part on the top of the Support Rod. Fully press the Lock Lever down to the printer. Lock Lever not fit in position, fully slide the Lock Slide upward. Lift the Support Rod to lock the tray. Lock Slide Lock Lever NOTE To fit the Lock Lever in 3-15 Chapter 3 Error Correction Fully slide the Lock Slide upward. 13. Slightly push the tray down Support Rod 14.

KIP 7900 User Guide
Page 67
No part of machine and so on. © 2009 Katsuragawa Electric Co., Ltd. Digital Printer KIP 7900 User's Manual Version A.1 Published by Katsuragawa Electric Co., Ltd. 21-1 Shimomaruko 4-Chome, Ohta-ku, Tokyo 146-8585, Japan Please note that some articles, illustrations and photographs might be copied, reproduced or distributed in any form without express written permission from the actual machine because of the modification of this publication may be partially different from Katsuragawa Electric Co., Ltd.
No part of machine and so on. © 2009 Katsuragawa Electric Co., Ltd. Digital Printer KIP 7900 User's Manual Version A.1 Published by Katsuragawa Electric Co., Ltd. 21-1 Shimomaruko 4-Chome, Ohta-ku, Tokyo 146-8585, Japan Please note that some articles, illustrations and photographs might be copied, reproduced or distributed in any form without express written permission from the actual machine because of the modification of this publication may be partially different from Katsuragawa Electric Co., Ltd.