
KIP 700 User Manual
Page 16
... ejected from the Scanner Unit. Connect the Power Cord here. Turn on the Dehumidify Heater with this switch when you would like to shut off supplying the AC power. It is possible to dry the paper in the humid season. 1-10 Chapter 1 Before Use 1. 5. 2 Rear view 2 1 7: behind 7 5 4 6 3 No. Name 1 Toner Cover... Heater Switch (Option) Function Open here to the network. (Do not connect a telephone line) Service Use, 5VDC max. Connect the LAN Cable to connect the KIP 700m to access toner supply system.
... ejected from the Scanner Unit. Connect the Power Cord here. Turn on the Dehumidify Heater with this switch when you would like to shut off supplying the AC power. It is possible to dry the paper in the humid season. 1-10 Chapter 1 Before Use 1. 5. 2 Rear view 2 1 7: behind 7 5 4 6 3 No. Name 1 Toner Cover... Heater Switch (Option) Function Open here to the network. (Do not connect a telephone line) Service Use, 5VDC max. Connect the LAN Cable to connect the KIP 700m to access toner supply system.

KIP 700 User Manual
Page 23
Chapter 2 Basic Operation 2. 1 Turning on KIP 700m 2. 2 Turning off KIP 700m 2. 3 Replacing Roll Media 2. 4 Initial Cut 2. 5 Toner Supply 2. 6 Cut Sheet Media 2. 7 Copying 2. 8 Emergency Stop of Scan or Copy 2. 9 Canceling Sleep Mode 2. 10 Dehumidifying Roll Media 2-1 page 2- 2 2- 4 2- 5 2- 9 2-10 2-13 2-14 2-16 2-17 2-18 Chapter 2 Basic Operation
Chapter 2 Basic Operation 2. 1 Turning on KIP 700m 2. 2 Turning off KIP 700m 2. 3 Replacing Roll Media 2. 4 Initial Cut 2. 5 Toner Supply 2. 6 Cut Sheet Media 2. 7 Copying 2. 8 Emergency Stop of Scan or Copy 2. 9 Canceling Sleep Mode 2. 10 Dehumidifying Roll Media 2-1 page 2- 2 2- 4 2- 5 2- 9 2-10 2-13 2-14 2-16 2-17 2-18 Chapter 2 Basic Operation
KIP 700 User Manual
Page 32
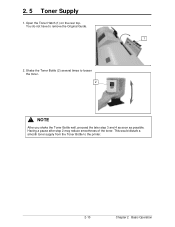
Having a pause after step 2 may reduce smoothness of the toner. Open the Toner Hatch (1) on the rear top. Shake the Toner Bottle (2) several times to remove the Original Guide. 1 2. 2. 5 Toner Supply 1. You do not have to loosen the toner. 2 NOTE After you shake the Toner Bottle well, proceed the later step 3 and 4 as soon as possible. This would disturb a smooth toner supply from the Toner Bottle to the printer. 2-10 Chapter 2 Basic Operation
Having a pause after step 2 may reduce smoothness of the toner. Open the Toner Hatch (1) on the rear top. Shake the Toner Bottle (2) several times to remove the Original Guide. 1 2. 2. 5 Toner Supply 1. You do not have to loosen the toner. 2 NOTE After you shake the Toner Bottle well, proceed the later step 3 and 4 as soon as possible. This would disturb a smooth toner supply from the Toner Bottle to the printer. 2-10 Chapter 2 Basic Operation

KIP 700 User Manual
Page 33
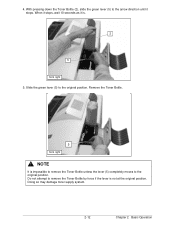
Put the dent area (3) under the holder (4) to firmly seat the bottom plate of the Toner Bottle (2) to the toner supply position. 3 4 from right 2 4 from front 2-11 Chapter 2 Basic Operation 3.
Put the dent area (3) under the holder (4) to firmly seat the bottom plate of the Toner Bottle (2) to the toner supply position. 3 4 from right 2 4 from front 2-11 Chapter 2 Basic Operation 3.
KIP 700 User Manual
Page 34
Slide the green lever (5) to remove the Toner Bottle by force if the lever is . 2 5 from right NOTE It is impossible to remove the Toner Bottle unless the lever (5) completely moves to the arrow direction until it is not at the original position. Do not attempt to the original position. Doing so may damage toner supply system. 2-12 Chapter 2 Basic Operation 4. When it stops, wait 10 seconds as it stops. Remove the Toner Bottle. 5 from right 5. With pressing down the Toner Bottle (2), slide the green lever (5) to the original position.
Slide the green lever (5) to remove the Toner Bottle by force if the lever is . 2 5 from right NOTE It is impossible to remove the Toner Bottle unless the lever (5) completely moves to the arrow direction until it is not at the original position. Do not attempt to the original position. Doing so may damage toner supply system. 2-12 Chapter 2 Basic Operation 4. When it stops, wait 10 seconds as it stops. Remove the Toner Bottle. 5 from right 5. With pressing down the Toner Bottle (2), slide the green lever (5) to the original position.

KIP 700 User Manual
Page 38
...• the machine receives a print job through the network. • you tap on Fuser Unit. The KIP 700m will enter Sleep Mode after a 60 minute of inactivity to stop the power supply for Fuser Unit. • Cold Sleep Mode will start after a certain period of inactivity in order to... reduce the power consumption. 2. 9 Canceling Sleep Mode The KIP 700m has two Sleep Modes to reduce the power supply for Fuser Unit and some other components. In the default setting; • Warm Sleep Mode will start after a 15...
...• the machine receives a print job through the network. • you tap on Fuser Unit. The KIP 700m will enter Sleep Mode after a 60 minute of inactivity to stop the power supply for Fuser Unit. • Cold Sleep Mode will start after a certain period of inactivity in order to... reduce the power consumption. 2. 9 Canceling Sleep Mode The KIP 700m has two Sleep Modes to reduce the power supply for Fuser Unit and some other components. In the default setting; • Warm Sleep Mode will start after a 15...

KIP 700 User Manual
Page 53
... is open (not closed . If there is no problem, turn off and again on the machine's power switch. 3-15 Chapter 3 Error Correction For the toner supply procedure, see [2.3 Replacing Roll Media]. 3. 2. 2 Toner Empty When the printer is open . (not closed properly) For closing the Scanner Unit, see [3.1.7 Original Jam]....a loaded roll media, the UI Screen will display "Roll Replacement" sign as well. For the roll replacement procedure, see [2.5 Toner Supply]. 3. 2. 3 Roll Deck Cover Open If the Roll Deck Cover is running out of toner, the UI Screen will display "Toner Empty" sign.
... is open (not closed . If there is no problem, turn off and again on the machine's power switch. 3-15 Chapter 3 Error Correction For the toner supply procedure, see [2.3 Replacing Roll Media]. 3. 2. 2 Toner Empty When the printer is open . (not closed properly) For closing the Scanner Unit, see [3.1.7 Original Jam]....a loaded roll media, the UI Screen will display "Roll Replacement" sign as well. For the roll replacement procedure, see [2.5 Toner Supply]. 3. 2. 3 Roll Deck Cover Open If the Roll Deck Cover is running out of toner, the UI Screen will display "Toner Empty" sign.