

User Guide
Page 3
... Names of Parts 14 Camera Body 14 Operation Buttons 16 Attaching the Strap 17 Preparing the Power Supply 18 Charging the (supplied) Battery Pack 18 Installing the (supplied) Battery Pack 19 Connecting the AC Adapter (sold separately 22 Turning the Power ON/OFF 23 Setting the Menu Language/Date and Time 24...
... Names of Parts 14 Camera Body 14 Operation Buttons 16 Attaching the Strap 17 Preparing the Power Supply 18 Charging the (supplied) Battery Pack 18 Installing the (supplied) Battery Pack 19 Connecting the AC Adapter (sold separately 22 Turning the Power ON/OFF 23 Setting the Menu Language/Date and Time 24...

User Guide
Page 7
... metal objects or combustible items inside the camera. Do not use the camera on unstable ground. Do not use the camera while driving. Remove the batteries from the wall outlet. Do not dismantle, modify or repair the camera yourself. Fire and/or electrical shock may occur as smoke or an abnormal...
... metal objects or combustible items inside the camera. Do not use the camera on unstable ground. Do not use the camera while driving. Remove the batteries from the wall outlet. Do not dismantle, modify or repair the camera yourself. Fire and/or electrical shock may occur as smoke or an abnormal...

User Guide
Page 8
...the flash near eyes. Malfunction of internal parts may occur from the camera may cause short circuits and breakdown of insulation, resulting in the battery/card cover. Do not touch the metal parts on the camera during thunder and lighting. Personal injury may occur if lighting strikes the camera..... Fire may result. Electric waves emitted from concentrated rays of or impaired eyesight may occur as a result. Take care not to the battery, or throw into a fire. Loss of light. Do not dismantle, short-circuit, coat (solder, etc.), apply heat, apply pressure (with...
...the flash near eyes. Malfunction of internal parts may occur from the camera may cause short circuits and breakdown of insulation, resulting in the battery/card cover. Do not touch the metal parts on the camera during thunder and lighting. Personal injury may occur if lighting strikes the camera..... Fire may result. Electric waves emitted from concentrated rays of or impaired eyesight may occur as a result. Take care not to the battery, or throw into a fire. Loss of light. Do not dismantle, short-circuit, coat (solder, etc.), apply heat, apply pressure (with...
User Guide
Page 9
...; Within the reach of children. Do not leave the camera in locations such as: • A location exposed to the unit may occur as batteries, Memory Card, etc. Fire and/or damage to direct sunlight or inside a car, etc. When cleaning or carrying out non-photographic operations on...careful not to cover the flash. Do not use . may wrap around the neck causing strangulation, or accessories such as a result. 9 The battery may not only cause personal injury but malfunction of the flash. Important Safety Precautions (Cont'd) Caution When taking a picture, wipe off the flash ...
...; Within the reach of children. Do not leave the camera in locations such as: • A location exposed to the unit may occur as batteries, Memory Card, etc. Fire and/or damage to direct sunlight or inside a car, etc. When cleaning or carrying out non-photographic operations on...careful not to cover the flash. Do not use . may wrap around the neck causing strangulation, or accessories such as a result. 9 The battery may not only cause personal injury but malfunction of the flash. Important Safety Precautions (Cont'd) Caution When taking a picture, wipe off the flash ...
User Guide
Page 10
...liquid crystals do not rub the eye. Important Safety Precautions (Cont'd) Caution Remove the batteries when the camera will not be missing or constantly lit pixels on a tripod. About battery fluid leakage • Should battery fluid leaks ever come into contact with hands or clothing, wash immediately with water.... enter the eyes or mouth. 10 Furthermore, take care to the characteristics of liquid crystals, the brightness of eyesight may occur if battery fluid enters the eye. Do not rotate the camera when mounting on the monitor. The camera may appear uneven with water and seek...
...liquid crystals do not rub the eye. Important Safety Precautions (Cont'd) Caution Remove the batteries when the camera will not be missing or constantly lit pixels on a tripod. About battery fluid leakage • Should battery fluid leaks ever come into contact with hands or clothing, wash immediately with water.... enter the eyes or mouth. 10 Furthermore, take care to the characteristics of liquid crystals, the brightness of eyesight may occur if battery fluid enters the eye. Do not rotate the camera when mounting on the monitor. The camera may appear uneven with water and seek...
User Guide
Page 11
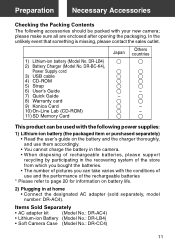
Japan Others countries 1) Lithium-ion battery (Model No. k 8) Warranty card k k 9) Konica Card k - 10) On-Line Lab (CD-ROM) k - 11) SD Memory Card k k This product can take varies with your new camera; Items Sold Separately • AC adapter kit (Model No.: DR-AC4) • Lithium-ion Battery (Model No.: DR-LB4) • Soft Camera Case...
Japan Others countries 1) Lithium-ion battery (Model No. k 8) Warranty card k k 9) Konica Card k - 10) On-Line Lab (CD-ROM) k - 11) SD Memory Card k k This product can take varies with your new camera; Items Sold Separately • AC adapter kit (Model No.: DR-AC4) • Lithium-ion Battery (Model No.: DR-LB4) • Soft Camera Case...

User Guide
Page 12
...-Media Card/Memory Stick Caution SD Memory Cards, Multi-Media Cards and Memory Stick are manufactured using and for storage. • Do not open the battery/card cover or remove the SD Memory Card/ Multi-Media Card/Memory Stick while data is being read or written. • Do not dismantle or...
...-Media Card/Memory Stick Caution SD Memory Cards, Multi-Media Cards and Memory Stick are manufactured using and for storage. • Do not open the battery/card cover or remove the SD Memory Card/ Multi-Media Card/Memory Stick while data is being read or written. • Do not dismantle or...

User Guide
Page 15
Names of Parts (Cont'd) Delete Button (→ P.16) Display Button (→ P.16) Play Button(→ P.16) LCD Monitor Battery Sub-cap Battery/Card Cover Viewfinder Eyepiece Green LED Red LED Zoom Buttons (→ P.16) Speaker 4-way Button P.16) Tripod Socket Menu/Set Button (→ P.16) 15
Names of Parts (Cont'd) Delete Button (→ P.16) Display Button (→ P.16) Play Button(→ P.16) LCD Monitor Battery Sub-cap Battery/Card Cover Viewfinder Eyepiece Green LED Red LED Zoom Buttons (→ P.16) Speaker 4-way Button P.16) Tripod Socket Menu/Set Button (→ P.16) 15

User Guide
Page 18
...of its useful life, it for a short time, even when fully charged. Preparing the Power Supply Charging the (supplied) Battery Pack - After charging, remove the battery pack from the charger and then the power cord from the outlet and the charger. • Normal charging time is fully ... the LCD monitor indicates, "NO MORE POWER". Please wipe them . • When a battery pack reaches the end of the battery pack. • Before using new battery packs or battery packs that happens, replace with a new battery pack (sold separately, model # DR-LB4). • During charging both the charger and...
...of its useful life, it for a short time, even when fully charged. Preparing the Power Supply Charging the (supplied) Battery Pack - After charging, remove the battery pack from the charger and then the power cord from the outlet and the charger. • Normal charging time is fully ... the LCD monitor indicates, "NO MORE POWER". Please wipe them . • When a battery pack reaches the end of the battery pack. • Before using new battery packs or battery packs that happens, replace with a new battery pack (sold separately, model # DR-LB4). • During charging both the charger and...

User Guide
Page 19
...heat. Fully charged 2. Do not change (charge) the battery. 19 Install the battery with wet hands, as follows: (Remaining power is facing the right way. Battery level indicator As the battery runs out of power, the battery level indicator displays the power remaining as there is a...2. Power is not lit and turn OFF all switches. 1 1. After making sure the battery pack is a danger of the arrow. change the battery with the terminals facing inside the camera. Open the battery/card cover by sliding it in two levels) 1. Preparing the Power Supply (Cont'd) Installing...
...heat. Fully charged 2. Do not change (charge) the battery. 19 Install the battery with wet hands, as follows: (Remaining power is facing the right way. Battery level indicator As the battery runs out of power, the battery level indicator displays the power remaining as there is a...2. Power is not lit and turn OFF all switches. 1 1. After making sure the battery pack is a danger of the arrow. change the battery with the terminals facing inside the camera. Open the battery/card cover by sliding it in two levels) 1. Preparing the Power Supply (Cont'd) Installing...

User Guide
Page 20
...Power is accessing the card or processing images (p.32). • To recharge the battery (DR-LB4), do not use the supplied charger (DRBC-K4) to recharge batteries other than our special battery (DR-LB4) • Do not leave the battery anywhere where the temperature may reach 60Cº (140°F), such as inside ...a car, in the sun, near a heater, etc. • Do not get the battery wet, drop it or subject it to violent shocks. • Charger (DR-BC-K4) Main Specifications · Input voltage : AC100-240V (50/60Hz) &#...
...Power is accessing the card or processing images (p.32). • To recharge the battery (DR-LB4), do not use the supplied charger (DRBC-K4) to recharge batteries other than our special battery (DR-LB4) • Do not leave the battery anywhere where the temperature may reach 60Cº (140°F), such as inside ...a car, in the sun, near a heater, etc. • Do not get the battery wet, drop it or subject it to violent shocks. • Charger (DR-BC-K4) Main Specifications · Input voltage : AC100-240V (50/60Hz) &#...

User Guide
Page 21
... to try to correct the interference by turning the equipment off the outer cover (insulation cover, tube, etc.) This may cause the battery to the following measures: - Industry Canada's Compliance Statement: This Class B digital apparatus complies with Canadian ICES-003. FCC Compliance Statement:...operate this equipment does cause harmful interference to leak, get hot, catch fire, or explode. If this equipment. Do not dismantle the battery.This may cause a fire or electrical shock. Consult the dealer or an experienced radio/TV technician for a class B digital device, pursuant...
... to try to correct the interference by turning the equipment off the outer cover (insulation cover, tube, etc.) This may cause the battery to the following measures: - Industry Canada's Compliance Statement: This Class B digital apparatus complies with Canadian ICES-003. FCC Compliance Statement:...operate this equipment does cause harmful interference to leak, get hot, catch fire, or explode. If this equipment. Do not dismantle the battery.This may cause a fire or electrical shock. Consult the dealer or an experienced radio/TV technician for a class B digital device, pursuant...
User Guide
Page 22
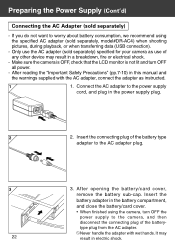
...and turn OFF the power supply to the camera, and then disconnect the connecting plug of the battery type adapter to the AC adapter plug. 3 3. After opening the battery/card cover, remove the battery sub-cap. type plug from the AC adapter. It may result in electric shock. Never handle...(sold separately, model#DR-AC4) when shooting pictures, during playback, or when transferring data (USB connection). - Insert the connecting plug of the battery- If you do not want to the power supply cord, and plug in this manual and the warnings supplied with wet hands. After reading the...
...and turn OFF the power supply to the camera, and then disconnect the connecting plug of the battery type adapter to the AC adapter plug. 3 3. After opening the battery/card cover, remove the battery sub-cap. type plug from the AC adapter. It may result in electric shock. Never handle...(sold separately, model#DR-AC4) when shooting pictures, during playback, or when transferring data (USB connection). - Insert the connecting plug of the battery- If you do not want to the power supply cord, and plug in this manual and the warnings supplied with wet hands. After reading the...

User Guide
Page 24
.... 31, 2050. 24 By pressing ̄ or ̆, select the desired language and push the MENU/SET button. 2 2. The first time that there is enough battery power. 1 1. You will return to the first screen. * Once you to the appropriate year. Setting the Menu Language/Date and Time - With "YEAR" selected, use...
.... 31, 2050. 24 By pressing ̄ or ̆, select the desired language and push the MENU/SET button. 2 2. The first time that there is enough battery power. 1 1. You will return to the first screen. * Once you to the appropriate year. Setting the Menu Language/Date and Time - With "YEAR" selected, use...

User Guide
Page 25
...and you will return to screen 3. 7. After finishing the settings... • If you turned the power ON with the main switch (by a back-up battery.Without a battery in the same way as Step 3 on page 24. • By repeating procedures (1) and (2) above, adjust the date-and-time setting, and set the... date format. • The date format can return to the previous screen and make corrections. 5 5. They will be lost if the back-up battery is maintained by opening the lens cover), you can take pictures once the lens has reached its extended position. • If you made the settings...
...and you will return to screen 3. 7. After finishing the settings... • If you turned the power ON with the main switch (by a back-up battery.Without a battery in the same way as Step 3 on page 24. • By repeating procedures (1) and (2) above, adjust the date-and-time setting, and set the... date format. • The date format can return to the previous screen and make corrections. 5 5. They will be lost if the back-up battery is maintained by opening the lens cover), you can take pictures once the lens has reached its extended position. • If you made the settings...

User Guide
Page 27
When a SD Memory card or MultiMedia Card are used , insert it will damage the connector. • There are two card slots. Close the battery/card cover. 27 Open the battery/card cover. 2 Memory Stick slot SD Memory Card/MultiMedia Card slot 2. Inserting/Removing Cards (Cont'd) Inserting a Card 1 1. With the camera and the label...
When a SD Memory card or MultiMedia Card are used , insert it will damage the connector. • There are two card slots. Close the battery/card cover. 27 Open the battery/card cover. 2 Memory Stick slot SD Memory Card/MultiMedia Card slot 2. Inserting/Removing Cards (Cont'd) Inserting a Card 1 1. With the camera and the label...

User Guide
Page 28
... cover. Insert or remove cards only after making sure that you open the battery/card cover. • When a card is inserted, it is used will be interrupted or hindered. However, in on the... card, the lock will release and the card will come out a little. If you DO NOT open the battery/card cover while the red LED is flashing, image processing may be recorded on . Inserting/Removing Cards (Cont'd) Card Removal 1. Warning!..."Now COPY...", etc., and the red LED will come on first. Then carefully draw the card out. 3. Open the battery/card cover. 2.
... cover. Insert or remove cards only after making sure that you open the battery/card cover. • When a card is inserted, it is used will be interrupted or hindered. However, in on the... card, the lock will release and the card will come out a little. If you DO NOT open the battery/card cover while the red LED is flashing, image processing may be recorded on . Inserting/Removing Cards (Cont'd) Card Removal 1. Warning!..."Now COPY...", etc., and the red LED will come on first. Then carefully draw the card out. 3. Open the battery/card cover. 2.

User Guide
Page 30
Insufficient battery warning (Green LED flashing/Red LED on) Card being accessed, images being connected (Flashing) System error; Card has insufficient memory, is being processed, compressed/expanded, ...
Insufficient battery warning (Green LED flashing/Red LED on) Card being accessed, images being connected (Flashing) System error; Card has insufficient memory, is being processed, compressed/expanded, ...

User Guide
Page 31
... wish to focus, the green LED will flash. 31 Also, put the auto focus mark on . See page 33. • If the camera senses your battery, press the DISPLAY button and the LCD monitor will be using the viewfinder, to take and determine the size of the lens is not in...
... wish to focus, the green LED will flash. 31 Also, put the auto focus mark on . See page 33. • If the camera senses your battery, press the DISPLAY button and the LCD monitor will be using the viewfinder, to take and determine the size of the lens is not in...

User Guide
Page 32
Taking Pictures (Cont'd) 4 4. During recording to off (p.96). 5 5. Do not open the battery/card cover while the red and green LEDs are finished taking pictures, close the lens cover and turn OFF the power supply. When it makes a ...
Taking Pictures (Cont'd) 4 4. During recording to off (p.96). 5 5. Do not open the battery/card cover while the red and green LEDs are finished taking pictures, close the lens cover and turn OFF the power supply. When it makes a ...