
User Manual
Page 1
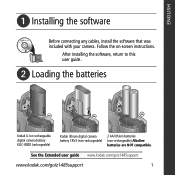
After installing the software, return to this user guide. ᕢ Loading the batteries Kodak Li-Ion rechargeable digital camera battery KLIC-8000 (rechargeable) Kodak lithium digital camera battery CRV3 (non-rechargeable) 2 AA lithium batteries (non-rechargeable) Alkaline batteries are NOT compatible. Follow the on-screen instructions. ENGLISH ᕡ Installing the software Before connecting any cables, install the software that was included with your camera. See the Extended user guide www.kodak.com/go/z1485support www.kodak.com/go/z1485support 1
After installing the software, return to this user guide. ᕢ Loading the batteries Kodak Li-Ion rechargeable digital camera battery KLIC-8000 (rechargeable) Kodak lithium digital camera battery CRV3 (non-rechargeable) 2 AA lithium batteries (non-rechargeable) Alkaline batteries are NOT compatible. Follow the on-screen instructions. ENGLISH ᕡ Installing the software Before connecting any cables, install the software that was included with your camera. See the Extended user guide www.kodak.com/go/z1485support www.kodak.com/go/z1485support 1
User Manual
Page 2
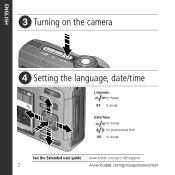
OK to change . Date/Time: to accept. for previous/next field. See the Extended user guide www.kodak.com/go/z1485support 2 www.kodak.com/go/easysharecenter ENGLISH ᕣ Turning on the camera ᕤ Setting the language, date/time Language: to accept. OK to change .
OK to change . Date/Time: to accept. for previous/next field. See the Extended user guide www.kodak.com/go/z1485support 2 www.kodak.com/go/easysharecenter ENGLISH ᕣ Turning on the camera ᕤ Setting the language, date/time Language: to accept. OK to change .

User Manual
Page 3
To stop recording, press the Shutter button again. ENGLISH ᕥ Taking a picture/video Pictures Smart 1 Capture 1 mode Videos Video mode Ready Framing light marks 2 Press the Shutter button halfway to focus. See the Extended user guide www.kodak.com/go/z1485support www.kodak.com/go/z1485support 3 When the Ready light turns green, press the Shutter button completely down and release. NOTE: For more about Smart Capture mode, see page 9. 2 Press the Shutter button completely down .
To stop recording, press the Shutter button again. ENGLISH ᕥ Taking a picture/video Pictures Smart 1 Capture 1 mode Videos Video mode Ready Framing light marks 2 Press the Shutter button halfway to focus. See the Extended user guide www.kodak.com/go/z1485support www.kodak.com/go/z1485support 3 When the Ready light turns green, press the Shutter button completely down and release. NOTE: For more about Smart Capture mode, see page 9. 2 Press the Shutter button completely down .
User Manual
Page 4
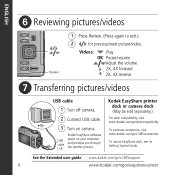
... volume Review 2X, 4X forward 2X, 4X reverse ᕧ Transferring pictures/videos USB cable 1 Turn off camera. 2 Connect USB cable. 3 Turn on your computer and prompts you through the transfer process. Kodak EasyShare software USB cable U-8 opens on camera. ENGLISH ᕦ Reviewing pictures/videos 1 Press Review. (Press again to exit.) 2 for previous/next picture...
... volume Review 2X, 4X forward 2X, 4X reverse ᕧ Transferring pictures/videos USB cable 1 Turn off camera. 2 Connect USB cable. 3 Turn on your computer and prompts you through the transfer process. Kodak EasyShare software USB cable U-8 opens on camera. ENGLISH ᕦ Reviewing pictures/videos 1 Press Review. (Press again to exit.) 2 for previous/next picture...
User Manual
Page 5
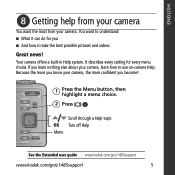
...See the Extended user guide www.kodak.com/go/z1485support www.kodak.com/go/z1485support 5 It describes every setting for you ■ And how to use on-camera Help. ENGLISH ᕨ Getting help from your camera. Because the more you know your camera, the more confident you learn... nothing else about your camera You want to ...
...See the Extended user guide www.kodak.com/go/z1485support www.kodak.com/go/z1485support 5 It describes every setting for you ■ And how to use on-camera Help. ENGLISH ᕨ Getting help from your camera. Because the more you know your camera, the more confident you learn... nothing else about your camera You want to ...

User Manual
Page 6
...5481; Keep learning about your best pictures! Finish reading this book, so you can take and share your camera! Visit www.kodak.com/go/z1485support and www.kodak.com/go/easysharecenter for: • the Extended user guide • interactive troubleshooting and repairs • ...• accessories • printing information • product registration See the Extended user guide www.kodak.com/go/z1485support 6 www.kodak.com/go/easysharecenter Congratulations! You have: • set up your camera • taken pictures • transferred pictures to your computer Keep learning!
...5481; Keep learning about your best pictures! Finish reading this book, so you can take and share your camera! Visit www.kodak.com/go/z1485support and www.kodak.com/go/easysharecenter for: • the Extended user guide • interactive troubleshooting and repairs • ...• accessories • printing information • product registration See the Extended user guide www.kodak.com/go/z1485support 6 www.kodak.com/go/easysharecenter Congratulations! You have: • set up your camera • taken pictures • transferred pictures to your computer Keep learning!

User Manual
Page 8
ENGLISH Back view 2 3 4 56 7 1 8 16 15 9 14 13 12 11 10 1 LCD 9 USB, A/V Out 2 , OK 10 DC-In, for optional 3V AC adapter 3 Ready light 11 Share button 4 Info button 12 Menu button 5 Delete button 13 Review button 6 Wide angle (W) button 14 Battery compartment 7 Telephoto (T) button 15 Tripod socket 8 Slot for optional SD or SDHC card 16 Dock connector 8 www.kodak.com/go/easysharecenter
ENGLISH Back view 2 3 4 56 7 1 8 16 15 9 14 13 12 11 10 1 LCD 9 USB, A/V Out 2 , OK 10 DC-In, for optional 3V AC adapter 3 Ready light 11 Share button 4 Info button 12 Menu button 5 Delete button 13 Review button 6 Wide angle (W) button 14 Battery compartment 7 Telephoto (T) button 15 Tripod socket 8 Slot for optional SD or SDHC card 16 Dock connector 8 www.kodak.com/go/easysharecenter
User Manual
Page 9
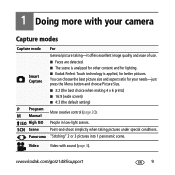
... -it offers excellent image quality and ease of use. You can choose the best picture size and aspect ratio for better pictures. www.kodak.com/go/z1485support 9 Panorama "Stitching" 2 or 3 pictures into 1 panoramic scene. Video Video with your needs-just press the Menu ... 20). Smart Capture ■ Faces are detected. ■ The scene is analyzed for other content and for lighting. ■ Kodak Perfect Touch technology is applied, for your camera Capture modes Capture mode For General picture taking pictures under special conditions. 1 Doing more with sound (page 3).
... -it offers excellent image quality and ease of use. You can choose the best picture size and aspect ratio for better pictures. www.kodak.com/go/z1485support 9 Panorama "Stitching" 2 or 3 pictures into 1 panoramic scene. Video Video with your needs-just press the Menu ... 20). Smart Capture ■ Faces are detected. ■ The scene is analyzed for other content and for lighting. ■ Kodak Perfect Touch technology is applied, for your camera Capture modes Capture mode For General picture taking pictures under special conditions. 1 Doing more with sound (page 3).

User Manual
Page 10
... Press Telephoto (T) or Wide Angle (W) to zoom in/out. 3 Take the picture. Digital zoom is not available in , move further from your subject. Press Telephoto (T) to the maximum optical zoom. Doing more with your camera Using optical zoom Use optical zoom to get up to 5X closer to your subject... while taking pictures. Remember: ■ Use the auto focus framing marks, page 3. ■ As you zoom in Smart Capture mode. 10 www.kodak.com/go/easysharecenter
... Press Telephoto (T) or Wide Angle (W) to zoom in/out. 3 Take the picture. Digital zoom is not available in , move further from your subject. Press Telephoto (T) to the maximum optical zoom. Doing more with your camera Using optical zoom Use optical zoom to get up to 5X closer to your subject... while taking pictures. Remember: ■ Use the auto focus framing marks, page 3. ■ As you zoom in Smart Capture mode. 10 www.kodak.com/go/easysharecenter
User Manual
Page 11
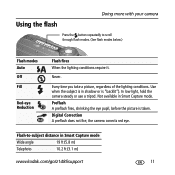
... Off Fill Red-eye Reduction Flash fires When the lighting conditions require it. Using the flash Doing more with your camera Press the button repeatedly to -subject distance in Smart Capture mode. Preflash A preflash fires, shrinking the eye pupil, before the picture... is "backlit"). Digital Correction A preflash does not fire; the camera corrects red eye. Never. Every time you take a picture, regardless of the lighting conditions. Not available in Smart Capture...
... Off Fill Red-eye Reduction Flash fires When the lighting conditions require it. Using the flash Doing more with your camera Press the button repeatedly to -subject distance in Smart Capture mode. Preflash A preflash fires, shrinking the eye pupil, before the picture... is "backlit"). Digital Correction A preflash does not fire; the camera corrects red eye. Never. Every time you take a picture, regardless of the lighting conditions. Not available in Smart Capture...

User Manual
Page 12
...second options are available in a picture, or to ensure a steady Shutter button press. 1 Place camera on a tripod) • Again for a 10-second delay (so you want to be included in video mode. 12 www.kodak.com/go/easysharecenter NOTE: The video stops when no storage space remains. Use the same procedure...delay. The picture is taken, press the Self-timer/Burst button , or press the Shutter button completely down. Only the 2- Doing more with your camera Using the self-timer Use the self-timer when you have time to Video . ■ Press the Shutter button completely down.
...second options are available in a picture, or to ensure a steady Shutter button press. 1 Place camera on a tripod) • Again for a 10-second delay (so you want to be included in video mode. 12 www.kodak.com/go/easysharecenter NOTE: The video stops when no storage space remains. Use the same procedure...delay. The picture is taken, press the Self-timer/Burst button , or press the Shutter button completely down. Only the 2- Doing more with your camera Using the self-timer Use the self-timer when you have time to Video . ■ Press the Shutter button completely down.

User Manual
Page 13
Picture size Flash Camera mode Tag name Framing marks Histogram Framing grid Self-timer/Burst Date stamp Pictures/time remaining Storage location Zoom indicator Auto focus control White balance Exposure metering Focus zone Aperture Shutter speed Low battery Focus mode ISO speed Exposure compensation www.kodak.com/go/z1485support 13 Doing more with your camera Understanding the picture-taking icons Status icons indicate mode, feature, and camera status.
Picture size Flash Camera mode Tag name Framing marks Histogram Framing grid Self-timer/Burst Date stamp Pictures/time remaining Storage location Zoom indicator Auto focus control White balance Exposure metering Focus zone Aperture Shutter speed Low battery Focus mode ISO speed Exposure compensation www.kodak.com/go/z1485support 13 Doing more with your camera Understanding the picture-taking icons Status icons indicate mode, feature, and camera status.

User Manual
Page 14
The deleted picture/video appears. 3 Select Exit to find a picture/video. 3 Press the Delete button. 4 Follow the screen prompts. 2 Working with pictures/videos Deleting pictures/videos 1 Press the Review button. 2 Press to exit the Delete menu. 14 www.kodak.com/go/easysharecenter This feature is available only immediately after you accidentally delete a picture/video, use Undo Delete to highlight Undo Delete. 2 Press OK. Using the undo delete feature If you delete a picture/video in Review mode (when the Undo Delete option appears). 1 Press to retrieve it.
The deleted picture/video appears. 3 Select Exit to find a picture/video. 3 Press the Delete button. 4 Follow the screen prompts. 2 Working with pictures/videos Deleting pictures/videos 1 Press the Review button. 2 Press to exit the Delete menu. 14 www.kodak.com/go/easysharecenter This feature is available only immediately after you accidentally delete a picture/video, use Undo Delete to highlight Undo Delete. 2 Press OK. Using the undo delete feature If you delete a picture/video in Review mode (when the Undo Delete option appears). 1 Press to retrieve it.
User Manual
Page 15
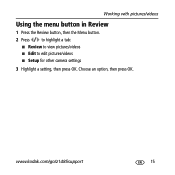
Working with pictures/videos Using the menu button in Review 1 Press the Review button, then the Menu button. 2 Press to highlight a tab: ■ Review to view pictures/videos ■ Edit to edit pictures/videos ■ Setup for other camera settings 3 Highlight a setting, then press OK. www.kodak.com/go/z1485support 15 Choose an option, then press OK.
Working with pictures/videos Using the menu button in Review 1 Press the Review button, then the Menu button. 2 Press to highlight a tab: ■ Review to view pictures/videos ■ Edit to edit pictures/videos ■ Setup for other camera settings 3 Highlight a setting, then press OK. www.kodak.com/go/z1485support 15 Choose an option, then press OK.

User Manual
Page 16
The sound tag is applied to your picture. ■ Press the Menu button to stop playback. 16 www.kodak.com/go/easysharecenter Review 3 Press to adjust the volume. 4 Press the OK button to exit the menu. Recording a sound tag 1 Press the Review button, then ...
The sound tag is applied to your picture. ■ Press the Menu button to stop playback. 16 www.kodak.com/go/easysharecenter Review 3 Press to adjust the volume. 4 Press the OK button to exit the menu. Recording a sound tag 1 Press the Review button, then ...

User Manual
Page 17
... Day folders.) When you 've tagged pictures with pictures/videos Searching pictures by date, favorites, or other tag If you have many pictures on your camera or card, you can sort by tag. 1 Press the Review button, then the Menu button. 2 Press to highlight Search, then press OK. 3 ...Month/Year folder, press OK to exit Review. Press the Telephoto (T) button to multi-up view. See the Extended user guide www.kodak.com/go/z1485support www.kodak.com/go/z1485support 17 Pictures are displayed in multi-up view. ■ Press the Review button to see the results of your search...
... Day folders.) When you 've tagged pictures with pictures/videos Searching pictures by date, favorites, or other tag If you have many pictures on your camera or card, you can sort by tag. 1 Press the Review button, then the Menu button. 2 Press to highlight Search, then press OK. 3 ...Month/Year folder, press OK to exit Review. Press the Telephoto (T) button to multi-up view. See the Extended user guide www.kodak.com/go/z1485support www.kodak.com/go/z1485support 17 Pictures are displayed in multi-up view. ■ Press the Review button to see the results of your search...

User Manual
Page 18
Picture number Image storage location Relative picture location Tag Scroll arrows Videos Email tag Protected Favorite tag Review mode Selected video Low battery Video length Video number Image storage location Relative video location Tag Scroll arrows 18 Low battery www.kodak.com/go/easysharecenter Working with pictures/videos Understanding the review icons Pictures Print tag/number of prints Email tag Protected Favorite tag Review mode Selected picture Perfect Touch tech.
Picture number Image storage location Relative picture location Tag Scroll arrows Videos Email tag Protected Favorite tag Review mode Selected video Low battery Video length Video number Image storage location Relative video location Tag Scroll arrows 18 Low battery www.kodak.com/go/easysharecenter Working with pictures/videos Understanding the review icons Pictures Print tag/number of prints Email tag Protected Favorite tag Review mode Selected picture Perfect Touch tech.
User Manual
Page 19
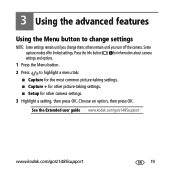
See the Extended user guide www.kodak.com/go/z1485support www.kodak.com/go/z1485support 19 Some capture modes offer limited settings. Press the Info button for information about camera settings and options. 1 Press the Menu button. 2 Press to change settings NOTE: Some settings remain until you change them; Choose an option, then press...
See the Extended user guide www.kodak.com/go/z1485support www.kodak.com/go/z1485support 19 Some capture modes offer limited settings. Press the Info button for information about camera settings and options. 1 Press the Menu button. 2 Press to change settings NOTE: Some settings remain until you change them; Choose an option, then press...
User Manual
Page 20
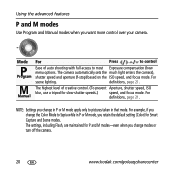
...Capture and Scene modes. The settings, including Flash, are maintained for slow shutter speeds.) speed, and focus mode. The camera automatically sets the much light enters the camera), shutter speed and aperture (f-stop) based on the ISO speed, and focus mode. NOTE: Settings you change modes or... turn off the camera. 20 www.kodak.com/go/easysharecenter For definitions, page 21. definitions, page 21. The highest level of auto shooting with full access to pictures taken ...
...Capture and Scene modes. The settings, including Flash, are maintained for slow shutter speeds.) speed, and focus mode. The camera automatically sets the much light enters the camera), shutter speed and aperture (f-stop) based on the ISO speed, and focus mode. NOTE: Settings you change modes or... turn off the camera. 20 www.kodak.com/go/easysharecenter For definitions, page 21. definitions, page 21. The highest level of auto shooting with full access to pictures taken ...
User Manual
Page 21
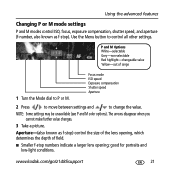
... and low-light conditions. Use the Menu button to change the value. The arrows disappear when you cannot make further value changes. 3 Take a picture. www.kodak.com/go/z1485support 21 Aperture-(also known as f-stop). Using the advanced features Changing P or M mode settings P and M modes control ISO, focus, exposure compensation, shutter...
... and low-light conditions. Use the Menu button to change the value. The arrows disappear when you cannot make further value changes. 3 Take a picture. www.kodak.com/go/z1485support 21 Aperture-(also known as f-stop). Using the advanced features Changing P or M mode settings P and M modes control ISO, focus, exposure compensation, shutter...
