
User's Guide
Page 3
Front/top/side view 19 18 17 16 15 Product features 1 2 3 4 5 6 7 8 9 14 13 12 11 10 1 LCD 2 Power button/light 3 Color Cartridge light 4 Red-eye Reduction button/light 5 Transfer button/light 6 Print button/light Left/Right Up/Down control 7 SDIO card slot 8 SD/MMC/Memory Stick/xD card slot 9 Paper tray 10 Paper tray door 11 CF card slot 12 Bluetooth button/light 13 Cancel button 14 Paper light 15 USB device connector 16 Menu button 17 Rotate button 18 Slide show button 19 Crop button www.kodak.com/go/support i
Front/top/side view 19 18 17 16 15 Product features 1 2 3 4 5 6 7 8 9 14 13 12 11 10 1 LCD 2 Power button/light 3 Color Cartridge light 4 Red-eye Reduction button/light 5 Transfer button/light 6 Print button/light Left/Right Up/Down control 7 SDIO card slot 8 SD/MMC/Memory Stick/xD card slot 9 Paper tray 10 Paper tray door 11 CF card slot 12 Bluetooth button/light 13 Cancel button 14 Paper light 15 USB device connector 16 Menu button 17 Rotate button 18 Slide show button 19 Crop button www.kodak.com/go/support i

User's Guide
Page 4
Product features Back/top/side view 1 7 65 43 2 1 Power connector (DC-in) 2 USB connector (to computer) 3 Cooling vents 4 Slot for paper path 5 Cartridge release 6 Color cartridge (installed as shown) 7 Cartridge door ii www.kodak.com/go/support
Product features Back/top/side view 1 7 65 43 2 1 Power connector (DC-in) 2 USB connector (to computer) 3 Cooling vents 4 Slot for paper path 5 Cartridge release 6 Color cartridge (installed as shown) 7 Cartridge door ii www.kodak.com/go/support

User's Guide
Page 5
Table of contents 1 1 Getting started 1 Finding a location for your photo printer 1 Connecting the power 2 Handling and storing the color cartridge 2 Installing and removing the color cartridge 3...a card or USB flash drive 7 Printing from a PictBridge compatible device 8 Printing tagged (DPOF) pictures 9 3 Doing more with your printer 10 Reducing red-eye in your pictures 10 Rotating your pictures 10 Running a slide show 11 Cropping your pictures 11 Changing the printed picture...the language 15 Changing default settings 16 Viewing the About screen 16 www.kodak.com/go/support iii
Table of contents 1 1 Getting started 1 Finding a location for your photo printer 1 Connecting the power 2 Handling and storing the color cartridge 2 Installing and removing the color cartridge 3...a card or USB flash drive 7 Printing from a PictBridge compatible device 8 Printing tagged (DPOF) pictures 9 3 Doing more with your printer 10 Reducing red-eye in your pictures 10 Rotating your pictures 10 Running a slide show 11 Cropping your pictures 11 Changing the printed picture...the language 15 Changing default settings 16 Viewing the About screen 16 www.kodak.com/go/support iii

User's Guide
Page 6
...21 Transferring pictures from a USB device 22 Printing from a computer 23 Canceling printing 26 5 Using the wireless features of your photo printer 27 Printing from a Bluetooth® wireless technology enabled device 27 Printing and transferring over a Wi-Fi wireless network 29 6 ...problems 36 Transfer/communication problems 42 Wireless network connection 43 Status lights 43 Helpful links 49 Telephone customer support 51 8 Appendix 52 Photo printer specifications 52 Wireless channels 53 Important safety instructions 54 Upgrading your software and firmware 54 Additional care and...
...21 Transferring pictures from a USB device 22 Printing from a computer 23 Canceling printing 26 5 Using the wireless features of your photo printer 27 Printing from a Bluetooth® wireless technology enabled device 27 Printing and transferring over a Wi-Fi wireless network 29 6 ...problems 36 Transfer/communication problems 42 Wireless network connection 43 Status lights 43 Helpful links 49 Telephone customer support 51 8 Appendix 52 Photo printer specifications 52 Wireless channels 53 Important safety instructions 54 Upgrading your software and firmware 54 Additional care and...
User's Guide
Page 7
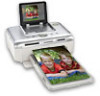
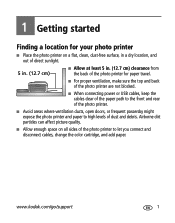
www.kodak.com/go/support 1 1 Getting started Finding a location for your photo printer ■ Place the photo printer on all sides of dust and debris. Airborne dirt particles can affect picture quality. ■ Allow enough space on a flat, clean, dust-free surface,... the cables clear of the paper path to the front and rear of the photo printer. ■ Avoid areas where ventilation ducts, open doors, or frequent passersby might expose the photo printer and paper to high levels of the photo printer to let you connect and disconnect cables, change the color cartridge, and add paper...
www.kodak.com/go/support 1 1 Getting started Finding a location for your photo printer ■ Place the photo printer on all sides of dust and debris. Airborne dirt particles can affect picture quality. ■ Allow enough space on a flat, clean, dust-free surface,... the cables clear of the paper path to the front and rear of the photo printer. ■ Avoid areas where ventilation ducts, open doors, or frequent passersby might expose the photo printer and paper to high levels of the photo printer to let you connect and disconnect cables, change the color cartridge, and add paper...

User's Guide
Page 8
... the color cartridge ■ For best quality prints, store the color cartridge in the sun). 2 www.kodak.com/go /accessories. NOTE: The AC power cord included with your photo printer or computer. 1 Connect the AC power cord to the AC power adapter, then to the back of high... outlet. Getting started Connecting the power RISK OF ELECTRIC SHOCK: Use only the AC power adapter included with your photo printer may not require assembly, and may be different from direct sunlight and out of the photo printer. Purchase an AC power cord and other accessories at www.kodak.com/go /support
... the color cartridge ■ For best quality prints, store the color cartridge in the sun). 2 www.kodak.com/go /accessories. NOTE: The AC power cord included with your photo printer or computer. 1 Connect the AC power cord to the AC power adapter, then to the back of high... outlet. Getting started Connecting the power RISK OF ELECTRIC SHOCK: Use only the AC power adapter included with your photo printer may not require assembly, and may be different from direct sunlight and out of the photo printer. Purchase an AC power cord and other accessories at www.kodak.com/go /support
User's Guide
Page 9
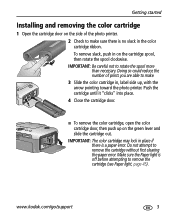
Make sure the Paper light is off before attempting to make sure there is a paper error. Doing so could reduce the number of the photo printer. 2 Check to rotate the spool more than necessary. Push the cartridge until it "clicks" into place. 4 Close the cartridge door. ■ To ...pointing toward the photo printer. To remove slack, push in on the green lever and slide the cartridge out. IMPORTANT: The color cartridge may lock in place if there is no slack in , label side up on the cartridge spool, then rotate the spool clockwise. www.kodak.com/go/support 3 Getting started...
Make sure the Paper light is off before attempting to make sure there is a paper error. Doing so could reduce the number of the photo printer. 2 Check to rotate the spool more than necessary. Push the cartridge until it "clicks" into place. 4 Close the cartridge door. ■ To ...pointing toward the photo printer. To remove slack, push in on the green lever and slide the cartridge out. IMPORTANT: The color cartridge may lock in place if there is no slack in , label side up on the cartridge spool, then rotate the spool clockwise. www.kodak.com/go/support 3 Getting started...

User's Guide
Page 10
... the cartridge error and resume printing. Do not touch the glossy side of high-temperature environments (such as a vehicle parked in the sun). 4 www.kodak.com/go/support After installing a new color cartridge, press the Print button to keep out dust and debris. Getting started ■ When the cartridge is almost empty...
... the cartridge error and resume printing. Do not touch the glossy side of high-temperature environments (such as a vehicle parked in the sun). 4 www.kodak.com/go/support After installing a new color cartridge, press the Print button to keep out dust and debris. Getting started ■ When the cartridge is almost empty...

User's Guide
Page 11
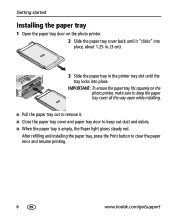
Do not load paper that is missing perforated tabs. IMPORTANT: Do not load more than 25 sheets of Kodak products, or visit www.kodak.com/go /support 5 www.kodak.com/go /accessories. To avoid fingerprints, do not touch the glossy side of the paper. 4 Load the paper into place, about... paper tray as a guide to keep the sheets from sticking together. Purchase Kodak color cartridge & photo paper kits and other accessories at a retailer of paper. Getting started Loading paper 1 Remove the paper tray from the photo printer if installed (see page 6). 2 Slide the paper tray cover back until...
Do not load paper that is missing perforated tabs. IMPORTANT: Do not load more than 25 sheets of Kodak products, or visit www.kodak.com/go /support 5 www.kodak.com/go /accessories. To avoid fingerprints, do not touch the glossy side of the paper. 4 Load the paper into place, about... paper tray as a guide to keep the sheets from sticking together. Purchase Kodak color cartridge & photo paper kits and other accessories at a retailer of paper. Getting started Loading paper 1 Remove the paper tray from the photo printer if installed (see page 6). 2 Slide the paper tray cover back until...
User's Guide
Page 12
IMPORTANT: To ensure the paper tray fits squarely on the photo printer. 2 Slide the paper tray cover back until the tray locks into place. After ..., the Paper light glows steady red. Getting started Installing the paper tray 1 Open the paper tray door on the photo printer, make sure to keep the paper tray cover all the way open while installing. ■ Pull the paper tray out... to remove it "clicks" into place, about 1.25 in. (3 cm). 3 Slide the paper tray in the printer tray slot until it . ■ Close the paper tray cover and paper tray door to clear the paper error and resume printing...
IMPORTANT: To ensure the paper tray fits squarely on the photo printer. 2 Slide the paper tray cover back until the tray locks into place. After ..., the Paper light glows steady red. Getting started Installing the paper tray 1 Open the paper tray door on the photo printer, make sure to keep the paper tray cover all the way open while installing. ■ Pull the paper tray out... to remove it "clicks" into place, about 1.25 in. (3 cm). 3 Slide the paper tray in the printer tray slot until it . ■ Close the paper tray cover and paper tray door to clear the paper error and resume printing...

User's Guide
Page 13
... remove a card when the photo printer is already inserted but no longer detected, remove and reinsert it. The current picture appears on the LCD. 2 Create a print order: ■ Press to locate a picture on the LCD. ■ Press to choose the number of Kodak products, or visit www.kodak.com/go /support 7 2 Printing without printing, press...
... remove a card when the photo printer is already inserted but no longer detected, remove and reinsert it. The current picture appears on the LCD. 2 Create a print order: ■ Press to locate a picture on the LCD. ■ Press to choose the number of Kodak products, or visit www.kodak.com/go /support 7 2 Printing without printing, press...
User's Guide
Page 14
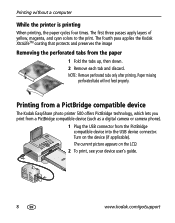
...Kodak EasyShare photo printer 500 offers PictBridge technology, which lets you print from a PictBridge compatible device (such as a digital camera or camera phone). 1 Plug the USB connector from the paper 1 Fold the tabs up, then down. 2 Remove each tab and discard. Turn on the LCD. 2 To print, see your device user's guide. 8 www.kodak.com/go/support... The fourth pass applies the Kodak XtraLifeTM coating that protects and preserves the image Removing the perforated tabs from the PictBridge compatible ...
...Kodak EasyShare photo printer 500 offers PictBridge technology, which lets you print from a PictBridge compatible device (such as a digital camera or camera phone). 1 Plug the USB connector from the paper 1 Fold the tabs up, then down. 2 Remove each tab and discard. Turn on the LCD. 2 To print, see your device user's guide. 8 www.kodak.com/go/support... The fourth pass applies the Kodak XtraLifeTM coating that protects and preserves the image Removing the perforated tabs from the PictBridge compatible ...

User's Guide
Page 15
...a print quantity to print tagged pictures first. Press the Share button to Kodak EasyShare digital cameras. The Print light blinks and tagged pictures are tagged for printing (DPOF-digital print order format), the photo printer gives you tag pictures for printing (DPOF), then print only the tagged ...to locate a picture. 2 Make sure Print is displayed in 3:2 aspect ratio, use this setting. 3:2 ensures that are printed. www.kodak.com/go/support 9 NOTE: If your camera can take pictures in the status area. 4 Press the OK button. The default is one. See your ...
...a print quantity to print tagged pictures first. Press the Share button to Kodak EasyShare digital cameras. The Print light blinks and tagged pictures are tagged for printing (DPOF-digital print order format), the photo printer gives you tag pictures for printing (DPOF), then print only the tagged ...to locate a picture. 2 Make sure Print is displayed in 3:2 aspect ratio, use this setting. 3:2 ensures that are printed. www.kodak.com/go/support 9 NOTE: If your camera can take pictures in the status area. 4 Press the OK button. The default is one. See your ...
User's Guide
Page 16
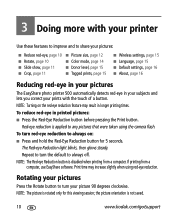
...computer. NOTE: The Red-eye Reduction button is rotated only for 5 seconds. Red-eye reduction is not saved. 10 www.kodak.com/go/support Rotating your pictures Press the Rotate button to any pictures that were taken using red-eye reduction. the picture orientation is applied ...page 15 ■ Language, page 15 ■ Default settings, page 16 ■ About, page 16 Reducing red-eye in your pictures The EasyShare photo printer 500 automatically detects red-eye in printed pictures: ■ Press the Red-Eye Reduction button before pressing the Print button. NOTE: Turning on : ■...
...computer. NOTE: The Red-eye Reduction button is rotated only for 5 seconds. Red-eye reduction is not saved. 10 www.kodak.com/go/support Rotating your pictures Press the Rotate button to any pictures that were taken using red-eye reduction. the picture orientation is applied ...page 15 ■ Language, page 15 ■ Default settings, page 16 ■ About, page 16 Reducing red-eye in your pictures The EasyShare photo printer 500 automatically detects red-eye in printed pictures: ■ Press the Red-Eye Reduction button before pressing the Print button. NOTE: Turning on : ■...
User's Guide
Page 17
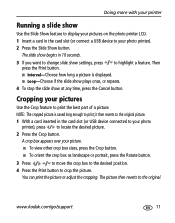
...USB device connected to your photo printer), press to print; Then ■ Interval-Choose how long a picture is saved long enough to locate the desired picture. 2 Press the Crop button. You can print the picture or adjust the cropping. www.kodak.com/go/support 11 Cropping your pictures Use... the Crop feature to the original. The picture then reverts to print the best part of a picture. The slide show begins in 10 seconds. 3 If you want to your photo printer). 2 Press the Slide Show...
...USB device connected to your photo printer), press to print; Then ■ Interval-Choose how long a picture is saved long enough to locate the desired picture. 2 Press the Crop button. You can print the picture or adjust the cropping. www.kodak.com/go/support 11 Cropping your pictures Use... the Crop feature to the original. The picture then reverts to print the best part of a picture. The slide show begins in 10 seconds. 3 If you want to your photo printer). 2 Press the Slide Show...

User's Guide
Page 18
... picture size on number of copies In most cases, the picture size setting also determines the number of copies (on the paper. 12 www.kodak.com/go/support For best results, choose a picture size or number of copies that minimizes blank space on your device user's guide. 2 Press the Menu button...a picture with your camera or device. For example, if three pictures on your camera are printed is determined by the setting on your printer Changing the printed picture size 1 Set print options on the photo printer is selected, three 2 x 3 in. (5.1 x 7.6 cm) pictures are printed.
... picture size on number of copies In most cases, the picture size setting also determines the number of copies (on the paper. 12 www.kodak.com/go/support For best results, choose a picture size or number of copies that minimizes blank space on your device user's guide. 2 Press the Menu button...a picture with your camera or device. For example, if three pictures on your camera are printed is determined by the setting on your printer Changing the printed picture size 1 Set print options on the photo printer is selected, three 2 x 3 in. (5.1 x 7.6 cm) pictures are printed.
User's Guide
Page 19
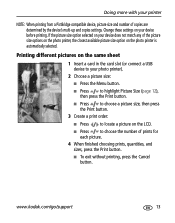
.... Doing more with your device before printing. www.kodak.com/go/support 13 Printing different pictures on the same sheet 1 Insert a card in the card slot (or connect a USB device to your device does not match any of the picture size options on the photo printer, the closest available picture size option on the...
.... Doing more with your device before printing. www.kodak.com/go/support 13 Printing different pictures on the same sheet 1 Insert a card in the card slot (or connect a USB device to your device does not match any of the picture size options on the photo printer, the closest available picture size option on the...

User's Guide
Page 20
... device to choose the number of prints for each picture. 4 When finished choosing prints, quantities, and sizes, press the Print button. Doing more with your photo printer). 2 Choose a picture size: ■ Press the Menu button. ■ Press to highlight Picture Size (page 12), then press the Print button. ■ Press to ...choose a picture size, then press the Print button. 3 Create a print order: ■ Press to locate a picture on the LCD. ■ Press to your printer Printing duplicate pictures on the same sheet 1 Insert a card in the color mode you chose. 14 www...
... device to choose the number of prints for each picture. 4 When finished choosing prints, quantities, and sizes, press the Print button. Doing more with your photo printer). 2 Choose a picture size: ■ Press the Menu button. ■ Press to highlight Picture Size (page 12), then press the Print button. ■ Press to ...choose a picture size, then press the Print button. 3 Create a print order: ■ Press to locate a picture on the LCD. ■ Press to your printer Printing duplicate pictures on the same sheet 1 Insert a card in the color mode you chose. 14 www...
User's Guide
Page 21
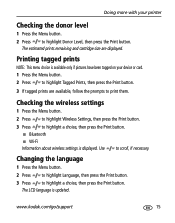
Printing tagged prints NOTE: This menu choice is available only if pictures have been tagged on your printer Checking the donor level 1 Press the Menu button. 2 Press to print them. www.kodak.com/go/support 15 Changing the language 1 Press the Menu button. 2 Press to highlight Language, then press the Print button. 3 Press to...
Printing tagged prints NOTE: This menu choice is available only if pictures have been tagged on your printer Checking the donor level 1 Press the Menu button. 2 Press to print them. www.kodak.com/go/support 15 Changing the language 1 Press the Menu button. 2 Press to highlight Language, then press the Print button. 3 Press to...
User's Guide
Page 22
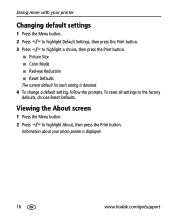
...photo printer is denoted. 4 To change a default setting, follow the prompts. To reset all settings to highlight a choice, then press the Print button. ■ Picture Size ■ Color Mode ■ Red-eye Reduction ■ Reset Defaults The current default for each setting is displayed. 16 www.kodak.com/go/support... Information about your printer Changing default settings 1 Press the Menu button. 2 Press to highlight Default Settings, then press the Print ...
...photo printer is denoted. 4 To change a default setting, follow the prompts. To reset all settings to highlight a choice, then press the Print button. ■ Picture Size ■ Color Mode ■ Red-eye Reduction ■ Reset Defaults The current default for each setting is displayed. 16 www.kodak.com/go/support... Information about your printer Changing default settings 1 Press the Menu button. 2 Press to highlight Default Settings, then press the Print ...