User's Guide
Page 5
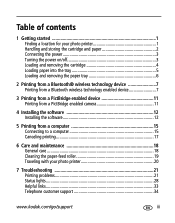
...1 1 Getting started 1 Finding a location for your photo printer 1 Handling and storing the cartridge and paper 2 Connecting the power 3 Turning the power on/off 3 Loading and removing the cartridge 4 Loading paper into the tray 5 Loading and removing the paper tray 6 2 Printing from a Bluetooth® wireless ... a computer 15 Canceling printing 17 6 Care and maintenance 18 General care 18 Cleaning the paper-feed roller 19 Traveling with your photo printer 20 7 Troubleshooting 21 Printing problems 21 Status lights 28 Helpful links 33 Telephone customer support 34 www...
...1 1 Getting started 1 Finding a location for your photo printer 1 Handling and storing the cartridge and paper 2 Connecting the power 3 Turning the power on/off 3 Loading and removing the cartridge 4 Loading paper into the tray 5 Loading and removing the paper tray 6 2 Printing from a Bluetooth® wireless ... a computer 15 Canceling printing 17 6 Care and maintenance 18 General care 18 Cleaning the paper-feed roller 19 Traveling with your photo printer 20 7 Troubleshooting 21 Printing problems 21 Status lights 28 Helpful links 33 Telephone customer support 34 www...

User's Guide
Page 7
...(12.7 cm) ■ Allow at least 5 in. (12.7 cm) clearance from the back of the photo printer for paper travel. ■ For proper ventilation, make sure the top and back of the photo printer are not blocked. ■ When connecting power or USB cables, keep the cables clear of the... paper path to the front and rear of the photo printer. ■ Avoid areas where ventilation ducts, open doors, or frequent passersby might expose the photo printer and paper to high levels of the photo printer to let you connect and disconnect cables, change the cartridge, and add paper. www.kodak.com/go...
...(12.7 cm) ■ Allow at least 5 in. (12.7 cm) clearance from the back of the photo printer for paper travel. ■ For proper ventilation, make sure the top and back of the photo printer are not blocked. ■ When connecting power or USB cables, keep the cables clear of the... paper path to the front and rear of the photo printer. ■ Avoid areas where ventilation ducts, open doors, or frequent passersby might expose the photo printer and paper to high levels of the photo printer to let you connect and disconnect cables, change the cartridge, and add paper. www.kodak.com/go...
User's Guide
Page 14
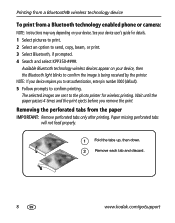
...photo printer for details. 1 Select pictures to print. 2 Select an option to send, copy, beam, or print. 3 Select Bluetooth, if prompted. 4 Search and select KPP350-####. Removing the perforated tabs from a Bluetooth technology enabled phone or camera: NOTE: Instructions may vary depending on your device user's guide for wireless printing. Paper... missing perforated tabs will not feed properly. 1 Fold the tabs up, then down. 2 Remove each tab and discard. 8 www.kodak.com/go/support Available Bluetooth technology wireless ...
...photo printer for details. 1 Select pictures to print. 2 Select an option to send, copy, beam, or print. 3 Select Bluetooth, if prompted. 4 Search and select KPP350-####. Removing the perforated tabs from a Bluetooth technology enabled phone or camera: NOTE: Instructions may vary depending on your device user's guide for wireless printing. Paper... missing perforated tabs will not feed properly. 1 Fold the tabs up, then down. 2 Remove each tab and discard. 8 www.kodak.com/go/support Available Bluetooth technology wireless ...

User's Guide
Page 17
...from a PictBridge enabled camera The photo printer offers PictBridge technology, which lets you print from a PictBridge enabled device (such as a digital camera or camera phone). 1 Plug the USB connector from the PictBridge enabled device into the USB device connector. The paper cycles four times during the ...printing process before the finished print is complete before removing paper, the paper tray, or the camera. See your camera to do so can cause paper misfeeds or jams. www.kodak.com/go/support 11 IMPORTANT: Wait until printing is ejected. Turn on the ...
...from a PictBridge enabled camera The photo printer offers PictBridge technology, which lets you print from a PictBridge enabled device (such as a digital camera or camera phone). 1 Plug the USB connector from the PictBridge enabled device into the USB device connector. The paper cycles four times during the ...printing process before the finished print is complete before removing paper, the paper tray, or the camera. See your camera to do so can cause paper misfeeds or jams. www.kodak.com/go/support 11 IMPORTANT: Wait until printing is ejected. Turn on the ...
User's Guide
Page 22
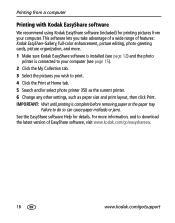
... a wide range of features: Kodak EasyShare Gallery, full-color enhancement, picture editing, photo-greeting cards, picture organization, and more information, and to do so can cause paper misfeeds or jams. See the EasyShare software Help for printing pictures from your computer (see page 12) and the photo printer is complete before removing paper or the paper tray. IMPORTANT: Wait...
... a wide range of features: Kodak EasyShare Gallery, full-color enhancement, picture editing, photo-greeting cards, picture organization, and more information, and to do so can cause paper misfeeds or jams. See the EasyShare software Help for printing pictures from your computer (see page 12) and the photo printer is complete before removing paper or the paper tray. IMPORTANT: Wait...
User's Guide
Page 23
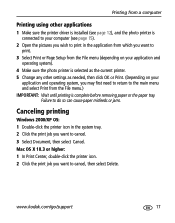
... print. 3 Select Print or Page Setup from the File menu (depending on your application and operating system). 4 Make sure the photo printer is selected as the current printer. 5 Change any other settings as needed, then click OK or Print. (Depending on your application and operating system, you may... the File menu.) IMPORTANT: Wait until printing is complete before removing paper or the paper tray. Failure to cancel, then select Delete. www.kodak.com/go/support 17 Mac OS X 10.3 or higher: 1 In Print Center, double-click the printer icon. 2 Click the print job you want to cancel. 3 ...
... print. 3 Select Print or Page Setup from the File menu (depending on your application and operating system). 4 Make sure the photo printer is selected as the current printer. 5 Change any other settings as needed, then click OK or Print. (Depending on your application and operating system, you may... the File menu.) IMPORTANT: Wait until printing is complete before removing paper or the paper tray. Failure to cancel, then select Delete. www.kodak.com/go/support 17 Mac OS X 10.3 or higher: 1 In Print Center, double-click the printer icon. 2 Click the print job you want to cancel. 3 ...

User's Guide
Page 24
...paper flat. 18 www.kodak.com/go/support 6 Care and maintenance General care IMPORTANT: Always disconnect the power before cleaning. Do not block the cooling vents. ■ Avoid blocking the back of the photo printer and paper-tray exit. ■ Keep power and USB cables away from the paper... path. ■ Keep the surrounding area vacuumed and litter-free. ■ Protect the photo printer from tobacco smoke, dust, sand, and liquid spills. ■ Avoid placing objects on the photo printer. ■ Keep the photo printer, accessories, and supplies away from...
...paper flat. 18 www.kodak.com/go/support 6 Care and maintenance General care IMPORTANT: Always disconnect the power before cleaning. Do not block the cooling vents. ■ Avoid blocking the back of the photo printer and paper-tray exit. ■ Keep power and USB cables away from the paper... path. ■ Keep the surrounding area vacuumed and litter-free. ■ Protect the photo printer from tobacco smoke, dust, sand, and liquid spills. ■ Avoid placing objects on the photo printer. ■ Keep the photo printer, accessories, and supplies away from...

User's Guide
Page 25
Advance the roller with water. www.kodak.com/go/support 19 Inspect the roller weekly for debris particles, and clean if necessary. IMPORTANT: Do not use cotton or cotton swabs to clean the paper-feed roller. 4 Use the moistened cloth to make sure your thumb and continue cleaning. 5 ...roller. IMPORTANT: Unplug the power before cleaning the roller. 1 Unplug the AC power cord from the power outlet. 2 Remove the paper tray from the photo printer, and leave the paper-tray door open. 3 Lightly moisten a lint-free cloth with your pictures look their best, we recommend that you keep the...
Advance the roller with water. www.kodak.com/go/support 19 Inspect the roller weekly for debris particles, and clean if necessary. IMPORTANT: Do not use cotton or cotton swabs to clean the paper-feed roller. 4 Use the moistened cloth to make sure your thumb and continue cleaning. 5 ...roller. IMPORTANT: Unplug the power before cleaning the roller. 1 Unplug the AC power cord from the power outlet. 2 Remove the paper tray from the photo printer, and leave the paper-tray door open. 3 Lightly moisten a lint-free cloth with your pictures look their best, we recommend that you keep the...

User's Guide
Page 26
... www.kodak.com/go/support Purchase an AC power cord, photo printer travel bag. Consider purchasing the AC power cord for the region to which you are traveling. 1 Turn off the photo printer. close the Paper-tray cover and the Paper-tray door on the photo printer. 3 Repack the photo printer in the original packing box, or use the optional photo printer travel...
... www.kodak.com/go/support Purchase an AC power cord, photo printer travel bag. Consider purchasing the AC power cord for the region to which you are traveling. 1 Turn off the photo printer. close the Paper-tray cover and the Paper-tray door on the photo printer. 3 Repack the photo printer in the original packing box, or use the optional photo printer travel...
User's Guide
Page 27
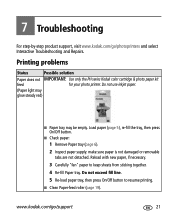
... For step-by-step product support, visit www.kodak.com/go /support 21 Printing problems Status Possible solution Paper does not IMPORTANT: Use only the PH series Kodak color cartridge & photo paper kit feed for your photo printer. Reload with new paper, if necessary. 3 Carefully "fan" paper to resume printing. ■ Clean Paper-feed roller (page 19). Do not exceed...
... For step-by-step product support, visit www.kodak.com/go /support 21 Printing problems Status Possible solution Paper does not IMPORTANT: Use only the PH series Kodak color cartridge & photo paper kit feed for your photo printer. Reload with new paper, if necessary. 3 Carefully "fan" paper to resume printing. ■ Clean Paper-feed roller (page 19). Do not exceed...

User's Guide
Page 29
... & photo paper kit (Paper light, for your photo printer. Carefully remove paper if it does not automatically eject. Carefully "fan" paper to remove the cartridge (see Paper light under Status lights, page 28). www.kodak.com/go/support 23 IMPORTANT: The cartridge may blink quickly) ■ If Paper light blinks quickly: 1 Remove Paper tray (page 6). 2 Disconnect power from photo printer for jammed paper. 3 Remove paper...
... & photo paper kit (Paper light, for your photo printer. Carefully remove paper if it does not automatically eject. Carefully "fan" paper to remove the cartridge (see Paper light under Status lights, page 28). www.kodak.com/go/support 23 IMPORTANT: The cartridge may blink quickly) ■ If Paper light blinks quickly: 1 Remove Paper tray (page 6). 2 Disconnect power from photo printer for jammed paper. 3 Remove paper...

User's Guide
Page 30
... photo printer. For excessive dirt or debris, thoroughly clean Paper tray and load new paper (page 5). wipe paper gently with new paper. 5 Carefully "fan" paper to keep sheets from photo printer. Check and clean Paper-feed roller (page 19). Print smudged ■ Fingerprints may blink) ■ Check paper: 1 Remove Paper tray (page 6). 2 Check paper slot on the paper or inside the photo printer (page 2). 24 www.kodak...
... photo printer. For excessive dirt or debris, thoroughly clean Paper tray and load new paper (page 5). wipe paper gently with new paper. 5 Carefully "fan" paper to keep sheets from photo printer. Check and clean Paper-feed roller (page 19). Print smudged ■ Fingerprints may blink) ■ Check paper: 1 Remove Paper tray (page 6). 2 Check paper slot on the paper or inside the photo printer (page 2). 24 www.kodak...

User's Guide
Page 31
... available light. See your photo printer. See camera user's guide for details. ■ Adjust exposure compensation on camera. See EasyShare software Help for details. ■ Edit picture using Kodak EasyShare software on computer. See camera user's guide for details. ■ Move photo printer from direct sunlight; Do not use inkjet paper. ■ Load paper with Kodak logo facing down (page...
... available light. See your photo printer. See camera user's guide for details. ■ Adjust exposure compensation on camera. See EasyShare software Help for details. ■ Edit picture using Kodak EasyShare software on computer. See camera user's guide for details. ■ Move photo printer from direct sunlight; Do not use inkjet paper. ■ Load paper with Kodak logo facing down (page...
User's Guide
Page 32
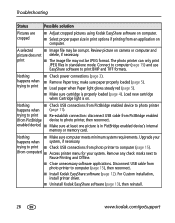
...in PictBridge enabled device's internal memory or memory card. Nothing ■ Check USB connections from photo printer to computer (page 15), then reconnect. ■ Install Kodak EasyShare software (page 12). enabled device) ■ Make sure at least one picture is in ...Troubleshooting Status Possible solution Pictures are cropped ■ Adjust cropped pictures using Kodak EasyShare software on computer. ■ Select proper paper size in print options if printing from PictBridge device to photo printer, then reconnect. Nothing happens when trying to print ■ Re-...
...in PictBridge enabled device's internal memory or memory card. Nothing ■ Check USB connections from photo printer to computer (page 15), then reconnect. ■ Install Kodak EasyShare software (page 12). enabled device) ■ Make sure at least one picture is in ...Troubleshooting Status Possible solution Pictures are cropped ■ Adjust cropped pictures using Kodak EasyShare software on computer. ■ Select proper paper size in print options if printing from PictBridge device to photo printer, then reconnect. Nothing happens when trying to print ■ Re-...

User's Guide
Page 33
... before attempting to prevent the print head from overheating. ■ Move photo printer from direct sunlight; Keep cartridge and paper supply synchronized by discarding unused cartridge or paper when one or other errors -Gradual advancement of cartridge ribbon when removing ...paper due to the next picture slot on the ribbon, resulting in temperature-controlled environment. ■ Do not block cooling vents; Upgrade system, if necessary. www.kodak.com/go/support 27 Troubleshooting Status Printing slow Possible solution NOTE: When printing a large number of photo printer...
... before attempting to prevent the print head from overheating. ■ Move photo printer from direct sunlight; Keep cartridge and paper supply synchronized by discarding unused cartridge or paper when one or other errors -Gradual advancement of cartridge ribbon when removing ...paper due to the next picture slot on the ribbon, resulting in temperature-controlled environment. ■ Do not block cooling vents; Upgrade system, if necessary. www.kodak.com/go/support 27 Troubleshooting Status Printing slow Possible solution NOTE: When printing a large number of photo printer...

User's Guide
Page 35
...kodak.com/go/support 29 Image being received by the photo printer. working normally. Cartridge light Light status Cause Action/solution IMPORTANT: The cartridge may lock if there is off before attempting to remove the cartridge (see Paper light under Status lights, page 28). Photo printer...button. None required. Light off Cartridge properly installed and None required. Paper light: corrupt or invalid image file. Bluetooth light Light status Cause Troubleshooting Action/solution Light off Light glows steady Light blinks Photo printer not ready to accept image. Clear the...
...kodak.com/go/support 29 Image being received by the photo printer. working normally. Cartridge light Light status Cause Action/solution IMPORTANT: The cartridge may lock if there is off before attempting to remove the cartridge (see Paper light under Status lights, page 28). Photo printer...button. None required. Light off Cartridge properly installed and None required. Paper light: corrupt or invalid image file. Bluetooth light Light status Cause Troubleshooting Action/solution Light off Light glows steady Light blinks Photo printer not ready to accept image. Clear the...

User's Guide
Page 36
photo printer. Paper light Light status Light off before attempting to remove the cartridge without first clearing the paper error. Paper tray properly loaded with Use only the PH series Kodak color Paper light: incorrect cartridge cartridge & photo paper kit for your and/or paper loaded. Make sure the Paper light is off Cause Action/solution IMPORTANT: The color cartridge may lock...
photo printer. Paper light Light status Light off before attempting to remove the cartridge without first clearing the paper error. Paper tray properly loaded with Use only the PH series Kodak color Paper light: incorrect cartridge cartridge & photo paper kit for your and/or paper loaded. Make sure the Paper light is off Cause Action/solution IMPORTANT: The color cartridge may lock...

User's Guide
Page 38
... jam, then press On/Off button. Light blinks alternating with new paper, then press On/Off button. Kodak color cartridge & photo paper kit for your camera manufacturer. 32 www.kodak.com/go /support, see Helpful links, page 33, or contact your photo printer. paper may Remove loose paper. Still having problems? Light blinks concurrently with Cartridge light: None required...
... jam, then press On/Off button. Light blinks alternating with new paper, then press On/Off button. Kodak color cartridge & photo paper kit for your camera manufacturer. 32 www.kodak.com/go /support, see Helpful links, page 33, or contact your photo printer. paper may Remove loose paper. Still having problems? Light blinks concurrently with Cartridge light: None required...

User's Guide
Page 41
....6 in. (68 x 174 x 295 mm) Weight Without paper tray: 33.3 oz (943 g) With paper tray: 38.7 oz (1098 g) Print size 4 x 6 in. (10.2 x 15.2 cm) www.kodak.com/go/support 35 Print speed is dependent on picture size, number of continuous prints, and environmental conditions. 8 Appendix Photo printer specifications Photo printer specifications Printing process Operating environment (for optimum...
....6 in. (68 x 174 x 295 mm) Weight Without paper tray: 33.3 oz (943 g) With paper tray: 38.7 oz (1098 g) Print size 4 x 6 in. (10.2 x 15.2 cm) www.kodak.com/go/support 35 Print speed is dependent on picture size, number of continuous prints, and environmental conditions. 8 Appendix Photo printer specifications Photo printer specifications Printing process Operating environment (for optimum...

User's Guide
Page 42
Appendix Photo printer specifications Paper size with perforated tabs 4 x 7.25 in. (10.2 x 18.4 cm) Picture resolution 300 ppi, continuous tone Compatible input devices USB 2.0 port, PictBridge enabled camera, Bluetooth version 2.0 wireless technology enabled-OBEX OPP, FTP, & BPP profiles. 36 www.kodak.com/go/support
Appendix Photo printer specifications Paper size with perforated tabs 4 x 7.25 in. (10.2 x 18.4 cm) Picture resolution 300 ppi, continuous tone Compatible input devices USB 2.0 port, PictBridge enabled camera, Bluetooth version 2.0 wireless technology enabled-OBEX OPP, FTP, & BPP profiles. 36 www.kodak.com/go/support


