

User Manual
Page 5
See the Extended user guide www.kodak.com/go/m1093support www.kodak.com/go/m1093support 5 View previous/next picture/video. Play a video. Delete a picture/video. ENGLISH ᕦ Reviewing pictures/videos Press the Review button to enter/exit Review.
See the Extended user guide www.kodak.com/go/m1093support www.kodak.com/go/m1093support 5 View previous/next picture/video. Play a video. Delete a picture/video. ENGLISH ᕦ Reviewing pictures/videos Press the Review button to enter/exit Review.
User Manual
Page 10
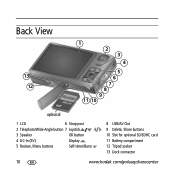
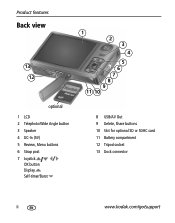
Back View 13 12 1 2 3 4 5 6 7 8 9 11 10 optional 1 LCD 6 Strap post 2 Telephoto/Wide Angle button 7 Joystick 3 Speaker OK button 4 DC-In (5V) Display 5 Review, Menu buttons Self-timer/Burst 8 USB/AV Out 9 Delete, Share buttons 10 Slot for optional SD/SDHC card 11 Battery compartment 12 Tripod socket 13 Dock connector 10 www.kodak.com/go/easysharecenter
Back View 13 12 1 2 3 4 5 6 7 8 9 11 10 optional 1 LCD 6 Strap post 2 Telephoto/Wide Angle button 7 Joystick 3 Speaker OK button 4 DC-In (5V) Display 5 Review, Menu buttons Self-timer/Burst 8 USB/AV Out 9 Delete, Share buttons 10 Slot for optional SD/SDHC card 11 Battery compartment 12 Tripod socket 13 Dock connector 10 www.kodak.com/go/easysharecenter
User Manual
Page 19
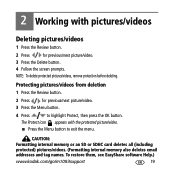
..., see EasyShare software Help.) www.kodak.com/go/m1093support 19 NOTE: To delete protected pictures/videos, remove protection before deleting. 2 Working with the protected picture/video. ■ Press the Menu button to highlight Protect, then press the OK button. The Protect icon appears with pictures/videos Deleting pictures/videos 1 Press the Review button...
..., see EasyShare software Help.) www.kodak.com/go/m1093support 19 NOTE: To delete protected pictures/videos, remove protection before deleting. 2 Working with the protected picture/video. ■ Press the Menu button to highlight Protect, then press the OK button. The Protect icon appears with pictures/videos Deleting pictures/videos 1 Press the Review button...

User Manual
Page 20
Picture/Video number Image storage location Relative picture number Videos Scroll arrows Email tag Protected Favorite tag Review Battery level Tag name Video length Picture/Video number Image storage location Relative video number Scroll arrows 20 Battery level Tag name www.kodak.com/go/easysharecenter Working with pictures/videos Understanding the review icons Pictures Email tag Protected Favorite tag Review Selected picture Print tag/number of prints Perfect Touch tech.
Picture/Video number Image storage location Relative picture number Videos Scroll arrows Email tag Protected Favorite tag Review Battery level Tag name Video length Picture/Video number Image storage location Relative video number Scroll arrows 20 Battery level Tag name www.kodak.com/go/easysharecenter Working with pictures/videos Understanding the review icons Pictures Email tag Protected Favorite tag Review Selected picture Print tag/number of prints Perfect Touch tech.
User Manual
Page 21
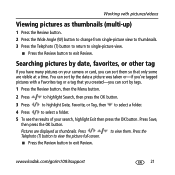
...so that you created-you can sort them . Press the ■ Press the Review button to view the picture full-screen. Pictures are visible at a time. Press Telephoto (T) button to exit Review. www.kodak.com/go/m1093support 21 Searching pictures by the date a picture was taken or-if...Press to highlight Date, Favorite, or Tag, then to select a folder. 4 Press to exit Review. You can sort by date, favorites, or other tag If you have many pictures on your camera or card, you 've tagged pictures with pictures/videos Viewing pictures as thumbnails. Working with a ...
...so that you created-you can sort them . Press the ■ Press the Review button to view the picture full-screen. Pictures are visible at a time. Press Telephoto (T) button to exit Review. www.kodak.com/go/m1093support 21 Searching pictures by the date a picture was taken or-if...Press to highlight Date, Favorite, or Tag, then to select a folder. 4 Press to exit Review. You can sort by date, favorites, or other tag If you have many pictures on your camera or card, you 've tagged pictures with pictures/videos Viewing pictures as thumbnails. Working with a ...

User Manual
Page 22
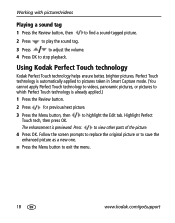
Working with pictures/videos Using Kodak Perfect Touch technology Kodak Perfect Touch technology helps ensure better, brighter pictures. Press to highlight the Edit tab. to view other parts of the picture. 4 Press OK. Highlight Perfect Touch The enhancement is already applied.) 1 Press the Review button. 2 Press for previous/next picture. 3 Press the Menu button...
Working with pictures/videos Using Kodak Perfect Touch technology Kodak Perfect Touch technology helps ensure better, brighter pictures. Press to highlight the Edit tab. to view other parts of the picture. 4 Press OK. Highlight Perfect Touch The enhancement is already applied.) 1 Press the Review button. 2 Press for previous/next picture. 3 Press the Menu button...
User Manual
Page 23
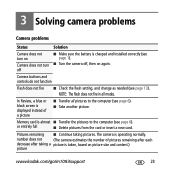
... 6). Pictures remaining ■ Continue taking a picture is taken, based on again. Camera buttons and controls do not function Flash does not fire ■ Check the flash setting... and change as needed (see page 13). Memory card is operating normally. In Review, a blue or black screen is displayed instead of pictures remaining after each decrease after...picture. number does not (The camera estimates the number of a picture ■ Transfer all modes. 3 Solving camera problems Camera problems Status Solution Camera does not turn on Camera does not turn off ■...
... 6). Pictures remaining ■ Continue taking a picture is taken, based on again. Camera buttons and controls do not function Flash does not fire ■ Check the flash setting... and change as needed (see page 13). Memory card is operating normally. In Review, a blue or black screen is displayed instead of pictures remaining after each decrease after...picture. number does not (The camera estimates the number of a picture ■ Transfer all modes. 3 Solving camera problems Camera problems Status Solution Camera does not turn on Camera does not turn off ■...
Extended User Guide
Page 4
Product features Back view 13 12 optional 1 LCD 2 Telephoto/Wide Angle button 3 Speaker 4 DC-In (5V) 5 Review, Menu buttons 6 Strap post 7 Joystick OK button Display Self-timer/Burst 1 2 3 4 5 6 7 8 9 11 10 8 USB/AV Out 9 Delete, Share buttons 10 Slot for optional SD or SDHC card 11 Battery compartment 12 Tripod socket 13 Dock connector ii www.kodak.com/go/support
Product features Back view 13 12 optional 1 LCD 2 Telephoto/Wide Angle button 3 Speaker 4 DC-In (5V) 5 Review, Menu buttons 6 Strap post 7 Joystick OK button Display Self-timer/Burst 1 2 3 4 5 6 7 8 9 11 10 8 USB/AV Out 9 Delete, Share buttons 10 Slot for optional SD or SDHC card 11 Battery compartment 12 Tripod socket 13 Dock connector ii www.kodak.com/go/support

Extended User Guide
Page 5
... the strap 1 Loading the KLIC-7004 battery 1 Charging the battery 2 Turning on the camera 2 Setting the language and date/time 4 Storing pictures on an SD or SDHC card 4 2 Taking pictures/videos 5 Taking a picture 5 Using the framing marks to ... 11 Understanding the picture-taking icons 12 3 Working with pictures/videos 13 Reviewing pictures/videos 13 Deleting pictures/videos 14 Understanding the review icons 15 Using the menu button in review 16 Cropping pictures 17 Adding sound tags 17 Using Kodak Perfect Touch technology 18 Editing videos 19 Running a slide show 22 Viewing...
... the strap 1 Loading the KLIC-7004 battery 1 Charging the battery 2 Turning on the camera 2 Setting the language and date/time 4 Storing pictures on an SD or SDHC card 4 2 Taking pictures/videos 5 Taking a picture 5 Using the framing marks to ... 11 Understanding the picture-taking icons 12 3 Working with pictures/videos 13 Reviewing pictures/videos 13 Deleting pictures/videos 14 Understanding the review icons 15 Using the menu button in review 16 Cropping pictures 17 Adding sound tags 17 Using Kodak Perfect Touch technology 18 Editing videos 19 Running a slide show 22 Viewing...
Extended User Guide
Page 11
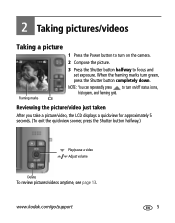
...Taking pictures/videos Taking a picture Framing marks 1 Press the Power button to turn green, press the Shutter button completely down. www.kodak.com/go/support 5 Reviewing the picture/video just taken After you take a picture/video, the LCD displays a quickview for approximately 5 seconds. (To exit ...the quickview sooner, press the Shutter button halfway.) Play/pause a video Adjust volume Delete To review pictures/videos anytime, see page 13. NOTE: You can repeatedly press to turn on the camera. 2 Compose the picture. 3 Press the Shutter button halfway to focus and set exposure.
...Taking pictures/videos Taking a picture Framing marks 1 Press the Power button to turn green, press the Shutter button completely down. www.kodak.com/go/support 5 Reviewing the picture/video just taken After you take a picture/video, the LCD displays a quickview for approximately 5 seconds. (To exit ...the quickview sooner, press the Shutter button halfway.) Play/pause a video Adjust volume Delete To review pictures/videos anytime, see page 13. NOTE: You can repeatedly press to turn on the camera. 2 Compose the picture. 3 Press the Shutter button halfway to focus and set exposure.
Extended User Guide
Page 16
... in low-light scenes. Taking pictures/videos SCN mode SelfPortrait High ISO Children Backlight Panning Shot Candle Light Sunset For Close-ups of yourself. To review and work with videos, see page 13. 10 www.kodak.com/go/support Assures proper focus and minimizes red eye.
... in low-light scenes. Taking pictures/videos SCN mode SelfPortrait High ISO Children Backlight Panning Shot Candle Light Sunset For Close-ups of yourself. To review and work with videos, see page 13. 10 www.kodak.com/go/support Assures proper focus and minimizes red eye.

Extended User Guide
Page 19
www.kodak.com/go/support 13 to view other parts of a ■ Press OK to return to a bookmark (see page 21). press again for 4X. ■ Press ...: ■ Press to adjust the volume. ■ Press to play at 2X speed; press again for previous/next picture/video. ■ To exit, press the Review button. Playing a video Press to play a video. 3 Working with pictures/videos...
www.kodak.com/go/support 13 to view other parts of a ■ Press OK to return to a bookmark (see page 21). press again for 4X. ■ Press ...: ■ Press to adjust the volume. ■ Press to play at 2X speed; press again for previous/next picture/video. ■ To exit, press the Review button. Playing a video Press to play a video. 3 Working with pictures/videos...
Extended User Guide
Page 20
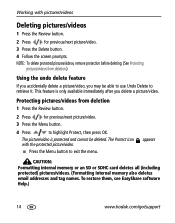
... be deleted. NOTE: To delete protected pictures/videos, remove protection before deleting. (See Protecting pictures/videos from deletion 1 Press the Review button. 2 Press for previous/next picture/video. 3 Press the Delete button. 4 Follow the screen prompts. Working with the protected...delete a picture/video, you delete a picture/video. To restore them, see EasyShare software Help.) 14 www.kodak.com/go/support The Protect icon with pictures/videos Deleting pictures/videos 1 Press the Review button. 2 Press for previous/next picture/video. 3 Press the Menu button....
... be deleted. NOTE: To delete protected pictures/videos, remove protection before deleting. (See Protecting pictures/videos from deletion 1 Press the Review button. 2 Press for previous/next picture/video. 3 Press the Delete button. 4 Follow the screen prompts. Working with the protected...delete a picture/video, you delete a picture/video. To restore them, see EasyShare software Help.) 14 www.kodak.com/go/support The Protect icon with pictures/videos Deleting pictures/videos 1 Press the Review button. 2 Press for previous/next picture/video. 3 Press the Menu button....

Extended User Guide
Page 21
Working with pictures/videos Understanding the review icons Pictures Email tag Protected Favorite tag Review Selected picture Print tag/number of prints Perfect Touch tech. Picture/Video number Image storage location Relative picture number Scroll arrows Videos Email tag Protected Favorite tag Review Battery level Tag name Video length Picture/Video number Image storage location Relative video number Scroll arrows www.kodak.com/go/support Battery level Tag name 15
Working with pictures/videos Understanding the review icons Pictures Email tag Protected Favorite tag Review Selected picture Print tag/number of prints Perfect Touch tech. Picture/Video number Image storage location Relative picture number Scroll arrows Videos Email tag Protected Favorite tag Review Battery level Tag name Video length Picture/Video number Image storage location Relative video number Scroll arrows www.kodak.com/go/support Battery level Tag name 15

Extended User Guide
Page 22
To get the most from your camera takes pictures/videos ■ Customize other camera settings (page 32) 3 Press to highlight a setting, then press OK. 4 Highlight an option, then press OK. 16 www.kodak.com/go/support Using the menu button in review The Menu button lets you: ■ Edit ...your pictures/videos ■ Control how your camera, see page 49. 1 Press the Review button, then the Menu button. 2 Press to highlight a tab:...
To get the most from your camera takes pictures/videos ■ Customize other camera settings (page 32) 3 Press to highlight a setting, then press OK. 4 Highlight an option, then press OK. 16 www.kodak.com/go/support Using the menu button in review The Menu button lets you: ■ Edit ...your pictures/videos ■ Control how your camera, see page 49. 1 Press the Review button, then the Menu button. 2 Press to highlight a tab:...

Extended User Guide
Page 23
... the camera. ■ Press the Menu button to exit the menu. The sound tag is saved.) Cropped pictures cannot be added to each picture (not to videos). Press OK. 4 Highlight Record, then press OK. 5 Follow the screen prompts. Recording a sound tag 1 Press the Review button,... then to find a 2 Press the Menu button, then to exit the menu. www.kodak.com/go/support 17 Press OK. 4 Follow the screen prompts. Working with pictures/videos Cropping pictures You...
... the camera. ■ Press the Menu button to exit the menu. The sound tag is saved.) Cropped pictures cannot be added to each picture (not to videos). Press OK. 4 Highlight Record, then press OK. 5 Follow the screen prompts. Recording a sound tag 1 Press the Review button,... then to find a 2 Press the Menu button, then to exit the menu. www.kodak.com/go/support 17 Press OK. 4 Follow the screen prompts. Working with pictures/videos Cropping pictures You...
Extended User Guide
Page 24
...as a new one. ■ Press the Menu button to highlight the Edit tab. Working with pictures/videos Playing a sound tag 1 Press the Review button, then to find a sound-tagged picture. 2 Press to play the sound tag. 3 Press to adjust the volume. 4 Press OK ...to which Perfect Touch technology is already applied.) 1 Press the Review button. 2 Press for previous/next picture. 3 Press the Menu button, then Touch tech, then press OK. Using Kodak Perfect Touch technology Kodak Perfect Touch technology helps ensure better, brighter pictures. Perfect Touch technology is ...
...as a new one. ■ Press the Menu button to highlight the Edit tab. Working with pictures/videos Playing a sound tag 1 Press the Review button, then to find a sound-tagged picture. 2 Press to play the sound tag. 3 Press to adjust the volume. 4 Press OK ...to which Perfect Touch technology is already applied.) 1 Press the Review button. 2 Press for previous/next picture. 3 Press the Menu button, then Touch tech, then press OK. Using Kodak Perfect Touch technology Kodak Perfect Touch technology helps ensure better, brighter pictures. Perfect Touch technology is ...
Extended User Guide
Page 25
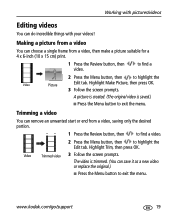
...Editing videos You can choose a single frame from a video, saving only the desired portion. 1 Press the Review button, then to find a 2 Press the Menu button, then to exit the menu. Trimming a video You... start or end from a video, then make a picture suitable for a 4 x 6-inch (10 x 15 cm) print. 1 Press the Review button, then video. Highlight Make Picture, then press OK. 3 Follow the screen prompts. Video Trimmed video 3 Follow the screen prompts. to find...Making a picture from a video You can do incredible things with your videos! www.kodak.com/go/support 19
...Editing videos You can choose a single frame from a video, saving only the desired portion. 1 Press the Review button, then to find a 2 Press the Menu button, then to exit the menu. Trimming a video You... start or end from a video, then make a picture suitable for a 4 x 6-inch (10 x 15 cm) print. 1 Press the Review button, then video. Highlight Make Picture, then press OK. 3 Follow the screen prompts. Video Trimmed video 3 Follow the screen prompts. to find...Making a picture from a video You can do incredible things with your videos! www.kodak.com/go/support 19
Extended User Guide
Page 26
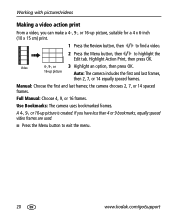
... 4, 9, or 16 frames. Highlight Action Print, then press OK. Manual: Choose the first and last frames; A 4-, 9-, or 16-up picture Auto: The camera includes the first and last frames, then 2, 7, or 14 equally spaced frames. Video 4-, 9-, or 3 Highlight an option, then press OK. 16-up picture... is created. If you can make a 4-, 9-, or 16-up picture, suitable for a 4 x 6-inch (10 x 15 cm) print. 1 Press the Review button, then to find a video. 2 Press the Menu button, then to exit the menu. 20 www.kodak.com/go/support Use Bookmarks: The camera uses bookmarked frames.
... 4, 9, or 16 frames. Highlight Action Print, then press OK. Manual: Choose the first and last frames; A 4-, 9-, or 16-up picture Auto: The camera includes the first and last frames, then 2, 7, or 14 equally spaced frames. Video 4-, 9-, or 3 Highlight an option, then press OK. 16-up picture... is created. If you can make a 4-, 9-, or 16-up picture, suitable for a 4 x 6-inch (10 x 15 cm) print. 1 Press the Review button, then to find a video. 2 Press the Menu button, then to exit the menu. 20 www.kodak.com/go/support Use Bookmarks: The camera uses bookmarked frames.

Extended User Guide
Page 27
..., then to find a video. 2 Press to highlight the Edit tab. www.kodak.com/go/support 21 Highlight Bookmark, then press OK. When finished adding up to 9 bookmarks, press . ■ Press the Menu button to exit the menu. 1 Press the Review button, then to find a video. 2 Press the Menu button, then to play...
..., then to find a video. 2 Press to highlight the Edit tab. www.kodak.com/go/support 21 Highlight Bookmark, then press OK. When finished adding up to 9 bookmarks, press . ■ Press the Menu button to exit the menu. 1 Press the Review button, then to find a video. 2 Press the Menu button, then to play...


