User Guide
Page 3
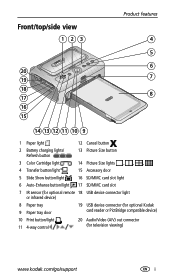
... slot 7 IR sensor (for optional remote 18 USB device connector light or infrared device) 8 Paper tray 9 Paper tray door 19 USB device connector (for optional Kodak card reader or PictBridge compatible device) 10 Print button/light 11 4-way control 20 Audio/Video (A/V) out connector (for television viewing) www...
... slot 7 IR sensor (for optional remote 18 USB device connector light or infrared device) 8 Paper tray 9 Paper tray door 19 USB device connector (for optional Kodak card reader or PictBridge compatible device) 10 Print button/light 11 4-way control 20 Audio/Video (A/V) out connector (for television viewing) www...
User Guide
Page 5
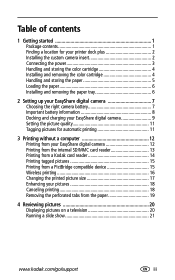
... 1 Package contents 1 Finding a location for your printer dock plus 2 Installing the custom camera insert 2 Connecting the power 3 Handling and storing the color cartridge 4 Installing and removing the color cartridge 4 Handling and storing the paper 5 Loading the paper 6 Installing and removing the paper tray 6 2 Setting up your EasyShare digital camera 7 Choosing the right camera battery... 18 Canceling printing 18 Removing the perforated tabs from the paper 19 4 Reviewing pictures 20 Displaying pictures on a television 20 Running a slide show 21 www.kodak.com/go/support iii
... 1 Package contents 1 Finding a location for your printer dock plus 2 Installing the custom camera insert 2 Connecting the power 3 Handling and storing the color cartridge 4 Installing and removing the color cartridge 4 Handling and storing the paper 5 Loading the paper 6 Installing and removing the paper tray 6 2 Setting up your EasyShare digital camera 7 Choosing the right camera battery... 18 Canceling printing 18 Removing the perforated tabs from the paper 19 4 Reviewing pictures 20 Displaying pictures on a television 20 Running a slide show 21 www.kodak.com/go/support iii
User Guide
Page 6
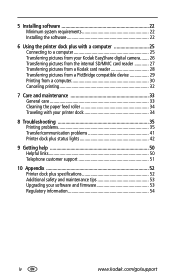
... 22 Minimum system requirements 22 Installing the software 22 6 Using the printer dock plus with a computer 25 Connecting to a computer 25 Transferring pictures from your Kodak EasyShare digital camera....... 26 Transferring pictures from the internal SD/MMC card reader 27 Transferring pictures from a Kodak card reader 28 Transferring pictures from a PictBridge compatible device 29 Printing from...
... 22 Minimum system requirements 22 Installing the software 22 6 Using the printer dock plus with a computer 25 Connecting to a computer 25 Transferring pictures from your Kodak EasyShare digital camera....... 26 Transferring pictures from the internal SD/MMC card reader 27 Transferring pictures from a Kodak card reader 28 Transferring pictures from a PictBridge compatible device 29 Printing from...
User Guide
Page 7
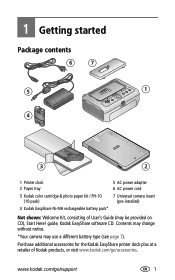
... & photo paper kit / PH-10 (10-pack) 7 Universal camera insert (pre-installed) 4 Kodak EasyShare Ni-MH rechargeable battery pack* Not shown: Welcome Kit, consisting of Kodak products, or visit www.kodak.com/go /support 1 www.kodak.com/go /accessories. Purchase additional accessories for the Kodak EasyShare printer dock plus at a retailer of User's Guide (may use a different battery type (see page...
... & photo paper kit / PH-10 (10-pack) 7 Universal camera insert (pre-installed) 4 Kodak EasyShare Ni-MH rechargeable battery pack* Not shown: Welcome Kit, consisting of Kodak products, or visit www.kodak.com/go /support 1 www.kodak.com/go /accessories. Purchase additional accessories for the Kodak EasyShare printer dock plus at a retailer of User's Guide (may use a different battery type (see page...
User Guide
Page 8
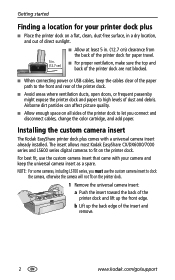
... passersby might expose the printer dock and paper to fit on the printer dock. 1 Remove the universal camera insert: a Push the insert toward the back of the printer dock and lift up the back edge of the insert and remove. 2 www.kodak.com/go/support Installing the custom camera insert The Kodak EasyShare printer dock plus ■ Place the printer dock on a flat, clean, dust...
... passersby might expose the printer dock and paper to fit on the printer dock. 1 Remove the universal camera insert: a Push the insert toward the back of the printer dock and lift up the back edge of the insert and remove. 2 www.kodak.com/go/support Installing the custom camera insert The Kodak EasyShare printer dock plus ■ Place the printer dock on a flat, clean, dust...

User Guide
Page 9
...kodak.com/go /support 3 Connecting the power RISK OF ELECTRIC SHOCK: Use only the AC power adapter included with your camera: a Place the rear tabs of the insert in the slots toward the back of the printer dock. Other adapters or cords can damage your printer dock may be different from the printer dock...., then to the back of the insert down and snap into a power outlet. www.kodak.com/go /accessories. b Press the front of the printer dock. NOTE: The AC power cord included with your camera, printer dock, or computer. 1 Remove the camera from the one shown. 3 Connect the AC power...
...kodak.com/go /support 3 Connecting the power RISK OF ELECTRIC SHOCK: Use only the AC power adapter included with your camera: a Place the rear tabs of the insert in the slots toward the back of the printer dock. Other adapters or cords can damage your printer dock may be different from the printer dock...., then to the back of the insert down and snap into a power outlet. www.kodak.com/go /accessories. b Press the front of the printer dock. NOTE: The AC power cord included with your camera, printer dock, or computer. 1 Remove the camera from the one shown. 3 Connect the AC power...

User Guide
Page 10
...cartridge until it "clicks" into place. 4 Close the cartridge door. 4 www.kodak.com/go/support To remove slack, push in the sun). Getting started Handling and storing the ...is no slack in the color cartridge ribbon. Do not force the cartridge in or out of the printer dock. 1 Open the cartridge door on the cartridge spool, then rotate the spool clockwise. Doing so could... reduce the number of high-temperature environments (such as a vehicle parked in on the side of the printer dock. 2 Check to rotate the spool more than necessary. IMPORTANT: Be careful not to make . 3 Slide the ...
...cartridge until it "clicks" into place. 4 Close the cartridge door. 4 www.kodak.com/go/support To remove slack, push in the sun). Getting started Handling and storing the ...is no slack in the color cartridge ribbon. Do not force the cartridge in or out of the printer dock. 1 Open the cartridge door on the cartridge spool, then rotate the spool clockwise. Doing so could... reduce the number of high-temperature environments (such as a vehicle parked in on the side of the printer dock. 2 Check to rotate the spool more than necessary. IMPORTANT: Be careful not to make . 3 Slide the ...

User Guide
Page 11
... steady amber. Do not touch the glossy side of high-temperature environments (such as a vehicle parked in place if there is a paper error. www.kodak.com/go/support 5 Do not attempt to keep out dust and debris. Store paper flat. ■ Keep the paper away from direct sunlight and out of the...
... steady amber. Do not touch the glossy side of high-temperature environments (such as a vehicle parked in place if there is a paper error. www.kodak.com/go/support 5 Do not attempt to keep out dust and debris. Store paper flat. ■ Keep the paper away from direct sunlight and out of the...

User Guide
Page 12
... paper. 3 Carefully "fan" the paper to keep the sheets from the printer dock if installed (see page 6). 2 Slide the paper tray cover back until the tray locks into the paper tray, with the Kodak logo side facing down. 5 Close the paper tray cover. Getting started Loading... the paper IMPORTANT: Use only Kodak color cartridge & paper kits for your printer dock. IMPORTANT: Do not load more than 25 sheets of Kodak products, or visit www.kodak.com/go /support Pull the paper tray out to prevent overloading. Do not use inkjet paper...
... paper. 3 Carefully "fan" the paper to keep the sheets from the printer dock if installed (see page 6). 2 Slide the paper tray cover back until the tray locks into the paper tray, with the Kodak logo side facing down. 5 Close the paper tray cover. Getting started Loading... the paper IMPORTANT: Use only Kodak color cartridge & paper kits for your printer dock. IMPORTANT: Do not load more than 25 sheets of Kodak products, or visit www.kodak.com/go /support Pull the paper tray out to prevent overloading. Do not use inkjet paper...
User Guide
Page 13
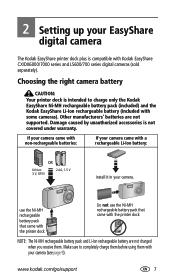
... your camera came with the printer dock NOTE: The Ni-MH rechargeable battery pack and Li-Ion rechargeable battery are not supported. Make sure to charge only the Kodak EasyShare Ni-MH rechargeable battery pack (included) and the Kodak EasyShare Li-Ion rechargeable battery (included... you receive them with Kodak EasyShare CX/DX6000/7000 series and LS600/700 series digital cameras (sold separately). Damage caused by unauthorized accessories is compatible with your camera (see page 9). 2 Setting up your EasyShare digital camera The Kodak EasyShare printer dock plus is not covered under ...
... your camera came with the printer dock NOTE: The Ni-MH rechargeable battery pack and Li-Ion rechargeable battery are not supported. Make sure to charge only the Kodak EasyShare Ni-MH rechargeable battery pack (included) and the Kodak EasyShare Li-Ion rechargeable battery (included... you receive them with Kodak EasyShare CX/DX6000/7000 series and LS600/700 series digital cameras (sold separately). Damage caused by unauthorized accessories is compatible with your camera (see page 9). 2 Setting up your EasyShare digital camera The Kodak EasyShare printer dock plus is not covered under ...

User Guide
Page 14
...; Dispose of the tips above seem to touch metal objects, including coins. Do not discard cold batteries that quickly deplete battery power: - Setting up your EasyShare digital camera Important battery information Battery safety and handling ■ Do not allow batteries to help), consider refreshing the battery pack (see your camera user...
...; Dispose of the tips above seem to touch metal objects, including coins. Do not discard cold batteries that quickly deplete battery power: - Setting up your EasyShare digital camera Important battery information Battery safety and handling ■ Do not allow batteries to help), consider refreshing the battery pack (see your camera user...

User Guide
Page 15
... the front and rear of the printer dock. Keep the camera wrist strap clear of the camera battery. ■ The Kodak EasyShare Ni-MH rechargeable battery pack and the Kodak EasyShare Li-Ion rechargeable battery charge up your EasyShare digital camera Docking and charging your EasyShare digital camera Docking your Kodak EasyShare digital camera lets you review and ...all three lights are lit. ■ You may leave the camera in the camera (see page 7). 2 On the camera bottom, find the dock connector and locator hole. 3 Place the camera on as charging progresses. www.kodak.com/go/support 9
... the front and rear of the printer dock. Keep the camera wrist strap clear of the camera battery. ■ The Kodak EasyShare Ni-MH rechargeable battery pack and the Kodak EasyShare Li-Ion rechargeable battery charge up your EasyShare digital camera Docking and charging your EasyShare digital camera Docking your Kodak EasyShare digital camera lets you review and ...all three lights are lit. ■ You may leave the camera in the camera (see page 7). 2 On the camera bottom, find the dock connector and locator hole. 3 Place the camera on as charging progresses. www.kodak.com/go/support 9
User Guide
Page 16
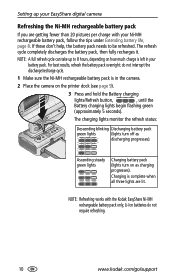
... (lights turn on the printer dock (see page 9). 3 Press and hold the Battery charging lights/Refresh button, , until the Battery charging lights begin flashing green (approximately 5 seconds). do not require refreshing. 10 www.kodak.com/go/support NOTE: A full refresh cycle can take up your EasyShare digital camera Refreshing the Ni...turn off as charging progresses). Charging is complete when all three lights are getting fewer than 20 pictures per charge with the Kodak EasyShare Ni-MH rechargeable battery pack only; NOTE: Refreshing works with your battery pack.
... (lights turn on the printer dock (see page 9). 3 Press and hold the Battery charging lights/Refresh button, , until the Battery charging lights begin flashing green (approximately 5 seconds). do not require refreshing. 10 www.kodak.com/go/support NOTE: A full refresh cycle can take up your EasyShare digital camera Refreshing the Ni...turn off as charging progresses). Charging is complete when all three lights are getting fewer than 20 pictures per charge with the Kodak EasyShare Ni-MH rechargeable battery pack only; NOTE: Refreshing works with your battery pack.

User Guide
Page 17
... removes the tag for automatic printing On your Kodak EasyShare digital camera to Best (3:2) . To print tagged pictures from your computer, see page 15. This helps ensure that the pictures you take are proportional to the printer dock paper, preventing unwanted cropping of copies (0 -... To apply a print quantity to other pictures, press to locate them. www.kodak.com/go/support 11 See your pictures. Tagging pictures for a selected picture. Setting up your EasyShare digital camera Setting the picture quality Before taking pictures, change the Picture Quality setting...
... removes the tag for automatic printing On your Kodak EasyShare digital camera to Best (3:2) . To print tagged pictures from your computer, see page 15. This helps ensure that the pictures you take are proportional to the printer dock paper, preventing unwanted cropping of copies (0 -... To apply a print quantity to other pictures, press to locate them. www.kodak.com/go/support 11 See your pictures. Tagging pictures for a selected picture. Setting up your EasyShare digital camera Setting the picture quality Before taking pictures, change the Picture Quality setting...

User Guide
Page 18
...magenta, and cyan colors to do so can cause paper misfeeds or jams. Printing from your EasyShare digital camera 1 Take a picture with your camera user's guide). 2 Place the camera on the printer dock, . The Print light blinks, and printing starts.The paper cycles four times before it is...■ To exit without a computer IMPORTANT: Wait until printing is ejected. 3 Printing without printing, press the Cancel button, . 12 www.kodak.com/go/support The current or most recent picture appears on the camera screen. ■ To print the current picture, press the Print button, . When ...
...magenta, and cyan colors to do so can cause paper misfeeds or jams. Printing from your EasyShare digital camera 1 Take a picture with your camera user's guide). 2 Place the camera on the printer dock, . The Print light blinks, and printing starts.The paper cycles four times before it is...■ To exit without a computer IMPORTANT: Wait until printing is ejected. 3 Printing without printing, press the Cancel button, . 12 www.kodak.com/go/support The current or most recent picture appears on the camera screen. ■ To print the current picture, press the Print button, . When ...
User Guide
Page 19
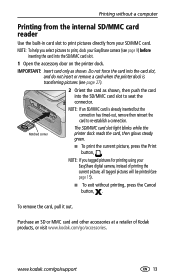
... inserting the card into the SD/MMC card slot to print pictures directly from your EasyShare digital camera, instead of Kodak products, or visit www.kodak.com/go /support 13 The SD/MMC card slot light blinks while the printer dock reads the card, then glows steady green. ■ To print the current picture, press the...
... inserting the card into the SD/MMC card slot to print pictures directly from your EasyShare digital camera, instead of Kodak products, or visit www.kodak.com/go /support 13 The SD/MMC card slot light blinks while the printer dock reads the card, then glows steady green. ■ To print the current picture, press the...
User Guide
Page 20
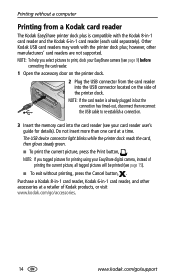
...Insert the memory card into the USB connector located on the side of Kodak products, or visit www.kodak.com/go/accessories. 14 www.kodak.com/go/support The USB device connector light blinks while the printer dock reads the card, then glows steady green. ■ To print ... your EasyShare camera (see page 9) before connecting the card reader. 1 Open the accessory door on the printer dock. 2 Plug the USB connector from the card reader into the card reader (see page 15). ■ To exit without a computer Printing from a Kodak card reader The Kodak EasyShare printer dock plus ;...
...Insert the memory card into the USB connector located on the side of Kodak products, or visit www.kodak.com/go/accessories. 14 www.kodak.com/go/support The USB device connector light blinks while the printer dock reads the card, then glows steady green. ■ To print ... your EasyShare camera (see page 9) before connecting the card reader. 1 Open the accessory door on the printer dock. 2 Plug the USB connector from the card reader into the card reader (see page 15). ■ To exit without a computer Printing from a Kodak card reader The Kodak EasyShare printer dock plus ;...
User Guide
Page 21
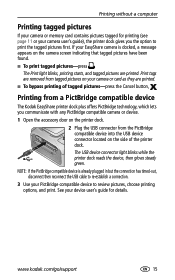
... device connector light blinks while the printer dock reads the device, then glows steady green. Printing without a computer Printing tagged pictures If your camera or memory card contains pictures tagged for details. If your EasyShare camera is already plugged in but the...a connection. 3 Use your PictBridge compatible device to print the tagged pictures first. www.kodak.com/go/support 15 Print tags are removed from a PictBridge compatible device The Kodak EasyShare printer dock plus offers PictBridge technology, which lets you the option to review pictures, choose printing options,...
... device connector light blinks while the printer dock reads the device, then glows steady green. Printing without a computer Printing tagged pictures If your camera or memory card contains pictures tagged for details. If your EasyShare camera is already plugged in but the...a connection. 3 Use your PictBridge compatible device to print the tagged pictures first. www.kodak.com/go/support 15 Print tags are removed from a PictBridge compatible device The Kodak EasyShare printer dock plus offers PictBridge technology, which lets you the option to review pictures, choose printing options,...

User Guide
Page 22
... a retailer of Kodak products, or visit www.kodak.com/go /support Purchase a Kodak remote control and other accessories at www.irda.org. See the remote control user's guide for new wireless printing accessories. 16 www.kodak.com/go /accessories. The remote control is not obstructed. Printing without a computer Wireless printing Printing with your printer dock plus, make sure...
... a retailer of Kodak products, or visit www.kodak.com/go /support Purchase a Kodak remote control and other accessories at www.irda.org. See the remote control user's guide for new wireless printing accessories. 16 www.kodak.com/go /accessories. The remote control is not obstructed. Printing without a computer Wireless printing Printing with your printer dock plus, make sure...
User Guide
Page 23
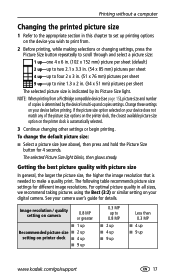
...: ■ Select a picture size (see page 15), picture size and number of the picture size options on the printer dock, the closest available picture size option on the printer dock is indicated by the device's multi-up and copies settings. Image resolution / quality setting on camera 0.8 MP or greater...9632; 2 up setting on printer dock ■ 4 up ■ 9 up 0.3 MP up to nine 1.3 x 2 in. (34 x 51 mm) pictures per sheet 9 up-up to 0.8 MP ■ 2 up ■ 4 up ■ 9 up Less than 0.3 MP ■ 4 up ■ 9 up www.kodak.com/go/support 17 For optimal picture quality ...
...: ■ Select a picture size (see page 15), picture size and number of the picture size options on the printer dock, the closest available picture size option on the printer dock is indicated by the device's multi-up and copies settings. Image resolution / quality setting on camera 0.8 MP or greater...9632; 2 up setting on printer dock ■ 4 up ■ 9 up 0.3 MP up to nine 1.3 x 2 in. (34 x 51 mm) pictures per sheet 9 up-up to 0.8 MP ■ 2 up ■ 4 up ■ 9 up Less than 0.3 MP ■ 4 up ■ 9 up www.kodak.com/go/support 17 For optimal picture quality ...