User Guide
Page 1
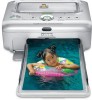
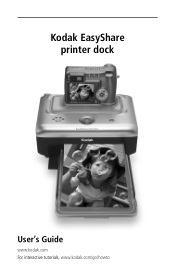
Kodak EasyShare printer dock User's Guide www.kodak.com For interactive tutorials, www.kodak.com/go/howto
Kodak EasyShare printer dock User's Guide www.kodak.com For interactive tutorials, www.kodak.com/go/howto
User Guide
Page 5
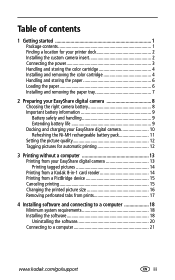
... started 1 Package contents 1 Finding a location for your printer dock 2 Installing the custom camera insert 2 Connecting the power 3 Handling and storing the color cartridge 4 Installing and removing the color cartridge 4 Handling and storing the paper 6 Loading the paper 6 Installing and removing the paper tray 7 2 Preparing your EasyShare digital camera 8 Choosing the right camera battery...
... started 1 Package contents 1 Finding a location for your printer dock 2 Installing the custom camera insert 2 Connecting the power 3 Handling and storing the color cartridge 4 Installing and removing the color cartridge 4 Handling and storing the paper 6 Loading the paper 6 Installing and removing the paper tray 7 2 Preparing your EasyShare digital camera 8 Choosing the right camera battery...

User Guide
Page 6
Table of contents 5 Using the printer dock with a computer 22 Transferring pictures from your Kodak EasyShare digital camera....... 22 Transferring pictures from a Kodak 8-in-1 card reader 23 Printing from a computer 24 Printing with Kodak EasyShare software 24 Printing using other applications 25 Choosing Kodak color mode 25 Canceling printing 26 6 Care and maintenance 27 General care 27 Cleaning the...
Table of contents 5 Using the printer dock with a computer 22 Transferring pictures from your Kodak EasyShare digital camera....... 22 Transferring pictures from a Kodak 8-in-1 card reader 23 Printing from a computer 24 Printing with Kodak EasyShare software 24 Printing using other applications 25 Choosing Kodak color mode 25 Canceling printing 26 6 Care and maintenance 27 General care 27 Cleaning the...
User Guide
Page 7
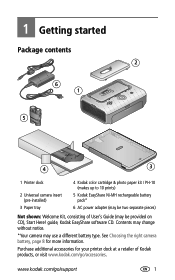
... pack* 6 AC power adapter (may be provided on CD), Start Here! Purchase additional accessories for more information. www.kodak.com/go /accessories. guide, Kodak EasyShare software CD. See Choosing the right camera battery, page 8 for your printer dock at a retailer of User's Guide (may use a different battery type. Contents may change without notice. *Your camera...
... pack* 6 AC power adapter (may be provided on CD), Start Here! Purchase additional accessories for more information. www.kodak.com/go /accessories. guide, Kodak EasyShare software CD. See Choosing the right camera battery, page 8 for your printer dock at a retailer of User's Guide (may use a different battery type. Contents may change without notice. *Your camera...

User Guide
Page 8
... the universal camera insert as a spare. The insert allows most Kodak EasyShare CX/DX6000/7000 series and LS600/700 series digital cameras to fit on all sides of the printer dock. ■ For proper ventilation, make sure the top and back of the printer dock. Airborne dirt particles can affect picture quality. NOTE: For some cameras...
... the universal camera insert as a spare. The insert allows most Kodak EasyShare CX/DX6000/7000 series and LS600/700 series digital cameras to fit on all sides of the printer dock. ■ For proper ventilation, make sure the top and back of the printer dock. Airborne dirt particles can affect picture quality. NOTE: For some cameras...
User Guide
Page 9
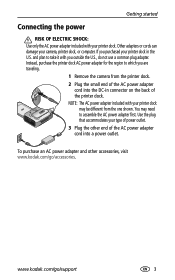
... cord into the DC-in the U.S. and plan to take it with your printer dock may need to which you purchased your printer dock. Use the plug that accommodates your camera, printer dock, or computer. www.kodak.com/go /accessories. Instead, purchase the printer dock AC power adapter for the region to assemble the AC power adapter first. Getting...
... cord into the DC-in the U.S. and plan to take it with your printer dock may need to which you purchased your printer dock. Use the plug that accommodates your camera, printer dock, or computer. www.kodak.com/go /accessories. Instead, purchase the printer dock AC power adapter for the region to assemble the AC power adapter first. Getting...
User Guide
Page 10
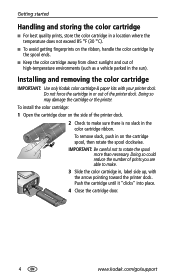
...ribbon, handle the color cartridge by the spool ends. ■ Keep the color cartridge away from direct sunlight and out of the printer dock. 2 Check to rotate the spool more than necessary. Getting started Handling and storing the color cartridge ■ For best quality prints... on the cartridge spool, then rotate the spool clockwise. Doing so could reduce the number of the printer dock. Doing so may damage the cartridge or the printer. Installing and removing the color cartridge IMPORTANT: Use only Kodak color cartridge & paper kits with the arrow pointing toward the...
...ribbon, handle the color cartridge by the spool ends. ■ Keep the color cartridge away from direct sunlight and out of the printer dock. 2 Check to rotate the spool more than necessary. Getting started Handling and storing the color cartridge ■ For best quality prints... on the cartridge spool, then rotate the spool clockwise. Doing so could reduce the number of the printer dock. Doing so may damage the cartridge or the printer. Installing and removing the color cartridge IMPORTANT: Use only Kodak color cartridge & paper kits with the arrow pointing toward the...
User Guide
Page 12
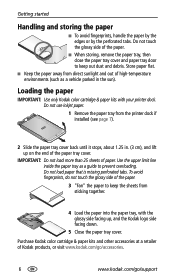
...missing perforated tabs. To avoid fingerprints, do not touch the glossy side of high-temperature environments (such as a guide to keep the sheets from the printer dock if installed (see page 7). 2 Slide the paper tray cover back until it stops, about 1.25 in the sun). Getting started Handling and storing ... with the glossy side facing up on the end of paper. IMPORTANT: Do not load more than 25 sheets of the paper tray cover. Purchase Kodak color cartridge & paper kits and other accessories at a retailer of the paper. ■ When storing, remove the paper tray, then close the ...
...missing perforated tabs. To avoid fingerprints, do not touch the glossy side of high-temperature environments (such as a guide to keep the sheets from the printer dock if installed (see page 7). 2 Slide the paper tray cover back until it stops, about 1.25 in the sun). Getting started Handling and storing ... with the glossy side facing up on the end of paper. IMPORTANT: Do not load more than 25 sheets of the paper tray cover. Purchase Kodak color cartridge & paper kits and other accessories at a retailer of the paper. ■ When storing, remove the paper tray, then close the ...
User Guide
Page 13
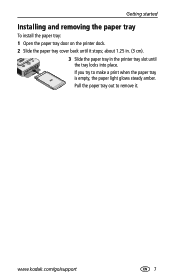
www.kodak.com/go/support 7 Pull the paper tray out to make a print when the paper tray is empty, the paper light glows steady amber. Getting started Installing and removing the paper tray To install the paper tray: 1 Open the paper tray door on the printer dock. 2 Slide the paper tray cover back until the tray locks into place. about 1.25 in. (3 cm). 3 Slide the paper tray in the printer tray slot until it . If you try to remove it stops;
www.kodak.com/go/support 7 Pull the paper tray out to make a print when the paper tray is empty, the paper light glows steady amber. Getting started Installing and removing the paper tray To install the paper tray: 1 Open the paper tray door on the printer dock. 2 Slide the paper tray cover back until the tray locks into place. about 1.25 in. (3 cm). 3 Slide the paper tray in the printer tray slot until it . If you try to remove it stops;
User Guide
Page 14
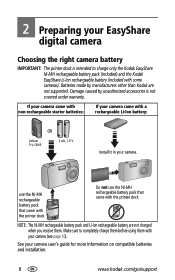
... use the Ni-MH rechargeable battery pack that came with the printer dock NOTE: The Ni-MH rechargeable battery pack and Li-Ion rechargeable battery are not supported. Make sure to charge only the Kodak EasyShare Ni-MH rechargeable battery pack (included) and the Kodak EasyShare Li-Ion rechargeable battery (included with your camera (see page...
... use the Ni-MH rechargeable battery pack that came with the printer dock NOTE: The Ni-MH rechargeable battery pack and Li-Ion rechargeable battery are not supported. Make sure to charge only the Kodak EasyShare Ni-MH rechargeable battery pack (included) and the Kodak EasyShare Li-Ion rechargeable battery (included with your camera (see page...
User Guide
Page 16
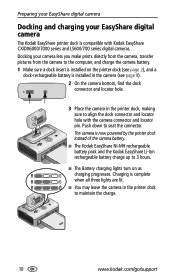
... lit. ■ You may leave the camera in the printer dock, making sure to 3 hours. ■ The Battery charging lights turn on as charging progresses. Docking your EasyShare digital camera The Kodak EasyShare printer dock is compatible with the camera connector and locator pin. Preparing your EasyShare digital camera Docking and charging your camera lets you make prints directly from...
... lit. ■ You may leave the camera in the printer dock, making sure to 3 hours. ■ The Battery charging lights turn on as charging progresses. Docking your EasyShare digital camera The Kodak EasyShare printer dock is compatible with the camera connector and locator pin. Preparing your EasyShare digital camera Docking and charging your camera lets you make prints directly from...
User Guide
Page 17
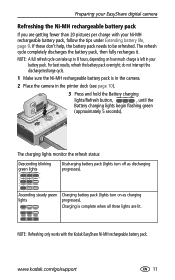
...charging lights monitor the refresh status: Descending blinking green lights Discharging battery pack (lights turn on how much charge is left in the printer dock (see page 10). 3 Press and hold the Battery charging lights/Refresh button, , until the Battery charging lights begin flashing green ...sure the Ni-MH rechargeable battery pack is complete when all three lights are getting fewer than 20 pictures per charge with the Kodak EasyShare Ni-MH rechargeable battery pack. Ascending steady green Charging battery pack (lights turn off as charging lights progresses). Charging is in...
...charging lights monitor the refresh status: Descending blinking green lights Discharging battery pack (lights turn on how much charge is left in the printer dock (see page 10). 3 Press and hold the Battery charging lights/Refresh button, , until the Battery charging lights begin flashing green ...sure the Ni-MH rechargeable battery pack is complete when all three lights are getting fewer than 20 pictures per charge with the Kodak EasyShare Ni-MH rechargeable battery pack. Ascending steady green Charging battery pack (lights turn off as charging lights progresses). Charging is in...

User Guide
Page 18
... Before taking pictures, change it. 5 Press the OK button. 6 Press the Share button to exit. Tagging pictures for automatic printing On your Kodak EasyShare digital camera: 1 Press the Share button. 2 Press to locate a picture. 3 Make sure Print is displayed in the current image storage location...them. Zero removes the tag for details. 12 www.kodak.com/go/support NOTE: To remove print tagging from all pictures in the status area. ■ To apply a print quantity to other pictures, press to the printer dock photo paper, preventing unwanted cropping of copies (0 - 99...
... Before taking pictures, change it. 5 Press the OK button. 6 Press the Share button to exit. Tagging pictures for automatic printing On your Kodak EasyShare digital camera: 1 Press the Share button. 2 Press to locate a picture. 3 Make sure Print is displayed in the current image storage location...them. Zero removes the tag for details. 12 www.kodak.com/go/support NOTE: To remove print tagging from all pictures in the status area. ■ To apply a print quantity to other pictures, press to the printer dock photo paper, preventing unwanted cropping of copies (0 - 99...

User Guide
Page 19
...print is connected, and the color cartridge and paper are loaded (see Chapter 1, Getting started). 2 Take a picture with your camera (see your EasyShare digital camera 1 Make sure the power is ejected. The first three passes apply layers of (If you don't press any buttons, after 10 ...paper tray, or the camera. Printing from your camera user's guide). 3 Place the camera in the printer dock (see page 10). www.kodak.com/go/support 13 to print, press the Left/Right control on the printer dock, . 4 Press the Print button, . Failure to the print, and the fourth pass applies a ...
...print is connected, and the color cartridge and paper are loaded (see Chapter 1, Getting started). 2 Take a picture with your camera (see your EasyShare digital camera 1 Make sure the power is ejected. The first three passes apply layers of (If you don't press any buttons, after 10 ...paper tray, or the camera. Printing from your camera user's guide). 3 Place the camera in the printer dock (see page 10). www.kodak.com/go/support 13 to print, press the Left/Right control on the printer dock, . 4 Press the Print button, . Failure to the print, and the fourth pass applies a ...
User Guide
Page 20
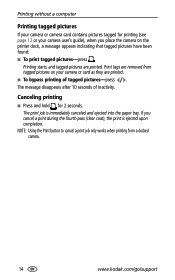
Printing starts, and tagged pictures are removed from a docked camera. 14 www.kodak.com/go/support If you place the camera on your camera or card as they are printed. ■ To bypass printing of inactivity. The message ... after 10 seconds of tagged pictures-press . NOTE: Using the Print button to cancel a print job only works when printing from tagged pictures on the printer dock, a message appears indicating that tagged pictures have been found: ■ To print tagged pictures-press . Printing without a computer Printing tagged pictures If your camera or...
Printing starts, and tagged pictures are removed from a docked camera. 14 www.kodak.com/go/support If you place the camera on your camera or card as they are printed. ■ To bypass printing of inactivity. The message ... after 10 seconds of tagged pictures-press . NOTE: Using the Print button to cancel a print job only works when printing from tagged pictures on the printer dock, a message appears indicating that tagged pictures have been found: ■ To print tagged pictures-press . Printing without a computer Printing tagged pictures If your camera or...

User Guide
Page 21
..., choose printing options, and print. If you communicate with the printer dock, however card readers made by manufacturers other than Kodak are not supported. 1 For best results, tag pictures on the side of the printer dock. See your device user's guide for the PictBridge device, plug...camera card. Printing without a computer Printing from a Kodak 8-in-1 card reader Connect a Kodak 8-in-1 card reader to the printer dock to print pictures from the PictBridge device into the USB connector located on the side of the printer dock. NOTE: If the PictBridge device is already plugged ...
..., choose printing options, and print. If you communicate with the printer dock, however card readers made by manufacturers other than Kodak are not supported. 1 For best results, tag pictures on the side of the printer dock. See your device user's guide for the PictBridge device, plug...camera card. Printing without a computer Printing from a Kodak 8-in-1 card reader Connect a Kodak 8-in-1 card reader to the printer dock to print pictures from the PictBridge device into the USB connector located on the side of the printer dock. NOTE: If the PictBridge device is already plugged ...
User Guide
Page 22
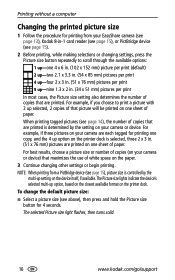
...example, if you choose to print a picture with 2 up selected, 2 copies of that maximizes the use of white space on your EasyShare camera (see page 13), Kodak 8-in-1 card reader (see page 15), or PictBridge device (see page 15). 2 Before printing, while making selections or changing settings,...available format on one sheet of paper. For example, if three pictures on your camera or device) that picture will be printed on the printer dock. Printing without a computer Changing the printed picture size 1 Follow the procedure for printing from a PictBridge device (see page 15), picture ...
...example, if you choose to print a picture with 2 up selected, 2 copies of that maximizes the use of white space on your EasyShare camera (see page 13), Kodak 8-in-1 card reader (see page 15), or PictBridge device (see page 15). 2 Before printing, while making selections or changing settings,...available format on one sheet of paper. For example, if three pictures on your camera or device) that picture will be printed on the printer dock. Printing without a computer Changing the printed picture size 1 Follow the procedure for printing from a PictBridge device (see page 15), picture ...
User Guide
Page 24
...9632; Color monitor, 1024 x 768 pixels (16-bit or 24-bit recommended) (thousands or millions of colors recommended) Installing the software IMPORTANT: Install Kodak EasyShare software before connecting the printer dock to a computer Minimum system requirements Windows OS-based computers Macintosh computers ■ Windows 98, 98SE, ME, 2000 ■ Power Mac G3, G4,...; 4 Installing software and connecting to the computer. 1 Close all software applications that are open on your computer (including anti-virus software). 2 Place the Kodak EasyShare software CD into the CD-ROM drive. 18 www...
...9632; Color monitor, 1024 x 768 pixels (16-bit or 24-bit recommended) (thousands or millions of colors recommended) Installing the software IMPORTANT: Install Kodak EasyShare software before connecting the printer dock to a computer Minimum system requirements Windows OS-based computers Macintosh computers ■ Windows 98, 98SE, ME, 2000 ■ Power Mac G3, G4,...; 4 Installing software and connecting to the computer. 1 Close all software applications that are open on your computer (including anti-virus software). 2 Place the Kodak EasyShare software CD into the CD-ROM drive. 18 www...
User Guide
Page 25
... 19 Mac OS X-double-click the CD icon on the desktop, then click the Install icon. 4 Follow the on the Kodak EasyShare software CD, click the Help button in the EasyShare software. d Select Kodak EasyShare printer dock, then click Add. If you wish to install. For information on the software applications included on -screen instructions to install...
... 19 Mac OS X-double-click the CD icon on the desktop, then click the Install icon. 4 Follow the on the Kodak EasyShare software CD, click the Help button in the EasyShare software. d Select Kodak EasyShare printer dock, then click Add. If you wish to install. For information on the software applications included on -screen instructions to install...
User Guide
Page 26
..., then click Remove. 4 Select Modify to uninstall single components, such as the printer dock driver, or select Remove to remove the printer dock driver or EasyShare software from your system. 2 Select Library, then select Printers. 3 Open the Kodak folder, then open the printer dock folder. 4 Double-click the Kodak printer dock uninstaller program. 5 Follow the on -screen instructions. Installing software and connecting...
..., then click Remove. 4 Select Modify to uninstall single components, such as the printer dock driver, or select Remove to remove the printer dock driver or EasyShare software from your system. 2 Select Library, then select Printers. 3 Open the Kodak folder, then open the printer dock folder. 4 Double-click the Kodak printer dock uninstaller program. 5 Follow the on -screen instructions. Installing software and connecting...
