
User Guide
Page 5
... 1 1 Getting started 1 Finding a location for your printer dock 1 Installing the custom camera insert 2 Connecting the power 3 Handling and storing the color cartridge 3 Installing and removing the color cartridge 4 Handling and storing the paper 5 Loading paper 6 Installing and removing the paper tray 7 2 Setting up your digital camera 8 Docking and charging your digital camera 8 Setting the picture quality 10 Tagging...
... 1 1 Getting started 1 Finding a location for your printer dock 1 Installing the custom camera insert 2 Connecting the power 3 Handling and storing the color cartridge 3 Installing and removing the color cartridge 4 Handling and storing the paper 5 Loading paper 6 Installing and removing the paper tray 7 2 Setting up your digital camera 8 Docking and charging your digital camera 8 Setting the picture quality 10 Tagging...
User Guide
Page 6
... 22 Connecting to a computer 24 Transferring pictures from your digital camera 26 Transferring pictures from the internal card reader 28 Transferring pictures from a Kodak card reader 29 Printing from a computer 30 Canceling printing 33 Uninstalling the software 34 5 Using the wireless features of your printer dock 35 Printing from a Bluetooth® wireless technology enabled device...
... 22 Connecting to a computer 24 Transferring pictures from your digital camera 26 Transferring pictures from the internal card reader 28 Transferring pictures from a Kodak card reader 29 Printing from a computer 30 Canceling printing 33 Uninstalling the software 34 5 Using the wireless features of your printer dock 35 Printing from a Bluetooth® wireless technology enabled device...
User Guide
Page 9
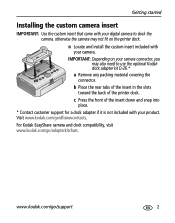
c Press the front of the printer dock. For Kodak EasyShare camera and dock compatibility, visit www.kodak.com/go /support 2 www.kodak.com/go /adapterkitchart. Getting started Installing the custom camera insert IMPORTANT: Use the custom insert that came with your digital camera to dock the camera, otherwise the camera may also need to use the optional Kodak dock adapter kit D-26.* a Remove any packing material covering...
c Press the front of the printer dock. For Kodak EasyShare camera and dock compatibility, visit www.kodak.com/go /support 2 www.kodak.com/go /adapterkitchart. Getting started Installing the custom camera insert IMPORTANT: Use the custom insert that came with your digital camera to dock the camera, otherwise the camera may also need to use the optional Kodak dock adapter kit D-26.* a Remove any packing material covering...

User Guide
Page 10
... away from the one shown. 3 Plug the AC power cord into a power outlet. Other adapters or cords can damage your camera, printer dock, or computer. 1 If a digital camera is docked, remove it. 2 Connect the AC power cord to the AC power adapter, then to the back of high-temperature environments (...85 °F (30 °C). ■ To avoid getting fingerprints on your printer dock. Handling and storing the color cartridge ■ For best quality prints, store the color cartridge in the sun). 3 www.kodak.com/go/support Getting started Connecting the power RISK OF ELECTRIC SHOCK: Use only...
... away from the one shown. 3 Plug the AC power cord into a power outlet. Other adapters or cords can damage your camera, printer dock, or computer. 1 If a digital camera is docked, remove it. 2 Connect the AC power cord to the AC power adapter, then to the back of high-temperature environments (...85 °F (30 °C). ■ To avoid getting fingerprints on your printer dock. Handling and storing the color cartridge ■ For best quality prints, store the color cartridge in the sun). 3 www.kodak.com/go/support Getting started Connecting the power RISK OF ELECTRIC SHOCK: Use only...
User Guide
Page 15
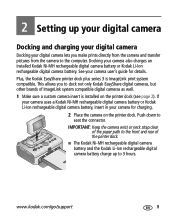
... your digital camera lets you to 3 hours. Plus, the Kodak EasyShare printer dock plus series 3 is installed on the printer dock. Push down to the computer. www.kodak.com/go/support 8 2 Setting up to dock not only Kodak EasyShare digital cameras, but other brands of the printer dock. ■ The Kodak Ni-MH rechargeable digital camera battery and the Kodak Li-Ion rechargeable digital camera battery charge up your digital camera Docking and charging your digital camera Docking your camera...
... your digital camera lets you to 3 hours. Plus, the Kodak EasyShare printer dock plus series 3 is installed on the printer dock. Push down to the computer. www.kodak.com/go/support 8 2 Setting up to dock not only Kodak EasyShare digital cameras, but other brands of the printer dock. ■ The Kodak Ni-MH rechargeable digital camera battery and the Kodak Li-Ion rechargeable digital camera battery charge up your digital camera Docking and charging your digital camera Docking your camera...

User Guide
Page 16
... refresh cycle takes up your digital camera ■ The Battery charging lights turn on as charging progresses. For Kodak EasyShare camera and dock compatibility, visit www.kodak.com/go /support do not require refreshing. For best results, refresh the battery overnight; If these tips don't help, the battery may leave the camera on the printer dock to be refreshed. Li...
... refresh cycle takes up your digital camera ■ The Battery charging lights turn on as charging progresses. For Kodak EasyShare camera and dock compatibility, visit www.kodak.com/go /support do not require refreshing. For best results, refresh the battery overnight; If these tips don't help, the battery may leave the camera on the printer dock to be refreshed. Li...

User Guide
Page 17
... lights monitor the refresh status: Descending Discharging battery (lights blinking turn on your digital camera to the printer dock paper, preventing unwanted cropping of your digital camera visit www.kodak.com/go /support 10 Setting up your camera user's guide for battery compatibility. See your digital camera 3 Press and hold the Battery charging lights/Refresh button, , until the Battery charging...
... lights monitor the refresh status: Descending Discharging battery (lights blinking turn on your digital camera to the printer dock paper, preventing unwanted cropping of your digital camera visit www.kodak.com/go /support 10 Setting up your camera user's guide for battery compatibility. See your digital camera 3 Press and hold the Battery charging lights/Refresh button, , until the Battery charging...

User Guide
Page 18
To print tagged pictures from your digital camera Tagging pictures for details. Setting up your Kodak EasyShare digital camera, see page 15. See your computer, see the camera user's guide. 1 Press the Share button on your camera, . 2 Press to locate a picture. 3 Press to highlight Print then ... the number of ImageLink system compatible cameras, see page 30. 11 www.kodak.com/go/support To remove print tagging from your camera user's guide for printing NOTE: The following procedure pertains to Kodak EasyShare digital cameras. Keep the print quantity as described...
To print tagged pictures from your digital camera Tagging pictures for details. Setting up your Kodak EasyShare digital camera, see page 15. See your computer, see the camera user's guide. 1 Press the Share button on your camera, . 2 Press to locate a picture. 3 Press to highlight Print then ... the number of ImageLink system compatible cameras, see page 30. 11 www.kodak.com/go/support To remove print tagging from your camera user's guide for printing NOTE: The following procedure pertains to Kodak EasyShare digital cameras. Keep the print quantity as described...

User Guide
Page 19
... Printing from your digital camera 1 Take a picture with your camera user's guide). 2 Place the camera on the printer dock (see page 8). When finished with your camera (see your selections, press the Print button, . The first three passes apply layers of yellow, magenta, and cyan colors to print, press the Left/Right control on the printer dock, . www.kodak.com/go...
... Printing from your digital camera 1 Take a picture with your camera user's guide). 2 Place the camera on the printer dock (see page 8). When finished with your camera (see your selections, press the Print button, . The first three passes apply layers of yellow, magenta, and cyan colors to print, press the Left/Right control on the printer dock, . www.kodak.com/go...

User Guide
Page 25
... pictures are printed on the picture size you want to print on your digital camera (see page 11). 2 Place the camera on the printer dock, or insert the memory card into the internal card reader or a connected Kodak 8-in-1 card reader (sold separately). 3 Press the Picture Size button repeatedly to select either 2 up , 4 up , or 9 up...
... pictures are printed on the picture size you want to print on your digital camera (see page 11). 2 Place the camera on the printer dock, or insert the memory card into the internal card reader or a connected Kodak 8-in-1 card reader (sold separately). 3 Press the Picture Size button repeatedly to select either 2 up , 4 up , or 9 up...

User Guide
Page 26
... copies you would like to print. 2 Place the camera on the printer dock, or insert the memory card into the internal card reader or a connected Kodak 8-in-1 card reader (sold separately). 3 Press the Picture Size button repeatedly to select either 2 up , 4 up , or 9 up on your digital camera (see page 16). 4 Press the Print button, , to...
... copies you would like to print. 2 Place the camera on the printer dock, or insert the memory card into the internal card reader or a connected Kodak 8-in-1 card reader (sold separately). 3 Press the Picture Size button repeatedly to select either 2 up , 4 up , or 9 up on your digital camera (see page 16). 4 Press the Print button, , to...
User Guide
Page 27
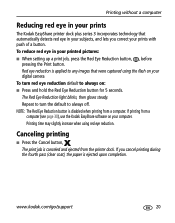
... canceled and ejected from the printer dock. Canceling printing ■ Press the Cancel button, . Red eye reduction is ejected upon completion. The print job is disabled when printing from a computer (see page 30), use the Kodak EasyShare software on your printed pictures.... Printing without a computer Reducing red eye in your prints The Kodak EasyShare printer dock plus series 3 incorporates technology that were captured using red eye reduction. To turn the default to always on your digital camera. If printing from a computer. Printing time may slightly increase when...
... canceled and ejected from the printer dock. Canceling printing ■ Press the Cancel button, . Red eye reduction is ejected upon completion. The print job is disabled when printing from a computer (see page 30), use the Kodak EasyShare software on your printed pictures.... Printing without a computer Reducing red eye in your prints The Kodak EasyShare printer dock plus series 3 incorporates technology that were captured using red eye reduction. To turn the default to always on your digital camera. If printing from a computer. Printing time may slightly increase when...

User Guide
Page 33
... option that best suits your situation: Yes, synchronize with a computer Transferring pictures from your digital camera 1 Make sure Kodak EasyShare software is installed (see page 22) and the printer dock is removed from the printer dock. ■ To stop transfer, or to return the printer dock to the synchronization options you have an optional USB card reader, disconnect it from...
... option that best suits your situation: Yes, synchronize with a computer Transferring pictures from your digital camera 1 Make sure Kodak EasyShare software is installed (see page 22) and the printer dock is removed from the printer dock. ■ To stop transfer, or to return the printer dock to the synchronization options you have an optional USB card reader, disconnect it from...

User Guide
Page 34
... transfer process. Using your printer dock with a computer Synchronizing with Kodak EasyShare software (Kodak EasyShare cameras only) Synchronizing with Kodak EasyShare software is an easy way to organize the images on your Kodak EasyShare camera without making these same changes to your images in your synchronization settings are available only to Kodak EasyShare digital cameras that support them. Each time your EasyShare camera connects to an available Wi...
... transfer process. Using your printer dock with a computer Synchronizing with Kodak EasyShare software (Kodak EasyShare cameras only) Synchronizing with Kodak EasyShare software is an easy way to organize the images on your Kodak EasyShare camera without making these same changes to your images in your synchronization settings are available only to Kodak EasyShare digital cameras that support them. Each time your EasyShare camera connects to an available Wi...

User Guide
Page 35
...button is pressed, or until the connection is no longer available. Kodak EasyShare software opens on your computer (if it is partially ejected, pull it out. Notched corner The printer dock Transfer light blinks while the pictures are being transferred. The Transfer...the card is installed). www.kodak.com/go/support 28 Using your printer dock with a computer Transferring pictures from the internal card reader 1 Make sure Kodak EasyShare software is installed (see page 24). 2 Open the accessory door on the printer dock. 3 If a digital camera is docked, remove it . IMPORTANT: Insert...
...button is pressed, or until the connection is no longer available. Kodak EasyShare software opens on your computer (if it is partially ejected, pull it out. Notched corner The printer dock Transfer light blinks while the pictures are being transferred. The Transfer...the card is installed). www.kodak.com/go/support 28 Using your printer dock with a computer Transferring pictures from the internal card reader 1 Make sure Kodak EasyShare software is installed (see page 24). 2 Open the accessory door on the printer dock. 3 If a digital camera is docked, remove it . IMPORTANT: Insert...

User Guide
Page 36
...not insert or remove a card when the printer dock is transferring pictures or if the USB device connector light is no longer available. Kodak EasyShare software opens on the printer dock. Other Kodak USB card readers may work with the printer dock plus is compatible with a computer Transferring pictures... on the side of the printer dock. 5 Insert the memory card into the card reader (see page 24). 2 Open the accessory door on the printer dock. 3 If a digital camera is a memory card in -1 card reader (sold separately). Using your printer dock with the Kodak 8-in the card slot, remove...
...not insert or remove a card when the printer dock is transferring pictures or if the USB device connector light is no longer available. Kodak EasyShare software opens on the printer dock. Other Kodak USB card readers may work with the printer dock plus is compatible with a computer Transferring pictures... on the side of the printer dock. 5 Insert the memory card into the card reader (see page 24). 2 Open the accessory door on the printer dock. 3 If a digital camera is a memory card in -1 card reader (sold separately). Using your printer dock with the Kodak 8-in the card slot, remove...

User Guide
Page 48
... transferred using the cable connection instead of your printer dock Print pictures over your Wi-Fi wireless network (EasyShare digital cameras only) 1 Add the printer dock to print from . IMPORTANT: Add the printer dock to the same network as the computer or device you have two or more information. 41 www.kodak.com/go /wifisupport and www.wi-fi.org...
... transferred using the cable connection instead of your printer dock Print pictures over your Wi-Fi wireless network (EasyShare digital cameras only) 1 Add the printer dock to print from . IMPORTANT: Add the printer dock to the same network as the computer or device you have two or more information. 41 www.kodak.com/go /wifisupport and www.wi-fi.org...

User Guide
Page 50
...Video Out (NTSC or PAL) on your digital camera (see page 8). 2 Press on the printer dock to scroll through the pictures, or press the Slide Show button, (see page 44). See your camera user's guide for details). Displaying pictures on a television With a docked camera, you can view pictures on a television, ...may not be as good as usual. 43 www.kodak.com/go/support Follow the instructions on the screen. A message appears on the camera screen asking you live in. 6 Reviewing pictures Reviewing pictures on the camera screen 1 Dock your camera to the format used in the region you to...
...Video Out (NTSC or PAL) on your digital camera (see page 8). 2 Press on the printer dock to scroll through the pictures, or press the Slide Show button, (see page 44). See your camera user's guide for details). Displaying pictures on a television With a docked camera, you can view pictures on a television, ...may not be as good as usual. 43 www.kodak.com/go/support Follow the instructions on the screen. A message appears on the camera screen asking you live in. 6 Reviewing pictures Reviewing pictures on the camera screen 1 Dock your camera to the format used in the region you to...
User Guide
Page 51
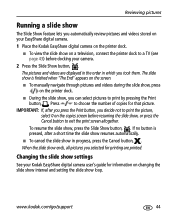
... pictures and videos during the slide show, press on the printer dock. ■ During the slide show, you automatically review pictures and videos stored on your EasyShare digital camera. 1 Place the Kodak EasyShare digital camera on the printer dock. ■ To view the slide show on the copies screen before docking your Kodak EasyShare digital camera user's guide for that picture. Press to print the picture...
... pictures and videos during the slide show, press on the printer dock. ■ During the slide show, you automatically review pictures and videos stored on your EasyShare digital camera. 1 Place the Kodak EasyShare digital camera on the printer dock. ■ To view the slide show on the copies screen before docking your Kodak EasyShare digital camera user's guide for that picture. Press to print the picture...
User Guide
Page 58
... camera user's guide for your printer dock. The printer dock can only print JPEG files in standalone mode. Troubleshooting Problem Print is too light Cause and/or solution IMPORTANT: Use only Kodak color cartridge & paper kits for details. ■ Adjust cropped pictures using Kodak EasyShare...Kodak EasyShare software on your computer. NOTE: Cropping may vary depending on your digital camera to print BMP and TIFF formats (page 30). 51 www.kodak.com/go/support See your camera user's guide for details. ■ Edit the picture using Kodak EasyShare software on your camera...
... camera user's guide for your printer dock. The printer dock can only print JPEG files in standalone mode. Troubleshooting Problem Print is too light Cause and/or solution IMPORTANT: Use only Kodak color cartridge & paper kits for details. ■ Adjust cropped pictures using Kodak EasyShare...Kodak EasyShare software on your computer. NOTE: Cropping may vary depending on your digital camera to print BMP and TIFF formats (page 30). 51 www.kodak.com/go/support See your camera user's guide for details. ■ Edit the picture using Kodak EasyShare software on your camera...
