
Use & Care Guide
Page 2
... will tell you what can kill or hurt you and others are not followed. 2 TABLE OF CONTENTS GRILL VENT HOOD SAFETY 2 INSTALLATION REQUIREMENTS 4 Tools and Parts 4 Location Requirements 4 Venting Requirements 5 Electrical Requirements 5 INSTALLATION INSTRUCTIONS 6 Prepare Location 6 Install Grill Vent Hood 7 Make Electrical Connection 7 Install Duct Cover 8 Reinstall Grease Filters 8 Complete Installation...
... will tell you what can kill or hurt you and others are not followed. 2 TABLE OF CONTENTS GRILL VENT HOOD SAFETY 2 INSTALLATION REQUIREMENTS 4 Tools and Parts 4 Location Requirements 4 Venting Requirements 5 Electrical Requirements 5 INSTALLATION INSTRUCTIONS 6 Prepare Location 6 Install Grill Vent Hood 7 Make Electrical Connection 7 Install Duct Cover 8 Reinstall Grease Filters 8 Complete Installation...
Use & Care Guide
Page 4
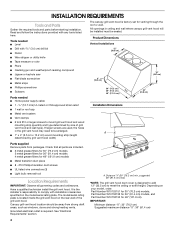
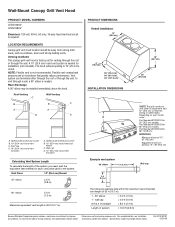
...) 30" (76.2 cm) 36" (91.4 cm) 48" (121.9 cm) Installation Dimensions 18" (45.7 cm) 24" (61.0 cm) AX Parts supplied Remove parts from strong draft areas, such as windows, doors and strong heating vents. Tools needed ■ Level ■ Drill with installation clearances specified on your...■ 8 - #10 Phillips transition duct screws ■ UL listed wire connectors (3) ■ Light bulb removal tool Location Requirements IMPORTANT: Observe all parts are used, the holes in ceiling and wall where canopy grill vent hood will be installed must be enlarged. ■ 1" x 4" (2.5 cm x...
...) 30" (76.2 cm) 36" (91.4 cm) 48" (121.9 cm) Installation Dimensions 18" (45.7 cm) 24" (61.0 cm) AX Parts supplied Remove parts from strong draft areas, such as windows, doors and strong heating vents. Tools needed ■ Level ■ Drill with installation clearances specified on your...■ 8 - #10 Phillips transition duct screws ■ UL listed wire connectors (3) ■ Light bulb removal tool Location Requirements IMPORTANT: Observe all parts are used, the holes in ceiling and wall where canopy grill vent hood will be installed must be enlarged. ■ 1" x 4" (2.5 cm x...

Use & Care Guide
Page 5
... area. ■ Do not use the damper supplied with National Electrical Code, ANSI/NFPA 70 (latest edition), or CSA Standards C22.1-94, Canadian Electrical Code, Part 1 and C22.2 No. 0-M91 (latest edition) and all local codes and ordinances. If the roof or wall cap has a damper, do not use 4" (10.2 cm...
... area. ■ Do not use the damper supplied with National Electrical Code, ANSI/NFPA 70 (latest edition), or CSA Standards C22.1-94, Canadian Electrical Code, Part 1 and C22.2 No. 0-M91 (latest edition) and all local codes and ordinances. If the roof or wall cap has a damper, do not use 4" (10.2 cm...
Use & Care Guide
Page 6
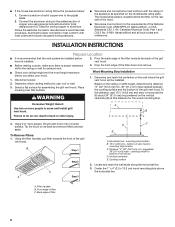
...; Wire sizes must conform with the rating of the National Electrical Code, ANSI/NFPA 70 (latest edition), or CSA Standards C22. 1-94, Canadian Electrical Code, Part 1 and C22.2 No. 0-M91 (latest edition) and all local codes and ordinances. Tip the hood on the wall where the grill vent hood will be...
...; Wire sizes must conform with the rating of the National Electrical Code, ANSI/NFPA 70 (latest edition), or CSA Standards C22. 1-94, Canadian Electrical Code, Part 1 and C22.2 No. 0-M91 (latest edition) and all local codes and ordinances. Tip the hood on the wall where the grill vent hood will be...

Use & Care Guide
Page 7
... 1. Securely fasten with 4 - #10 sheet metal screws using a #2 Phillips screwdriver. Securely fasten 4 - #10 mounting screws (not supplied) through to do so. Determine and make all parts and panels before operating. Electrical Shock Hazard Disconnect power before installing the grill vent hood. Failure to allow for the vent system. Wood mounting strip...
... 1. Securely fasten with 4 - #10 sheet metal screws using a #2 Phillips screwdriver. Securely fasten 4 - #10 mounting screws (not supplied) through to do so. Determine and make all parts and panels before operating. Electrical Shock Hazard Disconnect power before installing the grill vent hood. Failure to allow for the vent system. Wood mounting strip...

Use & Care Guide
Page 9
...vent hood controls are cool before first use. Press the fan button "down" to turn fan on grease, use Heavy Duty Degreaser Part Number 31552 (not included), a commercial degreaser designed for stainless steel. Replace grease filters before replacing it to operate several minutes after ... smoke, cooking vapors and odors from the area. GRILL VENT HOOD USE The grill vent hood is designed to -clean areas, use Heavy Duty Degreaser Part Number 31552 (not included), a commercial degreaser designed for stainless steel. Press fan button (A) "up" to order. Thermal Overload A B A. See...
...vent hood controls are cool before first use. Press the fan button "down" to turn fan on grease, use Heavy Duty Degreaser Part Number 31552 (not included), a commercial degreaser designed for stainless steel. Replace grease filters before replacing it to operate several minutes after ... smoke, cooking vapors and odors from the area. GRILL VENT HOOD USE The grill vent hood is designed to -clean areas, use Heavy Duty Degreaser Part Number 31552 (not included), a commercial degreaser designed for stainless steel. Press fan button (A) "up" to order. Thermal Overload A B A. See...
Use & Care Guide
Page 12
...specifications on our full line of appliances. ■ Installation information. ■ Use and maintenance procedures. ■ Accessory and repair parts sales. ■ Specialized customer assistance (Spanish speaking, hearing impaired, limited vision, etc.). ■ Referrals to build every new appliance.... Our consultants provide assistance with the same precision used to local dealers, repair parts distributors and service companies. Our consultants provide assistance with any questions or concerns at : Whirlpool Brand Home Appliances Customer...
...specifications on our full line of appliances. ■ Installation information. ■ Use and maintenance procedures. ■ Accessory and repair parts sales. ■ Specialized customer assistance (Spanish speaking, hearing impaired, limited vision, etc.). ■ Referrals to build every new appliance.... Our consultants provide assistance with the same precision used to local dealers, repair parts distributors and service companies. Our consultants provide assistance with any questions or concerns at : Whirlpool Brand Home Appliances Customer...
Use & Care Guide
Page 13
... TO STATE OR PROVINCE TO PROVINCE. After checking "Troubleshooting," you on the product. You will pay for Factory Specified Parts and repair labor to correct defects in accordance with published installation instructions. 11. ITEMS EXCLUDED FROM WARRANTY This limited warranty does...to correct the installation of your major appliance, to replace or repair house fuses, or to correct house wiring or plumbing. 2. Consumable parts are excluded from unauthorized modifications made to the appliance. 9. In Canada, call 1-800-253-1301. Damage resulting from accident, alteration, ...
... TO STATE OR PROVINCE TO PROVINCE. After checking "Troubleshooting," you on the product. You will pay for Factory Specified Parts and repair labor to correct defects in accordance with published installation instructions. 11. ITEMS EXCLUDED FROM WARRANTY This limited warranty does...to correct the installation of your major appliance, to replace or repair house fuses, or to correct house wiring or plumbing. 2. Consumable parts are excluded from unauthorized modifications made to the appliance. 9. In Canada, call 1-800-253-1301. Damage resulting from accident, alteration, ...
Dimension Guide
Page 1
...; elbow 2.5 ft (0.8 m) 90° elbow 5.0 ft (1.5 m) Maximum equivalent vent length is not recommended. Depending on your model, order: Part Number W10153151 for 30" (76.2 cm) models, Part Number W10153152 for 36" (91.4 cm) models, Part Number W10153153 for each vent piece used in the system. Ref. LOCATION REQUIREMENTS Canopy grill vent hood location...
...; elbow 2.5 ft (0.8 m) 90° elbow 5.0 ft (1.5 m) Maximum equivalent vent length is not recommended. Depending on your model, order: Part Number W10153151 for 30" (76.2 cm) models, Part Number W10153152 for 36" (91.4 cm) models, Part Number W10153153 for each vent piece used in the system. Ref. LOCATION REQUIREMENTS Canopy grill vent hood location...

