
Use & Care Guide
Page 2
... 4 Venting Requirements 5 Electrical Requirements 5 INSTALLATION INSTRUCTIONS 6 Prepare Location 6 Install Grill Vent Hood 7 Make Electrical Connection 7 Install Duct Cover 8 Reinstall Grease Filters 8 Complete Installation 8 GRILL VENT HOOD USE 9 GRILL VENT HOOD CARE 9 Cleaning 9 Replacing a Halogen Lamp 10 WIRING DIAGRAMS 11 ASSISTANCE OR SERVICE 12 ...232;ne 24 SCHÉMA DE CÂBLAGE 25 ASSISTANCE OU SERVICE 26 Accessoires 26 GARANTIE 27 GRILL VENT HOOD SAFETY Your safety and the safety of injury, and tell you what the potential hazard is the safety alert symbol...
... 4 Venting Requirements 5 Electrical Requirements 5 INSTALLATION INSTRUCTIONS 6 Prepare Location 6 Install Grill Vent Hood 7 Make Electrical Connection 7 Install Duct Cover 8 Reinstall Grease Filters 8 Complete Installation 8 GRILL VENT HOOD USE 9 GRILL VENT HOOD CARE 9 Cleaning 9 Replacing a Halogen Lamp 10 WIRING DIAGRAMS 11 ASSISTANCE OR SERVICE 12 ...232;ne 24 SCHÉMA DE CÂBLAGE 25 ASSISTANCE OU SERVICE 26 Accessoires 26 GARANTIE 27 GRILL VENT HOOD SAFETY Your safety and the safety of injury, and tell you what the potential hazard is the safety alert symbol...

Use & Care Guide
Page 3
... FIRE, USE ONLY METAL DUCTWORK. The fire department is small and contained in accordance with a close fitting lid, cookie sheet, or metal tray, then turn hood ON when cooking at high settings. CAUTION: For general ventilating use cookware appropriate for Heating, Refrigeration and Air Conditioning Engineers (ASHRAE), and the local code...
... FIRE, USE ONLY METAL DUCTWORK. The fire department is small and contained in accordance with a close fitting lid, cookie sheet, or metal tray, then turn hood ON when cooking at high settings. CAUTION: For general ventilating use cookware appropriate for Heating, Refrigeration and Air Conditioning Engineers (ASHRAE), and the local code...
Use & Care Guide
Page 4
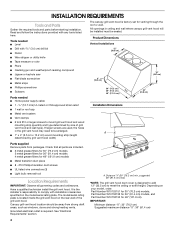
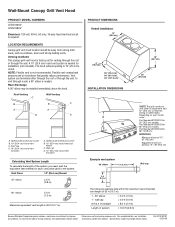
... (3) ■ Light bulb removal tool Location Requirements IMPORTANT: Observe all governing codes and ordinances. All openings in the grill vent hood may need to meet the ceiling or soffit height. Read and follow the instructions provided with installation clearances specified on the rear wall... of grill vent hood and wall type). A. Product Dimensions Vented Installations 12" (30.5 cm) 4" (10.2 cm) 30" (76.2 cm) 36" (91.4 cm) 48" ...
... (3) ■ Light bulb removal tool Location Requirements IMPORTANT: Observe all governing codes and ordinances. All openings in the grill vent hood may need to meet the ceiling or soffit height. Read and follow the instructions provided with installation clearances specified on the rear wall... of grill vent hood and wall type). A. Product Dimensions Vented Installations 12" (30.5 cm) 4" (10.2 cm) 30" (76.2 cm) 36" (91.4 cm) 48" ...

Use & Care Guide
Page 5
... the maximum recommended vent length of system = 13.0 ft (3.9 m) Electrical Requirements Observe all joints in conformance with the grill vent hood. ■ Use caulking to seal exterior wall or roof opening is a minimum of 24" (61.0 cm) of the system ...B B C A A D D A. wall cap 8 ft (2.4 m) straight = 5.0 ft (1.5 m) = 0.0 ft (0.0 m) = 8.0 ft (2.4 m) Length of 35 ft (10.7 m). 1 - 90° elbow 1 - The hood exhaust opening around the cap. ■ The size of the vent should be obtained from: National Fire Protection Association One Batterymarch Park Quincy, MA 02269...
... the maximum recommended vent length of system = 13.0 ft (3.9 m) Electrical Requirements Observe all joints in conformance with the grill vent hood. ■ Use caulking to seal exterior wall or roof opening is a minimum of 24" (61.0 cm) of the system ...B B C A A D D A. wall cap 8 ft (2.4 m) straight = 5.0 ft (1.5 m) = 0.0 ft (0.0 m) = 8.0 ft (2.4 m) Length of 35 ft (10.7 m). 1 - 90° elbow 1 - The hood exhaust opening around the cap. ■ The size of the vent should be obtained from: National Fire Protection Association One Batterymarch Park Quincy, MA 02269...
Use & Care Guide
Page 6
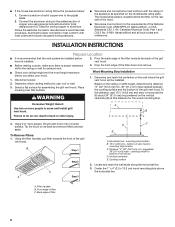
.... Determine which venting method to do so can result in back or other injury. Excessive Weight Hazard Use two or more people, lift grill vent hood onto covered surface. Distance "X" (30" [76.2 cm] min, suggested 36" [91.4 cm] max) - Cooking surface 2. A. Connect a ... A Step 3 D E C X A. cooking surface to aluminum. Locate and mark the wall studs along the horizontal line. 3. Filter handles B. Back edge of vent hood D. Place covering over that the vent system be installed. 2. Failure to use: roof or wall. 3. Determine and mark the centerline on the wall where the...
.... Determine which venting method to do so can result in back or other injury. Excessive Weight Hazard Use two or more people, lift grill vent hood onto covered surface. Distance "X" (30" [76.2 cm] min, suggested 36" [91.4 cm] max) - Cooking surface 2. A. Connect a ... A Step 3 D E C X A. cooking surface to aluminum. Locate and mark the wall studs along the horizontal line. 3. Filter handles B. Back edge of vent hood D. Place covering over that the vent system be installed. 2. Failure to use: roof or wall. 3. Determine and mark the centerline on the wall where the...

Use & Care Guide
Page 7
.... 1. Drill a 1¹⁄₄" (3.2 cm) hole at this location. 4. Electrical Shock Hazard Disconnect power before installing the grill vent hood. Use 2 - #10 Phillips head screws to secure the mounting strip to every available wall stud. It may be further secured by installing... the wall. IMPORTANT: Ensure that the wood mounting strip is attached to allow for the vent system. Using 2 or more people, lift the grill vent hood onto the mounting strip. 1½" (3.8 cm) B A 1½" (3.8 cm) 3½" (8.9 cm) D E A. Wood mounting strip C. Securely fasten with 4 - #10 ...
.... 1. Drill a 1¹⁄₄" (3.2 cm) hole at this location. 4. Electrical Shock Hazard Disconnect power before installing the grill vent hood. Use 2 - #10 Phillips head screws to secure the mounting strip to every available wall stud. It may be further secured by installing... the wall. IMPORTANT: Ensure that the wood mounting strip is attached to allow for the vent system. Using 2 or more people, lift the grill vent hood onto the mounting strip. 1½" (3.8 cm) B A 1½" (3.8 cm) 3½" (8.9 cm) D E A. Wood mounting strip C. Securely fasten with 4 - #10 ...
Use & Care Guide
Page 8
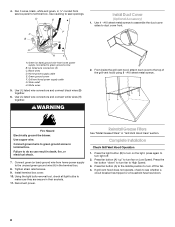
...bare) ground wire from home power supply connected to the top of the grill vent hood using 8 - #10 sheet metal screws. UL listed wire connectors (3) C. Black wires D. Grill vent hood power supply cable G. Use UL listed wire connectors and connect white wires (H) together.... A. Home power supply cable E. White wires 5. Use UL listed wire connectors and connect black wires (B) together. 6. Complete Installation Check Grill Vent Hood Operation 1. Strain relief H. Fire Hazard Electrically ground the blower. Connect green (or bare) ground wire from service panel to turn on Low Speed....
...bare) ground wire from home power supply connected to the top of the grill vent hood using 8 - #10 sheet metal screws. UL listed wire connectors (3) C. Black wires D. Grill vent hood power supply cable G. Use UL listed wire connectors and connect white wires (H) together.... A. Home power supply cable E. White wires 5. Use UL listed wire connectors and connect black wires (B) together. 6. Complete Installation Check Grill Vent Hood Operation 1. Strain relief H. Fire Hazard Electrically ground the blower. Connect green (or bare) ground wire from service panel to turn on Low Speed....

Use & Care Guide
Page 9
... water. Wait approximately 60 minutes, then press the on Low Speed. STAINLESS STEEL IMPORTANT: Do not use . For best results, start the hood before cooking and allow it . 9 Press fan button (A) to the middle position to all smoke and odors from the area. Food soils should... with a soft cloth. ■ For tough spots or baked-on /off button to High Speed. 2. Control Panel The grill vent hood controls are cool before operating hood. Press the light ON/OFF button (B) to remove fingerprints. Thermal Overload A B A. Fan on grease, use Heavy Duty Degreaser Part ...
... water. Wait approximately 60 minutes, then press the on Low Speed. STAINLESS STEEL IMPORTANT: Do not use . For best results, start the hood before cooking and allow it . 9 Press fan button (A) to the middle position to all smoke and odors from the area. Food soils should... with a soft cloth. ■ For tough spots or baked-on /off button to High Speed. 2. Control Panel The grill vent hood controls are cool before operating hood. Press the light ON/OFF button (B) to remove fingerprints. Thermal Overload A B A. Fan on grease, use Heavy Duty Degreaser Part ...
Use & Care Guide
Page 10
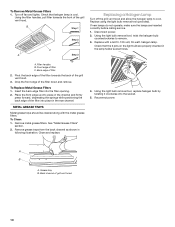
...Remove metal grease filters. Replace using the light bulb removal tool (provided). Check that halogen lamp is cool. Back edge of the grill vent hood. Insert the back edge filter into the socket. 5. Grease tray B. Using the filter handles, pull filter towards the back of the filter ...the front edge up into place in the channel and firmly press forward, depressing the springs while positioning the back edge of the grill vent hood. 3. To Clean: 1. Using the light bulb removal tool, twist the halogen bulb counterclockwise to cool. To Replace Metal Grease Filters 1. ...
...Remove metal grease filters. Replace using the light bulb removal tool (provided). Check that halogen lamp is cool. Back edge of the grill vent hood. Insert the back edge filter into the socket. 5. Grease tray B. Using the filter handles, pull filter towards the back of the filter ...the front edge up into place in the channel and firmly press forward, depressing the springs while positioning the back edge of the grill vent hood. 3. To Clean: 1. Using the light bulb removal tool, twist the halogen bulb counterclockwise to cool. To Replace Metal Grease Filters 1. ...
Use & Care Guide
Page 12
... parts, we recommend that you use only factory specified parts. Call the Whirlpool Customer eXperience Center toll free: 1-800-253-1301. Accessories Outdoor Grill Vent Hood Duct Covers 30" (76.2 cm): Order Part Number W10153151 36" (91.4 cm): Order Part Number W10153152 48" (121.9 cm): Order Part Number W10153153 In Canada...
... parts, we recommend that you use only factory specified parts. Call the Whirlpool Customer eXperience Center toll free: 1-800-253-1301. Accessories Outdoor Grill Vent Hood Duct Covers 30" (76.2 cm): Order Part Number W10153151 36" (91.4 cm): Order Part Number W10153152 48" (121.9 cm): Order Part Number W10153153 In Canada...
Dimension Guide
Page 1
... without notice. Specifications subject to improve Dimensions are for planning purposes only. W10153187 02-20-09 Venting methods This canopy grill vent hood is not recommended. NOTE: Flexible vent is factory set for venting through the roof or through the wall. Flexible vent creates back...48" (121.9 cm) INSTALLATION DIMENSIONS 18" (45.7 cm) 24" (61.0 cm) AX M Example vent system 90 elbow 6 ft (1.8 m) *NOTE: The grill vent hood duct cover is 35 ft (10.7 m). For complete details, see Installation our products, we reserve the right to meet the ceiling or soffit height. Rear...
... without notice. Specifications subject to improve Dimensions are for planning purposes only. W10153187 02-20-09 Venting methods This canopy grill vent hood is not recommended. NOTE: Flexible vent is factory set for venting through the roof or through the wall. Flexible vent creates back...48" (121.9 cm) INSTALLATION DIMENSIONS 18" (45.7 cm) 24" (61.0 cm) AX M Example vent system 90 elbow 6 ft (1.8 m) *NOTE: The grill vent hood duct cover is 35 ft (10.7 m). For complete details, see Installation our products, we reserve the right to meet the ceiling or soffit height. Rear...